|
Library Management Systems |
The cataloger’s toolkit for Vger |
Program and documentation by Gary L. Strawn, Authorities librarian, etc., Northwestern University Library.
The following trademarks, tradenames, registered trademarks, and/or service marks are used in this publication: Microsoft Windows™, Mirosoft Internet Explorer™, Microsoft Access™, Microsoft Word™ and Microsoft Outlook™—Microsoft Corporation; NOTIS™—Dynix; OCLC and Passport—OCLC Online Computer Library Center, Inc.; Eudora™ and Eudora Pro™—Qualcomm, Inc.; Unicode™—Unicode, Inc.
The expression Vger is used in this document to represent the name of a well-known client-server integrated library system.
No copyright or trademark protection is claimed on the abbreviations CTKV and CTK or the expressions cataloger’s toolkit and toolkit.
This documentation and the executable modules it describes (.EXE and .DLL files) are made available by Northwestern University to all interested parties at no cost. These modules may be incorporated into other programs developed by other parties, and freely redistributed with such other programs. The documentation may likewise be freely reproduced and redistributed. The following restrictions are placed on this free redistribution:
Those wishing to incorporate these modules into programs distributed under other conditions should contact the following organization for the terms under which this distribution may be allowed:
Technology Transfer Program
Northwestern University
1801 Maple Avenue
Evanston, IL 60208
847/491-3005
This document tells you how to use a program called the cataloger’s toolkit to perform many time-consuming, repetitive, and error-prone cataloging activities. The toolkit has special strengths in the verification and validation of bibliographic and authority records, and the creation and manipulation of authority records, but helps you perform many other operations that allow you to work with your Vger system in a more efficient manner.
Using the cataloger’s toolkit, you should be able to produce records of high quality, in less time and with less effort than before. The toolkit can be an important part of a movement to continue the creation of high-quality authority and bibliographic records in the face of reductions in staff and higher productivity standards. I’m glad you are able to use the cataloger’s toolkit, and I wish you much success in your work.
Gary L. Strawn
For years, catalogers have been looking forward to a time when the full benefits of automation would be available to them. To be sure, large libraries now have online systems, and catalogers don’t type headings onto cards any more; yet much of the early promise of automation for enhancing productivity and quality has yet to be realized. The mainframe library system was good at manipulating vast amounts of data, but was not so good at the elaborate routines, sometimes involving substantial interaction with an operator, which are required to perform operations such as the construction of an authority record or the shelflisting of a classification number.
The client/server model offered much promise for altering the library computing environment. The tasks at which a large, central computer excels—for example: managing a vast amount of data, and swiftly executing complicated keyword searches—are left to the central computer (the server), while other tasks—such as the formulation of index and record displays from data passed along by the server—are handed off to programs running on smaller computers perched on individual library workers’ desktops (the clients). Unfortunately, the full promise of the client/server model has yet to be realized: clients are often more elaborate than helpful; productivity and quality can suffer. The most recent library systems appear to offer web-based clients that are even less amenable to high production and high quality than previous systems. For as far ahead as anyone can see, there will be a need for add-on programs to help catalogers attain the highest possible levels of productivity and quality. The cataloger’s toolkit for Vger (CTKV) is one such program, developed at Northwestern University Library and made available to the general Vger community.
The cataloger’s toolkit is a program that runs in the Microsoft Windows™ operating environment. It does its work in some cases by asking Windows certain questions, and then it uses information gained from Windows to query your Vger database; in other cases, the toolkit simply manipulates some information it already has lying around. The toolkit may present information for your inspection, send a modified record back to Vger automatically, or write a record to a file for your later use. Here are some examples:
Your Vger system is not aware that the toolkit exists; you do not need to make any kind of modification to your Vger system in order to use most parts of the toolkit.2 The toolkit does not allow you to do things on your Vger system that your Vger system does not allow, or that you haven’t been granted permission to do; it simply helps you to use your Vger system in a more efficient manner.
The toolkit assists in some of the repetitive tasks of cataloging, and frees you to concentrate on the aspects of your job for which your training and experience are of vastly greater value. The toolkit does not relieve you of responsibility for the content of your records. Instead, the toolkit helps you gather the information you need to make decisions, and then carries out your informed instructions faithfully, quickly and accurately.
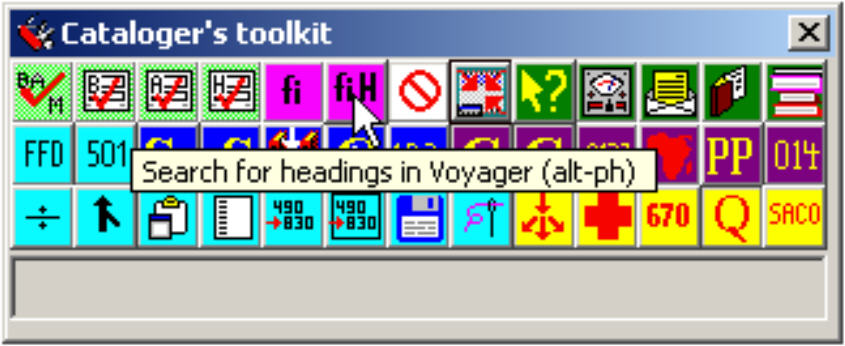
The cataloger’s toolkit is a collection of buttons with little pictures, letters, or combinations of pictures and letters on them, arrayed together on a floating toolbar. The picture on each button is intended to help you remember what the button does. (The connection between picture and function is not always clear-cut. Suggestions for changes to the icons on the buttons are always welcome.) The buttons have different background colors to identify in a general way the different functional groups into which they fall. (For example, buttons with deep blue backgrounds deal in some way with call numbers.)
In the following illustration, the toolkit is the pad of buttons in the lower left-hand corner of the screen, with the title ‘Cataloger’s toolkit’; Vger is the large window in the upper right-hand corner.
Use the Button arrangement tab on the toolkit’s Options panel to decide how many rows and columns of buttons you see on the toolkit’s main panel. You can also select which buttons appear (you don’t have to look at buttons you don’t use), and rearrange them to suit your whim. In the preceding illustration, the operator has decided to display 26 of the toolkit’s buttons. The following illustration shows a different toolkit layout; this operator has elected to display 39 buttons.
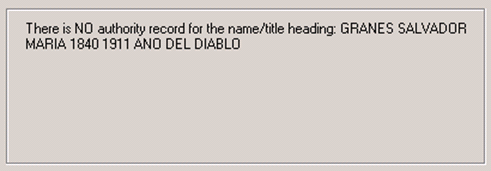
The gray area under the bottom row of buttons is a status window. The toolkit puts messages in this window from time to time. For example:
The toolkit can (at your option) be set to be always ‘on top’ of every other program you have running. It’s very easy to loose the little toolbar on a cluttered screen. (If you loose the toolkit, you should be able to find its icon in the row to the right of the Windows ‘Start’ button.) If you do not display the toolkit ‘on top’ of other windows, some of the toolkit’s messages may be buried under other programs; displaying the toolkit ‘on top’ of other programs is encouraged.
You may for one reason or another have multiple copies of the Vger cataloging client open in your Windows desktop. The cataloger’s toolkit will only ‘see’ the one that’s currently ‘on top’ of the other ones.
You may have more than one record (bibliographic, holdings, etc.) open in the Vger cataloging client at a time. The cataloger’s toolkit will only ‘see’ the one that’s currently ‘on top’ of the other ones.
The cataloger’s toolkit works with a bibliographic, holdings, authority or item record as it currently exists in the Vger database, and not necessarily as you see it in the Vger cataloging client. If you have changed a record, save the record back to Vger before using the toolkit to work with the record.
The cataloger’s toolkit does not maintain any kind of permanent connection to the Vger cataloging client; it makes no assumptions about the ‘state’ of the cataloging client. If for some reason you are forced to close and re-open the Vger cataloging client, you do not need to do anything special to the cataloger’s toolkit, such as close it and start it again; the toolkit should be able to find the newly-opened Vger cataloging client without any problem.
The cataloger’s toolkit maintains its own connections directly to the Vger database for reading and writing information. (These connections have nothing to do with the catlaoging client.) On occasion, for reasons the toolkit cannot control, one or both of these connections may be broken, and the toolkit will suddenly begin to provide unexpected results. (For example, it may tell you that a perfectly nice bibliographic record has no access fields.) If this happens, simply close the toolkit and start it again.
From time to time, you may find yourself saying ‘Why can’t the toolkit do ...?’, or ‘Wouldn’t it be nice if the toolkit could ...?’ Do not suppress these ideas for enhancements, but let them be known! Many of the buttons in the toolkit are the result of suggestions made by real live catalogers at institutions other than Northwestern University Library, prompted by the needs of the work before them; certainly, the wealth of detail offered by the toolkit is the result of countless suggestions for improvements from many institutions over many years. (For example, the validation/verification routine has been under continuous revision since it was introduced in 1994.) The program exists to make your life easier and better; take the responsibility upon yourself to pass suggestions along.
When you think you have an idea for an enhancement to the toolkit, talk it over with your local toolkit expert—the person responsible for maintaining the current version of the program. In some cases, this person may show you a way to realize your suggestion by using existing features. In other cases, this person should recognize that you have an efficiency- or quality-enhancing idea, and will (with your help) write up your idea into a suggestion, and forward the suggestion to Northwestern University Library.
The idea you have may seem at first blush to be of interest only to workers at your institution. Do not let this deter you from making the suggestion. If your idea will promote efficiency or improve quality at your institution, pass your suggestion along. It often happens that such an idea, bolstered by a few options, will produce a tool that can be used by many institutions.
Also, you will no doubt find cases where the toolkit behaves incorrectly, or reacts badly in some other manner. Please report these: you may be the first to encounter a bug or other infelicity, and your problem report may save grief on the part of many other toolkit users.
This online document should tell you everything you need to know to use the toolkit effectively. It is divided into several large sections, each dealing with a different set of tasks performed by the toolkit. In each section, there is a brief general description of the kinds of things the buttons do, followed by a detailed description of the work done by each button.
In this document, the word screen means the video monitor attached to your personal computer.
References to the left and right mouse buttons assume the native disposition of buttons under Windows. If you have reversed the left and right mouse buttons, you should mentally reverse the instructions in this manual as well.
It is assumed throughout this manual that you know how to perform common Windows operations, such as clicking buttons and selecting text.
Keys on the keyboard are named with the first letter in upper-case: Clear, Enter.
Names of buttons on the toolkit’s button pad are given in upper-case letters, often in italic: BAM button; BIG RED CROSS button.
Names of buttons on other toolkit display panels are given as they appear, within quotation marks: ‘Create authority’; ‘OK.’
If you print out this document in black and white, some of the features of the toolkit which rely on color or shades of gray will only be approximated.
![]() Exceptions and other unexpected but especially important things
to remember are marked with a ‘pointing finger’ symbol.
Exceptions and other unexpected but especially important things
to remember are marked with a ‘pointing finger’ symbol.
The illustrations in this document may fairly be assumed to show the most recent version of the item under immediate discussion. Some illustrations will reflect earlier versions of items not under immediate consideration. For example, an illustration of the verification report should show the current version of that report; but the toolkit’s toolbar visible in the same illustration may not show all buttons currently available.
When you have questions about using the toolkit, you should always look first at this online documentation. You should be able to find answers to most of your questions here. The main toolkit panel has a HELP button; you can pick up this button with the mouse and drop it on some other button, and the online documentation will open to the description of that button.
If you rest the mouse pointer over any of the toolkit’s buttons, you’ll see a very brief description of what the button does. This description also shows you the keyboard shortcut you can use instead of clicking the button.
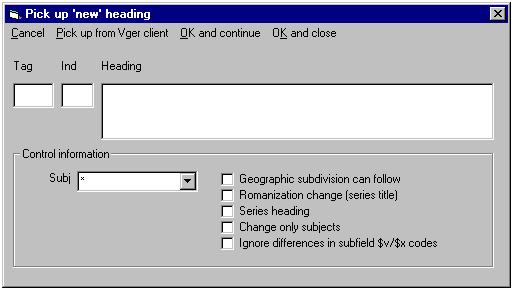
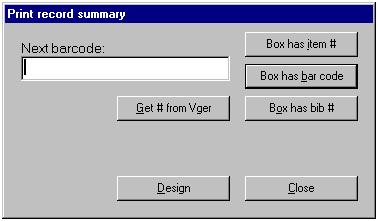
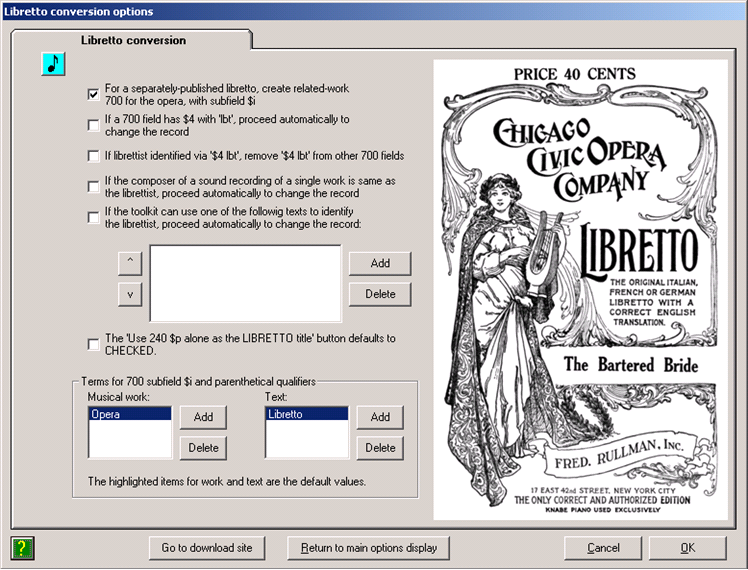
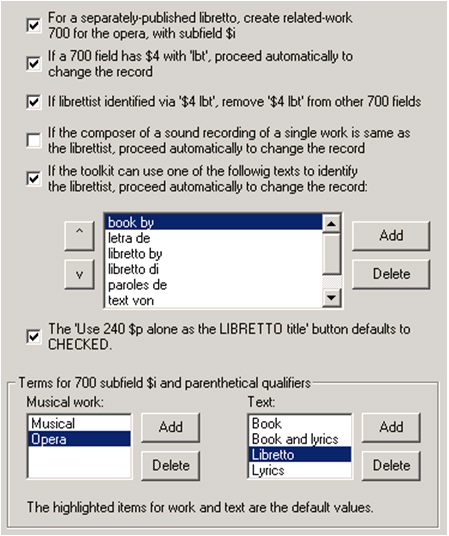
Most of the toolkit’s subsidiary panels have a ‘help’ button, with a question mark icon. If you click this button, this online documentation will open to the description of that panel. The following illustration shows the lower portion of one such form, with the ‘help’ button in the lower left corner.
Each institution should have a ‘toolkit guru,’ a person responsible for installing and maintaining the program. If you are unable to find an answer to your question in the online documentation, discuss the situation with your local toolkit expert. In many cases this person will be able to find an answer for you.
In some cases, you may wish to post a description of your problem, or a question, to an appropriate online discussion group.
If your friendly local toolkit expert and the body of toolkit users available via an online discussion list are unable to answer your question, your local toolkit expert may decide to contact the appropriate person at Northwestern University Library. (It’s easier on the programmer if each institution funnels suggestions and problems through one person.)
To summarize: When confronted with a question, always try to find the answer yourself. If this doesn’t work, contact your local toolkit expert, or other toolkit users. If all else fails, contact Northwestern University Library directly. You should not rest until you believe your problem has received a proper airing.
You’ll find the installation program for the cataloger's toolkit (and a whole bunch of other programs) at Northwestern University Library’s download site. Each program has its own folder, which you can find by clicking on the appropriate link. Here is a direct link to the folder that contains installation packages for the cataloger's toolkit.
Each installation package is a ZIP file (the contents of these ZIP files are described in more detail below). Most of the folders at the download site--including the folder for the cataloger's toolkit--contain more than one such ZIP file. If a program modifies the Vger database there is a ZIP file for each distinct build of the Vger system. The cataloger's toolkit is one such program that modifies records in a Vger database, so the folder for the toolkit contains different installers, one for each supported Vger version. You must select the toolkit installation package that is designed to work with your particular version of Vger. Or, to put the matter more precisely, you must use the toolkit installation package that exactly matches your version of the Vger ‘BatchCat’ interface. If you use an installation package for a different version of Vger, you will sooner or later see a cryptic message from Windows saying something like 'ActiveX object can't create object'; this message is your clue that you need to install a different version of the toolkit. The numbers at the start of the names of the installation packages are BatchCat version numbers, not version numbers for the toolkit; you do not want to find the most recent installation package, you want to find the appropriate installation package. To select the right installation package, you need to know your BatchCat version number.
To find your BatchCat version number, use MyComputer or the Windows Explorer to navigate to the C:\Voyager\System folder (or the System sub-folder of the Voyager installation, wherever it might be). Find the file whose name begins 'BatchCat' and has the extension 'DLL'. (If you don't display file extensions, find the file whose name begins 'BatchCat' and has the file type of 'Application extension'.) Right-click on the file name, and select 'Properties' from the pop-up context menu. The BatchCat DLL's version number will appear on one of the tabs of the Properties display; click around on the tabs to find the version number. (The specific location of the version number on the Properties display varies by Windows version.) The name of the installation package that you want to download from the toolkit folder at the Northwestern download site is the installation package that begins with this BatchCat version number.
![]() When
you install a new version of Vger—even just a patch to an existing
version—you should determine the BatchCat version number, and make
sure you have the correct version of the toolkit. Installing a new version
of Vger pretty much guarantees that you need a new version of the toolkit, too.
If there does not appear to be a version of the
toolkit for your BatchCat version (this often happens with new versions
of Vger, because you may move to the new version before Northwestern does),
contact the author of the cataloger's toolkit. If there is no version in
this folder with your BatchCat version number, don't install some other
version; instead, contact the toolkit's author at once.
When
you install a new version of Vger—even just a patch to an existing
version—you should determine the BatchCat version number, and make
sure you have the correct version of the toolkit. Installing a new version
of Vger pretty much guarantees that you need a new version of the toolkit, too.
If there does not appear to be a version of the
toolkit for your BatchCat version (this often happens with new versions
of Vger, because you may move to the new version before Northwestern does),
contact the author of the cataloger's toolkit. If there is no version in
this folder with your BatchCat version number, don't install some other
version; instead, contact the toolkit's author at once.
The cataloger’s toolkit is not updated according to a set schedule. When things are really jumping, there may be several updates a week; when things are calmer, there may be weeks between updates. You should form the habit of periodically checking Northwestern’s download site for updates, and always use the most recent version appropriate to your BatchCat version. (The toolkit's news feature tells when new features are added and bugs fixed, and also (sometimes) indicates when new versions are available.) It often happens that installing a new version of one program from Northwestern will bring with it updates to modules shared with other Northwestern programs, which means that programs installed earlier suddenly won’t start. If this happens, you’ll need to install updated versions of those other programs, too.
Note the following points if your workstation already contains some version of the cataloger’s toolkit:
Before you install the toolkit, you should install the ODBC drivers for Oracle, and define an ODBC data source for your Vger installation. This document does not describe the installation of ODBC drivers, or their configuration. Look for information about ODBC on Endeavor’s support site or in the manual for the Vger reporter client.
Identify and download the correct installation package as described here.
Before you download the correct ZIP file containing the installation program for your exact version of the BatchCat interface, you should delete any copy of the same ZIP file you may already have on your computer. Some Web browsers appear to download files and overwrite them, but they don’t actually do so; you end up with the same version of the ZIP file you started with. In addition, you should delete any copies of the three files contained within the installation ZIP file (see the next paragraph) before you un-ZIP the file you have downloaded. Some un-ZIP utilities appear to overwrite previous versions of files, but don’t actually do so. You can put the ZIP file and the un-ZIPped files into any folder that seems convenient to you.
When you’ve downloaded the installation package and un-ZIPped it, you should have the following three files, and you should be ready to install the toolkit:
![]() Depending
on the Windows permissions set on your workstation, you may need
help from a system administrator to run the toolkit's
installation program.
Depending
on the Windows permissions set on your workstation, you may need
help from a system administrator to run the toolkit's
installation program.
![]() Cancel the
toolkit, and all other programs from Northwestern University Library, before
running the installation program.
Cancel the
toolkit, and all other programs from Northwestern University Library, before
running the installation program.
Start the program setup.exe and follow the prompts; accept all of the defaults. If during the installation you are notified that you already have a more recent version of some component installed on your workstation, click the button that means "I want to keep the more recent version that I already have." The installation program will move modules into the proper places, and create entries for them in the Windows Registry.
The installation program creates an entry for the toolkit in the Windows ‘Start’ menu. The default location is:
      Start
         Programs
            Northwestern University Library
               Cataloger’s toolkit
You can of course create a shortcut on the desktop for the toolkit if you wish. The program’s main module is ‘ctk.exe’; this is located by default in this hierarchy of folders:
      Program Files
         ctk
The installation program may show you a message claiming that this or that module is in use, and installation cannot continue. If you have neglected to cancel all programs from Northwestern University Library, cancel the installation, cancel the other programs, and start again. If you have remembered to cancel all Northwestern programs before starting the installation, click the ‘Ignore’ button; and answer ‘Yes’ to the next question if you’re asked if it’s OK to proceed. You may be asked the question about ignoring the problem more than once, for various modules.
The installation program may show you a message telling you that your workstation already has a file with the same name, and the file that you already have is more recent than the one in the installation package. Your options are to keep the file you already have, or to overlay the existing file with the earlier version. In general, you should selection the option that means "I want to keep the file that I already have." There is an important exception: If you have installed the incorrect version of the toolkit and are now installing the correct version, it may well be that the version of the program's main file (ctkv.exe) that you already have is more recent than the one you're trying to install. If you're asked this question about ctkv.exe, the correct option is "I want to overlay the file that I have with the earlier version."
Some of the tools of which the toolkit is composed depend on a large number of configuration files. The first time you install the toolkit, you should go to the "Configuration" sub-folder at the toolkit download site, and download all of the files that you find there. Copy the 'ini' files into the standard folder for initialization files. (The folder varies, depending on the operating system. In Windows 2000, it’s the c:\winnt folder; in Windows XP, it’s the c:\windows folder; in more recent versions of Windows, it's c:\Users\<user name>\AppData\Local\virtualstore\windows. In the latter case, the trick is that the AppData folder is a hidden folder, so you'll have to turn on hidden folders to see it.) Copy the other configuration files into any other folder that's convenient to you. Some of these files change frequently, and others rarely change; check the download site for updates from time to time.
Immediately after installing the toolkit (and creating a shortcut, if you wish), start up the program, go to the Options dialog and do the following:
This is enough configuration to get you started. You will want to make additional changes to other parts of the Options dialog at some convenient time in the very near future.
By default, the toolkit stores its configuration in a file called ‘CTKV.INI’ located in the default Windows folder for configuration files. (The default folder for configuration files varies from one version of Windows to another.) If you want the toolkit to use a configuration file in some other location, or with another name, you can include the full name of the file following the label ‘-i’ in the shortcut you use to start the toolkit. For example, to tell the toolkit to store settings in the file ‘garysconfig.cfg’ in the ‘d:\configs\’ folder, start up the toolkit with an instruction along these lines:
If you wish, you can define a number of shortcuts to point the toolkit to several different configurations stored in various initialization files. In this manner, different operators sharing the same machine can each have a separate toolkit setup. (In more recent versions of Windows, each operator's INI files already reside in a separate folder, so this elaboration is no longer needed if multiple operators share a workstation and you have a recent Windows version.)
The first of these buttons allows you to verify the access fields in a bibliographic or authority record and validate the MARC content designation (tags, indicators, and subfield codes) in a bibliographic, authority or holdings record.3 The remaining buttons allow you to recall previously-generated reports of this work. These buttons are the BAM button, the Bibliographic BAM report button, the Authority BAM report button and the Holdings report button.
The toolkit first validates the record’s MARC content designation. For bibliographic and authority records, the toolkit also extracts search keys from appropriate fields and compares each access field to other access fields in your Vger datababse. This process, complicated though it is, normally takes just a second or two. If you have told the toolkit to do so with the appropriate options, the toolkit will automatically correct certain kinds of errors, and update the record in the Vger database.
When the toolkit has finished its work, it shows you a report that describes its work, and highlights any problems it found. This online report contains buttons to help you with any additional work that may be necessary: changing MARC coding, creating authority records, and so on. If you use the BAM button for every record you process, you can eliminate many errors in your Vger database.
To validate the MARC content designation in a record and verify its access fields, click the BAM button. (BAM stands for bibliographic and authority verification, and MARC validation.) What the toolkit does next depends on the topmost record in the Vger window.
If the topmost record is a bibliographic record or authority record, the toolkit retrieves a fresh copy of the record from Vger,4 inspects the MARC coding in the record, extracts access fields from the record, and checks each of those access fields against bibliographic and authority records in your Vger database.
If the topmost record is a holdings record, the toolkit retrieves a fresh copy of the record from Vger and inspects the MARC coding in it.
If you have asked the toolkit (through a set of configuration options) to save records that the toolkit changes during BAM, leave your computer alone after you click the BAM button, and leave it alone until you see the toolkit’s BAM report. (As part of its work, the toolkit may make changes to the record, save it back to Vger, and re-open the modified record in the cataloging client. Interfering with the computer while all this is happening will probably mean that the toolkit can’t finish its work.) If you have told the toollkit not to re-save records that it modifies during BAM, you can resume work on your computer immediately after you click the BAM button; none of the work you do will interfere with the work the toolkit is doing. In any case, the toolkit’s status window shows the access field with which it is working as it wends its way through the record; this gives you some idea of the progress the program is making. As soon as the toolkit has finished its work, it presents you with its report. (This report is described elsewhere.)
The very first time you use the BAM button, there may be a significant pause (perhaps a minute or more), as the toolkit reads your Vger tag tables and builds a ‘compressed’ version of them. After this first time, the toolkit uses its compressed version of the Vger tag tables; subsequent work with the BAM button will happen much more quickly.5
Configuration points to keep in mind
The work performed by the BAM button is controlled by a welter of BAM-related choices on the Options panel, in addition to general settings such as those on the Vger connection and NUC codes tabs.
The toolkit performs a large number of tests on the MARC content designation (tags, indicators, subfields, fixed-field codes, and values in coded subfields) of each record it inspects. These validation tests are of two basic kinds.
The amount of MARC validation the toolkit performs is entirely under your control. The toolkit comes with a set of default configuration files that perform hundreds of different tests. You may choose to remove some of these tests, and/or to define other tests.7
The rules the toolkit uses to inspect records, and the toolkit’s configuration itself, may instruct it to make certain changes to records. If this is the case, and if you have asked the toolkit to save modified records back to Vger, the toolkit will write the modified record to Vger and re-open it in the cataloging client.8 If the toolkit finds any problems in the record it can’t resolve, it prepares a list of them, which you can review later.
![]() The toolkit draws directly on the same tag tables your Vger
cataloging client reads, but it uses them in a predigested form that is easier
for the program to read than the raw Vger tag tables. Whenever you change your
local tag table files, the person in charge of the toolkit can take the appropriate
step that will migrate those changes automatically into the form that the
toolkit uses.9
The toolkit draws directly on the same tag tables your Vger
cataloging client reads, but it uses them in a predigested form that is easier
for the program to read than the raw Vger tag tables. Whenever you change your
local tag table files, the person in charge of the toolkit can take the appropriate
step that will migrate those changes automatically into the form that the
toolkit uses.9
The toolkit extracts each uniform access point from the bibliographic or authority record. The toolkit breaks each access field into its components, and verifies each piece of each access field separately. Appendix B lists the fields and subfields tested, and describes the manner in which they are handled.
The toolkit searches each of the access fields extracted from a bibliographic or holdings record against your authority and bibliographic records.
![]() In most cases, the toolkit is only looking for exact matches;
it does not attempt to find ‘fuzzy’ matches for an access field. An access field either
matches, or it doesn’t.10
In most cases, the toolkit is only looking for exact matches;
it does not attempt to find ‘fuzzy’ matches for an access field. An access field either
matches, or it doesn’t.10
At the end of all of this work:
You should use the information in the BAM report to guide your further work with the record. The verification and validation reports, and the kinds of things you might want to do next, are described in the following paragraphs.
The bibliographic and authority BAM reports are similar in most aspects. The following description of the bibliographic BAM report applies in most points to the authority BAM report as well. Those few areas in the authority BAM report that differ from the corresponding information in the bibliographic BAM report are described in a separate section.
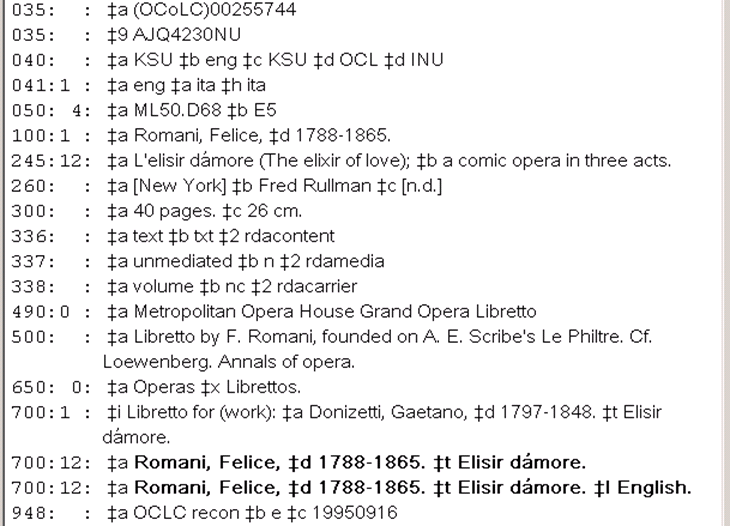
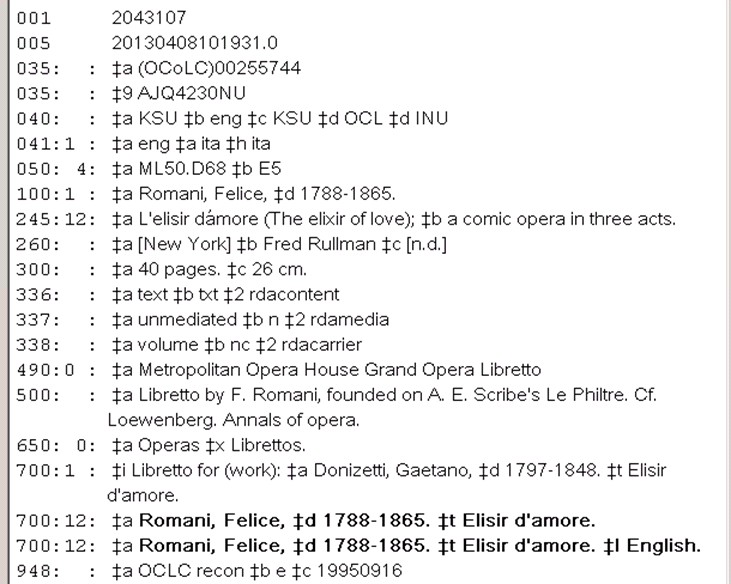
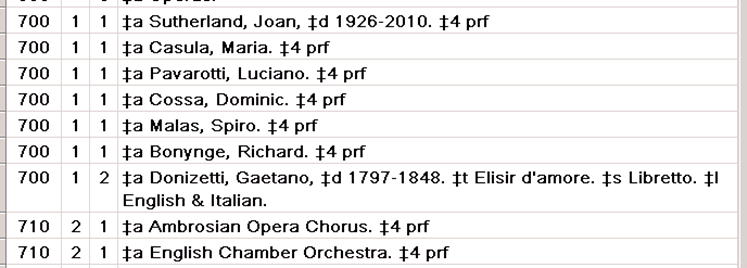
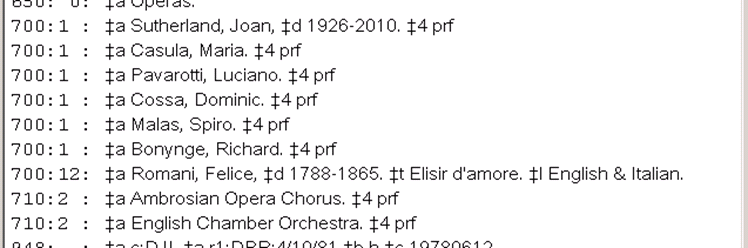
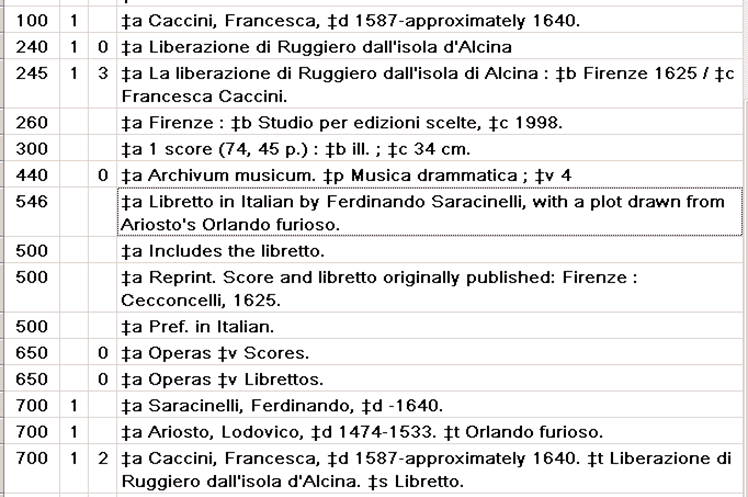
The top box of the bibliographic BAM report shows the results of the inspection of the access fields in a bibliographic record. This is the verification report. This box contains a list of the access fields the toolkit searched,13 with the tags and indicators from the original variable fields.14
The bottom box of the bibliographic BAM report shows any problems detected in the record’s MARC content designation. This is the validation report.
Between the verification and validation reports are buttons to help you work through any issues presented in the reports.
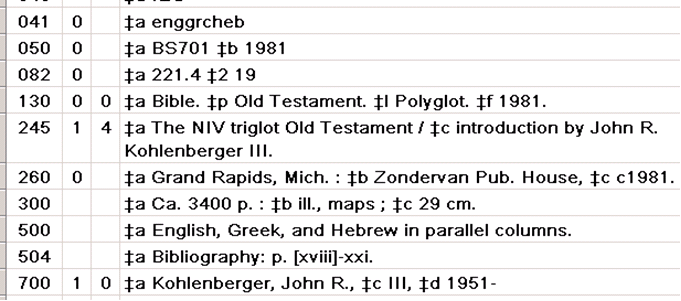
Here is a typical bibliographic BAM report. The report shows at the top the results of the verification of eight bibliographic access fields. The box at the bottom for MARC coding problems is empty, because no errors were found in this particular record.
The toolkit shows the bibliographic BAM report as soon as it has completed the inspection of a bibliographic record. You can use the Bibliographic BAM report button to recall this report whenever you like—the toolkit keeps the bibliographic verification report on file until you verify the next bibliographic record, or you cancel the program. (To remove the report from the screen temporarily, click its ‘Close’ button.)
As the toolkit encounters each access field in a bibliographic record, it compares the access field against authority and bibliographic records in your Vger database. At the end of this work, the toolkit shows you what it found out about each access field by means of a series of abstract codes. Each access field report line in the bibliographic BAM report begins with the codes that tell you how the access field measures up against other information in your database.
Although you will quickly come to recognize the most common verification codes, you’re not going to be able to remember all of them. The status box just below the list of access fields gives you a terse explanation of the codes for the currently-highlighted access field. You can get a fuller explanation of the codes assigned to a line in the verification report by clicking on a access field to highlight it, and then clicking the ‘Explain status’ button. When you do this, the toolkit pops open a window that contains (among other things) an expansion of the verification codes into real words.
The first code in any of the access field lines shows the result of the comparison of the access field to information in your authority records.
| + | The access field matches an established access field (authority 1XX field) |
| % | The access field matches an established access field (authority 1XX field), but there is a problem with the heading use codes (authority 008/14-16)15 |
| $ | The access field matches an established access field (authority 1XX field), with slight differences (differences in capitalization, subfield codes, and diacritical marks) |
| > | There is more than one authority record that appears to correspond to the bibliogoraphic access field (490 fields only) |
| H | The subdivision ‘History’ appears to be applied incorrectly |
| S | The access field matches an established access field (authority 1XX field), except for differences in the coding of subfield $v/$x |
| ? | The access field matches the text of an established access field (authority 1XX field), but the tags don’t correspond |
| 0 | The access field doesn’t match anything in any authority record.16 |
| ! | The access field matches a see reference (authority 4XX field) or something else suspicious |
| ' | The access field matches the text of a see reference (authority 4XX field), but the tags don’t correspond |
| * | The access field matches a see reference (authority 4XX field), but this match is acceptable17 |
| 5 | The access field only matches a see also reference (authority 5XX field) |
| o | The access field is a geographic name that contains ‘Metropolitan Area,’ ‘Region,’ or similar extending phrase. There is no authority record for the name as given. However, there is an authority record for the name without ‘Metropolitan Area,’ etc.18 |
If there is an authority record for the access field (for example, the first code in the report line is ‘+’ or ‘*’), the second character in the line is the ‘descriptive cataloging rules’ code from the authority record’s fixed fields (008/10). If the code is a lower-case letter, the authority record was created by a national library, or a participant in a recognized cooperative program.
| +a | The 1XX access field in the matching authority record conforms to pre-AACR standards |
| +b | The 1XX access field in the matching authority record conforms to AACR 1 standards |
| +c | The 1XX access field in the matching authority record conforms to AACR 2 standards |
| +d | The 1XX access field in the matching authority record does not follow AACR2 standards but is considered compatible with those standards |
| +n | The 1XX access field in the matching authority record was not formulated according to descriptive cataloging conventions (used for topical subject access fields) |
| +z | The 1XX access field in the matching authority record conforms to standards other than those listed above |
If this code is an uppercase letter, the authority record was created locally, and not by a national library or part of a recognized cooperative program.
| +A | The 1XX access field in the matching local authority record conforms to pre-AACR standards |
| +B | The 1XX access field in the matching local authority record conforms to AACR 1 standards |
| +C | The 1XX access field in the matching local authority record conforms to AACR 2 standards |
| +D | The 1XX access field in the matching local authority record does not follow AACR2 standards but is considered compatible with those standards |
| +N | The 1XX access field in the matching local authority record was not formulated according to descriptive cataloging conventions (used for topical subject access fields) |
| +Z | The 1XX access field in the matching local authority record conforms to standards other than those listed above |
If there is an authority record for the access field, the rules code from 008/10 may be followed by one or more of the following codes:
| # | There is a discrepancy between the numbering of a series in the bibliographic record and the series numbering information in the authority record. (This can stem from a large number of causes, such as the following: the authority record may indicate that the series is not numbered, or there may not be a numbering example, or the numbering example does not correspond with the numbering in the bibliographic record.) |
| @ | Geographic subdivision appears to have been applied incorrectly |
| 5 | One or more series treatment fields in the authority record lacks the local NUC code in subfield $5 |
| 4 | One or more series treatment fields in the authority record lacked the local NUC code in subfield $5; following instructions contained on the Options panel, the toolkit has added subfield $5 to the authority record |
| A | There is a problem with the series analysis practice |
| B | The 643 field in the series authority record does not correspond at all to the 260 field in the bibliographic record |
| C | The authority record indicates that members of the series should be classed together. |
| I | The first indicator in a personal name in the bibliographic record doesn’t match the first indicator in the authority record |
| M | The authority record indicates that members of the series should be classed with the main series |
| N | The authority record represents a ‘non-unique’ personal name, and the bibliographic record’s title cannot be found among the authority record’s 670 fields |
| P | The authority record is a provisional, preliminary or memorandum record |
| T | There is a problem with the series tracing practice |
| U | The authority record represents a ‘non-unique’ personal name, and the bibliograpic record’s title may be found among the authority record’s 670 fields |
| Z | The authority record presents additional problems. (There may be two authority records with the same access field; or a 4XX field in the authority record matches a access field in a bibliographic record.) Click the BAM button on the BAM report for more information |
If there is no authority record for the access field and if the bibliographic access field doesn’t conflict with anything in any authority record, the first code in the report line is ‘0’. The code following the ‘0’ in the BAM report line shows how the access field compares against bibliographic records in your file. (The toolkit ignores the bibliographic record from which verification started.) Here are some typical codes used in the second position in the BAM report line:
| 0 | The access field is used in no other bibliographic records |
| + | The access field is used in at least one other bibliographic record |
| * | The access field is used in at least one other bibliographic record; a geographic subdivision has been removed from the access field (see Appendix B) |
| ? | The access field matches text in a bibliographic record, but the tags don’t correspond |
If there is no authority record in the local file for a access field:
![]() The cataloger’s toolkit can not determine
that a subdivision is used properly in a particular access field; it only determines
that the subdivision is recognized as valild by the subject access field system.
The cataloger’s toolkit can not determine
that a subdivision is used properly in a particular access field; it only determines
that the subdivision is recognized as valild by the subject access field system.
Finally: Once the toolkit has collected the available information about an access field, it is able to guess whether or not it is likely that you need to pay further attention to the access field. For example, if a bibliographic access field matches an authority 1XX field, the odds are that you probably don’t need to worry about the access field. (Of course, there is always the possibility that the matching authority record is actually for a different entity.) At the other extreme, if the access field matches an authority 4XX field, you need to do further investigation, and you need to make some kind of change somewhere. The toolkit identifies the access fields that appear to be OK by giving the search terms in lower-case letters; those that seem to need further work are in upper-case letters. This visual clue allows you to concentrate on the access fields most likely to require your attention.
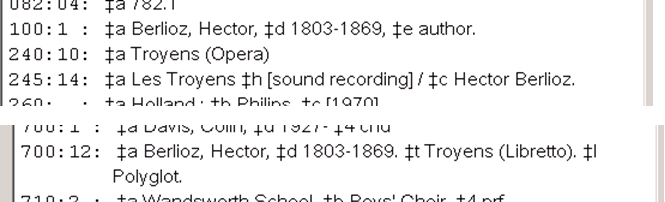
Here are some examples of complete lines from BAM reports, with explanations of each.
| +c | 100:1 | : | vauthrin jak |
In the center of the bibliographic BAM report are several buttons. Use these buttons to do further work with the access fields listed in the report. These buttons are described in the following paragraphs.
Explain status: Find out what a report line means
To see an explanation of the results of the verification of an access field, click on an access field in the list to highlight it, then click the ‘Explain status’ button. The toolkit expands the codes into words, and tells you other things about the access field.
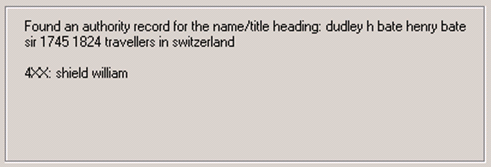
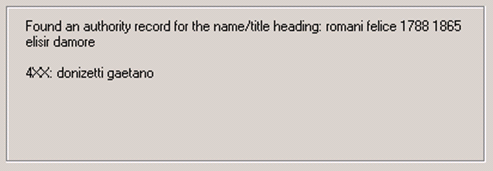
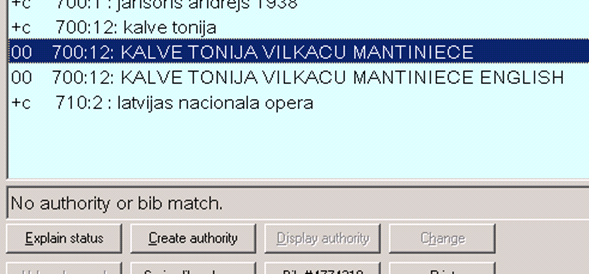
To create a new authority record, click on an access field in the bibliographic verification report for which there is not yet an authority record (i.e., a line whose first code is not a plus sign), then click the ‘Create authority’ button. (If the highlighted access field already has an authority record, this button is not active.) The toolkit formulates a proposed new authority record. What happens next depends on the choice you’ve made on the ‘New authority’ tab of the BAM button’s configuration on the Options panel.
In either case, you can immediately view the authority record from the verification report by clicking the ‘Display authority’ button.
If the access field matches anything in an authority record, you can view the authority record either by double-clicking on the access field in the list, or clicking once on the access field and then clicking the ‘Display authority’ button. The toolkit opens up a separate window and shows you a formatted version of the authority record.
The ‘Change’ button is available when any of the highlighted lines in either the list of access fields or the list of validation problems meets any of these criteria:20
In other words, the ‘Change’ button is available whenever it’s possible to make a change based on one of the highlighted lines in the BAM report, and operator approval is required before the toolkit makes the change.
To change one or more things in a record, highlight all of the lines in the access field and MARC boxes that represent things you wish the toolkit to fix, then click the ‘Change’ button. The toolkit will make all of the indicated changes, save the record to Vger, and open the modified record in the Vger cataloging client. The toolkit will also prepare a fresh version of the BAM report for you.
One final important thing to keep in mind about the ‘Change’ button: it only affects one bibliographic record. If you want to request a batch heading change to a set of records, use the yellow button with the big red cross on it.
Find out about changed access fields
You may adjust the toolkit’s configuration so that it will automatically modify access fields in certain closely-defined cases. If you have done so, and if the toolkit has followed your instructions and changed one or more access fields in a bibliographic record, you can click the ‘Hdgs changed’ button to view a list of the changed access fields.
Create an authority record for a series-like phrase
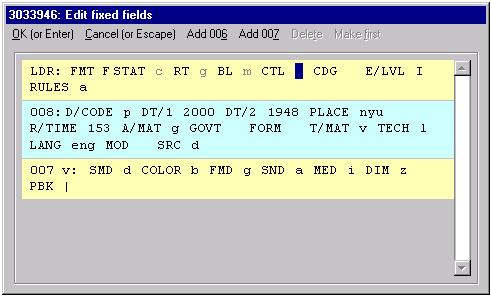
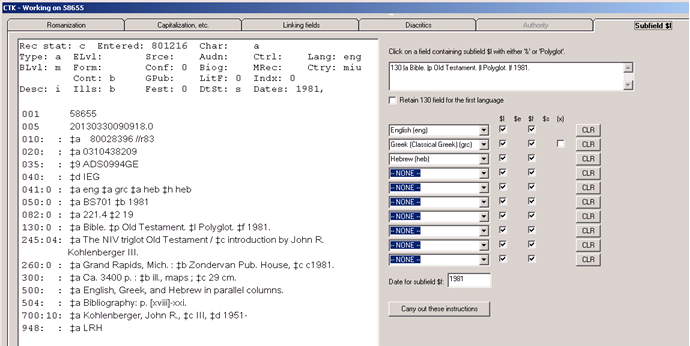
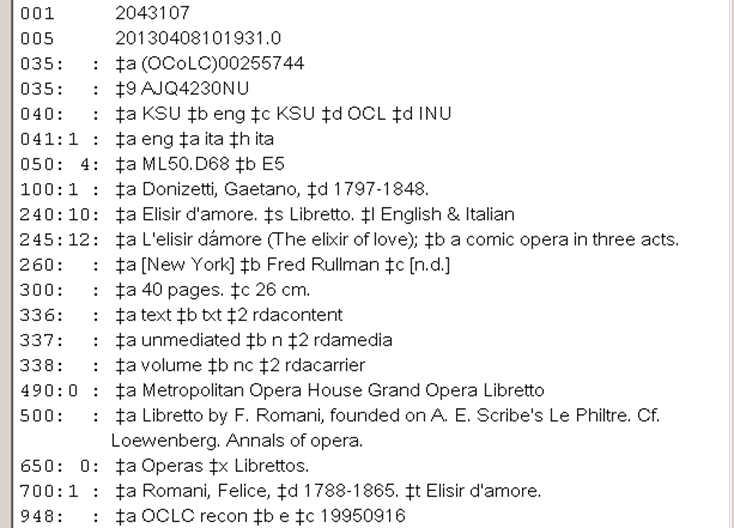
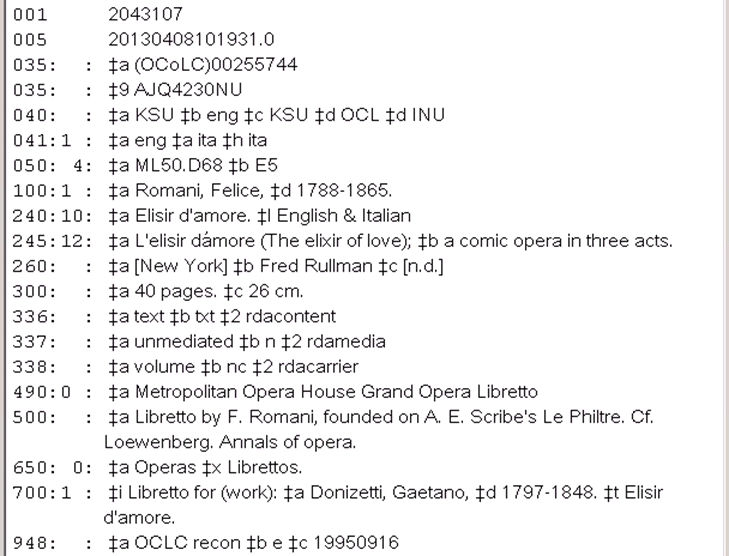
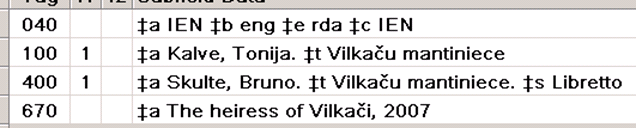
The schemes followed by both Vger and the cataloger’s toolkit for the validation of access fields do not provide a simple means for creating authority records for series-like phrases. If you wish to create an authority record for a series-like phrase, you can click the ‘Series-like phrase’ button. This button causes the toolkit to create an authority record whose 1XX field consists of the text from a ‘quoted’ 500 field in the bibliographic record.25 After the toolkit has created the record you can modify it to suit the exact needs of the situation. In most cases, you’ll need to change the 1XX field, and adjust the wording of the 667 field. The following illustration shows a typical authority record for a series-like phrase as created by the toolkit, before it has been modified by an operator. Obviously, some work is yet needed on this record.
Recall the record that was inspected
One of the buttons on the bibliographic BAM report will show the Vger record number of the record that was just inspected. If you click this button, the toolkit will call up the record in the Vger cataloging client.26
Use the ‘Print report’ button to print a copy of the bibliographic verification report. The toolkit includes your initials and date at the top of the first page of the print.
Get online help for the BAM report
The BAM report panel contains a HELP button on the left side, in about the middle; the icon on this button is an arrow and a question mark. You can drag this button to any other part of the BAM report, and this online documentation will open to the relevant point.
fi and fiH: Search an access field
Use the purple ‘fi’ and ‘fiH’ buttons to re-search an access field, and see what the Vger index looks like. (These buttons are the same as the toolkit’s FIND and FIND HEADINGS buttons.) When you click the ‘fi’ or ‘fiH’ button on the BAM report, the toolkit inserts the selected access field into the appropriate dialog box, and sets as many options for you as it can. You finish the operation in exaclty the same manner you would do if you clicked the toolkit’s FIND or FIND HEADINGS button.
S#: Find classification numbers that go with an access field
Use this button to find classification numbers that are used most often with a particular subject access field. This button will work more quickly if you install certain routines on your Vger server, and supply the appropriate information on the Options panel. If you haven’t installed the server routines the button will still work, it’ll just take longer for it to do its work.
This button is the same as the ‘S#’ button on the toolkit’s main panel, except that the button on the BAM report saves you some typing.
‘Red cross’ button: Request a batch correction
If a bibliographic access field matches an authority 4XX field (see reference tracing), you can (if you’re authorized to do so) request a batch correction by clicking the BIG RED CROSS button on the BAM report. (This button is the same as the BIG RED CROSS button on the toolkit’s main panel, except that you don’t have to call up the authority record in the Vger cataloging client first.)
‘BAM’ button: Request BAM of associated authority record
If a bibliographic access field matches an authority 1XX field, the toolkit will on option perform a secondary BAM of that authority record. If this authority BAM finds any problems (for example: 2 authority records with the same 1XX field), the BAM report for the access field will show that there is an ‘associated’ problem, and the BAM button on the BAM form will be available. If you highlight an access field that shows an associated problem and click the BAM button on the BAM form, the toolkit will show you the BAM report for the authority record. Use this authority BAM report to resolve problems aristing from the authority record.
‘e-mail’ button: E-mail the BAM report to someone
If for any reason you should wish someone else to know about anything in a BAM report, you can click this button to send the report as an e-mail message. As is the case with Vger records you send as an e-mail message via the E-MAIL button, the toolkit supplies much of the body of the message (in this case, it’s the BAM report). You determine the recipients, and supply the subject line and any annotation to accompany the BAM report.
The list of recipients you see here is the same list you see with the E-MAIL button. In the version of the BAM report sent in an e-mail message, the toolkit indicates which lines are highlighted, so you can refer in your annotation to the ‘highlighted’ line or lines as appropriate.
Use this button to display in the Vger cataloging client bibliographic records linked to the inspected record via information in 760-789 fields. If you click this button, the toolkit calls up each matching record in the Vger cataloging client. (What happens next, if anything, is up to you.) This button is only available when one of the highlighted lines in the validation report (the bottom part of the BAM report) indicates that linking information in a linking field found a match.
If the toolkit found any problems in the MARC content designation (or similar structural problems) in the record, it will describe each in the frame at the bottom of the BAM report. (If the toolkit didn’t find any errors in MARC content designation in the record, this frame is empty.)
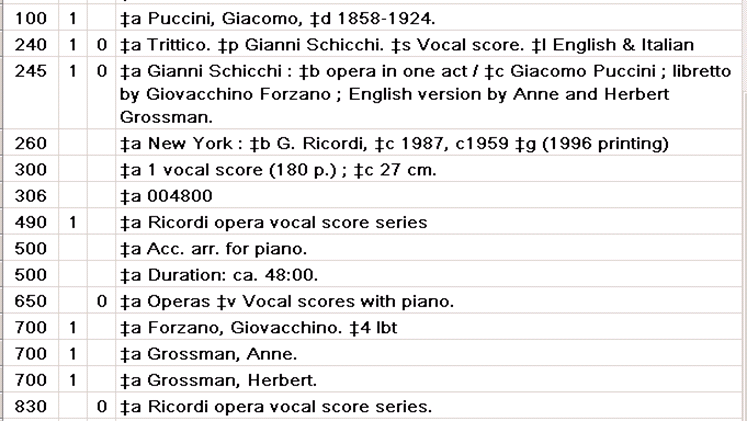
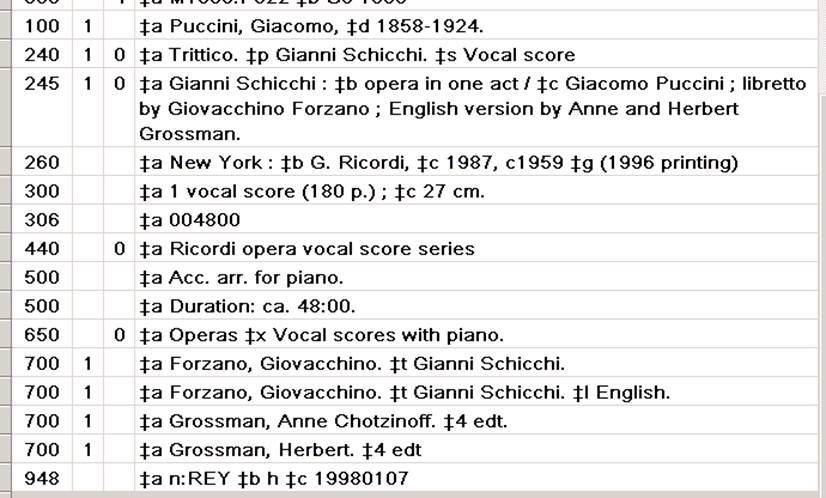
The following illustration shows a typical BAM report, superimposed on the related bibliographic record. The report of MARC coding problems is the lower window in the BAM report; the first line of the MARC coding report begins ‘If any Illustration code’.
Most of this report consists of terse descriptions of each problem. As a general rule, you should consider each of the problems (and change the record as necessary) before starting work on another record. (The Vger cataloging client will not allow you to save a record that contains any MARC coding errors,27 but the toolkit cannot force you to fix the problems it reports.)
Some of the lines in the validation report may begin with a ‘plus’ sign (+), which means that it’s possible for the toolkit to change the record for you. Consider each of the possibilities carefully. Highlight as many of the ‘+’ lines as you wish the toolkit to take care of for you, then click the ‘Change’ button.
If you have asked the toolkit to do ‘duplicate detection’ based on standard numbers in a record, and if a line in the report indicates that one of standard numbers in the current record appears in some other record, a double-click of that report line will produce a display of the related record.
If the toolkit found any problems in the record related to the use of diacritics, a double-click on any of the report lines will produce a display of the record, with a dot indicating the location of each diacritic. In the following illustration, the bibliographic record just BAMmed contains two diacritic errors: a diacritic on an unrecognized base character, and an unrecognized diacritic combiation. The record display produced by double-clicking either of the two lines shows with a black dot the placement of all diacritics in the record.
The authority BAM report describes how the access fields and MARC coding in an authority record measure up against various standards. This report is similar to the bibliographic BAM report in layout, content, and capabilities. For most matters, you should apply the description of the bibliographic BAM report to the authority BAM report.
The following description is limited to differences between the authority and bibliographic BAM reports. These differences lie chiefly in the codes assigned to access fields verified, although even here there are parallels with codes used in the bibliographic BAM report.
When you click the BAM button while the Vger cataloging client shows an authority record, the toolkit checks the record and immediately shows you the authority BAM report. You can use the Authority BAM report button to call up this report whenever you like—the toolkit keeps the authority verification report on hand until you verify the next authority record, or you cancel the program. (To remove the report from the screen temporarily, click the ‘Close’ button.)
The first code in any access field line shows the result of the comparison of the access field to access fields in other authority records. Here are some commonly-met codes:
| + | The access field matches a 1XX field in another authority record. (For 1XX fields, this is bad: is there another authority record for the same access field? For partial 4XX and all 5XX fields, this is OK.) |
| ? | The access field matches the text of a 1XX field in an authority record, but the tags don’t correspond |
| 0 | The access field doesn’t match anything in any authority record that it shouldn’t (this is OK) |
| ! | The access field matches a see reference or is otherwise suspicious (this is bad) |
| 5 | The access field only matches a 5XX field (this is OK) |
If there appears to be no conflict between the access field being tested and authority-related information (the first code in the line is ‘0’), the second (and possibly third codes) show how the access field compares against access fields in bibliographic records in your file. Here are some typical codes for the second code:
| 0 | The access field is used in no bibliographic records |
| + | The access field is used in at least one bibliographic record |
| ? | The access field matches text in a bibliographic record, but the tags don’t correspond |
As is the case with access fields in the bibliographic BAM report, the toolkit shows you access fields that seem to be OK by giving the acceptable access fields in lower-case letters; it show access fields that seem to need further work in upper-case letters. This visual clue allows you to concentrate on the access fields most likely to require your attention.
| 5 | 150: | : | low income housing |
A holdings record does not contain any access fields, so the BAM report for a holdings contains only a report of MARC coding problems. The toolkit presents MARC coding problems for a holdings record in a window that’s much simpler than the bibliographic and authority BAM reports. Here’s a typical example:
As is the case with the reports of MARC coding problems included in bibliographic and authority BAM reports, you need to work through the report of MARC coding problems in a holdings record one line at a time, and resolve each as appropriate. (It is not likely that any of the errors in a holdings BAM report can be corrected automatically, so there is no ‘Change’ button in this report.)
This group of buttons allows you to do various things related to call numbers: to build complete call numbers, to find associations between call numbers and subject access fields, to shelflist classification numbers, and to move a call number from a bibliographic to a holdings record. These buttons all have a deep blue background color.
There is a second set of buttons related to call numbers. These buttons have a dark purple background, and only work for catalogers at Northwestern University Library. These buttons are described in a separate section of this document.
From left to right in the above illustration, the buttons with the blue background do the following:
The S# button gives you a way to find the classification numbers that appear in your database most frequently with a given subject field—when that subject field is the first subject access field of its type in a bibliographic record. The image on the button means ‘go from subject to class number.’
For efficiency’s sake, this button was originally designed to call on a library of routines that resides on your Vger server. For most efficient use of this button, you should obtain this library of routines (written in the PL/SQL language, the native Oracle programming language), install the library on your server, and configure the toolkit to use the library.28 Only after the routines have been installed on the server, and you have configured the toolkit correctly, can you use this button in the most efficient manner.
![]() If you cannot or do not wish to install this library of PL/SQL routines
on your server, this button
will still work—it’ll just take longer for you to see the results.
If you cannot or do not wish to install this library of PL/SQL routines
on your server, this button
will still work—it’ll just take longer for you to see the results.
Configuration points to keep in mind
This button depends on the following information on the Options panel:
As mentioned above, this button will use a library of routines installed on your server for most efficient performance, but lacking this library it will simulate the server routine with a workstation routine. The results of the two methods should be identical, but the server routines will always take less time to finish.
When you click this button, the toolkit presents you with an inquiry form that looks something like this:
Type the access field in which you’re interested into the box in the upper frame. If the access field consists of a main heading with subject subdivisions and if you’d like to see a list of call numbers not only for the whole field but also for shorter parts of the field, give two hyphens between each segment. If you’d like to see a list of call numbers associated with any access field that begins with your text, follow your text with a percent sign, a pound sign or a question mark to indicate right truncation. If you’d like to see call numbers for a main heading plus a subdivision, skipping over any intervening subdivisions, place a pound sign (‘#’) between the main heading and the subdivision.
In the upper frame, also click the radio button that identifies the subject heading system to which your field belongs. In the next frame, click the radio button that identifies the kind of call numbers you’re interested in.30 You can ask the toolkit to search for any combination of subject heading system and call number type; but, of course, your database will probably not contain all of the combinations. (If you ask for a combination that doesn’t exist in your database, the toolkit will simply say it didn’t find anything.)
When everything appears OK, click the ‘Search’ button in the middle. Depending on the nature of your request, you will see results immediately, or after a delay of variable length.31 The following illustration shows a typical example of what you might see.
The box at the bottom of the panel now contains a summary list of the classification numbers associated with your subject access field. The classification numbers are sorted in decreasing frequency of occurrence.
To generate this summary, the toolkit routine (which operates either on the server or on the workstation, depending on the toolkit’s configuration) asks Vger for a list of the bibliographic records owned by your owning library that contain a given subject access field and have a call number of the proper type. The toolkit examines each bibliographic record, and considers only those that contain your subject access field as the first subject field.32 The toolkit generates a summary of the classification numbers assigned to records that contain your subject as the first subject and returns it to the toolkit.
When you see this report, you can do the following:
The #S button gives you a way to find the bibliographic subjects that appear in your database most frequently with a given classification number. The image on the button means ‘go from class number to subject.’
For efficiency’s sake, this button was originally designed to call on a library of routines that resides on your Vger server. For most efficient use of this button, you should obtain this library of routines (written in the PL/SQL language, the native Oracle programming language), install the library on your server, and configure the toolkit to use the library.33 Only after the routines have been installed on the server, and you have configured the toolkit correctly, can you use this button in the most efficient manner.
![]() If you cannot or do not wish to install this library of PL/SQL routines
on your server, this button
will still work—it’ll just take longer for you to see the results.
If you cannot or do not wish to install this library of PL/SQL routines
on your server, this button
will still work—it’ll just take longer for you to see the results.
Configuration points to keep in mind
This button depends on the following information on the Options panel:
As mentioned above, this button will use a library of routines installed on your server for most efficient performance, but lacking this library it will simulate the server routine with a workstation routine. The results of the two methods should be identical, but the server routines will always take less time to finish.
When you click this button, the toolkit presents you with an inquiry form that looks something like this:
Type the classification number in which you’re interested into the box in the upper frame. The toolkit assumes right truncation in all cases.
In the upper frame, also click the radio button that identifies the classification system to which the classification number belongs. In the next frame, click a radio button that identifies the subject system you’re interested in.35 You can ask the toolkit to search for any combination of subject heading system and call number type; but, of course, your database will probably not contain all of the combinations. (If you ask for a combination that doesn’t exist in your database, the toolkit will simply say it didn’t find anything.)
When everything appears OK, click the ‘Search’ button in the middle of the panel. Depending on the nature of your request, you will see results immediately, or after a delay of variable length.36 The following illustration shows a typical example.
The box at the bottom of the panel now contains a summary list of the subjects associated with your classification number. The subjects are sorted in decreasing frequency of occurrence.
To generate this summary, the toolkit routine (which operates either on the server or on the workstation, depending on the toolkit’s configuration) asks Vger for a list of the bibliographic records owned by your owning library whose holdings records contain a given call number of the proper type, and begin with the number you supply. The toolkit extracts from each bibliographic record the first subject of the proper type. It generates a summary of the subjects it finds. This summary does not identify the actual classification numbers assigned to each bibliographic record; you can only be certain that each classification number begins with the information you supply.
When you see this report, you can do the following:
This button allows you to move a call number from a bibliographic record into the holdings record without having first to copy it to the Windows clipboard. You define on the Options panel the kind of call number you want to move, and then use this button to move the call number. You can click this button when either a bibliographic or a holdings record is the active record in the Vger cataloging client’s window.
Althoug this button does perform simple duplicate detection, the button does not check to see if the transferred number places the item at the ‘best’ point in your shelflist. (The SHELFLISTING button provides more control over the assignment of call numbers.)
Configuration points to keep in mind
This button depends on the following information on the Options panel:
When you click this button, the toolkit obtains from the Vger cataloging client the number of the active record, and retrieves from Vger a fresh copy of that record. The toolkit scans the record for the kind of call number you defined on the Options panel. If it finds the appropriate kind of call number, the toolkit inserts it into the first holdings record attached to your bibliographic record that appears not already to have a call number. The toolkit saves this modified holdings record to your Vger database, and then displays it in the Vger cataloging client’s window. When you see the record in the cataloging client’s window, it has already been saved to your Vger database. If you don’t like the number for some reason, you must modify the holdings record and save the record again.
If this call number duplicates a number already in your shelflist, the toolkit will notify you with a simple message. Use the SHELFLISTING button if you wish the toolkit to fit a call number into your local shelflist.
Use this button to find the next number in a sequence and use that number as all or part of the call number in a Vger holdings record.
Configuration points to keep in mind
This button depends on the following information on the Options panel:
The toolkit retrieves the number of the active record from the Vger cataloging client, and fetches a fresh copy of the record from the Vger database. If the Vger cataloging client shows a bibliographic record, the toolkit also retrieves the first holdings record attached to the record that doesn’t already have a call number; if the Vger cataloging client shows a holdings record, the program also retrieves the bibliographic record. The toolkit extracts various pieces of information from these two records (the location from the holdings record, the leader, 006, 007 and 008 fields from the bibliographic record). The toolkit then attempts to match all this information to the definitions for sequential numbers.
If the toolkit finds exactly one match, it assigns the next number in the series.37 If the toolkit finds more than one match, the toolkit asks you to identify the pattern it should use. After it has assigned the next number, the toolkit puts the finished call number into the holdings record, saves it to the Vger database, and opens the record in the Vger cataloging client. Finally, the toolkit updates its configuration (so it knows the number it has assigned most recently).
Assigning the call number for an item is not simply a matter of finding a likely candidate in a bibliographic record and copying it into the holdings 852 field. The presence of other call numbers in the local database, the handling of earlier editions, and the classification practice for any series that appear in the bibliographic record, must all be taken into account. The toolkit’s SHELFLIST A CALL NUMBER button is not the perfect tool or most complete for working with call numbers, but it has a number of features that can make the process less tedious most of the time.
Several pieces of the toolkit’s configuration (available on the toolkit’s Options panel) are related to work with call numbers:
To begin work with a call number, click the SHELFLIST A CALL NUMBER button when the cataloging client shows a bibliographic, holdings or item record. The toolkit finds the bibliographic record and inspects the holdings records attached to it—there must be at least one holdings record with no call number. The toolkit BAMs the bibliographic record (unless you have just BAMmed the record and you haven’t changed the record since) so that it has authority records for all of the access fields (series authority records are the most important, but the toolkit needs all of them). Using your definition, the toolkit searches the bibliographic record for interesting call numbers. The toolkit checks authority records to see if any series in the bib record is classed together, and it looks for other editions of the work.
If the series is not classed together and if there are no other editions of the work and if the call number has not already been used in your holdings records and if you have told the toolkit to do so, the toolkit pastes the call number from the bib record into the holdings record, and you’re done. If any one of these conditions does not apply, the toolkit builds a list of the subject access fields in the bib record, and shows you a panel that describes what it found; the following is a typical example.
The left side of this panel is the same for all kinds of call numbers; the right side has different things for the different kinds of call numbers.
Next to many of the call numbers on the left side of this panel, you’ll find a number of buttons with identical captions; these buttons apply to the call number with which they are paired.
For Library of Congress call numbers, the right side of the panel contains the following (in addition to the basic classification number at the top):
When you click the ‘Use’ button, the toolkit will complete the call number (adding cutters if missing, and date) and paste the finished number into the holdings record.
Libraries often need to make the same change to a number of records. If a name or topical access field changes from one form to another (from the personal name ‘Ray, Satyajit, $d 1922-’ to ‘Ray, Satyajit, $d 1921-1992’, or from the MeSH term ‘Hemodialysis’ to ‘Renal Dialysis’, for example), libraries need to find and change each instance of the former access field in their records. Libraries have two principal courses of action open to them: they can ask an operator to call up each affected record and make a suitable change to each; or they can use a program to change records for them. The latter course, because it is quicker and less prone to error, should be the preferred one—provided the batch correction program is sufficiently capable, elaborate and robust.
Northwestern University Library distributes a suite of ‘batch correction’ programs for the Vger system. Working together, these programs allow you to make changes to a number of records with a single request. These programs can make a substantial difference—a positive difference—in the quality of access fields in your database. Endeavor Information Systems, Inc. also distributes a set of programs as part of its Vger system that makes changes to groups of records. The Vger and Northwestern batch correction programs differ in significant ways, both in the manner in which you make correction requests, and the manner in which programs carry out your requests.
Depending on how your institution wishes to change records, the Northwestern University Library suite of batch correction programs consists of either two or three separate programs; this means that the work of performing corrections can be a multi-step task. You will use different programs to request corrections to your records, and to perform the corrections. If you wish to review corrections before they are performed, you will use yet another program some time after you make the initial request but before the request is actually performed.
This section of this document tells you how to do the first step: how to use buttons on the cataloger’s toolkit to request a change to an access field in a set of records; this document also outlines the remainder of the correction process. Another document (Making changes to headings) tells you in detail how the other programs in the batch correction suite use the requests you make with the toolkit to change your records. The description of the correction process is divided into two parts in this manner because the majority of those engaged in this work will only perform the first step (generate the request), while only a very few people at a given institution (perhaps only one person) will be responsible for the remainder of the process (approving and performing corrections). Naturally, at some institutions, one person may be in charge of all of the steps.
There are three different ways you can request a batch correction to bibliographic access fields.
Here are some examples of the kind of changes the program can make with the BIG RED CROSS button:40
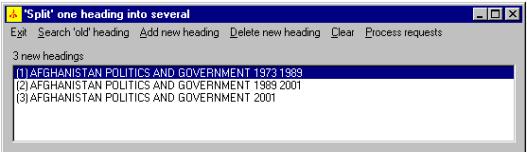
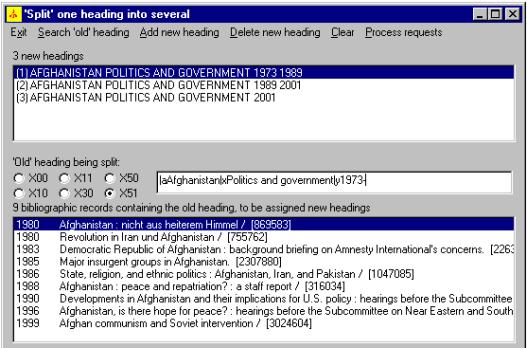
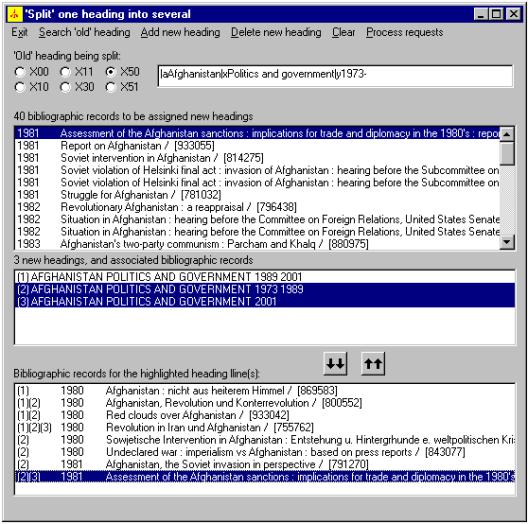
Here is an example of one kind of change the program can make with the SPLIT HEADINGS button:
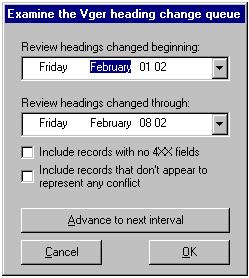
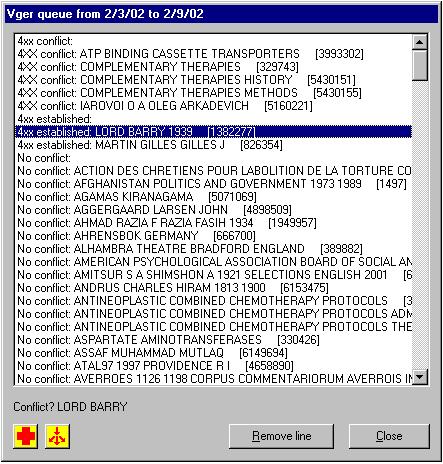
The Vger system maintains a heading change queue, with an entry for each heading that has changed.42 You can use the toolkit’s BIG RED Q button to review entries in the Vger changed heading queue, and convert them into correction requests to be processed by other parts of Northwestern’s suite of access field change programs. Each entry that you choose to process with these programs becomes either a simple request handled with the BIG RED CROSS button or an elaborate request with the SPLIT HEADINGS button. It will make the most sense to describe these other two buttons first, and then show how the BIG RED Q button relates to them.
Northwestern University Library’s batch correction programs use a system of queues to contain messages about corrections to be performed. These queues are in reality nothing more than dedicated folders on some disk drive somewhere. The messages in these queues are just text files (which you can inspect with the Windows Notepad or similar program), each of which describes one change to be made. The correction programs do their work by creating messages, moving them from one queue to another, and using instructions in them to make changes to records.
Individuial libraries have a great deal of flexibility in the implementation of queues; the person at your institution who oversees the performance of correction requests will design a workflow for batch corrections that suits the needs of your institution. (The design of queues and the shuttling of messages between them is described in some detail in the separate document Making changes to headings.) The most important thing for you to know right now is that when you use the toolkit to formulate a request for a change to access fields, you are in fact creating a small file that gets written to a folder somewhere; and this file—perhaps not until some later time—is used by another program to find and modify a group of records.
There are two basic models for setting up queues of correction messages.
In either case, an institution may choose to have corrections performed as requests are submitted (or approved, depending on the model followed at your institution), or an institution may choose to perform corrections in batches, when Vger is not too busy.43 All this means that, depending on choices made at your institution, the changes you request may or may not be reflected immediately in your database.
Several pieces of the toolkit’s configuration (available on the toolkit’s Options panel) are related to the request for a batch correction:
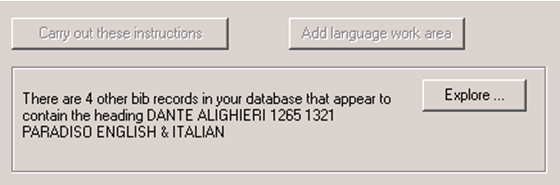
Use the BIG RED CROSS button on the toolkit to initiate a request for a general batch correction. More specifically, use this button when you want to change every occurrence of a particular access field or subdivision to one other thing.
When you click this button, the toolkit looks at the Vger cataloging client. If the active record44 in the cataloging client’s window is an authority record, the toolkit assumes you’re interested in making a correction based on that authority record. (If the active record is a bibliographic record, the toolkit may instead—depending on options you’ve chosen—display its ‘define your own correction’ form and automatically click the ‘Pick up’ button in the frame for the old access field.) The toolkit searches each 4XX field in the record against your Vger headings index, in an attempt to find reference tracings that might indicate the need for corrections. (The toolkit doesn’t limit itself to 4XX fields marked ‘old heading’—it checks them all.) If the toolkit finds a 4XX field in the authority record that matches one or more entries in your Vger headings index,45 it adds it to a list of potentially-interesting access fields. The toolkit also picks up other pieces of information from the authority record. (You won’t necessarily be able to see or modify these other pieces of information.)
When the toolkit has examined each of the 4XX fields in an authority record, it displays its findings in a small dialog box.46 The following illustration shows a sample of the dialog box the toolkit generates, based on the authority record shown in the Vger cataloging client’s window. (At the time this picture was taken, this institution’s database contained bibliographic records with subject access fields beginning ‘Poor $x Housing’.)
Here’s a picture of just the correction request form:
The ‘old heading’ frame contains information about 4XX fields that might be needed for batch corrections. The principal business in this frame is a drop-down list showing each 4XX field that matches access fields in your database. (The counter just above this drop-down box shows how many access fields are in this drop-down list—not how many bibliographic records would be affected by the correction.) If the ‘old’ heading is a 451 field (geographic name) that contains only subfield $a, the toolkit attempts to manipulate the old heading into the proper form to use in indirect subdivision, and shows this to you in the ‘Indirect subdivision form’ box.47
The ‘new heading’ frame contains the 1XX field from the authority record. If this is a 151 field that contains only subfield $a, the toolkit attempts to manipulate it into the proper form to use in indirect subdivision, and shows you this form in the ‘Indirect subdivision from’ box.48
When you see this correction request form, you can do the following things:
Under certain circumstances, you won’t be able to use the toolkit’s simple correction request form or even the split heading correction request form to create a correction request. In many of these cases, there will not be an authority record for the access field you want to change; in some cases there will be an authority record for the ‘new’ access field, but the access field you want to change will not be represented by a 4XX field in it. In still other cases, you will want to base a correction request on information in an authority record, but you will want to adjust the information in ways that are not allowed by the simple correction request form. In these and similar circumstances, you need to use the more elaborate correction request form the toolkit makes available.
You start using this form with whatever information happens to be available. If there is an authority record that contains at least some useful information, call up the authority record in the Vger cataloging client, click the BIG RED CROSS button to put the authority record’s information into the simple request form, then click the ‘Send this to special form’ button on the simple correction form. If you don’t have an authority record that contains any useful information, call up the simple request form with the BIG RED CROSS button, then click the ‘Show blank special form’ button on the simple correction request form.
The following illustration shows how the more elaborate correction request form looks when you click the ‘Show blank special form’ button on the simple request form. When you click the ‘Send this to special form’ button, the form will contain information (old heading, new heading, etc.) lifted from an authority record.
The ‘Notify’ menu choice allows you to identify the party or parties to whom e-mail notification should be sent after the correction has been processed. (The list of e-mail recipients available here is the same as the list available with the E-MAIL button.)
The main part of this form contains information distributed on three tabs. All of the information you’ll use in run-of-the-mill batch corrections is on the ‘Headings’ tab. In some cases, you’ll need information on the ‘Files, etc.’ tab or the ‘Multiples’ tab.
The ‘Headings’ tab contains information about the old and new headings. Many elaborate corrections will only have information on the ‘Headings’ tab.
This frame defines the access field that will be changed. The correction program uses this information to search Vger indexes to find candidate records, and to find candidate access fields in those records.
Give the tag and indicators as they are (or would be) found in a 4XX field in an authority record. The tag must begin with ‘4’, and the indicators must be those appropriate for use in authority records. (Follow these conventions even if an authority record does not lie behind the correction request. Think of the correction request as a virtual authority record.) The program will translate blank indicators into ‘#’ symbols so they’re easier for you to see, but the correction receiver will translate those symbols back into spaces.50
In the box for the old heading, use the vertical bar to represent the subfield delimiter. Do not use spaces around subfield codes. If you include diacritics and special characters, use the equivalents described in Appendix C. The text should begin with a subfield code: most of the time, this is going to be subfield $a.
The text of the old access field must contain all appropriate internal spaces and subfield codes, but it does not have to be properly capitalized, and you can omit diacritical marks that normalize to ‘nothing’ in Vger. The correction receiver program uses a normalized version of the old access field to search Vger and to inspect bibliographic access fields, so punctuation, capitalization and characters that will disappear anyway are irrelevant here. (If you’re pulling this information directly from an authority record, it’s simplest just to leave the field as you find it. The correction program knows how to handle diacritics, punctuation and so on.)
There are actually two boxes that contain the text of the old access field. The larger box, in line with the tag and indicator boxes, is the one that you can type into. The box just underneath this one shows the access field minus any diacritics; you can use this to make sure you’ve got the important parts right. (The frame for the new access field has a similar pair of boxes.) The toolkit changes this box as you change the text of the old access field. In the cataloger’s toolkit, this box may or may not show subfield codes, depending on your option.
To change a subject subdivision (one appearing in subfield $v, $x or $y of a subject access field) regardless of the main terms after which it appears, give a tag in the 48X group; the subdivision text should begin with the appropriate subfield code.
If the old heading is a simple geographic name—a 451 field with only subfield $a—the ‘Indirect subdivision’ box contains the indirect subdivision form of the old name. This text must begin with subfield $z. If the old access field is anything other than a simple geographic name, or if you do not wish the correction program to change the indirect subdivision form for a simple geographic name, leave the ‘Indirect subdivision’ box blank.
If the old access field could have been used as a subject heading or subject subdivision, select the appropriate subject heading system code from the drop-down list next to the ‘Subject system’ label. This list shows the code use in byte 11 of the authority 008 field. If this code is ‘z’ the list also shows the corresponding code from subfield $f of the 040 field—the same code used in subfield $2 of bibliographic subject access fields. You can also select the code ‘*’ to change all subject fields without regard to subject system code—you might select this value when changing a personal name, for example.
The Ignore $v/$x coding differences check-box instructs the program to ignore differences in the subfield codes assigned to topical and/or form/genre subdivisions. If this box is checked, the correction receiver program will change a topical or form/genre subdivision covered by the old access field whether it is coded $x or $v in a bibliographic record; if this box is not checked, the correction receiver program will change an access field that involves a topical or form/genre subdivision only if the subfield codes match.
The ‘Series heading’ check-box tells the program the old access field represents a series. If the ‘type of series code’ (008/12) in the authority record contains ‘a’, ‘b’, ‘c’ or ‘z’ this box must be checked—meaning the established access field is a series; if the type of series code contains any other value, the box must not be checked—meaning the established access field is a not series. If this box is checked, the correction receiver program looks for the access field in bibliographic 4XX and 8XX fields, in addition to the 1XX, 6XX and 7XX fields it would normally check (depending on other information in the correction request); if this box is not checked, the program does not look at bibliographic 4XX or 8XX fields.51
To change the series numbering pattern, give in the ‘Series numbering pattern’ box an example of the form of numbering you wish to change. (Examples: ‘v. 15’, ‘32’, ‘t. 2’.) The batch correction program will consider series access fields whose text matches the text given in the old heading box and whose subfield $v matches the pattern given in this box to be candidates for change. The numeric value you give in this box is not important, as long as you give some numeral; the critical thing is the relationship of the numeral to the caption (if any).
Pick up button: The access field needed as the old access field may not exist in an authority record, but only in a bibliographic record. You can’t conveniently paste the field from Vger into this form, but you can ask the program to pluck it out of a bib record for you. Call up a bibliographic record containing the former access field in the Vger cataloging client and then click this button; the toolkit will present you with a list of the access fields in the record. If you select an access field from this list, the toolkit will insert it into the work areas in the old heading frame.
Add as 4XX button: If you click this button, the toolkit will add the former access field to the authority record for the new access field as a 4XX field. (In order for this to work, there must already be an authority record for the new access field. Use the ‘New authority’ button in the ‘New new heading’ frame to create a new authority record.) You’ll normally use this button after you’ve used the PICK UP button to pull in an access field from a bibliographic record; in this case, the access field will contain normal capitalization, punctuation, diacritics and so on. If you have instead typed the old access field into this frame, you’ll want to be sure that you’ve supplied the text not in normalized form but in a form suitable for use as a 4XX field.
Add as 688 button: If you click this button, the toolkit will add the old access field to the authority record for the new access field as a 688 field, with the prefix ‘Former heading:’. (In order for this to work, there must already be an authority record for the new access field.) You’ll normally use this button after you’ve used the PICK UP button to pull in an access field from a bibliographic record; in this case, the access field will contain normal capitalization, punctuation, diacritics and so on. If you have instead typed the old access field into this frame, you’ll want to be sure that you’ve supplied the access field not in normalized form but in a form suitable for use as a 688 field.
This frame contains information pertaining to the access field that will replace the access field identified in the ‘Old heading’ frame. When the correction receiver program finds the ‘old’ access field in a bibliographic record, it will replace it with the access field defined in this frame.52
Give the tag and indicators as they are (or would be) found in a 1XX field in an authority record. The tag must begin with ‘1’, and the indicators must be those appropriate for use in authority records. (The program will translate blank indicators into ‘#’ symbols so they’re easier for you to see, but the correction receiver will translate those symbols back into spaces.53)
The text of the field must contain all appropriate subfield codes, must be properly capitalized, and must contain all diacritical marks, special characters and internal punctuation. Use the equivalents for diacritics and special characters listed in Appendix C. The text in this box should not end with a full stop or other punctuation unless that punctuation is an integral (i.e., inseparable) part of the access field.54
In the box for the new access field (the one on the same level as the Tag and Ind boxes), use the vertical bar to represent the subfield delimiter. Do not use spaces around subfield codes.
The box immediately below the box for the new heading is the program’s echo of the text of the new access field, minus the codes for any diacritical marks. This may make it easier for you to spot typographical errors. In the cataloger’s toolkit, this box may or may not show subfield codes, depending on your option.
If the old access field is a simple geographic name—a 151 field with only subfield $a—the ‘Indirect subdivision’ box contains the indirect subdivision form of the new name. If the new access field is anything other than a simple geographic name, or if you do not wish the correction program to change the indirect subdivision form for a simple geographic name, leave the ‘Indirect subdivision’ box blank. If you give an indirect subdivision form in either the old or new heading frame, you must have one in both frames.
To change a subject subdivision, give a tag in the 18X group; the subdivision text should begin with the appropriate subfield code.
To change the series numbering pattern, place in the ‘Series numbering pattern’ box the form you wish the numbering to take. The actual number you use here is not important; the numeral serves only to indicate the position of the numeral in relation to any caption.
Subject system: The subject heading system to which the new access field belongs. This box is only available if the ‘Change subject code’ box is checked. (The ‘Change subject code’ box is only available if the ‘Change only subjects’ box in the ‘Control information’ area is checked.) Only worry about the subject system box in the new heading frame if you need to change the second indicator in a bibliographic 6XX field.
The Geographic subdivision can follow check-box is only relevant when you’re changing a topical subdivision (i.e., when the ‘new’ tag is 180). If geographic subdivision can immediately follow this subdivision,55 check this box; if geographic subdivision may not immediately follow this subdivision, do not check this box. If you check this box, the correction program will move any geographic subdivision in an access field that appears to the left of the changed subdivision, so that it follows the subdivision;56 if you do not check this box, the program will not alter the placement of geographic subdivisions in changed access fields.57
Change subject code: Check this box if you wish to change an access field from one subject system to another. (Changing the subject system of an access field is a rare event.) This box is only available if the ‘Change only subjects’ box in the ‘Control information’ frame is checked.
Pick up: If there is no authority record for the new access field, the name to use as the new access field probably already exists in a bibliographic record. If you recall a bibliographic record containing the access field in the Vger cataloging client and then click this button, the toolkit will present you with a list of the access fields in the record. You can select an access field from this list and the toolkit will populate the corresponding boxes in the correction request form for you.
New authority: If there is no authority record for the new access field already, use this button to create a new authority record. (The toolkit may ask you to recall a relevant bibliographic record before it creates the new authority record.)
This frame contains information—mostly parallel to information found in an authority record’s 008 field—that controls the performance of the correction.
You occasionally need to be able to say things like these in the definition of the old heading (subfield codes used here are just examples):
Similarly, if the old heading fits into one of the categories listed just above, you may need to be able to say things like these in the definition of the new heading:
In these cases (and many similar ones), you will use one or more instances of a subfield with code ‘*’ (that’s an asterisk) to give the correction receiver program special instructions. Subfield $* is the wildcard subfield. In the old heading definition, wildcard subfields give special instructions for matching a bibliographic access field. In the new heading definition, wildcard subfields tell the correction receiver program how subfields that match wildcard definitions in the old heading should appear in the new heading.
At present, wildcard subfields are only available in access fields that begin with subfield $a; but the wildcard technique cannot be applied to subfield $a itself.
Wildcard subfields may contain various pieces of information, depending on the needs and context of an individual change request. Most of this information is provided as codes rather than as literal text. The following table describes the kinds of things that may appear in a wildcard subfield, in the order in which they must appear. Each is described in more detail in the following sections.
Literal text and a count of the number of occurrences cannot appear in the same wildcard subfield. Most wildcard subfields will only need one or two of these pieces of information. When present, the pieces of information must be in this order: group code, subfield code, count, literal text.
Unless the wildcard subfield contains literal text, it must not contain any spaces. Literal text in a wildcard subfield may only contain spaces if they follow the equals sign.
The examples in this section show the application of wildcard subfields to subject access fields—specially, LCSH access fields—because wildcard subfields are most useful when changing subject access fields. Although the wildcard technique is not likely to be needed in other contexts, it can in fact be used with all types of access fields.
Whenever you include wildcard subfields in a correction request, you should perform the correction request as a test and carefully examine the correction receiver program’s logs before you perform the correction request as part of a production job.
Wildcard subfields in the definition of the old heading tell the correction receiver how to find matching bibliographic subfields.
For some corrections, you will want to specify only part of the text of a subfield. When this is the case, give the subfield code as the first character in the subfield, followed by an equals sign and the text of the subfield; use an asterisk on either the left or the right end of the text (or both) to show where the program should allow truncation.
If the literal text includes an asterisk to indicate truncation, the asterisk may be paired with an underscore character or ‘#’ symbol to tell the program that a space is required at the truncation point.
Examples of old headings with wildcard subfields
As the program matches bibliographic subfields to wildcard definitions in the old heading, it extracts those matching subfields and moves them to a holding area; these subfields are skipped subfields.
If there are two or more groups of skipped subfields that need to be handled as independent entities, you can use group codes in the wildcard subfield. Most correction requests with wildcard subfields will not need to use group codes.
The correction receiver program extracts bibliographic subfields that match wildcard subfields in the old heading specification—skipped subfields—and holds them in a separate place. Wildcard subfields in the new heading specification tell the program where skipped subfields belong in the replacement field. Skipped subfields removed from the old heading don’t show up in the new heading unless you tell the correction receiver where to put them. Let’s have that last thought again: The correction receiver program only adds skipped subfields to the new heading if the specification for the new heading tells the program where they belong.
This is an important point, probably the most critical one in the definition of correction requests with wildcard subfields, so here it is a third time: Bibliographic subfields that match wildcard subfields in the definition of the old heading will only appear in the replacement bibliographic access field if the definition of the new heading also contains wildcard subfields.
Here’s yet another way to say the same thing: If you use wildcard subfields in the definition of the old heading, the corresponding bibliographic subfields will disappear unless you use wildcard subfields in the new heading to tell the program where to put them.
It only makes sense to include wildcard subfields in the definition of the new heading if you include wildcard subfields in the definition of the old heading, but you can include wildcard subfields in the old heading definition without including them in the new heading definition. If you include wildcard subfields in the old heading definition but not in the new heading definition, any skipped subfields will disappear from the changed access field. If wildcard subfields in the new heading definition do not provide for some of the subfields skipped from the old heading, those subfields will not appear in the replacement access field.
In the definition of the new heading, use wildcard subfields to tell the program where to insert the skipped subfields. Wildcard subfields in the new heading specification may contain nothing, one or more subfield codes, or subfield codes plus the numeral 1 or 2.
The correction receiver program inspects the new heading definition from left to right, and inserts skipped subfields pulled from the old heading as it comes to each wildcard subfield in the new heading definition. The skipped subfields that match any given wildcard subfield in the new heading definition appear in the changed bibliographic access field in the same relative order they had in the original bibliographic string.
Once a skipped subfield has been accounted for by a wildcard subfield in the new heading definition, it plays no further part in the formulation of the new heading; each skipped subfield will only appear once in the replacement access field. If the program runs out of skipped subfields before it runs out of wildcard subfields in the new heading, the program ignores the remaining wildcard subfields in the new heading; if the correction receiver program runs out of wildcard subfields in the new heading before it has disposed of all of the skipped subfields, it discards the remaining skipped subfields.
an access field in a bibliographic record may contain subfields beyond the reach of an old heading definition that contains wildcard subfields. As is the case for correcction requests that do not involve wildcard subfields, the correction receiver program carries such subfields forward into the replacement access field without change.
By default, the correction receiver places all subfields skipped from the bibliographic access field into a common pool. When the correction receiver is constructing the new access field, it draws subfields from that common pool. This is probably what you want most of the time; most correction requests will not need the elaborate technique described in this section. In rare circumstances you may find it necessary or useful to divide the skipped subfields from the old bibliographic access field into groups, and to handle each group separately when constructing the new bibliographic access field. To make this possible, you can include an optional group code in some or all of the wildcard subfields in a correction request.
A group code is an uppercase letter (A to Z) given as the first character in a wildcard subfield. (In other words, a group code precedes everything else in the wildcard subfield.) Different wildcard subfields can share the same group code. A wildcard subfield in an old heading definition can contain only one group code, but a wildcard subfield in a new heading definition can contain more than one group code.
As it happens, the correction receiver program requires group codes in all wildcard subfields, but it supplies its own default group code if there isn’t an explicit one. That’s why most correction requests with wildcard subfields don’t need group codes—most requests can rely on the program’s default behavior. In a correction request with wildcard subfields with but no explicit group codes, all subfields skipped out of the bibliographic access field are in the default group, and the wildcard subfields in the new heading draw from the default group. Most of the examples of wildcard subfields in this documentation don’t have group codes, but rely instead on the program to supply its default code; most of the time, putting all skipped subfields into a single (default) group is exactly right.
If you need to use group codes in your correction request, it is probably best if you use group codes in all of the wildcard subfields. This is not required, but the use of group codes in all wildcard subfields of an elaborate request may make it easier for you to work out what is supposed to happen.
The following example shows a moderately elaborate scheme for group codes. This example is given for purposes of illustration only. While this correction will work as described, there is no reason to believe that this example represents something that you ought to do in your own database.
A wildcard subfield in an old heading specification may contain more than one subfield code unless the wildcard subfield contains literal text. The correction receiver program skips any subfield with any of the indicated codes that occur at this point. Any numerals included in the wildcard subfield apply to the aggregate of subfields that match the wildcard definition.
A wildcard subfield in a new heading specification may also contain more than one subfield code. The correction receiver program inserts at this point any subfields with any of these codes that match the group code specification. The subfields in the new bibliographic access field are in the same relative positions they had in the original bibliographic access field. Any numerals included in the wildcard subfield apply to the aggregate of subfields that match the wildcard definition.
A wildcard subfield in a new heading specification may contain more than one group code. The correction receiver inserts at this point any subfields with the appropriate subfields that exist in any of the specified groups. The subfields in the new bibliographic access field are in the same relative positions they had in the original access field within each of the groups of subfields in the original access field.
You will only occasionally supply information on the ‘Files, etc.’ tab. Most of the time, this tab will be empty. The tab’s caption tells you whether or not the boxes on this tab contain any information.
You can use information on this tab to ask the correction receiver program to do two different things when it is performing a batch correction. Although these two things are not directly related, you will often find that you need to consider both of them to carry out a particular action. Both of these topics are discussed in more detail below.
Input file of records to correct
When presented with a standard correction request, the correction receiver program, using the ‘old’ heading as its guide, searches the appropriate Vger index or indexes and draws up a list of candidate records. The program then applies the correction definition to each of the candidate records. This scheme works just fine for a standard correction, in which one ‘old’ heading or subdivision is exchanged for another, and all access fields that contain the ‘old’ heading are to be changed. Access fields and subdivisions are contained in Vger tables, and the correction receiver program can easily formulate an SQL statement to find candidate records.
However, building a list of everything under a given access field doesn’t work in every case.
There are several techniques—techniques beyond the reach of the correction receiver program—that allow you to identify a set of records, and save them. For example:
If you are able in some manner to identify the records you wish the program to consider for a correction, and can save that set of record numbers in a file, you can give the name of this file in the ‘Input file of records to correct’ box on the ‘Files, etc.’ tab as part of the definition of a correction. At the same time you do this, you need to supply two additional pieces of information.
As it begins its work on a correction request, the correction receiver program considers the contents of the ‘Input file of records to correct’ box. If the program finds a file name there, it opens the file and applies a series of tests in an attempt to determine whether the file contains MARC records or Vger record numbers.
In this manner, if you supply a file of record numbers, the program generates an initial list of records of interest. If the ‘Yes’ button in the ‘Merge records in file with results of a search?’ box is checked, or if you did not supply any file of record numbers at all, the program searches the Vger for suitable bibliographic records, and adds them to the lilst of candidates.
Having done this work, the correction receiver program retrieves from your Vger database a fresh copy of each record in the list of candidate records, and applies to that record the remainder of the correction definition. The primary work of the correction receiver program takes place without reference to the manner in which the candidate record was identified—it handles records named in a file and records retrieved via an index in exactly the same manner.
Supplementary validation rules file
You will occasionally want to make changes to parts of records other than access fields and subject subdivisions. In such cases, you may be able to use the capabilities of a special tool, a validation tool, to achieve the result you wish. Normal changes to access fields do not need to call on the services of the validation tool.
The cataloger’s toolkit makes use of a validation tool that inspects the content designation (tags, indicators, codes and so on) in MARC records, and reports problems that it finds. (Many other programs from Northwestern University Library use this same module.) The interesting thing about the validation tool, from the point of view of batch corrections, anyway, is that it is able not only to inspect records, but also to change them. The validation tool can change many parts of records that the basic correction receiver program—the part that operates on access fields and subject subdivisions—cannot touch. The range of transformations possible with the validation tool, while not infinite, is large; if you need to make a change to a set of records other than a change to an access field, you will often find that the validation tool can do the job for you.
The validation tool draws on a set of rules when it does its work. The rules employ ‘if-then’ logic that can restrict a change to records that meet certain criteria; the rules also allow for multi-part actions. If you wish to use the validation tool to modify your records as part of the work of the correction receiver, you must construct the appropriate rules for the validation tool to use, and you must tell the correction receiver program where it can find those rules.
The validation tool applies a single set of basic rules to all of the records it handles (as identified on the Validation tab of its Options panel). If you ask the correction receiver program to pass your records through the validation tool, the tool will use the same basic set of rules on each record it handles. You can if you wish also define a supplementary file of rules for the tool to apply only to one set of records. The supplementary rules file used with one correction request might ask for a certain fixed-field code to be changed—perhaps changed only if a certain code is already present in that position; another supplementary rules file might ask for a note to be added to a record that does not already contain such a note. Within the confines of the abilities of the validation tool, it is up to you to decide what changes you want to make.
If you wish to use this capability, create a configuration file that contains the supplementary rule or rules you have in mind. The file can have any name that seems reasonable to you, and can reside in any folder to which the correction receiver program will have access. Supply this name in the ‘Supplementary validation rules file’ box on the ‘Files, etc.’ tab.
If you wish to use this capability, you must also configure the correction receiver program to perform validation. See the documentation for the correction receiver program for more information on the configuration of that program.
You will supply information on the ‘Multiples’ tab when a single access field in a bibliographic record is to become two or more access fields. For example, if you use the toolkit’s ‘split heading’ button to create a correction request, you might indicate that a single access field is to become two or more access fields. In this case, the first of the new headings shows up on the ‘Headings’ tab, and the remainder appear on the ‘Multiples’ tab.
The following illustration shows an example of what this tab looks like when an operator has indicated that one bibliographic access field should become two access fields after correction. The first of the ‘new’ access fields is on the ‘Headings’ tab, and the remaining access field is on the ‘Multiples’ tab.
You can select in turn each of the access fields from the list on the Multiples tab. (The label just above the list tells you how many terms are in the list.) As you do this, the display in the Tag, Indicators and Field boxes changes to match; these boxes always show the currently-highlighted new access field, ready for editing.
When an access field’s definition is highlighted, you can:
At any time, you can define an additional new access field by supplying an appropriate tag, indicators and field text, and then clicking the ‘Add as new’ button.
Wildcard subfields and ‘multiple’ corrections
The definitions of old and new headings included in a ‘multiple’ correction may contain wildcard subfields of exactly the same form as wildcard subfields included in definitions of simpler changes.
As described in the section on wildcard subfields, the correction receiver program holds subfields found in the old bibliographic field that correspond to wildcard subfields in the old heading definition in a separate work area, and makes use of them as directed by wildcard subfields in the definition of the new heading. The correction receiver program can apply these extraced subfields to access fields that are part of a ‘multiple’ correction. Each of the new access fields defined in such a correction has access to a fresh list of the extracted subfields; so the same subfield or set of subfields from the old heading can be used in more than one new heading.
Subfields that lie to the right of the definition of the old heading are carried forward into all of the replacement access fields.
In certain circumstances, the capabilities of the BIG RED CROSS button will not meet the need for a correction. The SPLIT HEADINGS button allows you to define corrections with additional characteristics. Use this button when:
At present the SPLIT HEADINGS button only works for ‘standard’ corrections, those that involve the replacement of the leftmost subfields in an access field with new text. (The majority of corrections fall into this category.) There is no doubt that, in the future, the concept will be expanded to other kinds of corrections (for example, the replacement of one topical or form subdivision with any eof several others).
The SPLIT HEADINGS button offers you much more flexibility than the BIG RED CROSS button does; but this means that you must do more work to formulate your correction request. You must identify the access field to be changed, the access field(s) to which that access field should be changed, and the records that should be changed.
When you click the SPLIT HEADINGS button, the toolkit shows you a special form:
The general manner of proceeding is to fill in the form from top to bottom. When you’re all done, you’ll ask that the corrections you’ve defined be performed.
At any time during the definition of split heading correction request(s), you can select ‘Notify’ from the menu to identify the party or parties to whom e-mail notification should be sent after the correction has been processed. (The list of e-mail recipients available here is the same as the list available with the E-MAIL button.)
First, you need to build a list of the new access fields that will replace the old access field. To do this, select the menu’s ‘Add new heading’ choice. The toolkit presents you with a second form.
You can identify each new heading in one of two ways:
When the definition of one ‘new’ heading meets your approval, do one of these:
Here’s the top part of the split-heading panel, with three new headings listed:
Next, you need to identify the ‘old’ heading—the heading to be changed. You can either:
Make sure that you select the type of access field from the group of radio buttons to the left of the old heading box. If the wrong radio button is checked, the correction program won’t be able to find the correct access fields in the records it inspects, but it may find things to change that you don't intend.
After you’ve supplied the ‘old’ heading, select ‘Search old heading’ from the window’s menu. The toolkit searches Vger for bibliographic records that contain the access field, and lists them in the ‘bibliographic records’ window.63 Each line contains the date of publication (from the record’s 008 field), the title (or the first part of the title) and the Vger record number (at the end, in brackets). If at any time you wish to see the full display of one of these bibliographic records, just double-click on the title.
The following illustration shows the top part of the split-heading form. Threre are 3 possible new headings, and 9 bibliographic records that contain the old heading. They’re listed in ascending order by date and title.
Now it’s really time to get to work. You need to define which access field or access fields should end up in each bibliographic record.
As is the case with bibliographic records listed in the top box, you can double-click a line in the bottom box if you want to see the full bibliographic record for any reason.
The following illustration shows the same form again. Note these changes:
Two lines in the top box and one line in the middle box are shown highlighted in this illustration; a click of the double ‘down’ arrow button would assign the bibliographic record to the second and third access fields, and move the line for this bibliographic record from the middle box to the bottom box.
(Note that this illustration has been constructed to display the capabilities of the correction request form; the actual corrections shown are almost certainly not the ones that would actually be made.)
If you want to see the bibliographic record for any title listed in either the middle or the bottom box, double-click on its line. (Seeing the whole record may help you decide how to handle it.)
Continue in this manner until you have assigned as many of the bibliographic records to single access fields or combinations as you wish. You may be left with some bibliographic lines in the middle box to which you have not assigned any access fields. The correction process will not touch these unassigned bibliographic records in any way; if they contain the ‘old’ heading before the correction, they will continue to contain the old heading after it.
If you make a mistake, you can undo it.
At the end of all of this work, you should have in the bottom box one or more bibliographic lines, each assigned to one or more access fields. In the middle box you may have one or more bibliographic lines to which you have not assigned any access fields.
When everything in this form is as you wish it to be, select ‘OK’ (formerly ‘Process requests’) from the program’s menu. This next step may take a few seconds, so please be patient. The program scans the bottom list for each set of bibliographic records assigned to the same access field or group of access fields; the toolkit prepares a correction request for each separate group. This correction request is accompanied by a corresponding list of bibliographic record numbers. The program then removes the bibliographic lines from the bottom box.
The middle box now contains any unassigned bibliographic records, the top box still contains the same access field lines, and the bottom box is empty. You can assign additional bibliographic records to the access fields in the manner described above and create additional correction requests, or you can select ‘Exit’ from the menu to discontinue work on this one problem. (Don’t worry if you find on further investigation that additional bibliographic records need to be assigned to an access field or group of access fields for which you have already created a request; just create another request. The program that performs the work won’t be bothered in the least.)
As is the case with corrections requested with the BIG RED CROSS button, corrections initiated with the SPLIT HEADINGS button may be subject to approval at your institution, and may not be performed immediately after you request them.
![]() You can also use the ‘split heading’ form even when there is
only one new heading, if you wish to correct only some
of the records that contain a given old heading. (For example: You discover that some
but not all of the items listed under a personal name should be assigned
a different name.) In this case, there will be
only one ‘new’ access field in the middle box, and you will move to the bottom box
only those records to be changed. You don’t have to have more than one access field
in the middle box before you can use the ‘split heading’ form.
You can also use the ‘split heading’ form even when there is
only one new heading, if you wish to correct only some
of the records that contain a given old heading. (For example: You discover that some
but not all of the items listed under a personal name should be assigned
a different name.) In this case, there will be
only one ‘new’ access field in the middle box, and you will move to the bottom box
only those records to be changed. You don’t have to have more than one access field
in the middle box before you can use the ‘split heading’ form.
Whenever a modified authority record is written to the database (either as a result of an operator saving a record, or as the result of a batch load of records), if the 1XX field of the previous version is not the same as the 1XX field in the new version, Vger writes a notification of the ‘changed heading’ to one of its database tables. Later, you can use information in this table, together with three batch jobs run on the server, to identify changed access fields that appear to call for changes to bibliographic records and—to the extent possible with the Vger heading change program—change those bibliographic records.
The BIG RED Q button allows you to view entries in the Vger heading change queue. This button allows you to see the access fields that are in the queue, to find out which records have reference tracings that appear to match access fields in bibliographic records, and to initiate batch corrections when appropriate, using features already available via the toolkit’s BIG RED CROSS button.
![]() It is very important to note that the BIG
RED Q button allows you to inspect entries in the Vger changed heading
queue and to change related bibliographic records, but this button does not and
can not change the Vger changed heading queue itself. After you use this button
to clean up your records, the Vger queue is exactly the same as it was before,
even though your bibliographic records may be markedly different.66
It is very important to note that the BIG
RED Q button allows you to inspect entries in the Vger changed heading
queue and to change related bibliographic records, but this button does not and
can not change the Vger changed heading queue itself. After you use this button
to clean up your records, the Vger queue is exactly the same as it was before,
even though your bibliographic records may be markedly different.66
There may be many thousands of entries in the Vger heading change queue. When you click the BIG RED Q button, the toolkit shows you a little panel that allows you to define the subset of the queue entries you’re interested in reviewing. The following illustration shows a typical example of this little panel.
The most important part of this work is setting the date range in which you’re interested. Each entry in the Vger heading change queue indicates the date on which the access field was changed; you’ll use this information to look at only part of the queue at a time.
Set the values for the beginning month, ending year, etc. by clicking the up/down arrows next to the appropriate box. By selecting dates, you control the size of the report—and also the amount of time the toolkit takes to prepare the report.
The toolkit remembers the dates you’ve inspected most recently, and shows them to you the next time you click the BIG RED Q button. When you subsequently click this button and then click the ‘Advance to next interval’ button, the toolkit will adjust the dates to show the next review period. For example, if the dates are set to the 8-day period Feb. 1 to Feb. 8 when you click the ‘Advance to next interval’ button, the toolkit will reset the dates to Feb. 9 and Feb. 16, the next 8-day interval.
When you click the ‘OK’ button this form, the toolkit finds each entry in the heading change queue in the range you specify, and calls up the corresponding authority record. The toolkit first does a crude search for each of the 4XX 67 fields in each record.68 If an authority record appears to have any 4XX fields of interest, the toolkit does a more detailed inspection of bibliographic records in your database. 69
As it does its work the toolkit sorts entries in the queue into three categories:
In its report on the headings queue, the toolkit always includes authority records in the first category. You can control the appearance in the report of records from the other two groups by checking (or not checking) the two boxes on the little panel that begins the queue review. (Most of the time, you won’t want to see these records, and you’ll leave the boxes unchecked.)
When you’ve got the definition of the heading change review set to your liking, click the panel’s ‘OK’ button. The toolkit first does a search of the queue to find out how many authority records are listed there. The toolkit shows you the total, and asks if you want to continue. If you approve the extent of the work, the toolkit immediately starts retrieving and inspecting authority records.
While the toolkit is retrieving and inspecting records, it shows you its progress in the title bar of the little panel you used to set the beginning and ending dates. The inspection may take quite a while, depending of course on how many entries are in the part of the queue you want to inspect. If at any time you want to interrupt the toolkit’s work, click the ‘Cancel’ button; the toolkit will show you the entries it has inspected so far.
When the toolkit is done inspecting records in the queue (or when you click the ‘Cancel’ button) the toolkit shows you a list of the access fields. Each access field is preceded with a label that shows the category into which the authority record appears to fall (authority 4XX matches bibliographic access field, no 4XX in authority record, etc.).
The following illustration shows a typical example of the first part of a report on the Vger changed headings queue. The first group of entries shows authority records that contain references matching bibliographic access fields, followed by authority records that contain references matching bibliographic access fields and also represented by 1XX fields in other authority records. (The text following the label “Conflict?” near the bottom of the display shows the access field that appears to be the problem.) The remainder of the entries shown here represent authority records that contain 4XX fields that don’t represent a conflict. A final group (not shown here) would list authority records with no 4XX fields at all. (As described above, the operator could have chosen to omit the ‘no conflict’ and ‘no 4XX fields’ groups from this report.)
If the toolkit found a 4XX field in the authority record that appears to match something, it shows you that 4XX field immediately under the list of authority records; as you highlight different lines in the report, this text changes correspondingly. (The authority record may contain multiple 4XX fields that match bibliographic access fields. For the purposes of this report, it is sufficient that the toolkit stop when it finds the first one.)
To view the authority record, simply double-click on the line in the report. To close the report panel, click the ‘Close’ button.
After appropriate review (which may involve inspection of the authority record and one or more searches in Vger) you may decide that a batch correction is called for. If this is the case, click the BIG RED CROSS button. The toolkit passes the authority record number and some other information to the same routine that handles the BIG RED CROSS button on the toolkit’s main panel; you’ll get the same effect if you call up the authority record in Vger yourself and then click the toolkit’s BIG RED CROSS button. (When you move an access field to the correction request from, the toolkit removes the line from the queue review list.) Here’s a typical example of a potential heading change request, initiated via the BIG RED Q button.
You can now use this correction request form exactly as you would for other requests. For example, if you click the ‘Correct on’ button, the toolkit will generate an access field change request that will be handled by a separate program. This request is identical in form with other heading change requests.
To treat a conflict as a ‘split heading,’ highlight the access field of interest in the list and click the SPLIT HEADING button. The toolkit passes the authority record number and some other information to the same routine that handles the SPLIT HEADING button on the toolkit’s main panel; you’ll get nearly the same effect if you call up the authority record in Vger yourself and then click the other SPLIT HEADING button.70 (When you move an access field to the ‘split heading’ from, the toolkit removes the line from the queue review list.) The toolkit supplies what it thinks of as the ‘old heading’ in the appropriate box on the split heading panel. Inspect this text and add subfield codes as necessary before you select ‘Search old heading’ from the split heading panel’s menu.
The 670 button gives you a way to add a new source citation (670 field) to an existing authority record, based on information in a bibliographic record. Under certain conditions, this button will also add a new reference tracing (4XX) field to the authority record. If the authority record represents a ‘non-unique’ personal name, the 670 button will also generate an ‘[Author of ...]’ 670 field for you.
For example, if a bibliograhpic record contains a statement of responsibility that shows a form of name not reflected in the authority record for the access field, you can use the 670 button to add a new source citation to the authority record; and if that new form of nlame is one of the types for which the toolkit can generate a reference tracing, it will automatically add a new 4XX field, as well.
Configuration points to keep in mind
This button depends on the following information on the Options panel:
To use this button, you need to show the toolkit the authority record for the access field, and the bibliographic to draw on for new information. You can click this button when the Vger cataloging client shows either the authority record or the bibliographic record.
Once you have shown the toolkit the authority and bibliographic records, the toolkit extracts information from the bibliograhpic record, and adds a new 670 field to the record. If the authority record is for a non-unique personal name, the toolkit adds a new ‘[Author of ...]’ 670 before the new source citation. If the toolkit is able to add a new 4XX field, it does this as well.71 When this work is finished, the toolkit closes the authority record in the Vger cataloging client, writes the changed record to the Vger database, then re-opens the authority record in the cataloging client. When you see the modified authority record, the changes have already been made to the Vger record.
The 643 button gives you a way to add a new series place/publisher (643 field) to an existing authority record, based on information in a bibliographic record.
Configuration points to keep in mind
This button depends on the following information on the Options panel:
To use this button, you need to show the toolkit the authority record for the access field, and the bibliographic to draw on for new information. You can click this button when the Vger cataloging client shows either the authority record or the bibliographic record.
Once you have shown the toolkit the authority and bibliographic records, the toolkit extracts information from the bibliograhpic record, and adds a new 643 field to the authority record. The toolkit closes the authority record in the Vger cataloging client, writes the changed record to the Vger database, then re-opens the authority record in the cataloging client. When you see the modified authority record, the changes have already been made to the Vger record.
In certain cases, you need to add a see reference tracing to an authority record, and the new reference tracing can be based on information in a second authority record. For example:
In such cases you can use the toolkit’s 4XX button to create the see reference tracing for you. The 4XX button does nothing that you could not do yourself with some typing and a series of copy-and-paste operations, but it saves you quite a few keystrokes.
Configuration points to keep in mind
This button depends on the following information on the Options panel:
Before you click this button, you should display in the Vger cataloging client the authority record to which you wish to add a see reference tracing. When you click the 4XX button, the toolkit assumes that any authority record at the top of the record display stack in the Vger cataloging client is the authority record to which you wish to add the see reference tracing.
After you’ve shown the toolkit the first authority record (the record to which you wish to add a see reference tracing), the toolkit asks you to show it the second authority record. The second authority record is the record the toolkit will use as the base for the see reference tracing.
The toolkit can only add see reference tracings in certain circumstances.
If you supply an improper combination of authority records, the toolkit will refuse to proceed. If you show the toolkit two authority records of the proper type, the toolkit will create a see reference tracing in the first record based on information in the second, and will re-display the modified authority record in the Vger cataloging client.
If the authority record’s reference evaluation byte (008/29) contains a code other than ‘a’ or ‘b’, the toolkit will change the code to ‘a’ when it adds the see reference tracing.
The RDA button can assist you in the addition of certain fields to an existing authority record, based primarily on information in a bibliographic record. These fields can be added to any authority record, not just to a record coded as RDA. (These fields can also be added automatically to new, and BAMmed, authority records; this is controlled by other options.)
To use this button, display in the Voyager cataloging client an authority record to which you wish to add one or more "RDA" fields. The toolkit retrieves the authority record and uses it to fill out information on an elaborate workform. (This is the same workform as the one that the toolkit uses when you click the linking fields button, but since you're starting from an authority record the toolkit starts you out on the "Authority" tab.) The next illustration shows an authority record as displayed in this workform.
You can do quite a few things to authority records with this workform. Some of these editing tricks require that you call up a second record (which can be either an authority record or a bibliographic record); some of these features will work even if you don't identify a second record.
Let's look first at things you can do without identifying a second record:
If you wish to draw on information in a second record to fill out the displayed authority record (this second record can be either a bibliographic record or an authority record), call up a different record in the Voyager cataloging client, and then click the "Get second record" button. The toolkit retrieves this record and puts information into various places on the editing form.
If the second record is a bibliographic record, the toolkit examines the record in detail and pulls out everything that might possibly be of use in an authority record (as controlled by options you have set), tags the information using MARC conventions, and lists all these fields on the "Suggestions" tab; the toolkit also puts the whole record on the "Texts" tab.
For example, if our second record is a bibliographic record, the "Suggestions" tab might look like this:
The toolkit doesn't attempt to guess whether a particular field is appropriate for the base authority record. (For example, the toolkit always generates a candidate 643 field from a 260 or 264 field, even if the authority record isn't a series record.) It's your responsibility to select things that are useful and move them to the authority record; just ignore the rest.
If you see anything in this list that would be of use in the authority record, simply highlight the line (or multiple lines) and click the "Add highlighted field(s)" button. The toolkit moves your fields to the displayed authority record.
The "Texts" tab contains the entire text of the second record.
If you find text in the record on the 'Texts' tab that can be used in one of the RDA fields in the authority record:
Now, the neat thing about this particular record display is that you can edit this text: you can add stuff, remove stuff, and change stuff. So if there's something here that's almost but not quite what you want, you can modify the text to suit, then highlight it, select the tag, and add the field to the record. (Any changes that you make to the record in this display are not saved to your Voyager database!)
Under certain conditions when the second record is also an authority record, the toolkit will place one or more possible 4XX fields on the "Suggestions" tab; you can add these 4XX fields to your record if you think they're appropriate. Under other conditions there won't be anything on this tab when the second record is an authority record.
But wait, there's more. If the second record is an authority record, go to the "5XX fields" tab. This is actually the same as the "Linking fields" tab that you see when you start from a bibliographic record, but there are different possibilities for authority records.
You can use this tab to create links between authority records; but instead of the 76X-78X fields, when you have two authority records, you use this tab to create 5XX fields. If you want to use the 5XX field to describe a particular kind of relationship, find the relationship in the drop-down box next to the "Add with this code" button, then click the "Add with this code" button. If you want just a plain 5XX field, click the "Add with no code" button.
As is the case with a bibliographic record to which you add linking fields, your change isn't saved to Voyager until you save it by clicking the "Save" button. And in parallel with the toolkit's behavior for bibliographic records, the "Add reciprocal link to the other record" button at the bottom of the "5XX fields" tab reverses the sense of the 5XX field in this record and creates a 5XX field in the other record.
But wait, there's more. If the primary record is an authority record, you can use some of the features of the 'Texts' sub-tab to create a field in the authority record based on information elsewhere in the same authority record. Most of the time this work will involve re-purposing information found in the 670 fields, but it can in truth involve any text anywhere in the record. To use this feature, select some text in the primary authority record, select the radio button for the kind of field you want to create, then click the "Add text from record on left" button. Here are some examples:
Here are some examples of 670 fields, and the 034 fields that the toolkit created from them. In the 670 fields, the text selected by the operator is shown in bold.
Cases where the toolkit is not able correctly to create an 034 field from text pulled from a 670 field include those where the hemisphere is not always stated explicitly, and where there is important text that describes the meaning of the coordinates. For example, although the toolkit will, if asked, attempt to create an 034 from the coordinate information in the following 670 field, that 034 field will not be free of problems.
Use the "046" sub-tab on the "Authority" tab to build each subfield for an 046 field. In general, you'll work through the 046 sub-tab from the top down and set controls that correspond to what you know about one of the dates associated with an entity.
When everything for one date is set to your satisfaction on this tab, click the "Add field" button. The toolkit adds this one date to your authority record. If the authority record already contains an 046 field with the same subfield as your new subfield (or if the authority record doesn't contain an 046 field at all), the toolkit creates a new 046 field; if the authority record already contains an 046 field but that 046 field doesn't contain the subfield you have just defined, the toolkit adds your subfield to the existing 046 field. After you've added one 046 subfield, you can proceed with a subfield for another date, if you have the necessary information.
Use the Geographic sub-tab when you have found information at the GNIS or GeoNames search sites that you wish to preserve in an authority record. The toolkit will help you preserve the information in a 670 field, and (depending on the available information) may create 451 and 034 fields for you, automatically.
In all cases, start by calling up an authority record for a place (an authority record with a 151 field) in the Voyager cataloging client, and pressing the toolkit's RDA button to get to the fancy editing form. (You can also use any of the other toolkit buttons that lead to the fancy editing form, then select the "Authority" tab.) In the multi-tab display at the right of the Authority display, select the "Geographic" sub-tab:
Because the GNIS and GeoNames sites present information in different ways, there are two different ways to get information from the sites into an authority record.
The GNIS site provides information about places in the United States, and in Antarctica. One of the features of this site, is that the display of information about a single place (the "feature detail report" page) is represented by a distinct URL. (This URL contains a "session" identifier, and so is only valid while the web browser is displaying the page.) The following illustration shows the first part of such a page.
To capture information from a GNIS page for a single place, highlight the entire URL for the feature detail report and press Ctrl-C to copy the URL to the Windows clipboard. Go to the toolkit's fancy editing panel, click the cursor into the text box within the "GNIS" frame, and press Ctrl-V to paste the URL into the box. You don't have to press Enter or do anything else; just paste. (You probably won't actually see the URL in the box, because as soon as it appears, the toolkit reads it and then clears the box so you're ready for the next use.) As soon as you paste a URL into this box, the toolkit fetches the page on its own (this may take a few seconds), digests the page, and adds information from the page to the current authority record. For the GNIS page shown above, the toolkit picks up the name, category, elevation, county name, state, and coordinates. From this information it builds a 670 field, and also creates an 034 field.
If the GNIS page had contained variant names, the toolkit would have captured them, too, and would have created 451 fields. In the following example, the GNIS page listed one variant, so the toolkit created on 451 field.
The only real trick to using GNIS information in this manner is that you have to keep the original web page open in your web browser, so that the session ID in the URL remains active. As part of its work, the toolkit constructs a "persistent" URL for the GNIS information, and adds it as subfield $u of the 670 field. This allows you (or anyone else) to return directly to the source information, without doing a search.
Unfortunately, the GeoNames web site is not as handy for machine use as is the GNIS site. To capture information from GeoNanmes search results in authority records, you will have to do a bit more work; and just how much work depends on the information available. (Even so, this still beats transcribing everything yourself.)
Before you do a search in GeoNames, you should add at least the "Variant" line to the list of kinds of names to be returned in the search results. (Do not bother to include any of the "vernacular" choices, because for mysterious reasons vernacular data doesn't come through correctly anyway. And if you select any of the vernacular choices, all of the non-vernacular choices are instantly de-selected.)
After you've included "variant" in the search results, proceed with your search in the usual manner. What happens when GeoNames presents you with a results page depends on the information on the results page. If the display for the place of interest includes variant names, you're going to need to get information from GeoNames in two steps; if the display does not include any variant names, you can get information from GeoNames in a single step.
If the display for the place of interest includes variant names, select all of the names (preferred name, and variant names), and press Ctrl-C to copy this information to the Windows clipboard. Try to include just information in the box that contains the approved and variant names, and none of the information from adjacent boxes.
Go to the toolkit's fancy editing panel, click the cursor into the GeoNames text box, and press Ctrl-V to paste the information into the toolkit. The toolkit will digest this information into a 670 field, and will create 451 fields for the variants.
Whether or not there are any variant names, click on the name of the place to move to the little floating "names search results" panel, which gives full information about the place (except of course for the variant names). Select all of the text in this display, and press CTRL-C to copy the information to the Windows clipboard.
Go to the toolkit's fancy editing panel, click the cursor into the GeoNames box, and press Ctrl-V to paste the clipboard information to the toolkit. The toolkit will digest this information, and either add it to the existing 670 field, or create a new 670 field. The toolkit will also create an 034 field for the coordinates.
This button allows you to put a version of the current Vger record, or just the record’s Vger number, into the Windows clipboard. You can then use standard Windows ‘paste’ functionality to copy the Vger record (or record number) into another application. This capability might be useful if you’re preparing documentation, and need to include all or part of a Vger record in a document.
You can use this button on authority, bibliographic, holdings and item records. If you tell the toolkit to copy the entire record, the toolkit ‘flattens’ MARC records so that each variable field is on a separate line; the Leader and 008 field appear as a labeled display. The toolkit presents item records (which are not MARC records to begin with) as a labeled display.
Configuration points to keep in mind
This button depends on the following information on the Options panel:
When you click this button, the toolkit retrieves from the Vger cataloging client the number and type of the current record. If you’ve asked for the complete record, the toolkit retrieves this record from Vger, formats the record as instructed on the Options panel, and copies this formatted record to the Windows clipboard.
The 501 button allows you to build 501 fields (‘with’ notes) in bibliographic records.73 To use this button, you call up each bibliographic record to be linked with ‘with’ notes, and tell the toolkit to add information about this record to a list. When the list contains all of the items to be linked, you ask the toolkit to build the finished notes.
![]() Throughout
this section, reference is made to the ‘501’ field. One of the
choices available on the Options panel relates to the tag of this field. If
you have chosen some tag other than 501 for the ‘With’ note, you should
mentally change references to the tag ‘501’ in this section to your chosen
tag.
Throughout
this section, reference is made to the ‘501’ field. One of the
choices available on the Options panel relates to the tag of this field. If
you have chosen some tag other than 501 for the ‘With’ note, you should
mentally change references to the tag ‘501’ in this section to your chosen
tag.
Configuration points to keep in mind
This button depends on the following information on the Options panel:
Begin the creation of 501 fields by calling up in the Vger cataloging client the bibliographic recored for the first item in the collection and clicking the toolkit’s 501 button. The toolkit digests information from this record and puts it into a small window.
This little window has its own menu.
Once you’ve identified the first item in the collection, your remaining task is to identify the other items in the collection. You have two choices.
![]() The toolkit will not add to this list as the second or
subsequent member a bibliographic record that
already bears a ‘With’ note for the first member in the list.
The toolkit will not add to this list as the second or
subsequent member a bibliographic record that
already bears a ‘With’ note for the first member in the list.
If you accidentally add the wrong record to this list, highlight the line for that record and click the ‘Delete item’ menu choice.
If you need to change the order of items, highlight an item in the list and use the ‘v’ and ‘^’ buttons to move the item down and up.
When the list is as you wish it:
When the toolkit has finished its work:
Important things to know about the 501 button
You may discover that an authority record indicates that a series should be traced, yet your database contains one or more bibliographic records in which the series is not traced; or you may decide that a series formerly not traced should now be traced, and one or more bibliographic records require attention. Use one of the toolkit’s 490/830 buttons whenever you wish the toolkit to change a series in a bibliographic record from ‘not traced ’ to ‘traced’, or from ‘traced’ to ‘not traced’. To use either of these buttons, your Vger database must contain an authority record for the series.
The two buttons perform similar actions, with one important difference. Use the button with a border around it if you wish to change a group of bibliographic records all at once. Use the button without a border if you wish to change individual bibliographic records. The button with the border can save you a lot of tedious clicking if you are certain that a group of records can be changed safely; the button without the border gives you full control over each record to be changed.
The 490/830 tab on the toolkit’s Options panel controls this button’s behavior.
Convert a series from traced to not traced
The toolkit’s 490/830 button with a border around it functions as a ‘batch correction’ button to change a series from traced to not traced. To change all occurrences of a series in your database from traced to not traced, open the authority record for the not-traced series in the Vger cataloging client and click this button. The toolkit absorbs information from the authority record and then immediately does a search for bibliographic records that contain the record’s 1XX field as a series access field. The toolkit will change each matching 440 field to a 490 field with first indicator ‘0’; it will delete each matching 8XX field and change the first indicator in the corresponding 490 field from ‘1’ to ‘0’. You cannot use the toolkit for any other work while it is batch-converting a series to not traced, but you can do other work with the Vger cataloging client.
If the toolkit finds bibliographic records in your database that contain the indicated series access field plus additional information (qualifiers, subseries, etc.) the toolkit will show you a message before it undertakes any work. You should carefully examine the bibliographic records before allowing the toolkit to proceed. After the toolkit has finished its work, you should search Vger for the series access field again, to make sure there are no leftovers for you to clean up on your own.
The toolkit’s 490/830 button without a border around it is a ‘one record at a time’ button. Use this button when you need to exercise full control over the bibliographic records that are changed. (Some bibliographic records may have the wrong series added entry.) To use this button, open the authority record for the not-traced series in the Vger cataloging client and click this button. Do a search in the Vger cataloging client for the series, and click this button again when the client is displaying a bibliographic record you wish the toolkit to change.
Convert a series from not traced to traced
Using the 490/830 buttons to convert a series from not traced is a two-step process: you show the toolkit the authority record for the series, then you show the toolkit the bibliographic records that contain the not-traced series. (Because the series are not traced, and the toolkit has no access to the Vger keyword indexes, you must find the records yourself, and show them to the toolkit.) One of these buttons has a border around the caption, the other does not. Both buttons start out by looking at authority records in exactly the same way, so you can begin the process of converting a series from not traced to traced by clicking either button when the cataloging client shows an authority record. The border, or its absence, marks an important difference between the two buttons in the handling of bibliographic records.
You can use these buttons to convert simple series access fields (i.e., series access fields that consist only of a ‘main series’). You can also use these buttons to convert series access fields that contain a subseries, but do not use these buttons for main series plus a subseries if you need separate added entries for the main series alone and the main series plus the subseries.76 Do not use these buttons if information (such as ‘new series’) needs to be moved in some (but not all) circumstances from the series numbering (subfield $v) to the text of the series access point, or vice versa.
When converting a series from not traced to traced, the change the buttons make depends on circumstances, and will even vary from one bibliographic record to the next within a given series. The following are general guides.
To use these buttons effectively to change a series from not traced to traced, you’re going to need to be able to find the bibliographic records that contain the series in a 490 field. The toolkit can find 490 fields when presented with a bibliographic record, but it can’t itself do the search to find the records. The most reliable way to find bibliographic records that contain a not-traced series (perhaps the only way available to all Vger customers) is with a keyword search.77
Use the SysAdmin client to define these keyword searches. You may well decide that both of these indexes should be suppressed from the OPAC.
You start the process of changing a series from not-traced to traced by calling up the authority record for the series in the Vger cataloging client. Make any changes to the authority record that seem appropriate, and save the record. When the authority record is in its final form, click either of the toolkit’s 490/830 buttons. The toolkit retrieves the authority record from Vger and extracts information from it for future use. (The toolkit retains information concerning this authority record until you click one of the 490/830 buttons again when the Vger cataloging client shows an authority record.) The toolkit digests the authority record’s 1XX field and each of the 4XX fields into an internal table; the toolkit also saves subfield $a of the first 642 field (series numbering example). If the 1XX field in the authority record ends with a full stop, the toolkit asks whether or not the full stop is an integral part of the term. (If the full stop is not an integral part of the term, the toolkit modifies the authority record to remove the full stop, and re-opens the authority record.)
When the toolkit has finished its examination of the authority record, it shows the series access field, or at least the first part of it, in the frame underneath the last row of buttons. You can also see the current access field at any time by resting the mouse pointer over either of the 490/830 buttons.
Once you’ve shown the toolkit the authority record for the series, you need to do a search to find bibliographic records that contain the series. The button you press after you’ve done the search depends on your perception of conditions.
The program for changing bibliographic records that lies behind these buttons is quite complicated. (The program logic for working with an individual bibliographic record is identical for both buttons.) There are many points at which the toolkit might have to pause to ask for your assistance. Some of these queries are in the form of simple yes/no questions; others require you to supply more information. The most severe of these latter cases involve the matter of series numbering. When the program looks over the authority record for the series, it saves the numbering pattern from the first 642 field.
The toolkit expects every series statement in bibliographic records to have numbering in the form specified by the authority record. (For example, if the series numbering example is ‘v. 5’, the toolkit will accept ‘v. 17’ or ‘v. 18-19’ or ‘v. 16, etc.’ but it will not accept without question ‘no. 12’ or ‘18.’) If the bibliographic record contains variant numbering (or other text in the 490 field beyond the end of the series name), the toolkit opens a window and asks what should happen next. In the example shown in the following illustration, the authority record contains the series numbering example ‘no. 12’ and the bibliographic record contains the numbering ‘2nd ser., no. 1.’
When this dialog panel reflects the handling of the numbering (or other text) you wish the toolkit to follow, click the ‘OK’ button. If you want the toolkit to cease working on this bibliographic record, click the ‘Cancel’ button instead.
If you click the ‘OK’ button and the toolkit has the information it needs, it changes the bibliographic record as appropriate and closes the record in the Vger cataloging client. The toolkit shows you the bibliographic record’s number in the message area below its bottom row of buttons. (If you’re using the 490/830 button with a border to change a group of records, the toolkit won’t show you the completed record number because it will immediately move on to the next record.) If you wish to see the modified record, you can call it up in the Vger cataloging client when the toolkit has finished its work.
How the toolkit finds a not-traced series in a bibliographic record
The following paragraphs should give additional understanding of the basic procedure the toolkit uses to find series statements in bibliographic records, and change them. If you are unsure how the toolkit is going to handle a series, the best thing to do is to have the toolkit perform the work on one bibliographic record, then call up the bibliographic record and see what happened to it. If the series you attempt to convert is within the button’s design limitations, you’ll probably be surprised how well the toolkit copes with your request.
The toolkit looks for bibliographic 490 and (for historical reasons) 500 fields that match information in the authority record. The toolkit considers 490 fields with first indicator ‘zero’ or ‘blank’; it also considers 490 fields with first indicator ‘one’ if there are no 8XX fields in the bibliographic record. If the bibliograhpic record contains the same series in both a traced field (4XX or 8XX) and a 490 field with first indicator ‘zero’, the toolkit won’t try to modify the bibliographic record. The toolkit isolates series numbering in subfield $v and the ISSN (in subfield $x, or in subfield $a when preceded by the text ‘ISSN’). The toolkit compares this extracted information against the 1XX and each 4XX in the authority record. (The toolkit compares authority fields in descending order by length of the field.)
If the 490 field exactly matches an access field found in an authority record, the program handles the record on its own. If the 490 field contains a field from the authority record plus additional text, but the matching point is not at the first character of the 490 field, the toolkit considers the test to the left of the match point to be an ‘initial article’. If this text is in the toolkit’s small internal table of articles, the toolkit retains the series in a 440 field and sets the nonfiling characters indicator as appropriate; otherwise, it creates a new 8XX field. For example:
If the 490 field contains a field from an authority record within it, but the 490 field contains text beyond the series access field, the toolkit considers this text to be ‘numbering’. If the pattern of this numbering matches the pattern of the series numbering example in the authority record, the toolkit moves the numbering to subfield $v; otherwise, it asks you what it should do with the text. For example:
This button allows you to edit the ‘fixed fields’ in a bibliographic, holdings or authority record. The fixed fields are the Leader, 006, 007 and 008 fields. You can also use this button to add and remove 006 and 007 fields. The advantage of this button over similar features offered by the Vger cataloging client is that you can directly change codes of interest, without necessarily consulting a menu of options. In most cases, this button will save you time and trouble, if you need to change more than one code in the fixed fields.
Configuration points to keep in mind
This button depends on the following information on the Options panel:
In addition, this program assumes that the folder named in the ‘Files of validation rules’ box on the File locations tab of options for the BAM button contains three configuration files, which are described in an appendix.
When you click this button, the toolkit obtains from the Vger cataloging client the number and type of the current record. The toolkit retrieves a fresh copy of this record from Vger, and hands it over to the component that makes possible the editing of fixed fields. 79 This component displays the fixed fields from this record in a small panel. The following illustration shows a typical example.
Each field in the record (Leader, 008, etc.) is shown in a different group; alternating field groups have different background colors to make them easier to distinguish. Each defined element in each field is displayed with a brief alphabetic prefix. (You can change these prefixes by changing a configuration file, if you can’t easily tell what is intended.) The color of each element reflects its status. (The default colors are: gray if you can’t actually modify the element, black if the element’s code is valid, red if the element’s code is not valid, and green if the element’s code is obsolete.)
To change a fixed-field code, click the cursor on either the code or its label, and type the code you want. Changing one code automatically advances the cursor to the next box. You can use the up/down arrow keys to move from one field to another, and the tab/reverse tab keys to move from one element to another. If you aren’t sure what codes are available in an element, you can put the cursor on a code and then press the F2 key. (The F1 key does the same thing.) You’ll see a tiny panel naming the code and providing a drop-down list of valid codes. (This tiny panel will appear over the currently-highlighted code.)
To add a whole new 006 or 007 field, select the type of field in which you’re interested from the panel’s menu, and modify the codes as appropriate. (The default values for each type of 006 and 007 field are in one of the configuration files, which you can of course change as you wish.) You can’t add an 006 field to a record if it’s of the same ‘type’ as the basic record itself. (For example, you can’t add a ‘book’ 006 to a ‘book’ record.)
To delete an 006 or 007 field, place the cursor anywhere in the field, then click the ‘Delete’ menu choice. (You can’t delete the leader or the 008 field.)
If you wish to make any one of the 006 or 007 fields the first field of that type, place the cursor anywhere in the field, and then click the ‘Make first’ menu choice.
When you’re all done working with the fixed fields, click the ‘OK’ menu choice (or, if you’ve enabled this on the Options panel, press the Enter key) to save your work. Click the ‘Cancel’ menu choice (or, if you’ve enabled this on the Options panel, press the Escape key) to abandon your work on the fixed fields.
The DIVIDE LONG FIELD button lets you split long fields in a bibliographic record (such as long contents notes) into two pieces. (The Vger cataloging client has problems displaying and allowing you to edit long fields.)
To split a field in a record into two pieces, click this button when the Vger cataloging client displays a bibliographic record. The toolkit examines the record, and shows you a window listing each field in the record that is longer than an arbitrary length, and whose tag is defined as repeatable.
Click the cursor in the long field at the point at which you wish to split it, and click the ‘OK’ button. The toolkit will modify the record as you instruct, save it to the Vger database, and open the modified record in the Vger cataloging client. If the text for the new field as found in the original field doesn’t begin with a subfield code, the toolkit begins the new field with $a.
The EXPORT buttons allow you to send the record displayed by the Vger cataloging client to an export file. During the export, the toolkit can transform the record in a number of ways; if you export a bibliographic record, the toolkit can also include information from associated holdings records. There are two buttons, allowing you to maintain two separate configurations at a time. (You might define one button for MARC export, and another for XML export; or one for MARC export for OCLC, another for MARC export for a vendor.)
Configuration points to consider
The Export to disk tab on the tookit’s Options panel controls the behavior of these buttons. From the ‘Button details’ tab, click the export button you wish to configure. The toolkit maintains two separate configurations, one for each export button.
When you click an export button, the toolkit gets the number of the current record from the Vger cataloging client and pulls the current version of that record from the Vger database. The toolkit transform the record as necessary (perhaps converting the character set for MARC output; or applying the selected schema for XML output) and saves it to the folder (and, as appropriate, file name) indicated in the button’s configuration. The toolkit shows a message in its status area when it has finished its work. The operation should take a second or less.
The MERGE button allows you to do to two rather different things, not necessarily involving the merging of two records. (The capabilities originally intended for this button have been expanded over time.)
The following illustration shows the toolkit’s ‘merge’ panel, before any records have been loaded into it. The left side of this panel will contain ‘source’ records—records from which you want to extract information. Source records may be read from a file, or from your Vger database. The right side of this form will contain ‘target’ records—records into which you want to copy information from source records. Target records are always records found in your Vger database.
If you load a file of records from some file, the left side lists these records, and shows you them one at a time. The right side shows the records in your local database that match the record on the left side. If the import file contains more than one record, the box in the upper left corner lists them all; you can move from one import record to another by highlighting each line in turn. If a record in the import file matches records in your Vger database, the box in the upper right corner lists them, and identifies the tag of the matching field; you can move from one matching record to another by highlighting each line in turn.
The following illustration shows the toolkit’s split panel ‘merge’ display while some work with this button is in progress. The operator has loaded an import file into the left side, and the toolkit has found matches for one of them. The box at upper left lists the records from the import file; the larger box on the left shows details of the highlighted record. The box at upper right lists records found in the Vger database that appear to match the record on the left side;80 the larger box on the right shows details of the highlighted record found in the Vger database.
Configuration points to keep in mind
This button depends on the following information on the Options panel:
When you click this button, the toolkit shows you its ‘merge records’ display. What happens after that is under your control. The first thing you need to accomplish is getting one or more records into the left side of the panel.
Once you have populated the left side of the toolkit’s merge panel with records (from a file, from Vger, or some combination of these), and perhaps populated the right side with matches found in your Vger database as well, you can do various things. You cannot directly modify the records displayed on this panel by typing, etc. The buttons distributed around the panel allow you to interact with and modify the records in carefully limited ways.
The NEEDLE AND THREAD button allows you to save fields from authority, bibliographic and holdings records, and copy them into other records. At the same that you paste a field into a record, you can (subject to certain limitations) change the field’s tag. (For example, you can copy a 1XX field from an authority record, and paste it into a bibliographic record as a subject.)
The toolkit maintains the access fields you identify from one session to another, by saving them in a configuration file. Once you have copied an access field, the toolkit will remember it until you delete it.
Configuration points to consider
The Needle and thread tab on the tookit’s Options panel controls the behavior of this button.
When you click this button, the toolkit shows you its ‘Save headings for later re-use’ display. This display contains your current list of terms, and gives you options for working with members of the list. The display shows only the text of each saved field, but the toolkit also saves other important information, such as the original record’s type (authority, bibliographic or holdings) and the original field’s tag and indicators. The list is sorted (by Windows) by the displayed text of the field; unfortunately, this sort takes the subfield codes into account.
The ZAP button allows you to repeat certain restricted operations on bibliographic records, and/or the holdings and item records attached to them. This button was originally intended to remove variable fields from bibliographic records—hence its name—but its capabilities have grown somewhat beyond that original intent. With this button you can now not only remove variable fields from bibliographic records, but add constant data to bibliographic records at the same time; you can set (but not un-set) the bibliographic and holdings records’ ‘Suppress from OPAC’ flag; and you can change the location code in all holdings and item records to some constant value. If you wish, you can define this button so that it only works on bibliographic records whose holdings reflect certain characteristics.
Configuration points to keep in mind
This button depends on the following information on the Options panel:
When you click this button, the toolkit gets from the Vger cataloging client the record number from its uppermost window; this record must be a bibliographic record. If you have told the toolkit only to modify records whose holdings bear certain characteristics, the toolkit will inspect the holdings records attached to the bibliograhpic record. The toolkit removes any fields you’ve asked it to remove, adds any fields you’ve asked it to add, and writes the bibliographic record back to Vger, setting the suppression flag at the same time. If you’ve asked the toolkit to set the suppression flag, and/or asked it to change the location codes in holdings in item records, the toolkit changes the holdings and item records for you.
The EXCHANGE DIACRITICS button allows you to see exactly what diacritics are used in a MARC record, and to replace one diacritic or special character in a record (or a combination of diacritics) with a different diacritic, special character or combination of diacritics. The button provides a ‘global replace’ capability at the level of individual characters.
This button does not depend on any configuration options that you can set within the toolkit. The toolkit uses the diacritics defined in the file ‘Special Characters.cfg’ that’s part of your Vger cataloging client’s configuration, and the diacritic combinations defined in the ‘Diacritics.cfg’ file that’s part of the BAM button’s configuration files.
When you click this button, the toolkit gets from the Vger cataloging client the record number from its uppermost window; this can be an authority, bibliographic or holdings record. The toolkit retrieves the record from Vger and shows you a formatted version of the record in a special panel.
You have two choices for the record display (as indicated by the radio buttons at the bottom of the panel). You can display diacritics as ‘pre-composed’ characters (i.e., with the diacritic displayed with its base character) and as text labels. The preceding illustration shows the record displayed with diacritics on the base charcter. The following illustration shows the same record, with labels instead of diacritics. In the following illustration, notice that some diacritics are repeated, which is not obvious when the diacritics appear with their base characters. The labeled display is probably the better choice.
To exchange one diacritic or special character for another, select from the list in the upper right corner the character you wish to remove, and select from the other list the character you wish to insert. Click the ‘Make this one change’ button. The toolkit will re-display the record, with changes made up to this point. (Because the toolkit cannot display the entire Unicode character set, not all special characters will show in the record display.) Make additional character substitutions as appropriate. When the record is entirely to your liking, click the ‘Save changed record’ button to send the changed record back to Vger.
This panel will be enhanced as the need for additional capabilities becomes evident. The ability to find geographic coordinates in authority 670 fields and insert the correct markers for degrees, minutes and seconds is anticipated for this panel in the near future.
The DEFAULT ITEM TYPE button allows you to set the ‘item type’ value in one item record, or all of the item records attached to one holdings record, to some constant value. In effect, this button provides a ‘global replace’ capability for the item type code.
Configuration points to keep in mind
This button depends on the following information on the Options panel:
When you click this button, the toolkit gets from the Vger cataloging client the record number from its uppermost window.
The ADDED VOLUMES button allows you to add a series of item records to an existing holdings record. This button can save you some time, keystrokes and tedium when you’re adding more than one item record to a holdings record.
This button can handle numbering that consists of multiple units (such as volume and part) only if just the last number changes. (For example, in numbering that consists of volume and part, the toolkit can only adjust the ‘number’ portion.)
Configuration points to keep in mind
This button depends on the following information on the Options panel:
When you click this button, the toolkit gets from the Vger cataloging client the record number from its uppermost window.
The toolkit looks at the holdings record, and makes a list of the item records already attached to it (if any). The toolkit shows you what it found. Your job is to supply information about the item records you want the toolkit to add to the holdings record.
The first consideration is the identification used on the individual pieces. The toolkit allows you use enumeration (such as ‘v. 1’ or ‘3.Bd.’), chronology (year only), or both enumeration and chronology. A set of radio buttons toward the upper left corner of the panel allows you to choose the type of designation to be included in the item records. Your choice of radio button determines the other information you need to provide.
If the 852 field of the holdings record contains subfield $t, the toolkit puts the contents of the subfield into the ‘Copy number’ box. Otherwise, it assumes copy number 1. You can change this number if you wish.
If you have defined a correspondence between the location code in 852 subfield $b and an item type, the toolkit will show that item type in the ‘Item type’ box. Otherwise, this box will contain some other value. You can change the item type as necessary.
The right side of the panel lists item records already attached to the holdings record. This is for your information only.
If you wish the toolkit to prompt you for a barcode number as it creates each item record, check the ‘Prompt for barcode numbers’ box. Each finished item record will contain its barcode.
If you wish to see a list of all of the item records attached to the holdings record once the toolkit has finished its work, check the ‘At end, open list of item records in Voyager’ box.
When the holdings panel accurately describes the item records you wish to create, click the ‘OK’ button. If the holdings record does not already contain an 866 field, the toolkit will create one for you. The toolkit will then attach new item records to the holdings record, supplying the enumeration and/or chronology as indicated. If you have asked the toolkit to prompt for barcodes, it will ask you for a barcode number for each record; you can supply the barcode number either by scanning or typing. (If you’ve told the toolkit you want to supply barcode numbers but you fail to supply a barcode for an item record, the toolkit will stop its work even if there are more items to create.)
If you asked the toolkit to open the list of item records in the cataloging client, it will attempt to do so. (This is the same display you see if you select ‘Record|Retrieve Items’ from the cataloging client’s menu.) The connection between the toolkit and the cataloging client being tenuous, it’s possible that the toolkit won’t be able to open the list for you, but it will try.
The ROMANIZATION/CAPITALIZATION button allows you to convert bibliographic data in a vernacular script into romanized form, and convert romanized data into vernacular script. The button also allows you to change with the 'case' of text.
Configuration points to keep in mind
This button depends on the following information:
When you click this button, the toolkit obtains from the Vger cataloging client the record number from its uppermost window. The toolkit displays the record in a special panel that should be able to display the same Unicode characters that Vger can display. You cannot edit this record directly, but you can use buttons to manipulate the record.
Here is a typical record ready for manipulation. In this case, the record is a romanized Russian record, and we will assume that the operator wishes to create vernacular fields that parallel the romanized fields.
(The above illustration shows the latest implementation of this record display, with convenient hanging indentions for variable fields. Many of the illustrations in this section show an earlier version, without hanging indention.)
At one side of the romanization form is a small frame that contains options for the display of diacritics. The standard convention is to display diacritics attached to their base characters; but you can instead display diacritics as text labels. The following illustration shows part of a record, with diacritics and special characters represented by labels. The important distinction between the two views is that you cannot use many of the toolkit's features, such as the ‘Convert highlighted text’ button on this tab, when you are using the labeled view.
Before you do anything else, make sure that the ‘Script/language’ drop-down list at the top of the panel is correctly set to the appropriate romanization definition for this record. The toolkit will attempt to do this for you, based on the bibliographic record's language code, but you should always check this setting.
What you can do next depends on the record and the romanization table you’ve selected.
In the following illustration, the operator has highlighted the entire text of the 245 field, then clicked the ‘Convert highlighted text’ button. The toolkit generated an 880 field that parallels the 245 field and linked the two fields with subfield $6 codes. The operator then highlighted subfield $a of the 600 field, and again clicked the ‘Convert highlighted text’ button. The toolkit generated an 880 field to parallel the text of the 600 field, but converted only the highlighted portion. The operator is now free to preceed with the conversion of other parts of the record, such as the 246 and 260 fields.
You can, if circumstances permit, instead click the ‘Convert whole record’ button. The toolkit will apply the current romanization table to each field in the record and then show you the modified record.
In the following illustration, the operator started with the same record as above, but instead of transforming fields one at a time simply clicked the ‘Convert whole record’ button. The configuration file allowed conversion of only the 100, 245, 246, 260, 600 (but not subfield $x), 650 (subfield $z only) and 651 (subfield $a only) fields. The toolkit converted the appropriate portions of these fields, creating a parallel 880 fileld for each. The operator is now free to preceed with the conversion of any other part of the record that can be rendered in vernacular script.
The next example begins with a record input by the operator using vernacular charcters in the standard fields.
It would be possible to work on this record one field at a time; but in general, because a program can unambiguously identify ‘vernacular’ characters in such a record, it’s simplest (and very safe) to do the whole record at once. If the operator selects the Chinese romanization table and then clicks the ‘Convert whole record’ button (with the configuration file probably set to allow conversion of all fields) the toolkit converts the Chinese text to its romanized form, moves the vernacular data to 880 fields, and links the parallel fields with subfield $6.
Although this particular conversion appears to have been successful, the whole record should receive careful review. In some cases, the toolkit's configuration file will not contain the equivalent for a vernacular character. When this happens, you can highlight a vernacular character and use the 'Define' and 'Replace' buttos to translate the character in this record and at the same time add the character to your configuratino file.
If the field being worked on contains an indicator for the number of nonfiling characters to skip, the toolkit will attempt to adjust the indicator in the converted field. In the following illustration, the toolkit changed the nonfiling indicator ‘4’ in the original 245 field to ‘2’ when it created the 880 field.
In some cases, there will not be a configuration file appropriate to a script or language represented in a record. Even in these cases, the "romanization" tab contains something that may be of use to you: the "new 880" button. Use this button to create an initial parallel field for a field in a MARC record; the principal advantage to allowing the button to help you in this work, is that the toolkit will construct subfield $6 in the original field and the 880 field for you, so you're spared that difficult and exacting task. After you save the modified record to Voyager, you will need to finish the parallel field in Voyager.
For example, to create an initial 880 field parallel to this 100 field, click anywhere in the 100 field. (You don't have to highlight a block of text; just click anywhere in the field.)
When you click the "New 880" button, the toolkit calculates the next sequence number for the pair of parallel fields (in this example, the new 880 field will be the first parallel field in the record), replaces subfield $a with an asterisk, and adds an 880 field to the record. After you save the changed record to Voyager, return to the Voyager cataloging client to finish work on the field.
The "New 880 RTL" button does exactly the same thing as the "New 880" button, except that it adds "/r" to the end of the text of subfield $6 of the new 880 field.
To create a right-to-left 880 parallel to the 100 field in this record, click anywhere in the field, then click the "New 880 RTL" button. The toolkit creates a new 880 field, with "/r" at the end of subfield $6. You can make additional changes to this field with the "Edit RTL" button. You can also work with the field in the Voyager cataloging client after you save the changed record to Voyager.
The "Edit RTL" button allows you to make very careful changes to an 880 field that contains right-to-left text. (Editing such text in either Voyager or OCLC can be a chore, as it's not always clear how to select text you want to change. If you want to modify an 880 field that contains right-to-left text, click the cursor anywhere in the field, then click the "Edit RTL" button. The toolkit copies the 880 field into a special editing window. The next illustration shows how this special editing window might look.
The important thing about this special editing window is that the toolkit has substituted names for each right-to-left character and each diacritic, but has left other characters as they stand in the field. The toolkit shows each character in input order, not in the order determined by any particular display convention.
When you have displayed a field in this editing panel, you can modify it, but you must be very careful.
Click the "Save" button to return to the main editing panel. The toolkit will insert your changed right-to-left field into the displayed record, but it has not yet saved the changed record to Voyager.
There are yet other buttons on the "romanization" tab:
Working with uppercase and lowercase characters
The workform that the toolkit presents when you click the romanization/capitalization button also has a number of features that help you convert the 'case' of characters. At one time, these were in the same place as the romanization features, but because the capabilities of the fancy editing panel grew beyond all expectation, they eventually had to be on their own tab, with the clever caption 'Capitalization, etc.' For all of these features, you select the text on which you want the toolkit to operate, then click a button. As is the case with all of the tabs on the fancy editing panel, none of the work is actually written to the Voyager database until you click the 'Save' button.
This button should work for all scripts scripts that have distinct uppercase and lowercase character forms, including (but not limited to) the Cyrillic and Greek scripts.
When you have done everything you can to a record using this feature and you wish to preserve your changes, click the ‘Save’ button. The toolkit writes the modified record back to Vger, and opens the record in the cataloging client.
The Z39.50 protocol allows a program running on one computer to search for bibliographic records at a remote site without knowing the details of the search engine at the remote site. The Z39.50 button implements this protocol within the cataloger’s toolkit. This button allows you to search remote bibliographic databases for records that match a Vger record. (For example, you might want to search OCLC if a vendor supplies you with a minimal-level record, or a record with no subject headings.)
If the toolkit finds a record in a remote database and if you approve that record, the toolkit will replace the Vger record with the record from another database. (The toolkit does not replace a Vger record without your approval.) As it overlays the record, the toolkit can preserve certain fields originally found in the Vger record. If none of the records in any of the remote databases is suitable for overlay, you can copy seleted fields (such as subject headings) into the Vger record (to make original cataloging simpler), and you can make other changes to the Vger record at the same time.
Configuration points to consider
This button depends on the following information:
When yhou click this button, the toolkit obtains from the Vger cataloging client the record number from its uppermost window. The toolkit extracts from this record those standard numbers that it knows how to search, and also the 1XX and 245 fields and the date of publication (from the 008 field). For ISBNs, the toolkit creates both 10-digit and 13-digit search keys whenever possible.
The toolkit sends each of the search keys derived from the Vger record to the first Z39.50 database. (If the toolkit uses a connection at all, it always sends the database all of the search keys derived from the Vger record.) If after sending all of the search keys the toolkit has found at least one record, the toolkit stops to display the search results; otherwise, it moves on to the remaining databaess, stopping its work as soon as it has retrieved at least one record from a remote database.
If the toolkit is not able to find at least one record at one of the Z39.50 databases, it tells you what has happened. As described below, you can apply a transformation to the Voyager record if appropriate (for example, you may wish to apply a some local convention to indicate that you have searched OCLC without finding anything), or you can move on to the next task.
If the toolkit finds at least one record, it displays the results. Here is a typical example:
The list in the upper left corner shows each of the records retrieved from the connection. Each line in the list briefly identifies the search key(s) by which the toolkit found the record, the language of cataloging (from 040 subfield $b—default is ‘eng’), the type of record, and a count of the subject headings in the subject system of interest. (In these examples, LCSH has been declared the subject heading system of interest for this database.) The large box at lower left contains the record retrieved from the remote database (more on this below). In the example shown above, the toolkit has found two matching records, one in English (and a PCC record to boot) and one in German; the English record has four LCSH headings, but the German record has none. If the list at upper left contains more than one record, the toolkit displays the first record; you can click other lines in the list to view the other records that the toolkit has retrieved.
The large box on the right shows the Vger record just retrieved from your local database.
The toolkit does a number of things to each record that it decides should be presented to you on this panel:
(In the illustration above, the toolkit copied the 948 field from the external record into the Voyager record and then applied to the external record a transformation that changed the code in 948 subfield $b and the date in 948 subfield $c, then added subfield $e.)
Because the toolkit does this work before showing you any record, the record you see in the box on the left is (or should be) ready for you to send to Vger, without additional modification. Nonetheless, you may wish to make some change to the record on the left. You can’t directly edit the record, but you can make a few program-assisted changes. (If you want to make other changes to the record, wait until it’s in Vger.) If you want to copy a field from the Vger record into the replacement record, click the cursor on the field in the Vger record and then click the button between the records with a left-pointing arrow; the field appears in the record on the left. If you want to copy several contiguous fields from the right record to the left one, you can highlight them all (you don’t need to be too careful—some part of the first and last fields is all that’s needed) and then click this button; they all appear in the record on the left. You can also apply a transformation to the record on the left: select the transformation’s name from the list above the record, then click the blue transformation button next to the list.
If you wish to send the record on the left to Vger, click the ‘Replace Voyager record’ button. The toolkit will update the record in the Vger database, and then attempt to call up the modified record in the Vger cataloging client. The toolkit’s ability to retrieve a record in the cataloging client is imperfect; if the toolkit isn’t able to retrieve the Vger record, you’ll have to call it up yourself if you wish to do anything else to the record, or its associated holdings or item records. If you wish to send the record on the left to Vger and then immediately BAM the record, click the ‘Replace Voyager record and BAM’ button.82 (If the toolkit isn’t able to open the record in the cataloging client, the BAM step won't work.)
If you decide that none of the records found by the toolkit should overlay the Vger record, you may stil determine that one or more fields in a retrieved record is worth retaining in the Vger record. For example, even though the toolkit has found no exact match, it may have found a close variant whose subject headings are worth preserving. You can click the cursor on a field in the left record (or highlight multiple contiguous fields) and then click the button between the records with the right-pointing arrow; the toolkit copies the fields into the Vger record. You can also apply one or more transformations to the Vger record. (For example, you might have a transformation that marks a record as having been unsuccessfully searched in OCLC.) Select the transformation’s name from the list above the right-hand record, then click the blue transformation button next to this list. Click the ‘Update Voyager record’ button to send the changed record back to the Vger database.
When you’ve disposed of one Vger bib record (either by replacing it and performing any additional actions, or by deciding that there is nothing to be done) you can either call up another record in Vger and click the toolkit’s Z39.50 button again, or (if you know the record’s Vger bib record number) click this panel’s ‘Search Voyager bib ID’ button to feed a Vger record number directly into this form, and bypass the Vger cataloging client altogether.
Search a list of bib record numbers
You may, through some means of your own devising, create a text file that contains Vger bib record numbers you wish to search in one or more remote databases via Z39.50. When this is the case, call up the Z39.50 panel by clicking the toolkit’s Z39.50 button, then click the ‘Load file’ button on the Z39.50 panel. Browse to find your file of Vger bib record numbers. The toolkit will read all of the bib IDs into an internal array, proceed to search for a replacement for the first record, and display the results. The display of results for any one record in your file is exactly the same as if you had called up the record in the Vger cataloging client and then clicked the Z39.50 button, except that the ‘Search Voyager bib ID’ button is replaced by a pair of navigation buttons and there’s a message showing the relative location of the current record within the file of bib record numbers.
When you see the results for a record, you can replace the Vger record, change the Vger record, or decide that nothing is to be done—just as if you had called up the record from the Vger cataloging client. When you’re ready to move to the next record, click the navigation button with the right-pointing arrow. (To move back to a previously-viewed record, click the navigation button with the left-pointing arrow.) As you update records in Vger, the toolkit marks the record IDs in its copy version of the list as having been handled; when you close the Z39.50 panel (by clicking the ‘X’ in the upper right corner) the toolkit saves back to your file a list of the Vger bib record numbers minus the ones that you’ve handled.
The behavior of this button is controlled by a set of options.
The linking fields button can assist in the generation of 76X-78X fields in bibliographic records. The tool to which this button leads can also assist in the addition of 5XX fields to authority records. (Authority 5XX fields are another way to specify relationships.) You can use this button to create linking fields in one bibliographic or authority record that point to other records (involving change to just one record), and you can use this button to create mutual relationships between two records (involving changes to both records).
To add a link to one record: To add a link to a Voyager record, display in the Voyager cataloging client a bibliographic record to which you wish to add a linking field, then click the linking fields button. The toolkit uses information from the record shown in Voyager to populate a multi-tabbed workform. The toolkit uses this workform for a number of different editing operations (working with diacritics, with parallel vernacular fields, with uppercase/lowercase transitions, as well as linking fields). If you start with the linking fields button, the toolkit starts you out on the "linking fields" tab, but you can move to other tabs to perform other operations on the same record. Before the toolkit shows you this record, it may make a number of changes to it, depending on options you have selected. (These changes are described in an appendix.)
Here is how the top part of this multi-tabbed editing form might look immediately after you click the "linking fields" button:
Once you've got the record that will serve as the focus of your linking fields, the next thing you need to do is identify the second record: the record to which the first record will be linked. Go to the Voyager cataloging client and display the record that the toolkit should use as the source of information for the linking field. When you have this second record, return to the toolkit's editing panel and click the "Get second record" button. The toolkit digests information from this second record. After you've shown the toolkit your two bibliographic records, the top part of this editing panel might look like this; information from the second record is summarized on the right side:
At this point, all that remains for you to do is to use the "Tag", "Ind. 1" and "Ind. 2" drop-down lists to select the kind of linking field you want to create. (The lists of indicators aren't available if there is only one choice.)
Once you have identified the base record and the secondary record, and set the tag and indicators:
When you click one of the 'Add' buttons, the toolkit adds the field you have defined to the displayed version of the record. For example, if we have asked the toolkit to add a 775 field to our record, with no subfield $i, the lower part of the base record might look like this at this point:
The toolkit has not yet updated the Voyager database with the record containing the new linking field. If you wish to save the record at this point, click the "Save" button. If you want to perform any of the operations made available on any of the other tabs, you might want to do that that work as well before you save the record. (You can always save the record more than once.)
Use the "Print" button to send a version of the record to the printer. Use the "Reset" button to discard any changes you have not yet saved, and return the display to the current state of the record in the Voyager database. When you're done with this editing panel, click the "Close" button. When you click the "Close" button, the toolkit discards any changes you have made but not saved.
If you need to add more than one linking field to the primary record, you can call up another record in Voyager, again click the "Get second record" button, and create the additional linking field.
To add reciprocal links between records. You can also use this button to create links both ways between your records. To do this, first create the link one way, as described above. Then click the "Add reciprocal link to the other record" button at the bottom of the editing panel. When you click this button, the toolkit will reverse the sense of the existing linking field, and add a linking field to the other record. For example, if you have used the toolkit to add a 780 field to the first record, a click of this button will cause the toolkit to add a 785 field to the second record. If the record contains more than one linking field, click first on the linking field of interest, then click this button.
Create a reciprocal link for an existing linking field: If any bibliographic record already contains a linking field and you want to put the reverse of this linking field into the "other" record in Voyager, you can call up the first record with the linking fields button, then simply click the "Add reciprocal link to the other record" button. In this case you don't need explicitly to identify the second record: it's already identified in the linking field.
Before RDA, the bibliographic record for an item that contains expressions of a work in two languages (except in the case of the Bible) bore an access point that joined the names of the two languages in subfield $l with an ampersand ('&'). For example:
(The occasonal pre-RDA record uses 'and' instead of the ampersand: 'English and Italian'.)
Before RDA, the bibliographic record for an item that contains expressions of a work in more than two languages bore an access point with the term "Polyglot" in subfield $l. For example:
(The occasional pre-RDA record lists all of the languages: 'English, French and German'.)
Under RDA, a bibliographic record should contain a separate access point for each language expression contained in the item represented by the bibliographic record. The cataloger's toolkit has two features that help you make non-RDA bibliographic records more RDA-like by teasing multi-language access points into separate access points for each language expression.
![]() The toolkit's handling of a multi-language subfield $l is informed and constrained by
information contained in a bibliographic record's 041 field.
The toolkit will refuse to handle a multi-language
subfield $l if a bibliographic record does not contain a suitable 041 field. (The toolkit
will attempt to supply an 041 field if a bibliographic record does not have one and if the
record contains only a single dual-language subfield $l, and will attempt to
massage an unacceptable 041 field into acceptable shape, with your help; see just below.)
If the toolkit refuses to
handle a record with a multi-language subfield $l, or if the toolkit's attempt to untangle
subfield $l does not match your expectations, your first course of action should be to
make sure that the record contains an 041 field that corresponds to the information in subfield
$l: create an appropriate 041 field, or modify the existing 041 field, and try the button again.
The toolkit's handling of a multi-language subfield $l is informed and constrained by
information contained in a bibliographic record's 041 field.
The toolkit will refuse to handle a multi-language
subfield $l if a bibliographic record does not contain a suitable 041 field. (The toolkit
will attempt to supply an 041 field if a bibliographic record does not have one and if the
record contains only a single dual-language subfield $l, and will attempt to
massage an unacceptable 041 field into acceptable shape, with your help; see just below.)
If the toolkit refuses to
handle a record with a multi-language subfield $l, or if the toolkit's attempt to untangle
subfield $l does not match your expectations, your first course of action should be to
make sure that the record contains an 041 field that corresponds to the information in subfield
$l: create an appropriate 041 field, or modify the existing 041 field, and try the button again.
The toolkit's '$l' button offers an operator-mediated method for handling a non-RDA subfield $l that represents more than one language:
With the '$l' button, you carefully instruct the toolkit (by selecting various options and setting various controls) how to tease apart access points with instances of multi-lingual subfield $l; the toolkit carries out your instructions.
To use this feature, call up a bibliographic record that contains one or more instances of subfield $l containing an ampersand or 'and', or one or more instances of $l with 'Polyglot', then click the $l button. The toolkit may make certain changes to the record before it shows it to you. What happens next depends on what's in the record; the 041 field is at the top of the list of things that affect the behavior of the $l button.
Useful tip: If you have a text file of bibliographic record numbers that identify records containing instances of non-RDA subfield $l, you can give that list of records to the 'view records in list' button, and select the option for that button to feed the record numbers directly into the '$l' button. This can vastly simplify and speed up the conversion of a large number of records containing non-RDA features.
As mentioned above, the toolkit requires that the bibliographic record contain what the toolkit considers to be a valid 041 field before you can use the '$l' button to split apart a multi-lingual subfield $l. But this does not mean that you must put the 041 field into each record yourself before you click the '$l' button. If the bibliographic record does not contain any 041 field at all, the toolkit will in many cases be able to suggest the correct one for you by working backwards from the languages named in subfield $l to the corresponding codes. In this work, the toolkit uses information in various configuration files (principally, the toolkit's own codes.cfg file, and also the Vger lang.cfg file).
For example, when presented with a record containing these fields, but no 041 field:
The toolkit finds the codes that correspond to the two named languages, assumes that the second language is the original language, and constructs what it believes to be the proper 041 field for this record. If you have selected the appropriate option, the toolkit silently adds the 041 field to the record before it shows the record on its fancy editing panel; if you have not selected this option, the toolkit shows you its proposed 041 field, and allows you to decide whether it's good or not. (In the latter case, if you don't like the toolkit's proposed 041 field, you'll have to add the 041 field yourself, before you can use the $l button for the bibliographic record.)
If one of the languages named in subfield $l is "Greek", the toolkit may ask a preliminary question: is the language classical Greek? (Most of the time, for most of the things handled by most libraries, "Greek" in subfield $l means "classical Greek".) The toolkit remembers your answer for this author or title and writes it to a configuration file; so if the 'Greek' question comes up again for the same author or work, you won't be asked the question a second time. (The toolkit stores your answers in a configuration file, which is described in an appendix.)
Although the toolkit contains yet other tricks for dealing with classical and modern Greek (and at least one trick for dealing with items that contain the same text in modern and pre-modern versions of the same language), and although the toolkit's tricks usually lead to the correct outcome, you are always well advised when dealing with any subfield $l other than the most mundane to look over the toolkit's proposed results with the greatest of care before you approve any action.
The toolkit will be able to suggest a correct 041 field for the vast majority of records with bi-lingual subfield $l, when there is not already an 041 field in the record. Note the following:
This 240 field names the languages contained in the item but neither of these is the original language (which happens to be Latin). For a record such as this, you will need to create the 041 field yourself, and then use the '$l' button to split apart the bi-lingual subfield $l in the 240 field.
If the toolkit is not able to suggest an 041 field, or if you do not accept the toolkit's suggested 041 field, you will need to add a suitable 041 field to the record before you can use the '$l' button for this bibliographic record.
The toolkit will also modify an existing 041 field in a few cases. (In this work, the toolkit may pause to ask you a question or two.) Most commonly, if the 041 field uses the old coding style, in which multiple codes were stuffed into a single subfield, the toolkit will put each code into its own subfield. (The same thing can occur during BAM.) But more importantly, the toolkit also helps deal with a subtler difference between current practice and earlier practice for the 041 field. Before subfield $h was defined in the 041 field (October 1980), the coding practice for a translation was to put all of the codes into subfield $a, in this order:
Because the second and third languages are commonly the same, the typical 041 field for a translation contained only two codes. This means that if the 041 subfield $a contains two codes and subfield $l contains two languages, then it's likely that the bibliographic record represents a bi-lingual edition.
For example, the following bibliographic record represents an edition of selected letters of Gregory Nazianzen, in the original Greek with a French translation. The 041 field was constructed according to an earlier coding practice, before subfield $h was defined.
If the bibliographic record you present to the '$l' button is constructed along these lines, the toolkit asks you to confirm that the record represents this earlier coding practice. For example, when presented with the record for the correspondence of Gregory Nazianzen, the toolkit asks if this is a bilingual edition, with the second language named in the 041 field as the original language. If you answer 'Yes', the toolkit remodels the 041 field to reflect current coding practice, and then continues with its work.
The toolkit's handling of what it suspects to be an 041 field that reflects earlier coding practice depends on the value of one of the toolkit's options for the '$l' button. If you have selected this option, and if the 041 field appears to follow earlier coding practice, and if subfield $l contains '&' or 'and', and if the year portion of the date of record creation (bytes 00-01 in the 008 field) is between 60 and 80 (inclusive), then the toolkit will go ahead and re-configure the 041 field for you, without asking.
The generation or modification of the 041 field (either with or without operator approval, depending on your option) is not the only change that the toolkit can make to a record when you click the '$l' button. If the main uniform title (240 subfield $a, or 7XX subfield $t) is "Selections", the toolkit will supply "Works" in subfield $a, and move "Selections" to subfield $k. For example, if the record in Voyager looks like this:
The toolkit will generate an 041 field, and modify the 240 field, then present you with this result:
One more thing about the 041 field: if there is already an 041 field in the record, the toolkit can be misled if the 041 field is incorrect. (For example, an 041 field using older-style coding may (incorrectly) have the original language first and the language of the translation second; or it may use the code 'gre' when 'grc' is needed.) The toolkit is pretty good at handling records that contain no 041 field at all, but it can be led down the wrong path by records that contain an incorrect 041 field. When a bibliographic record already contains an 041 field, it is a good practice always to compare the 041 field to the remainder of the record, and adjust the 041 field as necessary, before clicking the '$l' button. Whenever it appears that the toolkit has misinterpreted the contents of the record, the first thing you should suspect is the record's 041 field. Click the 'Reset' button, adjust the 041 field, and try again.
When you use the features of the $l button to create new access points, the toolkit checks each of your access points against 1XX fields in your local authority records. The toolkit's inspection of a heading results in one of three states for each heading:
The toolkit's comparison of bibliographic to authority information is much simpler than the comparisons made during the BAM operation. (For example: in this simplified work the toolkit ignores authority 4XX fields.) If at any time you wish to see the full BAM report on the record in its current state (including modifications you have made with the $l button but not yet saved to Voyager), click the BAM button at the bottom of the large editing panel. The toolkit will verify the headings in the modified record, and present you its usual verification report.
The toolkit can make the state of each heading in a modified record visible by displaying the heading according to conventions you define on the options panel for the $l button. The toolkit can display each category of heading (fully-verified, partially-verified, unverified) according to a distinct convention. The toolkit can display headings in a particular category in bold-face, in italics, or in a color of your choice. The examples in this document follow these conventions for the display of headings modified via the '$l' button:
The toolkit contains an option for dual-language subfield $l that can greatly speed up and simplify yor work, especially if you undertake a major project to eliminate instances of pre-RDA subfield $l. If a bibliographic record contains a dual-language subfield $l and a suitable 041 field, and if other conditions are met, the toolkit will not first show you the record and expect you to click the 'Carry out these instructions' button, but the toolkit will instead act as if you had clicked this button, and will automatically make the changes that appear to be needed. This means that if you select this option, the first display you will see for most dual-language records is the modified record; for most dual-language records, all you need to do is review the results and then click one of the various 'Save' buttons. Selecting this option will cut in half the number of mouse clicks you need to make for most records. This document describes the operation of the $l button with this option turned off. A good practice is first to become familiar with the operation of the $l button in all of its delightful complexity, and only then consider turning this option on to speed up the work.
So much for the preliminaries; let's see how the $l button works on real examples. Here is a typical-enough bibliographic record with a dual-language subfield $l; this record already contains an 041 field coded according to current practice:
When you click the '$l' button, the toolkit will present its fancy editing panel, opened to the tab for dealing with subfield $l:
The toolkit has examined the record, and has found the first field in the record that it believes to be of interest for this work (the 240 field). (You can also click directly on any field with a multi-language subfield $l; that field will become the focus of the toolkit's attention.) The toolkit shows you the current field of interest in the box in the upper right of the editing panel.
Because the field of interest in this example is the 240 field, the toolkit presents a check-box related to the 240 field, just under the box that contains the text of the field itself. The toolkit takes the default value for this check-box from an option on the options panel. If this box on the 'Subfield $l' tab is checked, the toolkit will retain the 240 field, re-configured to represent one of the language expressions represented by the 240 field, and create a 7XX field for the other language expression; if this box is not checked, the toolkit will delete the 240 field, and create two 7XX fields. Retaining the 240 field for an item that contains multiple language expressions does not follow RDA conventions. (If the field of interest is a 7XX field, the toolkit doesn't show this check-box, as it's clear that that toolkit will modify the existing 7XX field for one expressaion and add one a new 7XX field for the other expression.)
The toolkit disassembles the information in subfield $l into work areas on the right, just below the box that shows the original field. In this example, because the source field has a dual-language subfield $l, there are two language-based work areas. Each row in these work areas contains one or more check-boxes, depending on the contents of the field in question, the choices you have made on the options panel, and the contents of the 041 field. In this example, because both of these languages are properly identified in a configuration file, the toolkit has been able to map both of the languages in subfield $l to the appropriate element at the beginning of each language work area on the right. For now, let's just consider the possibilities available for this simple case.
The toolkit draws the lists of languages from one of its configuration files. If the language named in subfield $l is not identified as such in the configuration file, the toolkit will use the text exactly as found in subfield $l (minus any terminal punctuation) as the language name. You can also type any text you want, if you need some language name that's not listed.
The toolkit can offer you a maximum of 10 language work areas. If you need more than 10, you will need to finish the record on your own.
Because of a common coding error, if any language code in the 041 field is 'gre', the toolkit shows a button with the caption 'Classical Greek'. If you click this button, the toolkit changes the code 'gre' in the 041 field to 'grc', and changes the language name in the corresponding language work area.
When you have set the language-based controls on the right side to their proper values, click the 'Carry out these instructions' button. The toolkit will modify the record in the editing panel as instructed. As is always the case with features on this editing panel, the changes you see in the display are not yet saved to the Voyager database. The toolkit only saves your changes to Voyager when you click the Save button.
For our example record, following the operator's instructions, the toolkit deletes the 240 field and adds two new 7XX fields, one for each language expression. Per the operator's instructions, the 7XX field for the expression in the original language does not contain subfield $l:
The toolkit searches the local authority file for each access field that it creates or modifies during this work. The toolkit compares the complete text of each such field against authority 1XX fields, and uses display conventions you define on the $l button's options panel to indicate the results. In this example, the toolkit found a matching authority 1XX for the simple name/title heading; the display convention defined on the options panel for fully-verified headings is plain text, so the toolkit shows the fully-verified heading in plain text. The toolkit found a partial match in the local authority file for the name/title heading with subfield $l; the display convention defined on the options panel for partially-verified headings is italics, so the toolkit shows the partially-verified heading in italics.
The toolkit's displays of partially-verified and unverified headings are your indication that further work (authority-related) may need to be done. You can click the BAM button at any point during your work on the record and use the BAM report to initiate authority work; you can wait until you're finished with the record and click the 'Save and BAM' button; or you can call up the finished record at any later time and do whatever needs to be done.
After you've used the features on this tab to handle one instance of a multi-lingual subfield $l: If there is another access field in the record with a multi-lingual subfield $l, the toolkit will automatically find it for you, and present information about it in its work areas on the right side of the editing panel. Take care of othis field, and move on to the next. In this manner, you convert the record one field at a time, each in its turn. When you have handled all of the multi-lingual instances of subfield $l in a record, click the 'Save' or 'Save and BAM' button to write the changed record to your Voyager database.
If the first change that you approve to a bibliographic record involves the 1XX field plus a bi-lingual 240 field, there's an additional possibility. When you click the "Carry out these instructions" button, the toolkit does a quick-and-dirty search for other bibliographic records that appear to have the same heading, and (if there are any) tells you how many other similar bib records there appear to be. If you ask the toolkit to look further into the matter, it retrieves each bib record, examines it, and presents you with the records as they would be changed. If you like what you see, the toolkit will change all of the records at once.
Here's an example. We've found a bibliographic record for a bi-lingual (English and Italian) edition of Dante's Paradiso, and we wish to RDA-ify the primary access point to eliminate the bi-lingual subfield $l:
The '$l' button (correctly) surmises that we want to remove the 240 field and create two new analytical access points: one for the original language and one for the English translation. When you click the 'Carry out these instructions" button, the toolkit modifies the record on the left side of the big editing window to show the proposed change. The toolkit also does a search for similar records, and shows what it found:
If you click the "Explore" button, the toolkit fetches each of the records, and applies to each the same transformation definition that it applied to the original record. The toolkit shows all of the transformed records in a new window; you can (and really should!) scroll around in the window to examine all of the records. The toolkit uses the same conventions to indicate fully-verified, partially-verified and unverified headings in each of these records that it uses in the display of the original record.
Note the message line at the very bottom of the frame: in this case, the toolkit examined 4 records, but only changed 3 of them. If you scroll to the bottom of the last record, the toolkit will show you the record(s) it couldn't change automatically:
You'll need to call up that un-changed record and deal with it on your own. (The toolkit didn't change this particular record because the name/title combination appears in a 700 field, not as a 100 with 240.)
You have two options when you ask for a list of additional records that seem to need the same change:
Note: The toolkit will also present such a message regarding additional bibliographic records in the case of separately-published libretti, and libretto texts that accompany sound recordings. You should generally not follow up on the toolkit's suggestion that all of these can be handled at once, but should instead handle each according to its merits.
If at any point you want to start over, you can either click the 'Reset' button on the fancy editing panel, or you can call up the record in the Vger cataloging client and click the '$l' button (you can do this even if you're working from a list of records).
When you're satisfied with the final shape of the record, click one of the 'Save' buttons at the bottom of the fancy editing panel, to send the changed record back to Vger.
The toolkit does what it can to get the 041 field in a record into a form that may be 'good enough' to split apart the languages in subfield $l, but the resulting subfield $l may not be as good as it can be. For example, the code 'gre' in subfield $h may well allow the toolkit to handle 'French & Greek' in subfield $l correctly, even though the code 'grc' is the correct code.
When you notice that the 041 field in a record is not satisfactory, you can use the 'Fix the 041' button at the bottom of the fancy editing panel to work directly with the 041 field. The toolkit presents the current state of the 041 field in a special editing form. The following illustration shows a typical display.
There's a drop-down box at the top for the 041 field's first indicator. The toolkit provides a work area for each subfield in the 041 field. If you want, you can use each of these directly, and type into relevant boxes (use '$' for the subfield delimiter code). Or, if you want, you can select a language from the drop-down list of codes at the bottom of the panel, and add the code to a box by clicking the corresponding 'Add' button. To remove a code, either directly remove the language code and its subfield code from a box, or click on the code an then click the corresponding 'Delete' button. If any of the codes in the 041 field is 'gre', there's a special button that will change all of the 'gre' codes to 'grc' (this helps you fix a common error).
Click the 'OK' button to put the modified 041 field back into the record-in-progress, or click the 'Cancel' button to abandon your work on the 041 field. The changes you make on this special editing panel are part of the work you're doing on the record displayed in the 'fancy' editing panel; the toolkit doesn't save these changes to Vger until you click a 'Save' button.
So far, we've been looking at subfield $l that contains two languages joined by '&' (or "and"). Things are slightly more elaborate for 'Polyglot' access points. Here's a sample original bibliographic record:
When the operator clicks the '$l' button, the toolkit notices the lack of subfield $h in the 041 field, and asks if it is true that the original language is not known. If you answer 'No', the toolkit refuses to work on the record; if you answer 'Yes' the toolkit continues to work on the record. In this case, the operator supplied subfield $h for the 041 field and then clicked the '$l' button again. The toolkit showed this display:
Because the field of interest is the 130 field, the toolkit presents a check-box just under the box for the text of the original field, with a slightly different caption than it had when the field of interest is a 240 field. The toolkit takes the default value for this box from an option on the options panel. If this box is checked, the toolkit will retain the 130 field, re-configured to represent one language expression, and create 730 fields for the other language expressions; if this box is not checked, the toolkit will delete the 130 field, and create 730 fields for each language expression. (RDA practice is to remove the 130 field and construct replacement 730 fields.)
Because this subfield $l is "Polyglot", the toolkit starts out with all 10 possible language work areas. (If you need more than these 10 work areas, you will need to finish the record on your own.) The toolkit has primed the first three work areas by reference to the 041 field; if there had been no 041 field, all of the work areas would be set to their initial value of "None." All of the remaining work areas are set to their default value; the toolkit will only create access points if the language box shows something other than its default value.
This display shows additional check-boxes in the row for each language.
As always, it is your job to make sure that all of these language work areas accurately reflect the access points you wish to create. In this particular case, the toolkit's default actions are correct: we wish to delete the 130 field and create three new 730 fields, one for each language. Because this is a Bible heading, we will retain subfield $l and subfield $f in each of these access points. Because this item only contains one kind of Greek (i.e., it does not contain both classical and modern Greek), we don't need to retain the parenthesized expression after the basic language name.
When the operator clicks the "Carry out these instructions" button, the toolkit modifies the record in accordance with the instructions in the configuration:
In this case, because the toolkit has removed the 1XX field, it also adjusted the first indicator of the 245 field. As was the case with the earlier record with the bi-lingual subfield $l, the toolkit has tested each of the new access fields against the local authority file; in this case it found partial matches for the Greek and English headings (shown in italics) and a complete match for the Hebrew heading (shown in plain text).
As was the case with dual-language subfield $l, after it has carried out your instructions the toolkit will inspect the record for another field with multi-language subfield $l. If there is such a subfield, the toolkit will prime its work areas to match. As is also the case with dual-language subfield $l (and, indeed, all of the tabs on this fancy editing panel), the toolkit does not write the changed record to the Voyager database until you click a 'Save' button.
One more thing, about Bible headings in particular: If subfield $s is present, the toolkit can include, or exclude, subfield $s from the new access fields, but it does not provide a means to add subfield $s if the original access point does not contain one. In the case of the above record, the operator will need to intervene in the finished record, and add subfield $s containing "New International" (as suggested by "NIV" in the 245 field) to the access field for the English translation.
The work areas for each language can have additional check-boxes beyond those described above, depending on the contents of the original field and on your options.
NOTES: In the following description of the use of this button, the term opera is used generically for musical works that incorporate a text, and the term libretto is used generically for such texts that are part of musical works. These terms are to be understood as references to the broadest category of such works: the 'libretto' button is intended to work equally well for all musical works that incorporate text, and should work equally well for operas and Broadway-style musicals (for example).
In bibliographic records for musical works (printed or recorded), special considerations apply when the composer of the music is also the writer of the words. The toolkit's handling of this special case is described separately, after the description of the more usual cases.
Before RDA, the bibliographic record for a separately-published opera libretto (i.e., the text of an opera published as a separate book) had as its main entry the composer of the opera, with "Libretto" in the uniform title (in subfield $s, if you're lucky), and with an added entry for the author of the libretto. To add to the complexity of the situation, libretti are commonly published together with a translation, meaning that a multi-lingual subfield $l is often also present.
Here is a typical pre-RDA bibliographic record for a separately-published libretto, containing the original text and an English translation:
In contrast to previous practice, RDA recognizes that the librettist, and not the composer, is the author of the libretto. The libretto is one work, and the opera is a separate work. There is of course a special relationship between the two works, and this relationship needs to be expressed once the various responsibilities are sorted out.
The following illustration shows the above bibliographic record for a separately-published libretto as it might be remodeled to conform to the model used under RDA. (This illustration also shows other changes, not directly related to the RDA model for handling libretti.) The author of the libretto is now given in the 100 field, there are 700 fields for the two expressions contained within this item, and there is a third 700 field to describe the relationship of this work (the libretto) to some other work (the opera).
A sound recording of an opera is often accompanied by a separate libretto booklet, giving the text in one or more languages. Following the same line of thinking as was used for libretti, in a pre-RDA bibliographic record for a sound recording the libretto is identified by an added entry starting with the name of the composer (again, with "Libretto" in subfield $s). In the following illustration of part of a bibliographic record (for a sound recording of Elisir d'amore), the libretto is represented by the last 700 field. This particular bibliographic record does not identify the name of the librettist (Felice Romani) in 700 field or even in a note.
Here is the corresponding part of this bibliographic record, as it might be remodeled following RDA principles. Felice Romani is recognized as the author of the libretto, and there is a separate access point for each expression of the libretto.
To convert a pre-RDA bibliographic record for a separately-published libretto into a record that follows the RDA model, the following things need to happen:
In a similar vein, to convert a pre-RDA bibliographic record for a libretto that accompanies a sound recording into a record that better follows the RDA model, the following things need to happen:
The cataloger's toolkit contains a button, the "libretto" button, which (together with other toolkit features) can make all of the necessary conversions to a pre-RDA bibliographic record for a libretto with just a few clicks of the mouse. This button is designed to be used for:
It is possible that in the future the button's capabilities will be expanded to include additional similar things (such as the texts of songs); but for the present, it should only be used for those kinds of things for which it was designed. Although the functionality of this button is restricted, it should nonetheless be able to bring the majority of bibliographic records for separately-published libretti into a more RDA-like form.
It cannot be stated too firmly that the libretto button is not designed for use in creating new bibliographic records for libretti, or things that contain or refer to libretti. It is designed solely for the rearrangement of existing non-RDA bibliographic records into a more RDA-like shape.
When the Voyager cataloging client displays a bibliographic record for a separately-published libretto, you should first inspect the record to make sure that it fits the toolkit's criteria. Modify the existing 041 field, or create an 041 field, as appropriate. When the record appears to be in satisfactory form, click the libretto button. The toolkit reads the Voyager record, perhaps makes some initial changes to it, and then displays the record for you on the 'libretto' tab of its fancy editing panel.
Here is a typical bibliographic record for a separately-published libretto as it may initially be displayed on the 'libretto' tab of the fancy editing panel. The toolkit has not yet made any libretto-related adjustments to this record.
The toolkit was not able automatically to identify the librettist for you. 83 Your initial task is therefore to identify the librettist. If the bibliographic record contains a 700 field for the librettist, carefully click anywhere on that 700 field; when you click on a 700 field, you are telling the toolkit that this 700 field identifies the librettist. (If there is more than one librettist, click on the principal one, or the first one named.) When you identify the librettist in this manner, the toolkit immediately swaps the positions of the 100 and 700 fields, and makes other changes to the record as well. The changes that the toolkit makes depend to some extent on options you have selected.
Here is the above record, as it might appear after the operator has clicked on the 700 field for Romani. Romani has become the 100 field, subfield $t from the 700 field has become subfield $a of the 240 field (they're the same, as they will be most of the time), and the toolkit has constructed a 700 field that identifies a related work: the opera for which this text serves as the libretto. (The toolkit takes the text "Libretto" from the currently-selected item in the list of accompanying text types.) The core of the 700 field consists of the former 100 field and the title from the original 240 field.
With this single click, the record has been reformulated so that the librettist and composer are in their proper places as specified by RDA.
Because this 240 field represents two separate expressions of the libretto (the original Italian text, and an English translation), the operator is not quite finished with this record. The operator needs to move over to the '$l' tab, click on the 240 field to identify it as being of interest, inspect and adjust the language-based controls on the right side, and finally click the "Carry out these instructions" button to create the 700 fields needed for each expression contained in the item. The next illustration shows how this record appears after the operator has performed these additional operations (on the '$l' tab)
At this point, the operator can decide that the business of making this bibliographic record more RDA-like is complete, and can click the 'Save' button to write all of the changes back to Voyager.
On the '$l' tab, the toolkit shows the 700 field for the original text (the 700 field without subfield $l) in bold, which means that there is no authority record for the libretto by itself. (There is also no authority record for the English translation, so the toolkit shows it in bold, too.) If you wish to create an authority record for the libretto (highly recommended), click the 'Save and BAM' button instead of the plain 'Save' button, and then create the authority record for the libretto (or its translation) from the appropriate line in the BAM report. (Authority records that the toolkit creates for libretti are described elsewhere in this document.)
Depending on options you have set, and also on the content of the record, the toolkit may be able automatically to identify the librettist for you when you click the toolkit's 'libretto' button, and so will have reformulated the record before it shows you the record for the first time. For example, if you have told the toolkit that the text "libretto by" in a 500 field can be used to identify the librettist, the toolkit may have already flipped the record around for you. Your work is then to make sure that this rearrangement is correct, and to perform other operations (such as splitting apart a multi-lingual subfield $l into its individual components, and creating any authority records you might wish to create).
For example, if the option automatically to flip a record containing a 700 field with "lbt" in subfield $4 is selected, when you click the toolkit's 'libretto' button when the cataloging client displays this record:
The toolkit will automatically reformulate the record like this: 84
NOTE: The examples in this section assume that the "composer is also the librettist" option is not selected.
The toolkit handles pre-RDA bibliographic records for sound recordings and scores that have a 700 field for the libretto in a similar manner. We'll start with sound recordings (because they're the more common case) and then look briefly at scores.
Pre-RDA bibliographic records for sound recordings that are accompanied by a libretto often have a 700 field for the libretto (naming the composer as the author of the libretto). The actual author of the libretto may or may not be included amongst the 700 fields in the bibliographic record. This common case is the case for which the toolkit can offer the most assistance.
When the Voyager cataloging client shows a bibliographic record for a sound recording, with the composer named in the 100 field and also in a 700 name/title access point for the libretto, click the 'libretto' button. The toolkit will attempt to identify the librettist, and flip the record into an RDA-like configuration.
Example: Starting from a record for a sound recording of Donizetti's Elisir d'amore having these 7XX fields:
Because a 700 field contains subfield $4 with the text "lbt", the toolkit was able automatically to reconfigure the record in the following manner:
The libretto accompanying a sound recording is often in more than one language. The operator should now flip to the '$l' tab to split this single 700 field into two 700 fields, save the record, and create any authority records that may be wanted.
Example: We'lll start with a record containing these 7XX fields:
This bibliographic record does not contain a 700 field that identifies the librettist. As it happens, because of work performed earlier for a bibliographic record related to the same opera, the local authority file already contains an authority record for the libretto, with a 400 field for the composer:
Because of this 400 field in an authority record, the toolkit is able automatically to identify the librettist and reconfigure the 700 field into a more RDA-like shape:
As is often the case, the libretto is in more than one language. The operator should now flip to the '$l' tab to split this single 700 field into two 700 fields and save the record. Because there is already an authority record for the libretto by itself, there is probably no need to create additional authority records.
If the toolkit is not able to identify the librettist on its own, the most likely cause is this: the librettist is not clearly identified in the bibliographic record and there is also no suitable authority record for the libretto in the local authority file. In such a case, the first thing you need to do is to identify the librettist (research is usually required).
Once you have identified the librettist, 85 start from the bibliographic record and click the toolkit's 'libretto' button to display the bibliographic record on the 'libretto' tab of the fancy editing panel. If the local authority file contains an authority record for the librettist (name alone, not a name/title record), call up the authority record for the librettist in the cataloging client, then click the "Cataloging client shows authority record for librettist" button on the 'libretto' tab. The toolkit will use the 100 field from the authority record to reconfigure the bibliographic record.
If the local authority file does not contain an authority record for the librettist, you will need manually to add a 700 field for the librettist to the bibliographic record, with subfield $4 containing "lbt". When you have this, then click the toolkit's 'libretto' button to start the process.
The toolkit offers a few tools on the libretto tab for the modification of a bibliographic record. (Similar tools are not available on other tabs).
The right side of the toolkit's 'libretto' tab also contains a frame that tells you whether or not there is an authority record for what the toolkit believes to be the heading for the libretto by itself (minus any languages or other extensions). If there is no such authority record, you may wish to create one after the bibliographic record is appropriately re-configured. The toolkit shows the access point for the libretto in uppercase, to grab your attention.
If there already exists an authority record for the libretto, the toolkit shows the libretto's preferred access field in lowercase, so it's less likely to catch your eye. The toolkit shows you subfield $a from each of the 400 fields in the record; this lets you know whether or not the record already contains a 400 field for the composer, and for any collaborators.
If the bibliographic record represents, or appears to represent, a work for which the composer serves also as librettist, this frame will contain a slightly different kind of information.
Bibliographic records for the scores of operas created before RDA can follow the same model as used for sound recordings: there can be a 700 field for the libretto, naming the composer as the author of the libretto. (It appears that this was most often done when the libretto occurs separately in the score, in addition to the words that are set to music. In some cases there is no 700 for the libretto, in which case the matter of the pre-RDA access point for the libretto does not generally come up at all.) The toolkit's handling of libretti associated with scores is quite similar to its handling of libretti for sound recordings; the toolkit doesn't care whether the libretto is in a separate booklet or not.
The following illustration shows a typical bibliographic record for a score, with a 700 for the librettist (without subfield $4), but the librettist is named in a note:
In this case, the toolkit is not able to use the text in the note to identify the librettist, because "in Italian" isn't defined as part of the recognized texts. However, as is the case for separately-published libretti and sound recordings, the operator can click on a 700 field for the librettist (if there is one) and the toolkit will take over. (If the librettist is not named in the bibliographic record at all, the operator can call up the authority record for the librettist, and click the "Cataloging client shows authority record for librettist" button.) In the case of this record, when the operator clicks on the 700 field for the librettist, the toolkit reconfigures the record so that the 700 for the librettist becomes a name/title access field for the libretto, and the 700 for the composer as author of the libretto disappears altogether:
As is always the case, if the resulting access point for the libretto represents more than one language expression, you can finish the field by moving the "$l" tab; and then create any authority record for the libretto that may be wanted.
The authority record for a libretto written by one or more known persons should have in its 1XX field the preferred access point for the libretto itself. There should also be a 400 field for the opera for which the libretto serves as text, with the text "Libretto" in subfield $s. (See RDA 6.27.4.2.)
The following illustration shows a typical authority record for a libretto written by a single person, with a 400 field naming the work for which the libretto serves as text.
The following illustration shows a typical authority record for a libretto written by two or more people. Librettists other than the primary librettist are named in name/title 400 fields; in individual bibliographic records the joint librettists (if given access points at all) are given simple name access points, not name/title access points. (The same structure is used for the texts of Broadway shows and similar works: the primary author of the book and/or lyrics is identified in a 100 field, and other authors are given in name/title 400 fields.)
The toolkit contains several features to help you construct authority records for libretti with the least amount of manual intervention.
If the toolkit knows the librettist for a work (either because it was able to figure this out on its own, or because you told it), the toolkit will tell you whether or not there already exists an authority record for the libretto. If there is such an authority record, the toolkit shows you subfield $a from each 4XX field in the record. This latter feature tells you whether or not the authority record appears already to have the proper structure.
If there is no such authority record for the libretto, and if you wish to create an authority record, first get the bibliographic record into its correct final form, by using the 'libretto' button, the '$l' button, and any other feature of the fancy editing panel that seems appropriate. When the record is as good as it can be, click the 'Save and BAM' button. As is always the case, the BAM report will tell you which access fields have matching authority records, and which do not. Use the BAM report in the usual manner to create an authority record for the libretto by highlighting the access field for the libretto, and then clicking the "Create authority" button.
Example. The original access field in the following record for the libretto that accompanies a sound recording named the composer; the operator has used the "libretto" button to re-configure the access field, and to create a separate access field for each language expression of the libretto. Because the 700 for the libretto is in bold, the operator knows that there is no authority record for this access point.
The BAM report for the saved bibliographic record also tells the operator that there is no authority record for the libretto by itself.
If the operator highlights the line for the libretto and then clicks the "Create authority" button, the toolkit creates an authority record for the libretto, with a 400 field for the libretto as an extension of the access field for the opera:
The toolkit is able automatically to create this name/title 400 field for the composer most of the time, but not always. The toolkit can create this 400 field in the following circumstances:
When you create the authority record for a libretto, the toolkit will (under your guidance) also create name/title 400 fields for joint authors of the libretto. The toolkit does this by collecting any 700 fields in the record, and allowing you to choose from them.
Example. Here is a pre-RDA bibliographic record for a separately-published libretto:
Using the toolkit's 'libretto' button, the operator has modified the record to more closely follow RDA conventions for the access fields:
The operator uses the "Save and BAM" button to write the modified record back to Voyager, and to get a BAM report from which to create an authority record for the libretto. The operator highlights the name/title line for the libretto and clicks the "Create authority" button. The toolkit notices that there is a 700 field in the record that is not a name/title field, so the toolkit opens a panel showing the 700 field and presenting the operator with a decision to make.
If any of the names presented is a collaborator on the libretto (as is the case with Genée), the operator highlights the line (or, if there is more than one collaborator, highlights multiple lilnes) and clicks the "Add 4XX" button. If none of the names is a collaborator on the libretto, the operator clicks the "No 4XX" button.
In this case (because the 245 field clearly identifies Genée as a collaborator on the libretto—which can be confirmed by a quick recourse to reference sources if desired) the operator makes sure that the GENEE line is highlighted, and clicks the "Add 4XX" button. The toolkit creates a name/title 400 field for the collaborator, in addition to the standard 400 field for the opera.
Under RDA, the music and the words of a musical work are treated as separate (though related) entities, each of which calls for its own access point. The preceding discussion contains multiple allusions to a complicating factor that can arise with any libretto: the writer of the music may be the same as the author of the text. Additional considerations in the handling of bibliographic records come into play when this condition exists, or appears to exist. The cataloger's toolkit contains a number of features that can help untangle pre-RDA bibliographic records for works for which the composer serves as librettist, but you're going to have to be on your toes to make sure that these records are handled correctly.
The matter of composer as librettist arises most prominently in the case of the operas of Richard Wagner: he wrote the libretti for all of his operas. However, the matter can arise for other opera composers, and for any other kind of musical work with associated text: Jonathan Larson wrote the book, lyrics and music for Tick, tick—boom! and Hector Berlioz wrote the libretto and music for Les Troyens. The toolkit has a hard-coded exception for Richard Wagner (that is, for the one born in 1813), and it contains an option that you can turn on and off for other composers as conditions merit. Because the handling of works for which the same person provided both music and text requires extra attention and (except for Wagner) special attention to the toolkit's configuration, you will find it expedient to handle such materials in groups whenever possible. (For example, you will find it expedient to handle everything related to Jonathan Larson's Rent as a discrete group.) Although for purposes of brevity this description will often refer to such works as "operas" and their text as "libretti", it should be understand that the features described here can be used for any work for which the same person provided both music and text.
The toolkit option related to composers as librettists is this check-box:
The toolkit assumes that for all sound recordings and scores for works by Richard Wagner (b. 1813) Wagner serves as his own librettist. The value you set for this option has no effect on the toolkit's handling of records for works by Wagner.
The pre-RDA bibliographic record for a separately-published libretto of an opera for which the composer wrote the text can have the same appearance as any other libretto, except that there probably won't be a 700 field for the librettist. (There may of course be 700 fields for editors and/or translators.) Here is a typical example:
When you display such a record in the cataloging client and click the 'libretto' button, the toolkit won't recognize this as representing any case that it can handle automatically; the toolkit will just show you the record (as enhanced according to your options) and will wait for you to do something:
For a work such as this, your proper action is to make sure that the "Musical work" and "Text" lists accurately reflect the kind of material represented by the bibliographic record (in this case, assume that the operator has identified "Opera" and "Libretto"), and then to click the "Composer is the librettist" button to the right of the record display. The toolkit reformulates the record following the RDA model:
This reformulated record recognizes that the libretto and the opera for which it serves as text are separate (related) entities. Because the basic title of the libretto and the opera are the same, the toolkit has added a qualifier to each, to distinguish them. The texts that the toolkit uses for these two qualifiers are the currently-selected values in the lists of types of musical works and associated texts.
When the composer is also the librettist, the "authority information" frame to the right of the record display shows slightly different information than it does at other times:
The toolkit has performed several searches (to catch a number of likely permutations), and shows you the results of all of them. In this case, the toolkit is telling you that there is at least one authority record for the basic opera title plus additional text. The toolkit bases this determination on information it finds in a Voyager table. The "more text" referred to may for example be the names of individual selections, as shown in the following illustration:
Because access points for this opera under RDA must contain the qualifier "(Opera)" there is often (as here) a lot of cleanup required, both to authority and bibliographic records. The toolkit can help you with the bibliographic records, and the toolkit can create new authority records, but you're going to have to deal with changes to existing authority records on your own.
The "Composer is the librettist" button works in a similar manner when presented with a bibliographic record for a sound recording or score that does not contain an explicit reference to the libretto. In this case, the toolkit adds a qualifier to the uniform title but otherwise leaves the record alone.
For example, when you click the 'libretto' button when the cataloging client displays a record such as the following (there is no 700 field for the text), the toolkit will initially take no action.
If you click the "Composer is the librettist" button, the toolkit simply adds a qualifier to the 240 field.
In some cases, the pre-RDA 240 field mashes together information about the musical work and the libretto. For example, the following 240 field tells us both that we have a vocal score, and that the text is present in both German translation and the original French.
If the 240 field contains subfield $l and if there is not already a 700 field for the libretto, the toolkit will create a 700 field for the libretto, moving subfield $l from the 240 field to the new 700 field. In this case, it remains for the operator to deal with subfield $s in the 240 field, and with the multi-lingual subfield $l in the new 700 field.
Sound recordings and scores having an existing 700 field for the libretto: If the option telling the toolkit to assume that the composer is librettist is checked, the toolkit will automatically reconfigure the record, providing separate access points for the music and the words.
Example: If this option is selected, when the toolkit is presented with a bibliographic record containing fields like these:
The toolkit will automatically reformulate the record, so that there are separate RDA-like access points for the music and the text:
Again, the authority information box shows authority records that match each possible configuration of these access fields, and it is up to you to modify authority records as appropriate.
There is an additional feature added to the toolkit specifically for Wagner's Der Ring des Nibelungen but which can be of use also for Puccini's Il trittico, and other similar works as appropriate. This feature is based on the fact that the rules for the preferred title of a musical work differ in a fundamental way from the rules for the preferred title of a text. This difference in the selection of title means that additional considerations come into play when dealing with the libretto for a part of a musical work.
To understand the situation, it will be best to work with a specific example. Here is a bibliographic record for the score of Gianni Schicchi, of one of the three operas that comprise Puccini's Il Trittico. Following the rules for musical works, the 240 field in this record shows the full hierarchy: title for the main work followed by title for the part.
This hierarchy for the title of the musical work needs to be preserved. However, the hierarchy does not apply when we are considering access fields for the libretto. Giovacchino Forzano did not one-third of the libretti for Il trittico, he wrote all of the libretto for Gianni Schicchi. When properly re-configured in RDA fashion, the record should have an appearance something like the following:
In order to achieve the distinction between the title for the musical work and the title for the libretto, the toolkit's 'libretto' box contains a check-box that is only available when the title of the musical work contains subfield $p:
If this box is checked, when the toolkit constructs the access point for the libretto the title will contain only the title for the individual part (just subfield $p, now in $t), and not the full hierarchy of title for the main work plus the title of the part. If this box is not checked, the toolkit will preserve the full hierarchy in the access point for the libretto. Most of the time, the correct value for this option is 'checked', and you can make sure that it is normally checked by selecting an option listed amongst the options for the libretto button on the toolkit's options panel. This higher-level option sets the default value for the check-box on the libretto tab.
Use the 'transformer' button to make a collection of changes to a set of bibliographic records. The separate transformer button on the toolkit's main panel allows you to make pre-defined changes to the record currently displayed in the Vger cataloging client; some secondary forms (such as the Z39.50 form) have their own 'transformer' button that allow you to do the same kind of thing in other contexts.
Any transformation you make with this button must be defined ahead of time, on the options panel. Use the options panel to define as many different transformations as you need, and also to assign one of those transformations to the transformer button. Although you can have a large number of defined transformations, the transformer button only performs the one transformation currently assigned to it.
To make a transformation to a bibliographic record, define a transformation and assign it to this button. Call up the record in the Vger cataloging and click this button. The toolkit makes the changes defined for the button's current transformation, saves the changed record to the Vger database, and attempts to re-display the record in the cataloging client for you.
![]() The re-link button uses features added to the BatchCat interface of the Vger system
beginning with version 8.2. These features allow a program to move an item record
from one holdings record to another, and to move a holdings record from one bib
record to another. If you have an earlier version of Vger, you
can not use the re-link button.
The re-link button uses features added to the BatchCat interface of the Vger system
beginning with version 8.2. These features allow a program to move an item record
from one holdings record to another, and to move a holdings record from one bib
record to another. If you have an earlier version of Vger, you
can not use the re-link button.
For any number of reasons, it can happen that you need to move an item record from one holdings record to another, and/or to move a holdings record from one bibliographic record to another. This process, commonly called 're-linking,' can be done through the Vger cataloging client. Unfortunately, the method used by the Vger cataloging client requires that the operator correctly type the target holdings record ID or bibliographic record ID. In addition, re-linking can only be done one record at a time, so if you have a large number of items to move on a single record, the Vger interface seems a hinderance rather than a help.
The re-link button on the cataloger's toolkit is an attempt to overcome these problems with the Vger cataloging client. With this button, you show the toolkit what you want to do, and the toolkit carries out the work for you. For example, you can grab a handful of item records and move them to a different holdings record in a single motion (sometimes this takes two moves); after you verify that the items are now at the correct place, the toolkit makes the move permanent for you.
You can also use this feature to create a new holdings record, and then move item records to that new holdings record. You can suppress and un-suppress holdings records, change the location of a holdings record and its associated item records, and change the item type in a group of item records.
You can use this button to re-arrange the holdings information attached to a single bibliographic record (for example, you might use this button to move older serial volumes to a new storage location). You can also use this button to shift holdings and item information between two bibliographic records. (For example, you could use this button to help you split apart a record that combines print and microform information into separate records, with appropriate holdings attached to each one.)
The behavior of this button is controlled by choices you make on the toolkit's Options panel.
To begin your work with this button, call up a record in the Vger cataloging client, and click the button. The toolkit will retrieve the bibliographic record, and list all of the associated holdings and item records linked to it, in a simple indented display. Each line in the display represents a holdings record or an item record; item records are indented under the holdings record to which they are linked.
The following picture shows a reasonably typical display. The bibliographic record has two holdings records with linked items, and one holdings record without any items.
The toolkit places each data element in each line into a separate subfield, using the vertical bar as the subfield delimiter character. For a line that represents a holdings record, many of the subfield codes are the familiar ones used in the 852 field, but there are some different ones, too; all of the subfield codes used for data from item records are made up just for this display.
Holdings record subfields:
Item record subfields:
You will select holdings and item records in the display, and the use the buttons running down the middle of the display to tell the program what you want it to do. Here is a brief description of these buttons (there's more detail below about how to use each one):
When you are working with holdings records, you should work with just one holdings record at a time; but when you are working with item records, you have more flexibility. You can use the familiar Windows keyboard commands to select multiple item records:
When you are working with the re-link button, you can do the following, in whatever order seems appropriate to the situation at hand:
As a simple example, assume that in the illustration above you wish to move the item lines for volumes 29-45 from the first holdings record to the second. First, highlight the item records of interest:
Click the red 'down' arrow to copy the selected items to a temporary staging area:
Select the holdings record to which the items should be linked, and click the 'up' red arrow:
If you need to move information from one bibliographic record to another, call up the second bibliographic record in the Vger cataloging client, and select 'Pick up second Voyager record' from the menu at the top of the re-linking panel. The toolkit will collect information about the second record, and display it to the right of information from the first record. The following illustration shows a typical two-record display.
You can do the same things with the record on the right that you can do with the record on the left; but you can also move holdings and item records from the record on the left to the record on the right, or from the record on the right to the record on the left.
After you have made all of the changes you think are necessary, you can select 'Preview' from the panel's menu. The toolkit shows you a detailed description of every action it will take when you tell it to go ahead and commit the changes. The toolkit's preview panel will also clearly show you when it will not make a change to a record. Make additional changes, and inspect the preview again, until the records are all as you wish them to be. (You don't have to preview changes if you don't want to, but when you're just getting started, or when changes are more complex than usual, it's a good idea.)
When you are satisfied that the holdings and item records are distributed correctly, select 'Save' from the panel's menu. The toolkit makes exactly the changes it showed you in its preview panel.
Use the E-MAIL button to send the record displayed by the Vger cataloging client as an e-mail message. The button allows you to perform various transformations on the record as it is sent.
Configuration points to consider
The E-mail tab on the tookit’s Options panel controls the behavior of this button.
Your e-mail client must be configured to accept requests to send messages that arrive from Windows via the MAPI interface. If you e-mail client cannot process MAPI requests, you will not be able to use the toolkit to send e-mail messages.86 Windows treats Microsoft Outlook™ as its default handler for MAPI messages. If you have not properly configured your workstation to process MAPI messages, you may see a curious message relating to Outlook when you try to send an e-mail message via the toolkit.
When you click the E-MAIL button, the toolkit shows you its e-mail form. This form allows you to control the appearance of the finished e-mail message.
When you click the ‘Send’ button, the toolkit prepares the message as instructed and hands it to Windows. Windows in turn hands the message to whichever program is identified as capable of handling MAPI messages.
Use this button to print ‘processing slips’ you might need to place in items that are not yet cataloged.88
Configuration points to consider
The Processing slip tab on the tookit’s Options panel controls the behavior of this button. These options are also available when you are ready to print a processing slip.
When you click this button, the toolkit shows you a little form. If you’re going to be printing a number of processing slips during a work session, you’ll probably want to keep this window open the whole time.
The principal task (and, normally, only task) involves the identification of the Vger record for which you wish to print a processing slip. The default method is by item barcode; if your workstation has an attached barcode reader, you can just scan the barcode, and the toolkit will print the processing slip for the associated bibliographic record. If you know the Vger item or bibliographic record number, you can type type number into the box and click either the ‘Box has item #’ or ‘Box has bib #’ button, as appropriate. Finally, if the Vger cataloging client currently displays the record if interest, you can just click the ‘Get # from Vger’ button.
When you identify the record of interest with any of these methods, the toolkit will retrieve the associated bibliographic record from the Vger database, apply your design definition to it, and immediately89 send the resulting page to the default printer.
The toolkit offers you great latitude in the appearance of the procesing slip. You can decide which record elements should appear on the processing slip either by working from the toolkit’s Options panel, or by clicking the ‘Design’ button on the ‘Print record summary’ panel.
You can use this button to view a single item record, all item records linked to a single holdings record, or all of the item records linked to all of the holdings record linked to a single bibliographic record. You can print the display.
If you view all of the items attached to a holdings record, the toolkit gives you a circulation summary for all of the item records; if you view all of the item records attached to a bibliographic record, the toolkit shows you a circulation summary for the entire title, as well as summaries for each holdings record.
There are several problems with the display of item records provided by the Vger cataloging client:
This button attempts to remedy all these problems, by allowing you to view all parts of an item record—including circulation information—at one time.
Configuration points to keep in mind
If you request a printout of an item record display, the toolkit sends it to the printer named on the Printer tab of the Options panel. Otherwise, the settings on the Options panel have no effect.
The display you see depends on the active record displayed by the Vger cataloging client.
The following illustration shows a typical display generated by this button. The operator requested this display when the active record displayed by the Vger cataloging client was a bibliographic record, to which 2 holdings records are attached.
The display begins with summary information from the bibliographic record, followed by a summary of circulation information from all of the item records attached to both holdings records. This is followed by summary information for each holdings record (only the first is visible here). Each holdings summary is followed by detail information for its linked item records (only the first two are visible here).
To receive a printout of the entire item summary, click the ‘Print’ button.
Each form or dialog panel used by the toolkit contains a button that closes or hides the form. You can use the CLOSE ALL WINDOWS button to hide all of the toolkit’s subsidiary panels. (The toolkit’s main panel of buttons is always visible.)
The HELP button takes you to the point in this online documentation that describes the current operation. To see online help for any of the toolkit’s buttons, simply pick up this button with the mouse and ‘drop’ it on any other button. (You can even drop the button on itself.)
Many of the toolkit’s subsidiary forms also contain a ‘help’ button of some kind. In some cases, this is a button you can drop on elements in the form to see a description of that specific element; in other cases this button shows a simple question mark, and takes you to a general description of the form as a whole.
Use these buttons to search your Vger records in ways that are not possible via the Vger cataloging client, and/or to present the results of a search in ways that are not available via the Vger cataloging client.
Both of these buttons are also available on the BAM report. If you select the button on the BAM reort, the toolkit fills out most of the search definition for you.
The FI button allows you to search Vger bibliographic and authority records, using a syntax similar to that available in the NOTIS™ mainframe library system—including ‘qualified search’ extensions available at Northwestern University.
Each search term (typed into the box in about the middle of the form) begins with a code that identifies the kind of search:
The portion of the search term immediately following this prefix is the ‘anchor’ portion of the search term. This must match the left portion of an access field, starting with the first character. The search term may also include up to two floating terms, each preceded by ‘#’. The toolkit will consider an access field to be a match if it begins with the anchor portion of the term and contains the floating terms anywhere within it. (For example, you can use floating terms to perform a name/title search without supplying the complete cataloging form for an author’s name: ‘shakespeare william#hamlet’.)
The search term can also include a date qualifier, and a type of record qualifier. The date of publication qualifier can be a single date, an open range of dates, or a closed range of dates. The type of record qualifier must be one of the seven qualifiers listed. If you include either a date qualifier or a type of record qualifier, the toolkit will automatically exclude authority records from the search result.
The check-boxes under the search term control the search results in additional ways. The toolkit maintains the setting of these boxes from one session to the next.
When you click the ‘OK’ button the toolkit formulates a search based on the prefix and the anchor portion of the search term. The toolkit applies floading terms to each potential matching access field, and applies date and type of record qualifiers to each matching bibliographic record. The toolkit also applies the criteria identified by check-boxes after it has retrieve individual records. Performing a search with the FI button can easily take several minutes; please be patient.
The toolkit should eventually show you results in a window similar to the one shown in the following illustration.
The FIH button allows you to search Vger bibliographic and authority records for each unique access field.
To define a search, you supply the beginning portion of the term of interest into the box near the top of this form, and select some options. Your search term will not include the prefix, date qualifier or floating term allowed with the FI button.
When you click the ‘OK’ button the toolkit formulates a query based on the search term and type. The toolkit identifies each different access field that matches the search term, and collapses all occurrences of that access field into a single item in its report. Performing a search with the FIH button can easily take several minutes; please be patient.
The toolkit should eventually show you results in a window similar to the one shown in the following illustration.
The list identifies each different matching access field found in your Vger authority and bibliographic records. Each text line shows the number of bibliographic records that contain the access field—the number of records available in the cataloging client, followed by the number of records visible in the Web OPAC. The line following each access field identifies the access field as coming from an authority record or a bibliographic record.
The FIR button allows you to search a single Vger bibliographic or authority record for some given piece of text. For example, you can use this button to search a long contents note for a particular title.
Display a record in the Voyager cataloging client, then click the fiR button. The toolkit asks you to give the word or words that you wish to find within the record; type appropriate text into the supplied box.
The toolkit displays the record, with each occurrence of each of your words shown in boldface. In this case, the operator searched for the words 'art nouveau.'
From time to time, you may use one tool or another to produce a list of record numbers of Vger records that need review. For example, you may use an SQL statement in Microsoft Access™ or Northwestern’s VgerSele to produce a list of holdings records whose call numbers fall within a given range. You can also use any tool at your disposal to generate a list of bibliographic or authority 010s of interest.
If you have such a list of Vger authority, bibliographic, holdings or item record numbers, or authority or bibliographic 010s, you can hand the list over to the toolkit’s VIEW RECORDS IN A LIST button. The button will call up each record for you, and you can take whatever follow-up action may be appropriate. The button saves you the trouble of typing in the number for each record you need to review, but the button doesn’t actually help you do anything with the record.
You can use this button to review any type of Vger record you can call up via the Vger cataloging client: authority, bibliographic holdings, or item. The only restriction is that all of the records in the source file have to be of the same type—you can’t mix holdings and item record numbers, and you can’t mix authority and bibliographic 010s, for example. In most cases, the file of record numbers will be a plain text file; if you open the file with the Windows Notepad and it looks like a plain list of record numbers, the toolkit will be able to use it. You can also feed the program a file containing extracted Vger records in MARC format. (These records must have the Vger control number in the 001 field.)
To review a set of records (once you’ve generated the file of record numbers), click the VIEW RECORDS IN A LIST button. You should have the Vger cataloging client running, and not minimized, before you click this button. The toolkit shows you a dialog box similar to the following. You need to identify the file, and tell the toolkit about it.
Use the ‘Browse’ button to find the file of record numbers. Click the radio button that corresponds to the information in that file (authority, bibliographic, holdings or item record numbers; MARC records; authority or bibliogrphic 010s).
The choices in the ‘If file contains Vger record numbers, help the toolkit find the Vger record number’ box let you tell the toolkit more about your file of record numbers. In most cases, you will give the toolkit a file that contains nothing but Vger record numbers; in this case, select the radio button labeled ‘First contiguous string of numerals in each line.’ This means that the record number is the first thing in each line of the file. (The line may contain additional text following the record number.) In rare cases, the Vger record number may be embedded within a line, preceded by some constant piece of text. If this is the case, click the ‘Contained within line, preceded by label’ radio button, and give in the box the text that precedes the Vger record number in every line of the file.
The 'Endgame' frame tells the toolkit what to do after it has read one line from the file.
If you check the 'Automatically move to next record when current record is closed in the cataloging client' box, the toolkit will monitor the cataloging client as you do your work. If the toolkit has called up a record for you and you have saved and closed the record, the toolkit will automatically advance to the next item in the list. Note that this option involves a significant amount of guesswork and approximation on the toolkit's part: if it doesn't behave correctly according to the way you like to work, don't select this option.
When you click the ‘OK’ button, the toolkit opens your file, finds the first record number, opens the first record in the Vger cataloging client, and opens a little window that allows you to control your work with the records in the file.
The ‘|<’, ‘<’, ‘>’ and ‘>|’ buttons move you to the beginning of the list of records, to the previous record, to the next record, and to the last record, respectively. The two ‘Skip’ buttons allow you to move backwards and forwards a large number of records. (The default size of the skip interval depends on the number of lines in the file of record numbers.) The ‘Save list from this point to end’ button allows you to re-save the list of records from the current point to the end, so you can pick up tomorrow where you leave off today. The 'Delete' button marks an item in the list for deletion, and advances to the next item. Finally, the Options button allows you to change the arrangement of the buttons on the form.
If a line in the source file contains text other than the record number itself, the toolkit puts the text into the window on this form. For example:
The text box is empty if the only thing in a line from the source file is a number.
The toolkit will tell you when you reach the end of your file. The toolkit does not modify the source file of numbers unless you click the ‘Save list from this point to end’ button.
These buttons only work for catalogers at Northwestern University Library.
Text goes here: is this record with 501 relevant?
Text goes here: select Cuttering text
Text goes here: select subject heading
Text goes here: is this a different edition?
Text goes here: help with belletristic number
Text goes here: Africana cuttering
Text goes here: select classification number
You control the behavior of the cataloger’s toolkit by providing appropriate values for a large collection of miscellaneous pieces of information. Some of these pieces of information pertain to your Vger installation, some pertain to the toolkit itself, and some pertain to you, the individual toolkit user. (Some elements of the toolkit's behavior are further controlled by information in a large number of configuration files).
To inspect these pieces of information, or to make changes to them, click the CONTROL PANEL button. The toolkit shows you its options screen. There are too many options to fit on one panel, so the options are arranged on a series of tabs, rather like cards in a file. In fact, there are so many options that there are actually several different sets of these tabs, or piles of cards. There are quite a few tabs on the main options display, and well over twenty secondary displays. Several of the secondary displays have multiple tabs of their own. (This all sounds a bit confusing, but it's much more straightforward to use than it sounds.)
The cataloger's toolkit consists of a large number of discrete compoents all attempting to work together. Many of the properties you set on the options panel are simply passed along to the appropriate component, which deals with the implications of your choices at the appropriate time. Because there are so many options, it is a difficult thing for the toolkit to keep track of which options pertain to which component, and the toolkit will not necessarily pass changed values to the proper component when you change and then save your options.
![]() This
means that whenever you make important changes, you should close the toolkit and
start it again, to be sure that each component has the current information;
in fact, this isn't a bad way of proceeding for even minor changes.
This
means that whenever you make important changes, you should close the toolkit and
start it again, to be sure that each component has the current information;
in fact, this isn't a bad way of proceeding for even minor changes.
When you click the CONTROL PANEL button, the toolkit presents the primary set of tabs, opened to the tab that leads to the subsidiary tabs for controlling individual buttons. When you first install the toolkit, you’ll need to set values on each of the tabs in this collection of general options before you worry about each button’s details. Once you’ve got the basic toolkit installation settled, you’ll probably only need to adjust the behavior of individual buttons; so most of the time, you’ll go from this opening panel to the displays for a single button.
The following view of the toolkit’s options display is provided for the purposes of illustration only. The options panel is the subject of frequent rearrangement as buttons are added and deleted, and as the need for additional user control over certain tasks becomes evident. However, the descriptions that follow are intended to be complete.
To see a set of options on the main tabbed display, click the tab heading ('General', 'Connections' and so on). To see the options pertaining to an individual button, go to the ‘Button details’ tab and click the button of interest. When you’re done with all of the variables in the options panel, click the ‘OK’ button to preserve your changes, or click the ‘Cancel’ button to tell the toolkit to ignore them.
At any time, you can click the ‘Online help’ button at the lower left. The toolkit will launch a Web browser and point to the page in this documentation that describes the tab you’re viewing.
This tab contains some details about the toolkit; this is for your information only. There are no options on this tab for you to change. The most important things here are the version numbers of the toolkit and its various components. These version numbers will allow someone to determine whether you have the correct version, or are working with an earlier (or incorrect) version. If you have some difficulty with the toolkit, you may need to include one or more of these numbers in your message, as an aid in determining the source of the problem. The panel also includes information about the copyright of the toolkit.
Use this tab to change the appearance of the toolkit’s main panel. You can change the size of the toolkit's main panel by changing the number of rows and the number of columns. You can change the placement of buttons, and you can select which buttons are available and which are invisible, by dragging and dropping buttons here and there.
To change the number of rows or columns in the toolkit’s main display, change the values in the ‘Rows of buttons’ and ‘Columns of buttons’ boxes by clicking the up and down arrows attached to each. The display of buttons under this box will adjust to the new size; buttons may move into the ‘invisible buttons’ area, or move out of the ‘invisible buttons’ area, in parallel with your change.
![]() For
mysterious reasons, buttons that are newly added to the toolkit do not necessarily
show up automatically on the right side of this display, as they should. If you're
looking for a button that isn't shown on this tab, nudge the number of rows up by one,
and then nudge it back down again to its original value. This will force the toolkit
to re-draw all of its buttons, and this should make the missing buttons appear.
For
mysterious reasons, buttons that are newly added to the toolkit do not necessarily
show up automatically on the right side of this display, as they should. If you're
looking for a button that isn't shown on this tab, nudge the number of rows up by one,
and then nudge it back down again to its original value. This will force the toolkit
to re-draw all of its buttons, and this should make the missing buttons appear.
To swap the positions of two buttons, pick a button in the ‘visible buttons’ area with the left mouse button, drag it, and release the left mouse button to drop in on another button in the ‘visible buttons’ area; the two buttons will exchange places.
To a make button invisible, drag it from the left side of the screen and drop it onto a grey button in the ‘invisible buttons’ area. To make a button in the ‘invisible buttons’ area available, pick it up and drop it into a grey button on the left side of the screen. If you drop a button from the right side onto a button on the left side, the two buttons will swap places. Any grey buttons on the left side will become empty areas in the toolkit's main display.
Use this tab to gain access to configuration options that affect a single button, or a group of buttons. Simply click the button you wish to configure, and the toolkit will show you the options for that button. See the separate description of options for each button
Some buttons are not controlled by special options. The right side of this tab shows these buttons under the caption "There are no configuration options for these buttons."
These fields control some of the mechanical aspects of the toolkit’s behavior.
Displays: The four rows of boxes and buttons allow you to set the foreground and background colors for displays of bibliographic, authority and holdings records, and displays of other things. The ‘Default’ button changes the setting for that row to the default (black text on a white background).
Screen font for lists, etc. This is the font the toolkit will use when it’s displaying information in lists and tables. You can select any available font, but you should normally use a font that contains definitions of the complete Vger character set, such as Arial Unicode MS.
This tab lists the Vger databases the toolkit should inspect when it is verifying records and searching for authority-related information.
The list on the left side of the panel shows each of your defined connections to Vger databases: there must be at least one connection defined here in order for the toolkit to work properly. The first time you start up the toolkit, you may see one or more cryptic error messages that simply mean you haven’t set up any proper connections yet. You must establish at least one connection on this tab before you can use the toolkit to do anything. (Most users will only have this one connection.)
The first connection in this list must be the one that identifies your local Vger production database;91 the other connections—if any—will be additional Vger databases in which you are permitted to search for information, and from which you are permitted to extract information.92 If there is more than one connection in the list, you can change relative positions of connections—and hence the order in which the toolkit searches them—by highlighting a connection name and using the ‘v’ and ‘^’ buttons to move the connection down or up in the list.
To add a new connection, click the ‘Add’ button; to delete a connection, highlight it and click the ‘Delete’ button; to view or change the definition of a connection, highlight it and click the ‘Change’ button. The display on the Connections tab changes when you click the ‘Add’ or ‘Change’ button—you will see a bunch of boxes that contain the full definition of the connection. (See the illustration below.) After creating a new definition or changing a definition to your satisfaction, click the little ‘OK’ button within the ‘Add/change a connection’ frame. Items in this display whose names begin with an asterisk (*) are required. Items without an asterisk are optional—at least, in the sense that they are not required. You will not be able to use any of the toolkit’s functions if you do not fill in the required boxes; you will not be able to use some of the toolkit’s functions if you do not supply information in the optional boxes.93
You should normally close the toolkit and start it up again after you have changed information about the first connection listed. In fact, in most cases the toolkit will recognize that you have made a significant change to the connection information, and will close itself when you save your changes; but you should do this yourself even if it doesn’t happen automatically. When the toolkit closes itself, you should re-open the toolkit and examine other parts of the configuration that depend on the connection information (owning library, cataloging ‘happening’ location, etc.)
Any connection may contain one or more resource files, which are separate Vger databases at the same connection as the main Vger database. (The identification of such resource files is optional.) For example, an institution using Vger may choose to maintain a complete copy of the Library of Congress name or LCSH subject authority records in a separate database, and to move records from that file into the production authority file only as they are needed; this separate file of authority records is a resource file. A given connection may contain any number of such resource files. The DSN, read UID and read PWD for the resource files must be the same as for the main database. (If for some local reason the resource file must have some other signon, you can define the resource file as a separate connection.)
To add a resource file to the definition of a database, click the ‘Add’ button next to the list of resource files. To delete a resource file definition, highlight the resource file name in the list and click the ‘Delete’ button.
When you click the ‘Add’ button, the panel changes to show fields related to the resource file definition. After completing the definition of a resource file, click the ‘OK’ button within the ‘Add/change resource file’ frame.
Notes about the ‘DSN’ on this tab
At least through Oracle version 10, you use two different programs to establish an ODBC connection to a Vger database. After installing the ODBC drivers themselves, you use the ‘Oracle Net8 Easy Config’ program to create a database service. (The definition of this service includes the IP address, port number, and the Oracle service name 'VGER' [earlier versions of Voyager: 'LIBR'.) In this program you can assign to this service any name that the program will accept. (By a convention which may perhaps lead to some confusion, this database service is often itself named 'VGER' or 'LIBR', but the service name can in fact be anything. The Oracle thing that this service points to must be called VGER.) You may need to be a systems administrator to use this program.
The second stage in the definition of an ODBC connection involves the definition of the data source name; you use the Microsoft ODBC applet (available from the ‘Administrative tools’ area of the Windows ‘Control panel’) for this.95 The definition of the data source consists of four elements: the source’s name itself (which can be anything you choose that the program will accept), a description of the source (another piece of free text), the read-only signon for the source, and the database service name you defined with Net8 Easy Config.
![]() Some ODBC configuration instructions for Vger suggest that you give the name 'VGER' both
to the database service you create with the Oracle Net8 Easy Config program,
and to the data source that you define with the Microft ODBC applet found in
the Windows control panel. Do not follow such advice; this way leads to inevitable
confusion. The names that you assign to the database service and
the data source can be anything that you wish, but they should
not be the same thing.
Some ODBC configuration instructions for Vger suggest that you give the name 'VGER' both
to the database service you create with the Oracle Net8 Easy Config program,
and to the data source that you define with the Microft ODBC applet found in
the Windows control panel. Do not follow such advice; this way leads to inevitable
confusion. The names that you assign to the database service and
the data source can be anything that you wish, but they should
not be the same thing.
It is the data source name you supply in the Microsoft ODBC applet that you must give in the DSN box on the Connections tab. Do not use the service name you define within Net8 Easy Config; the toolkit won’t know what to make of it. The DSN box will almost certainly not contain ‘VGER’ or ‘LIBR’.
At the bottom of the ‘Connections’ tab is a box labeled Path to Voyager.INI. In this box, give the name of the folder that contains the version of the Vger initialization file that points to the database also identified in the first connection listed on this tab. The toolkit uses information in this initialization file when it needs to save a record to your Vger database.
This tab contains information that didn’t seem to fit anywhere else.
The hijacked web browser problem
When the toolkit opens a page in a Web browser for you (examples: some part of this online documentation; a site identified by an 856 field in a record being verified) if you don’t already have a Web browser running the toolkit will open a Web browser and point it to the right address. But if you already have a Web browser running, there are two possibilities: either the new page will appear in the same instance of the Web browser, or it will appear in a new instance of the Web browser. Whichever of these occurs, if you you don’t like it, you need to follow a complicated set of steps to change this behavior. The change doesn’t have anything to do with the toolkit; it’s a matter for Windows.
The change that you make here should only affect Web documents that are opened by other programs (such as the toolkit). When you click on a link within a Web document, whether or not the new document appears in a separate window is controlled by other settings.
The boxes on this tab tell the toolkit which institution codes ('NUC' codes)97 to use in new records, and which codes apply to institutions sharing your Vger installation
Use this tab if you want to make it impossible for operators to get to some or all of the toolkit's options. The box at the left lists all of the tabs on the Options panel (except the ‘About’ tab). If the tab’s name is highlighted, it will be available to the operator; if the tab’s name is not highlighted, it will not be available to the operator. (Note that you can not only make all of the other tabs unavailable, you can also make this very tab unavailable, so that once choices are made they can never be changed.)
To select all of the tab names (thereby making all tabs available) click the ‘Select all’ button. To clear all selections (thereby making only the ‘About’ tab available) click the ‘Clear all’ button.
If you wish to disable all of the options tabs, you can also ‘hide’ the Options button altogether.
Disabled tabs on the Options panel
If you are ever in a pickle because you don't have access to any of the toolkit's tabs, something has probably gone wrong with this panel. To fix this problem, close the toolkit. Find the toolkit's configuration file (CTKV.INI), and open it with a text-editing program such as Notepad. Find the 'Options' stanza; one of the lines immediately following the stanza label should be one that begins 'ButtonsDisabled='. Place a pound sign (#) at the start of this line, and save the changed file. When you start the toolkit and go to the options panel, you should now have access to all of the tabs.
These boxes tell the toolkit where to print reports you request, and in what form.
Information on this tab identifies certain of your Vger location codes as representing various categories of materials. At present, you can define locations for these categories of bibliographic records:
At present, the toolkit uses this information when assigning 336-338 fields in a bibliographic record; but it may in the future use this information in other tasks.
Use the drop-down box to select the definition of locations for either electronic resources or microforms. The toolkit displays your current choices. (When most users first visit this tab, the choices will be empty; but users at Northwestern University are supplied with default values.) The following illustration shows the definition of a set of locations that mean 'remotely-accessed electronic resource':
To add a location to the definition, select one or more locations in the top list of all available locations, then click the 'v' button. The toolkit copies the selected locations to the bottom list.
To remove a location from the definition, select one or more locations in the bottom list, then click the '^' button. The toolkit removes the locations from the bottom list.
The behavior of any of the toolkit’s buttons can be controlled by choices on the toolkit’s control panel beyond those choices available on the basic tabs. To view or change the settings that affect a particular button, go to the control panel’s ‘Button details’ tab and click the button of interest. (The buttons on the right side of this display are not controlled by any special options.)
The toolkit reconfigures the display to show options that affect your button. When you’re finished viewing or changing these options, either click the ‘Return to main options display’ button to return to the ‘Button details’ tab, click the ‘OK’ button to save any changes you’ve made, or click the ‘Cancel’ button to abandon any changes you’ve made.
The following sections describe the options available for individual buttons.
Information on this tab controls the assignment of sequential numbers with the 1,2,3 button.
You can define any number of different models for assigning sequential numbers. Normally, you’ll define a separate model for each different kind of sequential number you assign. For example, if you assign one sequence of numbers to microfilms, another sequence of numbers to microfiche, and a third sequence of numbers to music CDs, you’ll have three definitions listed in the box on this tab.
Each definition can contain an almost bewildering set of different elements. (You can see the possibilities if you click the Add button next to the list of models.) Some of these elements allow the toolkit to identify the records that belong to the category; others allow the toolkit to construct the sequential number.
Each code requirement consists of upper-case letters that represent bibliographic record formats (books, computer files, mixed materials, maps, sound recordings, scores, serials, visual materials) and, optionally, one or more codes from Leader, 007 and/or 008 fields. These bits of information help identify the records that come under the scope of this rule: In order for a record to be considered part of the group, it must (in its record leader) contain codes that match one of the listed formats, and it must contain fields that bear the indicated Leader, 007 and/or 008 field codes.
You can make any definition temporarily inactive by making sure the ‘Active’ box is checked when you see the definition of one model. When the toolkit is trying to match the characteristics of a bibliographic and holdings record against your models, it ignores those not marked ‘Active.’
Information on this tab controls the behavior of the two 490/830 buttons for changing a series from not-traced to traced.
Two sets of options control the behavior of these buttons in two circumstances: when the toolkit finds series numbering in subfield $v of a 490 field, and when the toolkit finds something that may be series numbering in subfield $a of a 490 field. The options themselves are identical for each condition.
If you don’t select either of these options (which is the recommended set-up), you can select one or both of the following options:
In most circumstances you’ll probably be happiest if you check only the box that causes the toolkit to present series numbering that doesn’t match the pattern shown by the 642 field.
The choices in the ‘Preview of finished headings’ box tell the toolkit whether it may proceed to update each record, or should show you the proposed change before updating the record.
If you don’t select either of these options, you can ask that the toolkit present a proposed change only if it contains numbering of a pattern not previously encountered. In most situations, you will probably want to leave all of these boxes un-checked.
The ‘Other’ box contains miscellaneous items related to the change of a series from not-traced to traced.
These options control the generation of a 501 field ('with' note) from a set of bibliographic records.
These options control the addition of fields to existing authority records, based on information in a bibliographic record, second authority record or internet resource.
Items in the 'Add subfield $5?' frame tell the toolkit to add subfield $5 with your institution code (as defined on the 'Institution codes' tab) to certain fields. The toolkit only adds subfield $5 to fields that it appends to LC/NACO, LCSH or MeSH authority record; the toolkit does not mark fields that it adds to 'local' authority records with subfieldl $5.
The three 'use elaborate display' check-boxes control the toolkit's behavior when you click one of the buttons controlled by options on this panel. Each of these buttons originally had a simple behavior. For example, the original '670' button adds a 670 field to an authority record, based on information in a bibliographic record, with a minimum of fuss. The tasks performed by these buttons are now also available on the elaborate record-editing panel, as part of a substantial effort to build error-free authority records simply and quickly. You can use these buttons as originally designed, or you can use them as part of the suite of features on the fancy editing panel. If you leave one of these boxes un-checked, the toolkit will use its original, simple behavior when you click the button; if you check one of these boxes, the toolkit will present its elaborate record-editing panel.
Concealed behind the BAM button is a formidible battery of routines that inspect authority and bibliographic records in great detail, and make changes to them. These capabilities are controlled by a similarly extensive set of options, arranged on a growing number of sub-tabs.
The choices in the 'Test of 245 $a, $n, $p when no 1XX field is present' frame tell the toolkit whether you wish it to attempt to find cases where the title in a bibliographic record with no 1XX field appears to match title information in other records. (Under RDA, if such a condition exists, one or more records needs a 130 field.) The toolkit makes this determination by comparing parts of the 245 field in a bibliographic record to parts of other bibligoraphioc records. Use the various check-boxes in this frame to tell the toolkit exactly which parts of other bibliographic records to consider. Because this work may end up taking quite a long time, you can also set a limit on the number of bibliographic records that the toolkit will examine.
Separate but similar options are avilable for each of the four series treatment fields (tags 642, 644-646). There is one set of options to set the ‘order of preference’; these allow you to decide the order in which the toolkit should consider fields in a given authority record with a given tag. In these choices, ‘local’ means a field with your institution’s symbol in subfield $5, ‘DPCC’ means a field with the PCC symbol in subfield $5, and ‘DLC’ means a field with the Library of Congress symbol in subfield $5. (Additional rules for order of preference may be established as the need arises.)
A second set of options for each series treatment field allows you tell the toolkit what it should do if it does not find your institution’s symbol attached to a field with the given tag. You always have the option of adding your symbol to an existing field (as determined by the established order of preference), and of not doing anything; most tags offer at least one additional option (such as 'add a new field').
This tab contains choices for authority records. Most of these pertain to new authority records that the toolkit creates for you, but some apply to authority records that the toolkit inspects. Because there are so many options for authority records, they are arranged on sub-tabs.
This sub-tab contains a number of options that the toolkit applies when you create a new authority record. The toolkit also applies some of these when it's BAMming an existing authority record.
In the If the new authority record has 040 $e = rda: frame is a large set of options that instruct the toolkit to attempt to generate the "RDA fields" (fields that were originally defined to contain elements needed for RDA), and perform other RDA-related work. Check the box for each RDA-related task that you wish the toolkit to perform. The toolkit contains its own logic for determining whether or not a given task possible and appropriate in a given context. You should check all of these boxes, except perhaps for those noted in the following bullet points. (The default value for these boxes is un-checked.)
The toolkit can also add "RDA" fields to new non-RDA records. If you wish this to happen, check the Add these fields also to new non-RDA records box. (This option applies to new authority records; there is a similar-sounding option on the "Get started" sub-tab, but that option applies to existing records sent to the BAM button.)
There are also a few miscellaneous things to consider.
The Include $n, $d, $c in 'rotated' 411 fields if present in the 111 box controls the addition of number, date and place subfields to authority 411 fields in conference authority records. If you check this box, the toolkit will subfields $n, $d and/or $c from the 111 field to 411 fields in new records that are mere 'rotations' of the 1XX field to expose useful lead elements.
The pair of frames at the bottom of this sub-tab control the "coercion" of new authority records: one frame for new series records, one frame for new non-series records. "Coercion" in this case means the shifting of the "rules" of a new record from one value to another: from AACR2 to RDA, or from RDA to AACR2, and adjusting subfield $e of the 040 field to match. If you check the "Coerce RDA records into AACR2 records" box, the toolkit will re-code all RDA authority records that it creates as AACR2 records; if you check the "Coerce AACR2 records into RDA records" box, the toolkit will re-code new AACR2 authority records it creates as RDA records. You can check one box or the other, or you can leave both boxes un-checked; you cannot check both boxes. In general, you should elect to coerce AACR2 records into RDA records. (The options to re-code an RDA authority record as an AACR2 record were added to the toolkit for use before the transition of the LC/NACO authority file to RDA; these options may eventually be removed.) The toolkit will not "coerce" a new pre-AACR2 authority record into an RDA record. If the toolkit's "coercion" feature does not appear to work as you expect, the first thing you should consider is the value of Leader/18 and 040 subfield $e in the original bibliographic record.
Options on this tab control the toolkit's behavior when you ask it to create a new authority record.
When you click the 'General linking field options button' the toolkit shows you an options panel for filling out linking fields during BAM, which looks like this:
The toolkit uses the options on this separate panel when you BAM a bibliographic record that bears a linking field, if that linking field contains one or more numbers (Voyager record number, OCLC number, etc.) but does not contain subfield $t (title). The toolkit attempts to find the related record in your local database, and to supply subfield $t (and perhaps additional subfields) from the related record. This means that one way for you to build a linking field in a Voyager bibliographic record is to create a linking field with only one or more number subfields, (such as $w, $x, $z) and then BAM the record; the toolkit will find the related record and transcribe the descriptive subfields from the related record into the linking field for you, saving you a lot of tedious copying. (For another way to generate a linking field in a bibliographic record, see the description of the linking fields button. The linking fields button has its own set of options for building linking fields.)
If you have defined a Z39.50 connection to OCLC within the toolkit, and if the toolkit is not able to find an appropriate record in your Voyager database, and if the incomplete linking field contains an OCLC number, the toolkit will retrieve the record from OCLC, and will use information pulled from the OCLC record to build the linking field.
There are three broad areas on this panel. The two large areas across the top contain the same elements; one is for subfields to be included in linking fields in serial records, the other for subfields to be included in linking fields in non-serial records. Check the boxes that correspond to the subfields you wish to include in your linking fields; un-check the boxes that correspond to subfields that you do not wish to include in your linking fields.
The small area in the lower left corner of this panel has a set of options to tell the toolkit how to find the related record in your local database. You can of course set these check-boxes however you choose; but it may be best to leave all of the boxes checked.
The toolkit considers any linking field encountered during BAM that has no subfield $t as a candidate for enhancement. If a linking field does not contain subfield $t, the toolkit will attempt to complete the field for you; if a linking field contains subfield $t, the toolkit will not attempt to complete the field for you even if the linking field does not contain all possible subfields. (The toolkit does nothing if a linking field contains subfield $t, even if other subfields that might be required are not present.)
Given the options shown above, and this linking field in a serial record (this field contains the Voyager system number for the related record, with the local institution code in parentheses):
And given this information in bibliographic record 5819073 in the local Voyager database:
The changes on this tab have something or other to do with RDA. Some of these choices require you to construct suitable configuration files. In general, you should check all of the check-boxes and allow the toolkit to do its work, based on its own internal logic. There are two or three exceptions to the 'check all of these boxes' rule:
In doing this work, the toolkit does not make any attempt to "RDA-ize" the data; it simply changes the tag and indicators. For example, after the conversion, subfield $c of the 264 field with second indicator "1" may contain a copyright date.
For example, if you ask the toolkit to supply the 33X fields to a bibliographic record for a print monograph that does not already contain 33X fields, the toolkit will add fields like this to the record:
Additional options in the 'Existing and new 33X fields' frame control the toolkit's treatment of 33X fields.
The ‘Subject systems of interest’ box contains a list of the subject heading systems that you are interested in checking during bibliographic record verification. (In most cases, these should be the systems for which you have, or wish to have, authority records in your authority file.) The toolkit will not bother itself to verify subject access fields not identified here. (For example, if you don’t list second indicator ‘6’ here, the toolkit won’t check French-language subject access fields.)
The identification in this list of a subject heading system consists of a brief name and the value used in the second indicator of bibliographic 6XX fields; if the indicator value is '7', the identification also shows the subfield $2 code. Use the ‘Add’ and ‘Delete’ buttons to modify this list.
The cataloger’s toolkit is able to sort the subject access fields (the 600 through 655 fields) in a bibliographic by the second indicator (so that all LCSH terms come before all MeSH terms, etc.) The problem is that the 653 field has no second indicator, because it by definition does not contain an access point created according to some scheme. If you have asked the toolkit to sort the 600-655 fields by second indicator, it will, by default sort the 653 field after all other fields in that range—as if its second indicator were ‘9’. (This is probably what you want to do.) If you wish the toolkit to sort the 653 amongst the access fields of some other subject heading system, give in the Pretend the 653 field has this second indicator box the second indicator code for the subject heading system.
The drop-down list with the label Vger authority index equivalent for bibliographic 6XX second indicator “4” is only of interest if your list of subject systems of interest includes those with second indicator ‘4’ and if your Vger authority file contains authority records you wish to match to those access fields. Those not interested in subject access fields with second indicator ‘4’ should skip this paragraph. The Vger heading table represents each subject heading system as an internal code;110 Vger translates the second indicator in bibliographic 6XX fields (or the contents of subfield $2 if the econd indicator is ‘7’) to this internal code, and it translates the an authority record’s subject system code (008 byte 11) to this internal code. In order for the toolkit to find an authority record for a subject access field, it translates the bibliographic information into this code, and then goes looking for an authority-derived table entry with the same code. We know that Vger uses code ‘’ for bibliographic subjects with second indicator ‘4’; the issue to be resolved is: What is the proper authority-derived code to use when second indicator is 4? In most cases, you should be able to figure this out by consulting the Vger heading type table; find the code in this drop-down box, and the toolkit should be able to find authority records for bibliographic subjects with second indicator ‘4’.
Two tabs control the behavior of the toolkit’s buttons related in some way to call numbers for all users. A third tab is of interest only to catalogers at Northwestern University Library.
Choices in the Work with bibliographic call number frame control the behavior of the ‘shelflisting’ and ‘move a call number’ buttons.
The right side of this tab displays various options, depending on the type of call number you select.
Handling of finished number tab
Choices in the Handling of completed call numbers frame control the manner in which the toolkit handles finished numbers. These choices apply not only to the ‘move call number’ and ‘shelflisting’ buttons available to all, but also to the two call number buttons available only to NUL catalogers.
Coding of completed number frame: If you want the toolkit to put the classification portion of the number (the first subfield in the string of subfields for this tag) into subfield $h and the other portion of the number (taken from subfields other than the first one listed) into subfield $i, click the Use both 852 $h and 852 $i radio button; if you want the toolkit to put the entire call number—classification number, Cutter number, date, the whole thing—into subfield $h, click the Put whole number into 852 $h radio button.
Handling of completed number frame: If you want the toolkit to add the finished call number to holdings records, click the Save in holdings records(c) and put into clipboard radio button. 111 If you want the toolkit only to copy the finished call number into the clipboard, click the Put into clipboard only radio button.
This tab configures two buttons available only to catalogers at Northwestern University Library.
Force display and Be cautious check-boxes: There is a set of these buttons for each of the call number buttons.
Type of call number to be assigned: The only supported choice is Dewey.
Maximum characters per line: The maximum length of each call number line.
Pretend one holdings has no call number: Only supervisors should check this box. Normally, the toolkit will not attempt to assign a call number if all holdings records attached to a bibliographic record already have call numbers. If this box is checked, the toolkit will pretend that one of the holdings records doesn’t have a call number.
The Gay pulp scheme frame contains check-boxes that allow you to assign one or another of the standard call number buttons to the gay pulp scheme. If the only cataloging that you do for Special Collections is for the gay pulp fiction collection, it doesn't matter which button you choose; if you do cataloging for Special Collections in addition to materials for the gay pulp fiction collection, you should assign the 'C with arrow' button to the gay pulp fiction scheme.
Locations that do NOT have ‘Large’, Locations that do NOT have ‘Folio’ and Locations whose Folio items go to Main: Select locations in these boxes that are exceptions to the normal practice for marking oversize items.
Copy what?: You can use the CLIPBOARD button to copy either an entire Vger record (in ‘flattened’ form), or just the Vger record number, to the clipboard.
If whole record ‘flattened’: If you ask the toolkit to copy an entire record to the clipboard in ‘flattened’ form, you can tell the toolkit how it should handle diacritics and special characters. There are four possibilities:
Your complete e-mail address: Your full e-mail address (for example, ‘frammis@northwestern.edu’, not ‘frammis’). The toolkit uses this information in certain limited circumstances. For example, when the toolkit packages up a correction request, it includes your e-mail address as part of the request; this makes it possible for someone else reviewing correction requests to e-mail you any questions that might arise.
Default subject line: The subject line that you expect to be appropriate for most of the e-mail messages you send via the toolkit.
Only one addressee per message: If this box is checked, the toolkit will only allow you to select one recipient for an e-mail message; if this box is not checked, you can select as many recipients as you want. (If this box is checked, you cannot accidentally send a message to the wrong recipient. Unless you’re really good at paying attention all the time, it’s best to send e-mail messages via the toolkit to one recipient at a time.)
Server: This box tells the toolkit how to go about sending messages. If you select the ‘Use built-in SMTP service’ radio button, the toolkit will use its own primitive e-mail capabilities. You need to supply the server address, and possibly also the port number, user name and password. (Different SMTP installations require different pieces of information; at some sites, only the server name itself is needed. The 'Archive file' for storing a copy of outgoing messages is in all cases optional.) If you select the ‘Will not attempt to send e-mail messages via the toolkit’ radio button, the toolkit will not send any e-mail messages, regardless of other elements in the configuration.112
Default values for messages: Default values for most of the options available when you’re sending records via e-mail:
These choices affect the content of Vger records sent in e-mail messages, either as plain text or as attachments; they have no effect on the Vger record itself. Most of these were added at a time when it was thought that SACO proposals could be transmitted via e-mail with a MARC attachment.
Variable fields to omit from attached records:List fields (by tag) you wish the toolkit to omit when preparing a record as a MARC attachment. Supply a different list for each of the basic MARC formats; place a space between tags.
Character set for MARC attachments:Select the character set to be used when a Vger record is included as an attachment in MARC format
There are two export buttons (identified with numerals on the button icons), each of which can have a different configuration. For each button the toolkit saves a matrix of options, one for each combination of output type (MARC or XML) and file scheme. If you establish options in this panel for different combinations of values, you can recall them by selecting the radio buttons for that combination; but only one combination can be active at a time. The two buttons allow you to set up two different kinds of export. For example, you can define one button for exporting a record to OCLC, the other for exporting a record to a vendor; or you can define one button for exporting a record in MARC, the other for exporting in an XML format.
Display caption: Text for the toolkit to use when you rest the mouse pointer over the button. If you define more than one export button, defining a meaningful display caption for each of the export buttons will help you remember which is which. The toolkit will automatically add its hot-key identifier to the text you supply.
MARC output/XML output: The toolkit can output a Vger record either in MARC format or in XML format. Other options on this panel depend on this primary choice.
File options: You can tell the toolkit to output each record as a discrete file; to use a single file for each record type and to save only the most-recently-exported record to the file, or to use a single file for each record type and cumulate all records in a single file, with the most recently exported record at the end.
Holdings options: When you’re exporting a bibliographic record, you can ask the toolkit to include information from linked holdings records in some manner.
Auth/Bib/Hold: Identify the folders or full file names into which you wish the toolkit to write authority, bibliographic and item records. The content of these boxes will vary, depending on your selection in the ‘File options’ box; the instruction just above the Auth/BibHold boxes tells you what you need to put into these three boxes.
Strip fields: List variable fields you want the toolkit to remove before it prepares the finished record. Place a space between tags.
Character set: This set of options only shows up if you have selected MARC output. You can ask the toolkit to translate the Vger record into a number of different character sets.
XML schema: This set of options only shows up if you have selected XML output. You can ask the toolkit to translate the Vger record according to any of several standard XML schemas for MARC records.
Copy Voyager record number to clipboard: If you check this box, the toolkit will also copy the Voyager record number of an exported record to the Windows clipboard.
Include holdings URLs in bib record export: If you check this box, when you export a bibliographic record the toolkit will copy into the exported bibliographic record any 856 fields present in associated holdings records.
The toolkit’s fixed field editor displays fixed fields in labeled format. Alternate fixed fields have different background colors, to make it easier for you to tell one field from another. The text in each field can be shown in different colors, depending on whether a code is valid, invalid or obsolete; or whether you have deleted the entire field. You can set the background colors and the colors of each kind of text, in the Field 1 colors and Field 2 colors frames on this tab.
Pressing ‘enter’ same as selecting ‘OK’: When you’re done editing a record’s fixed fields, you can use the mouse (or alt-O) to click the editing panel’s ‘OK’ menu item. If you check this box, you can also press the Enter key to get the same result.
Pressing ‘escape’ same as selecting ‘Cancel’: If you decide to abandon the editing of a record’s fixed fields, you can use the mouse (or alt-C) to click the editing panel’s ‘Cancel’ menu item. If you check this box, you can also press the Escape key to get the same result.
In lists of fixed field codes ...: These options control the display you see if you press the F2 key while editing a fixed field. You can ask the toolkit to arrange the list by code, or by the explanation of the code; and you can make separate decisions for place of publication code (008/15-17), language code (008/35-37) and all other codes.
This button's behavior is also controlled by several configuration files.
These options control the way the toolkit processes fields when it is handling an import file of records, or is merging two records. The toolkit presents the options for this button on three tabs: a general tab, a tab for choices related to bibliographic records, and a tab for choices related to authority records.
File of headings ...: The toolkit stores your saved fields in a separate configuration file that it maintains for you. Give in this box the name of the file the toolkit should use to store the access fields you want to work with. The toolkit stores this file in the default Windows folder for initialization files.
Options on this panel help you design 'processing slips' to be printed from a Vger record. There are two tabs on this panel.
The toolkit allows you to define as many different 'processing slip' formats as you need. On this tab you declare each different format and give it a name. (You give details for each format on the Elements tab.) Using the buttons provided you can:
To work with any of the defined formats, highlight the format's name in the list, then move to the Elements tab. When you leave the options panel altogether, the format that is highlighted is the default format when you actually click the button to print a processing slip. (You can select a different format at the time of printing, if you wish.)
The Current elements box lists the items of information that are included in the processing slip. You can change the order of elements by highlighting an element and using the ‘^’ and ‘v’ buttons to move the element up and down in the list. Use the bottons to the right of this list to add a new element, delete an existing element, or modify an existing element.
Left margin: The amount of indentation—beyond the printer’s default left margin—the toolkit should make.
2 columns per page: The toolkit can print processing slips the full width of the page, or it can print processing slips in two parallel columns. If you request two parallel columns, use Left margin adjust for column 2 to set an indentation for the second column. If you print two processing slips per page, the toolkit will only send a page to the printer after you request every two processing slips; it will print a single processing slip only when you close the toolkit.
Left margin adjust for column 2: If you ask the toolkit to print two columns to a sheet, the toolkit uses the value in this box as an offset to the right of the center of the page for the left margin of the second column.
If you ask to add an element to the processing slip, you will see the display shown in the following illustration. If you ask to change an existing element, you will see the same display, filled in with the definition of the currently-selected element.
Entire Vger bib record: If you check this box, the toolkit will give the entire bibliograhpic record (‘flattened’ in the same manner the toolkit treats records when you click the COPY TO CLIPBOARD button
Selected record element: Choose one of the pre-defined options, or give the tag, indicator and subfield code of an element you wish to print on the processing slip
Bib record creation date/Today’s date: Check one of these boxes to include the bib record’s date of creation, or today’s date, on the processing slip
Free text from box: If you check this box, give in the large open area to the right whatever text you wish to include. Your text can include as many lines as you need (as long as the text fits on a single page). You could use the ‘free text’ box to transform a record-based processing slip into a routing slip
Label for element: You can precede a selected element with a piece of constant text, if you wish
Font/size for element: The toolkit can print each element with a different appearance. Use the ‘Change’ button to change the font.
Element is preceded by blank line/Element is followed by blank line: Each element can be preceded and/or followed by a blank line
Choices in the Searches for class number and subject headings frame apply to the S# and #S buttons.
If you do not check the Report results for all owning libraries ... box, the toolkit will limit its search for class numbers or subject access fields to the single owning library identified on the General tab. If you check this box, the toolkit will search all owning libraries for call numbers and subject access fields.
These options control the modification of a bibliographic record and attached holdings records with the ZAP button.
This options panel is divided into two frames.
Set item type to default value frame
If you wish to use the toolkit to force the item type code in item records to a particular value based on the location code, you need to tell the toolkit which item codes to associate with each location. (You don’t need to establish the item type code for all of your locations, just the ones you’re interested in working with.)
To create an association between a location code and an item type, highlight the location code in the left column, highlight the location code in the right column, then click the ‘Add pair to list’ button. The list at the bottom shows the new association; the location is no longer in the list of location codes.
To delete an assocation between a location code and an item type, highlight the association in the bottom box and click the ‘Delete’ button. The location reappears in the list of location codes.
Create item records for multiple volumes frame
When you add item records for multiple volumes to a holdings record, the toolkit will use the copy number in subfield $t of the holdings record’s 852 field as the copy number in the item record. If the holdings record’s 852 field does not contain subfield $t, the toolkit will use the default value (probably either ‘zero’ or ‘one’) you set here.
These options allow you to define one or more Z39.50 connections to remote databases. The toolkit uses these connections for various purposes, such as searching for fully-cataloged records to overlay provisional vendor records. For each remote database you must specify at least the bare connection details; you can supply additional information to tell the toolkit which records you prefer to see first if there are multiple matches, and how to combine information from the current Vger record into a record retrieved from a remote database.
You can define as many connections as you feel you need (and you can define multiple connections to the same remote database, with different associated criteria, if you feel you need to do that). You tell the toolkit which connection or connections you wish to use in a particular search session by highlighting the names of those connections. (If you wish to use the toolkit’s Z39.50 button, you must have at least one highlighted connection.) You can change the order of connections in the list by highlighting a name and clicking the large up and down arrows at the left.
To create a new connection, click the ‘New’ button. To base a new connection on the definition of an existing connection, highlight the name of the appropriate connection, then click the ‘Copy to new’ button. In either case, the toolkit will ask you for the name of the new connection. The name can be anything you want (including spaces, punctuation, and so on). For your own ease, each connection should have a distinct name, but the toolkit doesn’t require this. Once you’ve supplied a name for the new connection, the toolkit shows you the additional tabs that give details for the remote database.
Information on the ‘Promotion rules’ tab tells the toolkit what to do when it finds more than one record at a remote database. The toolkit sorts the multiple matches into an order you specify, by ‘promoting’ one record over others.
There are six basic promotion rules. To indicate that the toolkit should apply a particular promotion rule, check the box next to the rule’s name. Use the up/down buttons next to the rules to change the order in which the toolkit applies them.
When you’ve set the values for the new connection to your liking, click the ‘Save’ button on either the ‘Promotion rules’ or ‘Connection details’ tabs.
To edit an existing connection definition, or just to examine the details of the definition, highlight the connection’s name in the list, then click the ‘Change/View button’.
These options allow you to define 'transformations' to apply to MARC records. You can apply transformations to MARC records in Vger, and to other MARC records that the toolkit has within its view (such as records retrieved from a remote database via Z39.50).
Each transformation consists of one or more simple 'steps.' Any given step can do one of the following things:
Any transformation can consist of any number of these steps (including repeats of the same kind of step doing different things), and in any order. The toolkit performs the steps in the order you specify.
Except as explained below, the initial implementation of the transformation feature in the toolkit does not provide for any kind of 'logic:' you cannot specify that the toolkit should only perform an action when certain conditions are met, and you cannot form subgroups of changes. (These and other capabilities may be present in future versions of the transformation feature.)
To create a new transformation, click the 'New group' button. To create a new transformation based on an existing transformation, click the 'Copy group' button. In both cases, the toolkit asks you to supply the name of the new transformation. The name you supply can include any valid characters (punctuation, spaces and so on). The name of each transformation must be different from the name of every other transformation.
To change an existing transformation or view its details, highlight the transformation's name and click the 'Change/view group' button.
When you are creating a new transformation or viewing an existing transformation, the toolkit takes you to a second tab. This tab lists the steps that make up the transformation, and indicates the kind of record to which the transformation can be applied.
To add a new step to a transformation, click the 'Add new step' button. To change a step or view its details, highlight the step and click the 'Change/view step' button. The toolkit presents you with the details for this step.
The set of radio buttons down the left side of this panel identifies the different kinds of transformations possible in a step. Before you do anything else, select the kind of transformation you wish to make. As you select radio buttons, the toolkit makes the appropriate boxes on the right side of the form available to you for input. The boxes available, and the kind of information possible, vary with the kind of transformation.
Specifying text in existing fields
The toolkit will perform a normalized text match: the toolkit will normalize any text you supply here, and will compare it to a normalized version of the text in Vger variable fields.
If you wish the toolkit to apply truncation to either the left or the right end (or both), place an asterisk (*) where truncation should occur. There is not at present any way to specify internal truncation.
In general, you specify text exactly as it should appear in existing fields.
Interpretation: change the text in 948 subfield $b to 'h'
There will be some circumstances in which you may wish to build a new field or subfield from information found elsewhere in a record. (For example, you might wish to build an 035 field from an incoming record's 001 and 003 fields before deleting those fields.) In such a case, you need to follow an elaborate scheme to specify the contents of the final field. This scheme uses two percent signs ('%%') to label special substitutions.
The two percent signs can be followed by any of these three-character instructions (you must supply the alphabetic characters in uppercase):
Interpretation: change the contents of 948 $c to the current date with a four-digit year
The two percent signs can also be followed by a string that consists of tag, indicators, subfield code and (optional) text.
This instructs the toolkit to find the indicated information in the original record (i.e., before any part of the curent transformation has been applied), and to insert it where shown. If you wish the toolkit to perform this work for all occurrences of the indicated subfield, place an asterisk immediately following the two percent signs.
If you need to include literal text in a subfield that also contains substitutions labeled with two percent signs, you must include that literal text within curly braces; there's no other easy way for the toolkit to know what's what in such a subfield.
Interpretation: Construct a new 776 field. The contents of subfield $c is the literal text 'Original.' Construct subfield $w by taking the text of 010 $a preceded by the literal text '(DLC)'. Construct another subfield $w by taking the text of any 035 field the normalized form of whose subfield $a begins 'OCOLC'. Construct an instance of subfield $x from every 022 $a in the record. Construct an instance of subfield $z from every 020 $a in the record.
Interpretation: Change the contents of 948 $a. The new subfield will consist of the literal text 'OCLC/' followed by the current date in the form 'yyyymmdd' followed by a slash and the cataloger's initials.
A number of options control the behavior of the toolkit's libretto button. The following picture shows the default values for these options.
Here are the configuration choices that lie behind the following description of the use of the libretto button. (These are not the default values for many of these options, but they are probably good ones for most typical cases.)
The toolkit's handling of multi-language subfield $l is controlled by a set of options. (There is a related option for the BAM button, that tells the toolkit whether or not you wish the toolkit to attempt to split apart a dual-language subfield $l during BAM. Although this document generally refers to this option as available, the automatic conversion of dual-language subfield $l during BAM has in fact been turned off to allow for additional testing and development. For the present, use the '$l' button for all instances of dual-language subfield $l, as well as for subfield $l containing 'Polyglot.')
The toolkit uses the options shown in the next illustration to control its handling of subfield $l both during BAM, and when you use the '$l' button directly. The default value for all of the check-boxes is 'not checked.'
In the following illustration, the operator has selected this option, and later clicked the '$l' button. For the record under consideration, the toolkit was able to propose an 041 field, and has automatically added it to the record under consideration.
When you direct the toolkit to make a change to a record via the $l button, the toolkit compares (in a very basic way) the resulting new access fields against information in your local authority records. The toolkit declares each heading to match fully an authority 1XX field, to match an authority 1XX field in part, or not to match any authority 1XX field at all. (Details of this work are given in the description of the $l button itself.) The toolkit can display headings that fit into these categories in different ways, to make the status of each new access field clear as work on a record proceeds.
You have four non-overlapping choices for each heading category:
The examples in this document generally show headings displayed according to a very basic scheme (verified headings in plain text, partially-vefified access points in italics, and unverified access points in bold). These choices make the examples available to all. Just to give you some idea of what else is possible, the following examples show verified headings in green, partially-verified headings in amber, and unverified headings in red:
The work performed by the linking fields button is controlled by a large set of options on a separate panel.
There is a separate set of options for each of the 76X-78X linking fields. Use the drop-down list near the top of the panel to select the linking field whose definition is currently displayed. The panel is set up to show all possible subfields in the linking fields (as defined in your Voyager tag table configuration files); subfields that are not available in a given field are disabled.
For each linking field, check the boxes for the subfields that you wish the toolkit to include when it creates a new linking field. (Naturally, the toolkit can only create a subfield if the appropriate information is available.)
The behavior of the RDA button is controlled by a number of options, on their own panel.
The check-boxes in the "Generate these fields" frame indicate the kinds of fields you wish the toolkit to help you with. In general, you should check all of these boxes except the box for the 336 field. (The use of the 336 field in authority records is not yet a decided question.)
There are additional options below the yes/no options for each tag:
The toolkit will not offer the possibility of creating an 034 field (from data found in a 670 field of an authority record), because of the difficulty of isolating coordinate information automatically. If you use the features of the RDA button to add an 034 field under your direction, the toolkit will attempt to assign a code for subfield $2, based on information it finds in subfield $a of the 670 field. If the toolkit is not able to assign a specific code, it will by default assign the code 'other.' If you prefer that the toolkit not assign the code 'other' in subfield $2 of the 034 fields it creates, check the 034 field: omit subfield $2 if 'other' box.
The toolkit can digest information found in GNIS (U.S. and Antarctica) and GeoNames (other places) into a 670 field, and in many cases also create an 034 field. For places in the U.S., the display will contain one set of coordinates for each map on which the place name appears. If you check the When digesting a GNIS page, retain only the first set of coordinates box, the toolkit will retain only the first set of coordinates in the 670 field; if you do not check this box, the toolkit will retain all sets of coordinates. (Whether the box is checked or not, the toolkit will use only the first set of coordinates to create an 034 field.)
Use the upper right side of this panel to define fields that you use frequently in your authority records. The toolkit will propose these fields every time you use the RDA button, in addition to any fields that are suggested by a second bibliographic or authority record. You can define as many 370, 372, 373 and 374 fields as you wish. To define a field, type the field's text (including subfield codes, using the "$" for the subfield delimiter) into the box, then click the "Add" button that corresponds to the field's tag.
This option controls the behavior of the re-link button:
The main toolbar of the cataloger's toolkit has a 'help' button that you can pick up with the mouse, and drop onto another button to open a web browser to the relevant section of this online help. Many of the toolkit's subsidiary panels likewise has a help button that you can click to find a description of what's happening, and what you can do next.
Each of these buttons and panels has associated with it an internal identifier for the relevant section within the online documentation, but the toolkit doesn't 'know' the address of the base page. (Due to shifts in Northwestern's infrastructure over the years, the location of the base page has changed several times, although the basic document has remained the same.)
Give in the text box on this panel the base address of the onlilne documentation for the cataloger's toolkit.
Many people are interested in knowing about changes are made to the cataloger's toolkit, bugs tghat are detected, work currently in progress, and so on. Information such as this is available as part of the toolkit's 'news' feature. You can get the current version of the toolkit's news panel by clicking the news button in the lower left corner of the toolkit's options panel.
When you click this button, the toolkit fetches the most recent version of the news from the toolkit's download site, and displays it in a separate panel.
You should get into the habit of checking this panel regularly. You will see here the first (and perhaps only) notification of new features added, and problems resolved.
Note that fixes and new features mentioned here will be available in the next toolkit builds, but may not yet be available in the toolkit build for your particular Vger version. If you see mention here of a feature or fix that you need, but it's not available yet, please contact the author of the toolkit for an updated installation package.
This button is only available to toolkit users at Northwestern University. The button was originally designed to create a 'clone' bibliographic record for the reproduction of an item, but it has since been bent to other (yet related) purposes. In fact, the button is designed to do different things for different operators. The options available on this panel vary from time to time, as the capabilities of the 'PP' button change to suit varying circumstances.
At one time, the cataloger's toolkit was not able to display many of the characters in the pre-Unicode MARC21 character set, so a cumbersome but workable solution was devised. This limitation became more significant with the adoption of the Unicode encoding convention, which vastly increased the number of characters that the toolkit could not represent. A different way of presenting the full range of available characters has been contrived; this mechanism displays characters as you would expect. This method is used at many points in the cataloger's toolkit, but no doubt there remain places at which this technique could be grafted into the existing code.
This appendix describes what the toolkit did universally at one time, and what it continues to do in limited circumstances. If you encounter a situation where the toolkit displays a record with this "\&H" notation instead of with native characters, where the failure to display characters in their proper aspect adversely affects your understanding of a situation, contact the author of the toolkit.
The toolkit is not able to display text containing many MARC21 characters in its native form, and it provides no direct method for operators to edit or modify these exceptional characters. The toolkit instead employs a set of substitutes for MARC21 diacritics and special characters. (For example, you must use these substitute characters when using the BIG RED CROSS and SPLIT HEADINGS buttons to work with the definitions of ‘batch’ corrections.) Operators must be able to recognize, and employ, this same set of substitutes as they review and modify correction requests.
This list is intended to be comprehensive. Inclusion of a character in this table does not imply the suitability for use of any character in a Vger MARC record, the suitability for transmission of any character in a MARC record to another system, or the appropriatness of the use of any character.
| Unicode™ equivalent113 | Pre-Unicode™ equivalent114 | Name |
| |115 | |116 | subfield delimiter |
| \&HC5\&H81 | \&HA1 | slash-L |
| \&HC3\&H98 | \&HA2 | slash-O |
| \&HC4\&H90 | \&HA3 | slash-D |
| \&HC3\&H9E | \&HA4 | uppercase Thorn |
| \&HC3\&H86 | \&HA5 | ligature AE |
| \&HC5\&HH92 | \&HA6 | ligature OE |
| \&HCA\&HB9 | \&HA7 | myagkii znak |
| \&HC2\&HB7 | \&HA8 | centered dot |
| \&HE2\&H99\&HAD | \&HA9 | musical flat sign |
| \&HC2\&HAE | \&HAA | ® symbol |
| \&HC2\&HB1 | \&HAB | plus or minus |
| \&HC6\&HA0 | \&HAC | hook-O |
| \&HC6\&HAF | \&HAD | hook\U |
| \&HCA\&HBE | \&HAE | alif |
| \&HCA\&HBB | \&HB0 | ayn |
| \&HC5\&H82 | \&HB1 | slash-l |
| \&HC3\&HB8 | \&HB2 | slash-o |
| \&HC4\&H91 | \&HB3 | slash-d |
| \&HC3\&HBE | \&HB4 | lowercase thorn |
| \&HC3\&HA6 | \&HB5 | ligature ae |
| \&HC5\&H93 | \&HB6 | ligature oe |
| \&HCA\&HBA | \&HB7 | tvyerdi znak |
| \&HC4\&HB1 | \&HB8 | undotted Turkish ‘i’ |
| \&HC2\&HAe | \&HB9 | British pound |
| \&HC3\&HB0 | \&HBA | eth |
| \&HC6\&HA1 | \&HBC | hook-o |
| \&HC6\&HB0 | \&HBD | hook-u |
| \&HC2\&HB0 | \&HC0 | degree sign |
| \&HE2\&H84\&H93 | &HA0 | script-l |
| \&HE2\&H84\&H97 | \&H92 | (p) symbol |
| \&HC2&HA9 | \&H93 | © symbol |
| \&HE2\&H99\&HAF | \&H94 | musical sharp sign |
| \&HC2\&HBF | \&H95 | inverted question mark |
| \&HC2\&HA1 | \&H96 | inverted exclamation mark |
| \&HCC\&H89 | \&HE0 | pseudo question mark |
| \&HCC\&H80 | \&HE1 | grave accent |
| \&HCC\&H81 | \&HE2 | acute accent |
| \&HCC\&H82 | \&HE3 | non-spacing circumflex |
| \&HCC\&H83 | \&HE4 | non-spacing tilde |
| \&HCC\&H84 | \&HE5 | macron |
| \&HCC\&H86 | \&HE6 | breve |
| \&HCC\&H87 | \&HE7 | superior dot |
| \&HCC\&H88 | \&HE8 | umlaut |
| \&HCC\&H8C | \&HE9 | hacek |
| \&HCC\&H8A | \&HEA | angstrom |
| \&HEF\&HB8\&HA0 | \&HEB | ligature, left half |
| \&HEF\&HB8\&HA1 | \&HEC | ligature, right half |
| \&HCC\&H95 | \&HED | high comma, off center |
| \&HCC\&H8B | \&HEE | double acute accent |
| \&HCC\&H90 | \&HEF | candrabindu |
| \&HCC\&HA7 | \&HF0 | cedilla |
| \&HCC\&HA8 | \&HF1 | right hook |
| \&HCC\&HA3 | \&HF2 | dot below |
| \&HCC\&HA4 | \&HF3 | double dot below |
| \&HCC\&HA5 | \&HF4 | circle below |
| \&HCC\&HBe | \&HF5 | double underscore |
| \&HCC\&HB2 | \&HF6 | non-spacing underscore |
| \&HCC\&HA6 | \&HF7 | left hook |
| \&HCC\&H9C | \&HF8 | right cedilla |
| \&HCC\&HAE | \&HF9 | upadhmaniya |
| \&HEF\&HB8\&HA2 | \&HFA | double tilde, first half |
| \&HEF\&HB8\&HA3 | \&HFB | double tilde, second half |
| \&HCC\&H93 | \&HFE | high comma, centered |
| \&HCE\&HB1 | \&HAF | alpha |
| \&HCE\&HB2 | \&HBE | beta |
| \&HCE\&HB3 | \&HBF | gamma |
| \&HE2\&H81\&HB0 | \&HC0 | superscript 0 |
| \&HC2\&HB9 | \&HC1 | superscript 1 |
| \&HC2\&HB2 | \&HC2 | superscript 2 |
| \&HC2\&HB3 | \&HC3 | superscript 3 |
| \&HE2\&H81\&HB4 | \&HC4 | superscript 4 |
| \&HE2\&H81\&HB5 | \&HC5 | superscript 5 |
| \&HE2\&H81\&HB6 | \&HC6 | superscript 6 |
| \&HE2\&H81\&HB7 | \&HC7 | superscript 7 |
| \&HE2\&H81\&HB8 | \&HC8 | superscript 8 |
| \&HE2\&H81\&HB9 | \&HC9 | superscript 9 |
| \&HE2\&H81\&HBA | \&HCA | superscript + |
| \&HE2\&H81\&HBB | \&HCB | superscript - |
| \&HE2\&H81\&HBD | \&HCC | superscript ( |
| \&HE2\&H81\&HBE | \&HCD | superscript ) |
| \&HE2\&H82\&H80 | \&HD0 | subscript 0 |
| \&HE2\&H82\&H81 | \&HD1 | subscript 1 |
| \&HE2\&H82\&H82 | \&HD2 | subscript 2 |
| \&HE2\&H82\&H83 | \&HD3 | subscript 3 |
| \&HE2\&H82\&H84 | \&HD4 | subscript 4 |
| \&HE2\&H82\&H85 | \&HD5 | subscript 5 |
| \&HE2\&H82\&H86 | \&HD6 | subscript 6 |
| \&HE2\&H82\&H87 | \&HD7 | subscript 7 |
| \&HE2\&H82\&H88 | \&HD8 | subscript 8 |
| \&HE2\&H82\&H89 | \&HD9 | subscript 9 |
| \&HE2\&H82\&H8A | \&HDA | subscript + |
| \&HE2\&H82\&H8B | \&H | subscript - |
| \&HE2\&H82\&H8D | \&HDC | subscript ( |
| \&HE2\&H82\&H8E | \&HDD | subscript ) |
This Appendix lists, in reverse chronological order, major changes made to the toolkit and its components. This list was instituted in December 2003. There is, unfortunately, no consistent record of changes made earlier. This list tends to omit changes that apply only to users at Northwestern University Library. This list is by no means an exhaustive list of all changes made to the toolkit. (For example, internal technical matters such as fixes to the program's translation of a MARC-8 record with vernacular data to Unicode will not be listed here.)
Beginning 2005 04 21, occasional lines in this list will cite toolkit build numbers. No attempt will be made to indicate every build number. It is impossible to provide information for builds before 1.5.211.
It was not possible to update the toolkit documentation for the extended period running from July 2008 to June 2013. Entries for this period have been reconstructed from comments in the program code. (In this work, changes whose purpose could not be extracted from the associated comments were simply ignored; dozens of such changes are ignored here. Changes to features that are no longer part of the toolkit--such as the SACO button--are omitted.) This manner of working means that often there will be not mention made of the initial appearance of a feature, but only of changes to it after its introduction.
The toolkit's 'news' feature (a button on the Options panel) contains much the same information (at least for recent changes), but also describes bug fixes and other chatter often omitted here.
In all cases, the toolkit only examines a bibliographic record for abbreviations if the language of cataloging is English: the bibliographic record must either contain the code "eng" in 040 $b, or it must not contain 040 $b at all.
Unless otherwise noted, the comparisons shown here are case-insensitive. "#" is used in some of the following descriptions to make the presence of a blank space more obvious.
At present, all of the substitutions that the toolkit makes are hard-coded, and are not controlled by information in a configuration file.
The toolkit only considers portions of the 245 field that are enclosed within brackets. The toolkit makes the following replacements:
The toolkit handles each subfield in the 255 field as a separate unit.
Temporarily remove (but retain for adding back at the end) the terminal punctuation ":", ";", "=" and associated blank spaces. Temporarily remove (but retain for adding back at the end) initial blank spaces.
Handle the remaining subfield text as a series of "words" delimited by spaces. For each word, temporarily remove from each such word (but retain for adding back) the leading punctuation "<", ">", "'", "(", "[", "{", ")", "]", "}", "." , ":" and the trailing punctuation ",", "(", "[", "{", ")", "]", "}", ":", ";", ">", "<", and ")."
If the resulting word contains a full stop, handle it as described in the following table:
| Word | Handling |
| ??. | Retain (whatever it means) |
| conic. | Replace withj conic |
| cm. | Retain as found |
| determined | Retain as found |
| differ. | Retain as found |
| direction. | Retain as found |
| given. | Retain as found |
| indeterminable. | Retain as found |
| km. | Retain as found |
| mercator. | Retain as found |
| meridians. | Retain as found |
| microfiche. | Retain as found |
| projection. | Retain as found |
| scale. | Retain as found |
| shown. | Retain as found |
| stereographic. | Retain as found |
| undetermined. | Retain as found |
| unknown. | Retain as found |
| variable. | Retain as found |
| varies. | Retain as found |
| vary. | Retain as found |
| approx. | Replace with "approximately" |
| ca. | Replace with "approximately" |
| ed. | Replace with "edition" |
| lat. | Replace with "latitude" |
| in. | Retain as found |
| proj. | Replace with "projection" |
| proj.. | Replace with "projection" |
| u t m | Replace with "universal transverse Mercator" |
During BAM, the toolkit reports for your consideration any other "word" found in the 255 field that contains a full stop.
Except as noted, the toolkit only considers portions of 260 $a that are enclosed within brackets. The toolkit makes the following replacements:
Make the following replacements (the indicated text may either be enclosed within brackets, or may occur at the start of the subfield, without brackets):
The toolkit does not attempt to RDA-ize the square brackets in a modified 260 field; the pattern of square bracket usage retains pre-RDA conventions.
Remove any leading comma, colon or semicolon.
Replace the letter "el" with the numeral "one".
For each occurrence of the lowercase letter "el":
Substitution of copyright and phonogram symbols
Make the following replacements in all cases to text in the 260 field:
Only make the replacements for the copyright and phonogram symbols if the letter "c" or "p" satisfies the following characteristics.
If the letter is the first character in the subfield:
If the letter is not the first character in the subfield:
Also replace "c." with the copyright symbol in the following circumstances (care must be taken because of the possibility that the expression is part of a roman numeral):
Under the conditions described below, make the following replacements to records whose language of cataloging is English (the record does not contain 040 $b, or 040 $b is "eng").
If the abbreviation does not occur at the beginning of the subfield:
If any preceding character in the subfield is acceptable:
Also replace "v." with "volume" if the language is "eng" and the following considerations apply (care must be taken, because of the possibility that "v." is part of a roman numeral):
The toolkit handles each subfield in the 300 field as a separate unit.
Discard any leading ".", ",", ":" or ";".
Replace each occurrence of the script-l character or the Greek "beta" character with a regular character "el", making sure that each such replacement is followed by a full stop.
Replace "lv." at the beginning of the subfield with "1 v." (in the first text, the initial character is the alphabetic character "el"; in the second, it is the numeral "one").
Consider the following possibilities for the whole subfield:
Categorical changes (order is important):
Insert missing spaces at appropriate points:
Remove, but retain for future re-addition, terminal colon, semicolon, equals sign or space.
Divide the subfield text into phrases at each comma. Remove from each phrase (but retain for future re-addition) one trailing or leading space. (Discard any additional leading or trailing spaces.) Divide each phrase into words at each space. Remove from each word (but retain for future re-addition) leading and trailing punctuation, as described for the 255 field.
If the resulting word contains a full stop, handle it as described in the following table:
| Word | Handling |
| abb., cartes., coul., couv., darst., farb., graf., il., ilustr., kolor., kt. | These appear to be abbreviations of non-English words; retain as given. |
| album., all., analog., annual., arms., atlas., box., boxes., broadsheet., broadside., broadsides., card., cards., case., cartoons., cassette., chart., charts., chiefly., cd-rom., cd-roms., color., columns., container., cover., digital., disc., discs., file., files., filmstrip., filmstrips., folded., folder., folders., foliations., folio., form., format., forms., graph., graphs., group., groups., html., information., inserted., items., jpeg., km., leaf., leaves., looseleaf., loose-leaf., map., maps.,. microfiches., microgroove., monthly., multigraphed., music., of., pages., paginations., paging., pagings., pamphlet., pamphlets., parts., pdf., photographs., pieces., plan., plans., plate., pocket., portfolio., portfolios., postcard., postcards., poster., posters., profiles., reel., reels., reproductions., score., scores., script., semimonthly., sheet., sheets., sketches., slides., some., table., tables., tape., text., unnumbered., unpaged., weekly., wrapper. | Remove the trailing full stop |
| add., addtl. | Replace with "additional" |
| adv. | Replace with "advertisement" |
| app., approx. | Replace with "approximately" |
| autog. | Replace with "autographs" |
| bibl. | Replace with "bibliography" |
| bill., cill. [subfield code plus text] | If prededed by a number whose value is 1, replace with "illustration"; else replace with "illustrations" |
| ca. | Replace with "approximately" |
| cds. | Replace with "cards" |
| chromolith. | Replace with "chromolithographic" |
| chron., chronol. | Replace with "chronological" |
| cm., mm., rpm. | Retain as given |
| col., cold., col'd., coll. | Replace with "color" |
| col)., col.). | Replace with "color)" |
| cols. | In subfield $a, replace with "columns"; else replace with "colors" |
| colums. | Replace with "columns." |
| contin. | Replace with "continuously" |
| cu. | Replace with "cubic." |
| Replace with "" | |
| diag., diagr., daigr., diagram., diar. | If preceded by a number whose value is greater than 1, replace with "diagrams"; else replace with "diagram" |
| diagrs., diags., diagrs., dairs., diagrams., digrs., diars. | Replace with "diagrams" |
| ea. | Replace with "each" |
| engr. | Replace with "engraved" |
| err., errata. | Replace with "errata" |
| facsim., facism., fascism., fascim., fasim., fac-sim., facsm., facim., fac., facisim., facsi., faxsim., fracsim. | (Additional variants probably exist.) If preceded by a number whose value is greater than 1, replace with "facsimiles"; else replace with "facsimile" |
| facsims., facs., fasims., fascisms., facims., facisms. | Replace with "facsimiles" |
| fasc. | In subfield $a, if preceded by a number whose value is greater than 1, replace with "fascicules" else with "fascicule"; in subfield $b, replace with "facsimile" or "facsimiles" as above |
| fig. | Replace with "figure" |
| figs. | Replace with "figures" |
| fol., fold., folds., fols., folde., fldg. | Replace with "folded" |
| fold.; | Replace with "folded;" |
| fr. | If preceded by a number whose value is 1, replace with "frame", else with "frames" |
| front., frontis., fron. | Replace with "frontispiece" |
| fronts., frontp., frons. | Replace with "frontispieces" |
| ft. | If preceded by a number whose value is 1, replace with "foot", else with "feet" |
| geneal., geneol., general. | Replace with "genealogical" |
| geol. | Replace with "geological" |
| gloss. | Replace with "glossary" |
| hr. | Retain as given |
| hrs. | Replace with "hr." |
| ill., illus., ilus., ill.., illi., ills., illustr., iilus, illis, illu. | If preceded by a number whose value is 1, replace with "illustration", else with "illustrations" |
| illum. | Replace with "illumination" |
| illustrations., illustrs. | Replace with "illustrations" |
| in 1. | Replace with "in 1" |
| incl., inc., inclu., inclc. | Replace with "including" |
| insert. | Replace with "insert" |
| irreg. | Replace with "irregular" |
| l. | If preceded by a number whose value is 1, replace with "leaf"; else with "leaves" |
| micro., microgroove. | Replace with "microgroove" |
| mimeo. | Replace with "mimeographed" |
| min. | Retain as given |
| mins. | Replace with "min." |
| misc. | Replace with "miscellaneous." |
| mono., monophonic. | Replace with "mono" |
| mount | Replace with "mounted" |
| Replace with "" | |
| ms. | Replace with "manuscript" |
| multigr. | Replace with "multigraphed" |
| music., mus. | Replace with "music" |
| no. | If preceded by a number whose value is 1, replace with "number", else with "numbers" |
| nos. | Replace with "numbers" |
| num., numb., number. | Replace with "numbered" |
| obl. | Replace with "oblong" |
| p. | If preceded by a number whose value is greater than 1, replace with "pages", else with "page" |
| pag., pgs. | Replace with "pagings" |
| pam. | If preceded by a number whose value is 1, replace with "pamphlet", else with "pamphlets" |
| pams. | Replace with "pamphlets" |
| part., par. | Replace with "partly" |
| partfold. | Replace with "partly folded" |
| phot., photo., photogr. | If preceded by a number whose value is greater than 1, replace with "photographs", else with "photograph" |
| photos., photogs., phots., phtos., photographs. | Replace with "photographs" |
| pl., plate. | If preceded by a number whose value is 1, replace with "plate", else with "plates" |
| port., por., portr., portrait. | Replace with "portrait" |
| portfolio. | Replace with "portfolio" |
| ports., pots., portrs. | Replace with "portraits" |
| pp. | Replace with "pages" |
| prelim. | Replace with "preliminary" |
| pt. | In subfield $a, if preceded by a number whose value is 1, replace with "part", else with "parts"; in other subfields, replace with "partially" |
| pts. | Replace with "parts" |
| quad. | Replace with "quadraphonic" |
| ref. | Replace with "reference" |
| the script-l character | If preceded by a number whose value is 1, replace with "leaf", else with "leaves" |
| s. | If this is lowercase "s.": if preceded by a number whose value is 1, replace with "side", else with "sides"; if this is uppercase "S.", treat as unrecognized |
| sd. | Replace with "sound" |
| sec. | Retain as given |
| sect. | If preceded by a number whose value is 1, replace with "section", else with "sections" |
| ser. | Replace with "series" |
| si., sil. | Replace with "silent" |
| stats. | Replace with "statistics" |
| stereo., stereophonic., stereos. | Replace with "stereo" |
| sup., supp., suppl. | Replace with "supplement" |
| tab., table. | Replace with "table" |
| tabs., tables. | Replace with "tables" |
| typog. | Replace with "typographical" |
| unnumb. | Replace with "unnumbered" |
| unp. | Replace with "unpaged" |
| v., vol. | If preceded by a number whose value is 1, replace with "volume", else with "volumes" |
| var. | Replace with "various" |
| vols. | Replace with "volumes" |
If the fragment ends "p." and is immediately preceded (without a space) by what appears to be a roman numeral, insert a space before the "p." (then handle the "p." as instructed above).
For subfield $a, replace a construction in the form "X pages of music" (where "X" is a string of one or more numerals) with the construction "1 score (X pages)", and replace "X leaves of music" with "1 score (X leaves)".
If the word contains a full stop and its handling is not described above, consider it to be unrecognized.
At present, the toolkit considers only abbreviations in the 504 field.
If so instructed, the toolkit will add one 336 field (in rare cases, two 336 fields), one 337 field, and/or one 338 field to a bibliographic record that does not already contain a field of the same tag. (In a few cases, the toolkit will add two 336 fields to a record that does not already contain a 336 field.) These 33X fields are intended to represent only the primary component of the entity represented by the bibliograpic record, and not any accompanying material.
In this work, understand the designation "enhanced 300 $a" to mean a conglomerate consting of the following:
In this work, understand the designation 'enhanced 300 $e' to mean a conglomerate consisting of the following:
Any reference in the following to 300 subfield $b or $c should be understood to mean that part of such subfields that precedes any '+'.
The lists of microform and internet locations are identified on the 'Locations' tab tab of the toolkit's Options panel.
The toolkit uses these tests, in this order, to identify Braille items:
When constructing 33X fields, the toolkit considers only 007 fields that it can reliably assign to the primary component of any item, and ignores any 007 fields that it can reliably assign to accompanying material. (The toolkit does not apply similar tests to the 006 fields.) If the toolkit is not able to assign all 007 fields either to the primary component or to accompanying material, it will not generate any 33X fields at all. The following paragraphs describe the toolkit's logic for assigning 007 fields to the primary component or accompanying material.
Must the 007 be assigned to the primary component?
If the 007 field cannot be applied to the primary component by the above tests, the toolkit performs the following tests in an attempt to assign the 007 field either to the primary component or or to any accompanying material.
Can the 007 be assigned to the primary component?
Can the 007 be assigned to accompanying material?
If the toolkit cannot assign an 007 field to either the primary component or accompanying material, or if an 007 field could be assigned to either the primary component or accompanying material, the toolkit does not attempt to generate any 33X fields.
The 336 field generated by the toolkit directly reflects the value of Leader/06 (record type).
| Leader/06 value | Handling |
| a, t | If the record represents a Braille item, use 'tactile text'; else if 300 $b contains 'all ill' use 'still image'; else if 300 $b contains 'chiefly ill.' use both 'still image' and 'text'; else if 300 $b contains 'all maps' use 'cartographic image'; else if 300 $b contains 'chiefly maps' use both 'cartographic image' and 'text'; else use 'text' |
| c, d | If the record represents a Braille item, use 'tactile notated music'; else use 'notated music' |
| e, f | If the record represents a Braille item: if the record contains an 007 field beginning 'aa', use 'cartographic tactile three-dimensional form', else use 'cartographic tactile image.' If the record does not represent a Braille item: if the record contains an 007 field beginning 'aa', use 'cartographic three-dimensional form', else use 'cartographic image' |
| g, k | If the record represents a Braille item, use 'tactile image'. If the record does not represent a Braille item: If the record contains an 007 field with 007/00='m': if 007/04='c' use 'three-dimensional moving image' else use 'two-dimensional moving image'; if the record contains an 007 field with 007/00='v' assume 'two-dimensional moving image, but if the record contains a normalized 5XX field that contains the separate word '3D' or the separate words '3 D', or if the record contains a normalized 665 field that contains the separate word '3D' or the separate words '3 D', use 'three-dimensional moving image'. If none of the above, use 'still image'. |
| i | If the record contains an 006 field with 'm' in byte 00 and 'h' in byte 09, use 'sounds', else use 'spoken word' |
| j | Use 'performed music' |
| m | If 008/26 is 'b', use 'computer program', else use 'computer dataset' |
| o, p | Use 'other' |
| r | If the record represents a Braille item, use 'tactile three-dimensional form'; else use 'three-dimensional form' |
| all others | Use 'unspecified' |
The toolkit considers the following record elements, in this order, when constructing the 337 field.
| 245 $h | Use |
| computer file | computer |
| electronic resource | computer |
| filmstrip | projected |
| microform | microform |
| microscope slide | microscopic |
| motion picture | projected |
| slide | projected |
| sound recording | audio |
| transparency | projected |
| videorecording | projected |
Byte 00 in the first 007 field contained in the record (if any).
| 007/00 | Use |
| c | computer |
| g, m | projected |
| h | microform |
| k, t | unmediated |
| s | audio |
| v | video |
| z | unspecified |
| Leader/06 value | Use |
| a, c, d, e, f, k, r, t | unmediated |
| g | projected |
| i, j | audio |
| m | computer |
| o, p | unspecified |
| all others | unspecified |
The toolkit considers the following record elements, in this order, when constructing the 338 field.
| 245 $h | Use |
| activity card | card |
| filmstrip | filmstrip |
| flash card | card |
Bytes 00-01 in the first 007 field contained in the record (if any).
| 007/00-01 | Use |
| ca | computer tape cartridge |
| cb | computer chip cartridge |
| cc, ce | computer disc cartridge |
| cd, cj, cm, co | computer disc |
| cf | computer tape cassette |
| ch | computer tape reel |
| ck | computer card |
| cr | online resource |
| c plus anything else | other computer carrier |
| gc | filmstrip cartridge |
| gd | filmslip |
| gf, go | filmstrip |
| gs | slide |
| gt | overhead transparency |
| ha | aperture card |
| hb | microfilm cartridge |
| hc | microfilm cassette |
| hd | microfilm reel |
| he | microfiche |
| hf | microfiche cassette |
| hg | microopaque |
| hh | microfilm slip |
| hj | microfilm roll |
| h plus anything else | other |
| mc | film cartridge |
| mf | film cassette |
| mo | film roll |
| mr film reel | |
| m plus anything else | other |
| sd | audio disc |
| se | audio cylinder |
| sg | audio cartridge |
| si | sound track reel |
| sq | audio roll |
| ss | audio cassette |
| st | audiotape reel |
| s plus anything else | other |
| vc | video cartridge |
| vd | videodisc |
| vf | videocassette |
| vr | videotape reel |
| v plus anything else | other |
| Leader/06 value | Use |
| r | object |
Additional values in 245 $h (if present).
| 245 $h | Use |
| microform | other |
| microscope slide | microscope slide |
| slide | slide |
| sound recording | other |
| videorecording | other |
If leader/06 is "a", "c" or "t" and the record contains a 300 field with subfield $a:
| 300 $a contains | Use |
| p., page, leaves, score | volume |
| v., volume | volume |
| broadside, sheet | sheet |
If none of the above leads to a 338 field, the toolkit will not construct a 338 field at all.
This appendix describes the method the toolkit uses to parse a 502 field consisting of just subfield $a into a 502 field that contains subfields $b, $c and $d. There are additions to this method that the toolkit applies if the 502 field contains the string "Northwestern University"; these additions are described at the end of this appendix.
Initial split: degree information, and institution/date
The toolkit splits the 502 field into two work areas: the "left" area (assumed to contain degree information and perhaps other information) and the "right" area (assumed to contain the institution name and a date).
Examination of the degree information
If the left work area does not contain an opening parenthesis and a closing parenthesis, the toolkit does nothing with the 502 field. If the closing parenthesis appears in the left work area to the left of the opening parenthesis, the toolkit does nothing with the 502 field.
The text in the left work area, to the left of the opening parenthesis, must be one of the following "dissertation types" (normalized comparison):
If the text before the opening parenthesis is none of these, the toolkit does nothing with the 502 field.
The toolkit uses the text within parentheses in the left work area as the degree name. If the extracted degree name begins with a numeral, the tookit does nothing with the 502 field.
Examination of the institution/date information
The right work area must contain at least one comma; the toolkit is interested in the rightmost comma. If the right work area does not contain a comma but ends with text enclosed in square brackets, the toolkit acts as if the square brackets were preceded by a comma. The toolkit examines the text to the right of this comma. If the text to the right of the comma is a recognizable date, the toolkit uses the text to the right of the comma as the date in the new 502 field, and the text to the left of the comma as the institution name in the new 502 field. If the text to the right of the comma is not a recognizable date, the toolkit uses date 1 from the 008 field (bytes 07-10) as the date, and uses the entire text of the right work area as the institution name.
If the toolkit has been successful in its effort to parse the 502 field into degree name, institution and date, the toolkit replaces the existing 502 field with a new one, containing subfields $b, $c and $d.
Additions and exceptions for 502 fields for Northwestern University dissertations:
The toolkit considers the following to be recognized degree names (normalized comparison):
If the putative degree name is none of these but if the normalized form of the degree name consists of an odd number of characters, all of the characters must be alphabetic, and (in their normalized form) must be separated by spaces. (This means that the toolkit will recognize "M.A.", "B.F.A." and similar constructions as degree names, without having to list them all.)
The toolkit relies on a dismayingly large number of configuration files to do its work. Although this structure means that you have a large amount of control over the toolkit's performance of many tasks, it also means that maintenance of these files can present substantial problems. Although the toolkit can draw on the information in these files for many purposes, at any time in its work, for convenience these files can be regarded as falling into one of the following broad groups:
The following sections of this appendix discuss in turn the files in each of these groups. Current versions of all of these files (the files as used at Northwestern University Libraries) are available in the Configuration sub-folder of the toolkit download site; you may wish to make local modifications to these files.
The validation portion of the BAM button draws on a series of configuration files. Other parts of the toolkit also draw on the information in these files as needed.
Because of their complexity, this set configuration of files is described in a separate document.
Three configuration files control the behavior of the fixed-field editor button.
FfdStanzas.cfg. If this file isn’t present, this probably means that the file VITagTableC.cfg isn’t there, either. These are not files you can modify directly; the toolkit creates both of these files (if they’re not present) when you click the BAM button. To create these two files, make sure that VITagTableC.cfg is not there, then simply click the BAM button. (The toolkit will appear to be stuck for a moment as it reads through your entire set of Vger tag table files and prepares its digested form.) If you change your Vger tag tables, delete VITagTableC.cfg, start up the toolkit and click the BAM button; the toolkit will re-create these files.
FfdLabels.cfg. This file defines the fixed-field elements the toolkit will present for editing, and the labels it will use when presenting them. The toolkit recognizes nine different layouts for the 008 field in a record; these constitute the nine MARC ‘formats’ the toolkit recognizes. Each format is identified by a single upper-case letter:
There are stanzas in this file for the elements in the leader of each format, and for the 008 field in each format. The names of these stanzas are ‘Leader’ or ‘008’ plus the format code plus the word ‘Labels’; so the stanza describing elements in the leader for authority records is called LeaderALabels, and the stanza describing elements in the 008 field for holdings records is called 008Hlabels.
Within each stanza, each element to be presented by the fixed field editor is given as a separate line. The label to be used when presenting the element is first on the line, followed by an equals sign. To the right of the equals sign are two numbers; the first gives (in the zero-based form used in MARC documentation) the starting position of the element, the second the length of the element. If an element should be displayed but should not be subject to operator modification, follow the label with an asterisk. To keep the display as compact as possible, the default element labels are very brief, but they can be longer if you wish; they can be several words if you want. The labels are also in upper-case to make them easy to distinguish from the code that follows, but this is also just the convention used in the supplied default file.
There are two more stanzas, called 006Names and 007Names, that give information about the 006 and 007 fields. To the left of the equals sign in each line of the 006Names stanza is the single-character code used in byte 0 (the first character) of an 006 field. To the right of the equals sign are the single-character code of the corresponding bibliographic format, the name of the 006 field, and the default value used for a new field of that type. (The last two elements are separated from each other by a double slash.) In the default value, use the underscore for blank spaces, and the vertical bar for the fill character. The 007Names stanza has the same format as the 006Names stanza, except that it does not contain the single-character code for the corresponding bibliographic format. The fixed-field editor uses the labels defined for the 008 field to display elements in an 006 field. Each different 007 field has a stanza that describes its elements. The names of these stanzas are ‘007’ plus the code that appears in byte 0 (the first character) of the field; the contents of the stanzas are identical in form with those of the stanzas for the leader and 008 field.
FfdStanzasOverride.cfg. When using the fixed-field editor, you can press the F1 or F2 key to see a list of values allowed for any fixed-field element. The toolkit draws this list directly from your Vger tag table files; but in some cases, those files don’t show the actual codes. For example, the Vger tag tables do not list every valid year that may appear in Date 1 or Date 2, but simply contain the code <<<TEXT>>>. The FfdStanzasOverride.cfg allows you to provide a piece of text describing the contents of a fixed field element to be displayed instead of values from the Vger tag tables.
There may be stanzas in this file for each of the 007 formats and each of the 008 formats; the name of each stanza is the code appearing in byte 0 for 007 fields or the single-letter code given above for the 008 format, followed by the tag itself. Each line in the stanza constists of a numeral to the left of the equals sign, and a message to the right. The numeral is the starting position (using the zero-based convention found in the MARC documentation) of one fixed field element whose values are not given properly in the Vger tag tables.
The toolkit uses a set of configuration files (originally designed for a separate RDA conversion program) to direct some parts of the manipulation of headings into a more RDA-like form. These files, which are available at the toolkit's download site, are plain text files; most of these can be modified to suit local needs.
Most of these files have something to do with authority records. Only the RdaSubfieldCConfig.Parels.AllTypes.txt file is used by the toolkit in its handling of bibliographic records. Unless a future version of the toolkit makes RDA-related changes to authority records, the toolkit will not actually draw on the other files described here. However, for the sake of completeness (and probably to make the DLL that handles the RDA conversions happy), you should place all of these files in the toolkit's configuration folder. If a later version of the toolkit offers the option of making similar changes to authority records, these files will suddenly become important.
This file lists each term that might be found in subfield $b of a corporate heading (tag group X10, first indicator not "1") that means, or might possibly mean, something conference-y in some fashion. The initial list was generated by finding every distinct subfield $b text in candidate authority records that was followed immediately by conference-specific subfields ($n, $d or $c). The configuration file consists of one line per term; a term may consist of as many words as it needs to contain.
RdaSubfieldCConfig.NoParensForename.txt
RdaSubfieldCConfig.NoParensAllTypes.txt
RdaSubfieldCConfig.ParensAllTypes.txt
These three files define texts used in subfield $c of personal names that have been deemed acceptable for use under RDA. Each file contains subfield $c texts, one per line. The three files define subfield $c texts that are appropriate in various contexts.
RdaConversion.Rda7xxExtendedHeadingConsideration.txt
This file was created during 'phase 1' of the RDA conversion. The contents of this file provide important information during phase 2. This file has a peculiar format; you should not attempt to modify this file.
When working with the '$l' button, the toolkit will occasionally ask if a particular author originally wrote in classical Greek (the alternative being modern Greek), or if a particular work (not associated with an author) was originally written in classical Greek (or modern Greek). The toolkit stores your answers in a configuration file, which you can also modify if you wish.
The configuration file is called ClassicalGreekAuthorsAndWorks.cfg, and contains two stanzas:
The structure of the two stanzas is identical. Each line begins with the identification of an author (all subfields from the author's name) or work (just subfield $a), in normalized form, and with spaces replaced with an underscore. This is followed by an equals sign, and the corresponding language code.
If you incorrectly answer the toolkit's question, so that the toolkit assigns the wrong language code to a person or work, close the toolkit, edit the file to contain the correct code, start the toolkit again and continue with your work.
Here is a sample of lines from a typical file:
	[Authors]
	ARISTOTLE=grc
	ARISTOPHANES=grc
	ARATUS_SOLENSIS=grc
	PLATO=grc
	PINDAR=grc
	HERACLITUS_OF_EPHESUS=grc
	CLEMENT_I_POPE=grc
	THUCYDIDES=grc
	HIPPOCRATES=grc
	STRABO=grc
	CASSIUS_DIO_COCCEIANUS=grc
	LONGINUS=grc
	THEOGNIS=grc
	THEOCRITUS=grc
	DIONYSIUS_PERIEGETES=grc
	MENANDER_OF_ATHENS=grc
	EURIPIDES=grc
	SALLUSTIUS=grc
	ARRIAN=grc
	OPPIAN_OF_APAMEA=grc
	HERODIAN=grc
	AGATHARCHIDES=grc
	LYSIAS=grc
	AESCHINES=grc
	[Titles]
	DE_MELISSO_XENOPHANE_GORGIA=grc
	PROBLEMATA_PHYSICA=grc
	GREEK_ANTHOLOGY=grc
The LanguagesByCodeSubfieldL stanza in the codes.cfg configuration file gives the toolkit additional information about languages whose names may appear in subfield $l in a form different from that given in other parts of the toolkit's configuration. This stanza was designed initially for languages that exist in both modern and earlier forms, but it may be of use in other situations.
	[LanguagesByCodeSubfieldL]
	#stanza added 20130323, to support work with pre-RDA subfield $l
	ang=English (Old English)
	dum=Dutch (Middle Dutch)
	enm=English (Middle English)
	frm=French (Middle French)
	fro=French (Old French)
	gmh=German (Middle High German)
	goh=German (Old High German)
	grc=Greek (Classical Greek)
	gre=Greek (Modern Greek)
	mga=Irish (Middle Irish)
	peo=Persian (Old Persian)
	sga=Irish (Old Irish)
A suite of configuration files controls the behavior of the romanization and capitalization tabs of the toolkit's general editing panel.
These configuration files are text files, and take the general form of INI files, though they occasionally vary from the usual INI file format.
These configuration files reside in the same folder as the toolkit's other configuration files.
A configuration file to control other configuration files
The file RomanizationMaster.cfg is a central point that lists the other files of interest. This file got its name when there was only a need to list configuration files for the romanization feature, but it now also lists configuration files for the title-case feature on the capitalization tab.
There are two stanzas in this file. Each stanza lists configuration files of one type. Each file is listed starting with number 1. The two stanzas are:
Here is a typical example of this file. This file defines twelve romanization configuration files, and two title-case configuration files.
Each of the files listed here must be in the same folder as this the RomanizationMaster.cfg file.
Configuration files for the romanization feature
The contents of these files are contained in a separate document, ConfigurationFilesForRomanization.doc. Although this document is now several years old, it still accurately describes the content of these files.
Configuration files for the title case feature
Each file contains two stanzas. Although this file has the general appearance of an INI file, the toolkit actually reads it serially, from first line to last.
The next illustration shows the first part of a title-case configuration file for English. This file contains instructions for the information given in the TitleCaseWords stanza.
The authority 368 field contains a miscellaneous collection of attributes of persons and corporate bodies; these are best thought of as things that must according to RDA be recorded, but which found no more logical place in the MARC authority format.
The information needed in the 368 field is often present somewhere in the authority 1XX field'; so as is often the case the automatic construction of the 368 field becomes a matter of recognizing the relevant bit of text, perhaps manipulating it, and copying it into the appropriate MARC pigeonhole. Here is an outline of the scheme that the cataloger's toolkit uses for creating the 368 field. The toolkit uses this scheme for new authority records, and for authority records submitted to the BAM button:
If the authority record represents a personal name, the toolkit examines the subfield $c text for "spirit" and "saint", and also examines the subfield $c text for a recognizable title. If 100 $c contains "spirit" the toolkit creates a 368 field "$c Spirits $2 lcsh". If the 100 $c contains "saint" the toolkit creates a 368 field "$c Saints $2 lcsh". If the 100 $c contains a recognizable title and if the option to create 368 $d is turned on, the toolkit creates a 368 field with the personal title in subfield $d.
If the authority 1XX field represents a corporate body, conference or geographic name, the subfield of interest must contain a parenthetical qualifier; if the subfield does not contain a parenthetical qualifier, the toolkit does not attempt a 368 field. 118 The toolkit compares the normalized form of each colon-delimited segment in the qualifier against a list of type-of-jurisdiction terms, and a list of type-of-corporate body terms. (More on this list in a moment.) If the toolkit finds a term from the qualifier in one of these lists, the toolkit creates a 368 field with subfield $a (type of jurisdiction) or subfield $b (type of corporate body). Depending on the manner in which the toolkit is working, the 368 field may also contain subfield $2. If the toolkit does not create a 368 field based on the qualifier, and if the heading is a geographic name, the toolkit may be able to recognize a type-of-jurisdiction term in the portion of the heading to the left of the parenthetical qualifier. Finally, if the toolkit is not able to create a 368 field for a conference name based on the qualifier, the toolkit creates a 368 field "$a Congresses and conventions $2 lcsh".
Made-up examples (assuming the proper configuration is available):
How does the toolkit identify terms for type of jurisdiction and type of corporate body?
The original attempt at the creation of the 368 field involved a list of suitable terms that was hard-coded into the toolkit program itself. This worked well enough, but it made it difficult for others to adjust the terms to suit their needs. The original scheme was quickly supplemented by a second scheme, which involves a new configuration file: if the configuration file is present, the toolkit uses information in the configuration file to identify suitable bits of text in the parenthetical qualifier; if the configuration file is not present, the toolkit uses its original hard-coded scheme instead.
The configuration file for type of jurisdiction and type of corporate body terms is called RdaOtherAttributes.cfg, and resides in the same folder as all of the other toolkit configuration files. A sample version of this file is available in the Configuration folder at the toolkit's download site. The file contains two stanzas: TypeOfJurisdiction and TypeOfCorporateBody. 119 Each stanza contains lines composed of 1, 2 or 3 segments, each separated from its neighbors by a slash. (You don't need slashes to delimit segments to the right that are not present.) The three segments are:
Here are some sample lines from these stanzas, with an explanation
There is one other thing you can accomplish with the configuration file, that isn't part of the toolkit's build-in configuration. In some geographic names, the term for the type of jurisdiction is build into the name itself, and not in the qualifier. (Examples: Greene County (Ala.); Washington Township (Macomb County, Mich.).) If you prefix such terms in the configuration file with an asterisk, the toolkit will also look for them just to the left of the opening parenthesis.
When you start with a bibliographic record and click any button that leads to the fancy editing panel, the toolkit does a number of things to the bibliographic record.
After all this, the toolkit sends each bibliographic record through the validation portion of BAM processing. The toolkit may make additional changes, depending on the configuration you have defined for the BAM button.
If so requested, the toolkit can (during BAM) parse subfield $b in the 670 fields in an authority record for a personal name, in an attempt to find birth and/or death dates. If the toolkit finds such dates, it can use them to construct or enhance the record's 046 field.
When inspecting the text of 670 $b, the toolkit uses a number of different techniques to find the year portion of a date, and then looks around that year to see if the immediate context contains month and day as well. Although all of the techniques that the toolkit uses have been extensively tested, it is true that some of them are more consistently reliable than others. Here are the techniques that the toolkit uses to find the year portion of a date, in order of reliability from most reliable to least reliable. (There is no meaningful difference in the reliability of the first four items in this list.)
You may assume that the toolkit applies a variety of tests to information that it extracts from 670 fields before it uses the information to construct an 046 field. A description of this full process is beyond the scope of this documentation.
1. The toolkit works with the record as found in Vger, so it won’t know about any changes you’ve made to the record but haven’t yet saved.
2. The toolkit features that work with call numbers require the installation of routines on the Vger server.
3. The Vger cataloging client performs similar tasks when you ‘click the boat’ but the toolkit does the work in a more comprehensive manner, and presents the results in a more useful form.
4. The toolkit works with the bibliographic, authority or holdings record as found in the Vger databse, not as shown in the cataloging client. The toolkit doesn’t know about any changes you may have made to the record but haven’t yet saved. You should always save a modified record before you click the BAM button.
5. If you copy the toolkit’s configuration files from one workstation to another (as opposed to installing them on a networked drive), you can also copy this compressed tag table, once the toolkit has prepared it, to avoid repeating this delay for each user. The file is VITagTableC.txt, and it’s in the folder identified on the Options panel, in the ‘Files of validation rules’ box on the ‘Files’ tab of the BAM button’s configuration.
6. This test is similar to the test performed by the Vger cataloging client, but includes the codes found in certain subfields (such as bibliographic 043/a and 650/2). This MARC test also takes into account the ‘obsolete’ nature of some elements of content designation.
7. With a few exceptions, you cannot change the manner in which the toolkit performs MARC validation by changing any of the toolkit’s options; instead, you must use a text editor to modify one or more configuration files. This extremely complicated process is described in the document validit.doc, available from Northwestern University Library.
8. If the toolkit also makes changes to a record when checking access fields, it will consolidate all of the changes, and only update the record once when you click the BAM button.
9. Delete the file VITagTableC.txt; this causes the toolkit to recreate the file from your modified Vger tag tables. This is also described in the document validit.doc (see an earlier note).
10. It is possible that the toolkit will eventually acquire additional matching logic that will allow it efficiently to search for near matches when it cannot find an exact match.
11. The toolkit’s handling of subject subfield $z is a bit complicated. The toolkit normally removes subfield $z (or two consecutive instances of subfield $z) and tries to find a geographic authority record for the place name. The toolkit assumes that in most cases the authority file will not contain a record for a topical access field with a geographic subdivision.
12. About the only time this will happen for bibliographic records is when the record contains no access fields under authority control, and has no problems with MARC coding.
13. The access fields shown in the report are normalized according to a set of system-independent ‘generic’ rules, and do not necessarily show the term exactly as used to search Vger.
14. If the access field being verified is a geographic name pulled from another access field, the tag will be the first digit of the original field’s tag, plus ‘51’; this pseudo-tag will not always correspond to a ‘real’ MARC tag. (A geographic access field created from an indirect subdivision in a topical access field will be tagged ‘651’, but a geographic access field created from the place name in a conference name added entry will be tagged ‘751’.)
15. For example, the access field is used as a subject, but authority 008/15 does not contain code ‘a’.
16. This code is a ‘zero,’ not the letter ‘oh’.
17. Used when a combination of the 1XX+245 field matches an authority 4XX field, and the 1XX+240 from the same bibliographic record matches that authority record’s 1XX field. The ‘access field’ being searched matches a 4XX field, but the match is in fact to be expected.
18. For example, when verifying the access field ‘Chicago Metropolitan Area (Ill.)’ the toolkit found no matching authority record, but did find an authority record for the name ‘Chicago (Ill.)’. This code is the lower-case letter ‘oh,’ not a ‘zero.’
19. For example, if the bibliographic record is an AACR2 record, this code is ‘a’.
20. By holding down the Control key and clicking with the mouse, you can highlight as many access fields in the two lists on the BAM report as you wish. When you click the ‘Change’ button on the BAM report, the toolkit will make changes based on the highlighted lines in the BAM report—the toolkit ignores the not-highlighted lines, even if they also represent potential changes.
21. For example, the access field matches an authority 4XX field, or shows slight variations from the established access field.
22. For example, a personal name access field matches an authority 4XX field, but the access field does not contain subfield $d. Except in certain closely-defined circumstances, the toolkit will not change a personal name with no dates, without operator approval.
23. For example, the toolkit has identified one or more 043 codes to add to the record, but you have not told the toolkit to do this work automatically.
24. For example, the toolkit suspects that a non-filing indicator is incorrect, and suggests the correct value. The toolkit will never change a nonfiling indicator automatically; but it can make the change if you approve it.
25. If the bibliographic record contains more than one quoted note, the toolkit will ask you which one it should use.
26. If the Vger cataloging client already displays the record but the record is not at the top of the ‘pile’ of open records, doing this will unfortunately not cause the record of intrest to become the topmost record.
27. If the operator has checked the ‘Bypass MARC validation’ box on the Validation tab of the Vger cataloging client’s Options|Preferences panel, the client will allow the operator to save records that contain coding errors. The operator should never check this box.
28. The #S button uses the same library of routines. The library resides in two text files (one header file and one body file) available from Northwestern University Library. (The library of routines calls on the services of a set of utility routines, also available from Northwestern.) A person with sufficient authorization on your Vger server must use a separate program to install the header and body files on the server, and to grant permission for all users to access these routines. This person will do this work under an Oracle signon, to which Oracle assigns ongoing responsibility for the routines. This Oracle signon is the text you put into the ‘Oracle schema’ box for the primary Vger connection on the ‘Connections’ tab of the Options panel. Contact Northwestern University Library for the location of the source code for the server modules,and detailed instructions for their installation.
29. This only applies if you have installed the library of server routines mentioned above. If you have not installed this library, leave the ‘Oracle schema’ box empty.
30. After you’ve used the panel once, it will show you the choices for heading type and call number type you selected most recently.
31. The routines that produce this summary have several built-in guarantees against run-away processing. These include a limit on the number of different call numbers considered, and the number of bibliographic records retrieved. This means that if the subject field is extremely common, the results may not represent a perfect sample of the available data; but in most cases the results will give a useful indication of trends.
32. To determine this, the toolkit has to retrieve each bibliographic record that contains the string of interest, normalize the first subject field, and compare it to your string. This is what makes the routine take as long as it does to produce a response.
33. The S# button uses the same library of routines. The library resides in two text files (one header file and one body file) available from Northwestern University Library. (The library of routines calls on the services of a set of utility routines, also available from Northwestern.) A person with sufficient authorization on your Vger server must use a separate program to install the header and body files on the server, and to grant permission for all users to access these routines. This person will do this work under an Oracle signon, to which Oracle assigns ongoing responsibility for the routines. This Oracle signon is the text you put into the ‘Oracle schema’ box for the primary Vger connection on the ‘Connections’ tab of the Options panel. Contact Northwestern University Library for the location of the source code for the server modules,and detailed instructions for their installation.
34. This only applies if you have installed the library of server routines mentioned above. If you have not installed this library, leave the ‘Oracle schema’ box empty.
35. After you’ve used the panel once, it will show you the choices for heading type and call number type you selected most recently.
36. The routines that produce this summary have several built-in guarantees against run-away processing. These include a limit on the number of different call numbers considered, and the number of bibliographic records retrieved. This means that if the subject is extremely common, the results may not represent a perfect sample of the available data; but in most cases the results will give a useful indication of trends.
37. The toolkit uses the most-recently-assigned-number in the matching definition as a starting point, and does a series of call number searches, with increasing sequential numbers, until it finds a stretch of 10 numbers that have not yet been used. The toolkit uses the lowest number in this stretch of 10 numbers in the holdings record.
38. A few ‘simple’ requests actually operate on more than one field. For example, a change to a bibliographic 440 field may result in the retagging of that field to 490, and the addition of an 8XX field. Also note that the replacement text can consist of nothing. For example, it is possible to use this suite of programs to remove the subdivision ‘Addresses, essays, lectures’ from LCSH strings.
39. As the name the button’s name, and its icon, imply, the button was originally designed to deal with single access fields that have become two or more. However, its capabilities have grown beyond the original scope.
40. Notice in these examples that the bibliographic access field being changed does not necessarily match the ‘old’ access field exactly, but may instead contain additional subfields. These examples are constructed in this way for one special reason: to show the difference between this set of programs and the heading change programs supplied as part of the Vger system. Northwestern University Library’s batch correction suite is able to change access fields both when a reference tracing matches the entire bibliographic access field and when a reference tracing matches only part of a larger access field. While the programs have been written with every possible attention to detail, you may occasionally have questions about what will happen to a request. In case of doubt, the best thing to do is to define a correction and perform it as a test. A review of the report of fields changed by the programs should indicate whether or not the programs can successfully perform a given request.
41. These programs do not require that an authority record representing a change be present. (This is another important difference between Northwestern’s programs and the Vger programs.) The examples given here are stated in terms of authority records only for simplicity. The document Making changes to headings contains additional examples, including one that hints at the elaborate scheme available for changing series access fields. Because the Northwestern University Library programs do not require the presence of an authority record, you can also use this set of programs to make changes to access fields that are not and would not in the normal course of things be represented by reference tracings in authority records.
42. Entries arrive at the heading change queue whenever the 1XX field in an authority record is modified. They stay in this queue until the queue is flushed, or until the Vger heading change jobs are run, or until the left-anchored indexes are regenerated.
43. For example, the program that performs corrections might be instructed to do its work after 5 PM. CARLI users: the correction receiver program will automatically configure itself to perform corrections between 10 PM and 2 AM.
44. The active record is the record at the top of the pile of records displayed in the Vger cataloging client’s window.
45. The toolk performs a crude, left-anchored search that doesn’t trouble to determine whether tags and/or subject heading systems correspond properly. If the toolkit finds the text of a 4XX field in the Vger headings table, it assumes that there’s a match. This means that the toolkit will report more reference tracings as problems than actually represent problems. But don’t worry: the program that actually makes corrections to records does check things like tags, the second indicators of subject fields, and the full text of subfields, so that only the proper things actually get changed.
46. If the toolkit can’t find any 4XX fields in the record that might match access fields in your database, it tells you so, and leaves this dialog box empty.
47. The program’s routine for doing this work is at best rudimentary. Carefully check any information in both of the ‘indirect subdivision’ boxes.
48. The program takes the indirect subdivision form for the ‘new’ heading from the authority record’s 781 field, if there is one.
49. The toolkit doesn’t do any of the work mentioned here if the active record is something other than an authority record.
50. You can use the letter ‘X’ for one or both indicators, to show that the indicator value doesn’t matter. If an indicator is defined to show the number of nonfiling characters, use ‘0’ and omit nonfiling characters from the text of the old access field. The correction receiver program knows how to deal with initial articles in bibliographic access fields.
51. Well, of course that’s not quite the full story. If you’re changing a non-series name access field, the program will inspect the name parts of 400-411 and 800-811 fields, just as it inspects the name parts of 600-611 and 700-711 fields.
52. That is, assuming this is a ‘normal’ correction in which the program substitutes one piece of text for another. The correction receiver can also make other kinds of changes.
53. Use ‘X’ for one or both indicators to tell the program to leave a bibliographic indicator as it finds it. But, if an indicator is used for the number of nonfiling characters, use ‘0’ and omit nonfiling characters from the text of the new access field. The correction receiver program knows how to deal with nonfiling characters.
54. The correction receiver program knows how to add punctuation to the end of the new access field, depending on the finished field’s tag, and any following subfield, but it does not attempt to remove terminal punctuation from the access field you supply. The program will assume that any punctuation you include here is an integral part of the access field; if you include here any unnecessary terminal punctuation, the program may produce instances of dreaded ‘double punctuation.’ Examples of integral punctuation are: full stops at the end of abbreviations, and hyphens at the end of open dates in personal name access fields.
55. That is, if the authority record for the subdivision contains ‘d’ or ‘i’ in byte 06 of the 008 field, or if, for LCSH subdivisions, the designation ‘(May Subd Geog)’ appears after the subdivision in SHM: Subject headings manual.
56. The toolkit will not change the position of a geographic subdivision that appears to the right of the changed subdivision.
57. If a subdivision changes from one that does not allow geographic subdivision to one that does allow geographic subdivision, you can define a request that will cause the correction program to move the geographic subdivision to the proper place; and you can do this even if the text of the subdivision does not change. For example:
58. For example, consider the change from ‘Java Sea’ to ‘Java Sea (Indonesia)’, with the implied change in indirect subdivision form from ‘|zJava Sea’ to ‘|zIndonesia|zJava Sea’. If this box were not checked for this request, the heading change program might try to change an existing access field such as ‘Fishing $z Indonesia $z Java Sea’ to ‘Fishing $z Indonesia $z Indonesia $z Java Sea’. (The correction program actually contains some primitive logic to help prevent accidents of this type: it will not change a geographic subdivision if the resulting access field contains three occurrences of subfield $z in a row.)
59. For example, given this correction definition:
60. You can employ this technique in other situations, if you wish a correction to produce the same result (swap one 440 field for another, instead of creating a 490/830 pair of fields). For example, you could use this definition to remove the final comma from a 440 series access field:
61. For subject access fields as for everything else, the tags and indicators of the reference tracing and the candidate bibliographic field must correspond.
62. For example, in some cases you might want to change the string “Afghanistan $x History $y 1973- $x Bibliography.” to Afghanistan $x History $y 1973-1989 $x Bibliography.” and at the same time create a new access field “Afghanistan $x History $y 1989-2001 $x Bibliography.”
63. The toolkit first performs a crude, left-anchored search for the old heading. It takes each bibliographic record retrieved by this search and passes it to the tool that performs corrections. (This is just a quick method of determining whether or not the ‘old heading’ is present in the record—i.e., whether or not the record is actually a candidate. The toolkit does not at this point actually save the results of this work; it’s only interested in finding out if a correction is possible or not.) The bibliographic records listed are the only ones in your database that are subject to the currently defined correction. Because the toolkit is doing quite a bit of work for you when you select ‘Search old heading’, it may take some amount of time before you see any results.
64. Holding down the shift key as you click on lines in this box allows you to select a contiguous group; holding down the control key as you click allows you to select multiple individual lines.
65. If the deleted access field is part of a group of access fields assigned to a bibliographic record, the program removes the notation for the deleted access field from each bibliographic record’s line, but does not remove the line from the bottom box unless the record is now not assigned any access fields.
66. In a given queue review, you might start with 405 entries pulled from the Vger changed heading queue. If you should happen to re-visit the same part of the queue later, the toolkit will continue to report that there are 405 entries in the queue. (If in your first review you actually changed some bibliographic records, then the report you see the second time should be different from the report you see the first time.)
67. The toolkit also does a search for any ‘old heading’ it can extract from the 667 and 688 fields; but because these fields contain free text, its extraction will often be less than perfect. Whenever this section refers to ‘4XX’ fields, you should keep in mind that the category of fields inspected is slightly broader. The toolkit assumes that the old heading extracted from one of these fields is the same as the tag of the 1XX field.
68. This crude test is based on a comparison of text in 4XX fields in the record to text in entries in a Vger table, without consideration of such details as tag and subfield coding.
69. This more detailed test is identical to the test made by the program that perform corrections; it identifies only bibliographic records that would actually be changed if the correction is approved.
70. Actually, the toolkit fills out more of the split heading form when you start from the button on the queue review panel.
71. What really happens, is that the toolkit ignores the existing authority record and formulates a new one based on the bibliographic record—without actually writing the new authority record to the Vger database. The toolkit then simply transfers relevant fields from this scratch authority record to the Vger authority record.
72. When it adds a 4XX field, the toolkit also adjusts the value of the authority record’s reference evaluation code (008/29).
73. The 501 fields built by this button are intended to conform to the instructions in AACR2 2.7B21 and the accompanying LCRI.
74. If a bound-with collection is set up in Vger either with a single holdings and item record to which a number of bibliographic records are linked, or with separate holdings records for each member, the toolkit will find all of the appropriate bibliographic records.
75. In most cases, a cataloger will create the bibliographic record for the first item in the collection, and proceed through the remaining items in the list; so in most cases the list sorted by Vger bibliograhpic record number will approximate the order of items in the collection.
76. For example, you’ll need two separate added entries if the main series has its own numbering.
77. Some Vger sites may have a separate text index for the 490 field. Use of this index by itself may not allow an operator to eliminate series traced differently, or to find series hidden in 5XX fields; a keyword search using specially-designed indexes will generally prove more satisfactory. You will no doubt develop your own practices for performing keyword searches to find members of not-traced series. The following points are proposed only as guidelines.
78. Rule 3:16E of the Rules for descriptive cataloging in the Library of Congress (cataloging rules in effect in the United States from about 1949 to 1967) instructed catalogers to give series statements (to use modern terminology) other than the first as notes, rather than in parentheses after the collation. (Remember that these rules were formulated with cards, not MARC records, in mind.) It very often happened that a series statement appearing in the note position was converted into a 500 field rather than a 4XX field when a printed card was converted to the MARC format. In order to find these series-disguised-as-notes (and then convert them), you need to include 500 subfield $a in your not-traced-series keyword index definition. While this means that a search will find series statements in 500 fields, it also means that your searches will retrieve irrelevant records containing text that accidentally matches a series term.
79. As is the case with some of its other operations (such as MARC validation) the toolkit’s editing of fixed fields is handled by a generic component that itself does not know anything about Vger—it knows only about MARC records.
80. For matching records, each line begins with the tag of the matching field, and also contains the owning library ID (if the toolkit was told to look at multiple owning libraries) and the Vger record number.
81. The illustrations in this section show the 880 fields immediately after the fields they parallel. If the special instruction for this field order is not present in the configuration file, the 880 fields will appear toward the end of the record.
82. For Northwestern users, the caption on this button is ‘Replace Voyager record and assign call number’. Clicking this button saves the record on the left to Vger, then starts the process of assigning the call number. The toolkit does a fresh BAM just before assigning the call number, so if you're interested in the BAM report you can use the bibliographic BAM report button without re-BAMming the record.
83. This example was created before the toolkit learned that forenames of librettists are often given in 500 fields as initials rather than in full. More recent versions of the toolkit should be able automatically to identify the librettist for this opera, assuming that "libretto by" is defined as text that precedes the name of the librettist.
84. (After this example was constructed, the toolkit also learned to compare the "final" 240 field to the 245 field. If this example had been constructed from the current version of the toolkit, the toolkit would have removed the 240 field because it is redundant with the 245 field. As is always the case, "Libretto" in the 700 field is the currently-selected item in the list of text types.)
85. Assuming that you can identify the librettist! Many libretti are written by a single person, but some are written by several people working together (or one after the other), and the order of names may vary from one source to another.
86. The ability to process MAPI messages may be considered a security problem at some institutions, and may not be allowed.
87. These remaining choices were added when it was thought that it would be possible to send SACO proposals to the Library of Congress in MARC format as e-mail attachments; but the Library of Congress, for reasons that remain unclear, prefers instead that SACO participants send proposals via information in a Web form that is converted back into MARC format.
88. The Vger system has no capability for printing processing slips, although such slips are almost certainly needed to help keep cataloging backlogs in order.
89. If you have chosen to print processing slips in two columns, the toookit will only send a page to the printer for every two records you identify. However, if the toolkit is holding information from a single record when you end your session, it will send the final page to the printer with a blank second column.
90. This divergence is visible in the cataloging client, and also in the online public catalog.
91. In other words, the first connection defined on this tab must correspond to the database to which your Vger cataloging client is connected. At several points in its work, the toolkit will look at the Vger cataloging client to get a record number, and then (via the first connection defined on this tab) retrieve that record in order to perform some operation. If the data sources used by the cataloging client and the toolkit are not identical, the results will be unpredictable, and possibly unfortunate.
92. For example, you may be part of a consortium that purchases the complete Library of Congress name and subject authority files, and keeps a pristine copy of those records in a separate Vger database. You can define a secondary connection to that authority file, and the toolkit will automatically pull from it authority records you don’t already have and add them to your local authority file.
93. For some operators, not being able to use certain functions may be the desired outcome.
94. You define this connection using tools provided by Microsoft and Oracle. See the note at the end of the description of this tab regarding this name.
95. Different versions of Windows call this applet by different names, and use different icons; sometimes it’s called ‘Data sources’. In some Windows configurations, you must be a system administrator in order to use this program.
96. If you rest the mouse over a toolkit button you’ll see a little window that describes the button, and gives the keyboard shortcut.
97. This documentation often uses the outdated expression NUC code as a convenient shorthand term for the abbreviations listed in MARC code list for organizations.
98. For example, if institutions with the codes ‘IEN’, ‘IEN-M’, ‘IEN-Tr’, ‘IEN-Mu’, ‘IEN-L’ and ‘IEG’ participate in your Vger installation, this box should contain two codes, separated by a space: ‘IEN IEG’.
99. For example, the toolkit will allow the second indicator in a 260 field to have the value ‘0’ if the record was created in 1974, but not if the record was created in 2001. The toolkit’s configuration includes an indication of just when each piece of obsolete content designation was declared obsolete.
100. The matter of severity levels, and an explanation of why there are two different codes, is covered in a separate document.
101. For example, in a pre-Unicode record the umlaut character would appear as ‘\&HE8’, as in: ‘\&H38uber’.
102. So that an umlaut associated with the letter ‘u’ appears as ü.
103. For example, if this box contains ‘2’, the toolkit will not inform you of obsolete content designation if the record under consideration was created within 2 years of the date on which the content designation became obsolete.
104. This area formerly contained options labeled ‘Test field order’ and ‘Test subfield order’. These options were removed in June, 2005; field and subfield order are now always tested.
105. For example, if you check this box and if a 245 field begins with the text ’Tis of thee I sing, the toolkit will not present an error message if the 245 second indicator is incorrectly set to ‘1’.
106. In most cases, you will not want to supply authority templates.
107. The SACO participant’s manual requires the inclusion of the bibliographic 1XX in all cases. There's no reason for this, except "that's the way we've always done it." For access fields that may only be used as subjects (650 fields, or any 6XX field with subfield $v, $x, $y or $z), the toolkit includes the bibliographic 1XX in subfield $a of the 670 field regardless of the setting of this option.
108. The toolkit will never automatically swap series access fields, and imposes its own constraints on other categories of access fields. For example, it will not generally change a personal name access field unless that access field contains subfield $d.
109. The toolkit may at some future date inspect the punctuation within variable fielids.
110. Early versions of Vger used an arbitrary single-byte code for internal uses, meaning that versions of Vger through about 2007 can recognize at most 255 different subject schemes. The most recent versions of Vger use a multi-byte code instead--a code that not accidentally is the same as that used in subfield $2. Regardless of the length of the code, the point being made here is the same: Vger translates the various things that identify subject systems (indicators, authority 008/11 codes, and so on) to a common value for internal uses.
111. The toolkit will not be able to save the modified holdings record unless you also supply a Write UID and Write PWD in the definition of the first connection on the Connections tab, select a cataloging location on the General tab, and supply a path to voyager.ini on the File locations tab.
112. In earlier versions, the toolkit was also able to send e-mail messages via MAPI. In all cases this required that the local workstation have a suitably capable program installed on it that was defined to handle MAPI messages. This capability became less and less efficient as anti-spamming confirmations were added to programs with MAPI capabilities, to the point where it was just too much bother to continue to send messages via MAPI.
113. This is a hexadecimal representation of the UTF8 encoding of Unicode characters. Use this column for Vger version 2003 and later; place diacritical marks after the base character.
114. This is a hexadecimal representation of the characters of the ‘legacy’ Vger/RLIN character set. Use this column for Vger versions before 2003; place diacritical marks before the base character.
115. This character is a vertical bar.
116. This character is a vertical bar.
117. Under current policy, NACO participants are not to supply 368 subfield $d. The creation of 368 $d is controlled by an option whose default value is "do not create 368 $d."
118. As usual, there is an exception: if the 1XX does not contain a parenthetical qualifier but if the 1XX field represents a conference, the toolkit adds a 368 field "$a Congresses and conventions $2 lcsh".
119. In the future, this configuration file may contain additional stanzas for the handling of additional RDA attributes.
External NU Links: Northwestern Home | Search | Directories
Northwestern University Library •
1970 Campus Drive • Evanston, IL • 60208-2300
Phone: (847) 491-7658 • Fax: (847) 491-8306 • E-mail:
library@northwestern.edu
© Copyright 1994-present Northwestern University Library. World Wide Web Disclaimer and Policy Statements
Last Revision: November 20, 2018