|
Northwestern University Library |
Authority toolkit: create and modify authority records |
Program and documentation by Gary L. Strawn, Northwestern University Library.
Queries to: mrsmith - at - northwestern.edu
This document describes a tool that can do three things:
This tool was originally designed to work with all types of authority records contributed to the LC/NACO Authority File as part of the NACO program: personal names, corporate and conference names, uniform titles, geographic names, series, and name/title headings. Although this tool's features continue to be developed with the NACO program in mind, this tool can be used by anyone interested in creating and maintaining authority records of the highest quality, whether a NACO participant, or not.
This tool only knows how to process information packaged according to the MARC21 format for authority data.1 This tool works with MARC21 data encoded using the UTF-8 scheme.
This tool cannot at present be used for authority records that represent topical subject headings (including name headings plus subfields $v, $x, $y and/or $z).
|
The authority toolkit has two distinct modes of operation2 These modes are provided by different installation packages.
In OCLC Connexion mode, the tool reads bibliographic and authority records directly from the OCLC Connexion client, and writes new and modified authority records directly to the OCLC Connexion client. While this mode is designed with NACO participants in mind, this mode can also be used by non-NACO participants that like to do their work within the OCLC Connexion client. (Non-NACO participants working within the Connexion client will be able to use this mode to do everything described in this document except save a finished record to the LC/NACO Authority File; they will need to use an existing Connexion feature to export finished records to files.)
When running in OCLC Connexion mode, this tool is actually a system that consists of two elements working together:
The macro extracts information from an OCLC record, passes the information to the DLL, and asks the DLL to provide a service (create a new authority record from a bibliographic access point; present a new or existing authority record for enhancement). The DLL provides the service requested by the macro and eventually returns the result of its work to the macro. The macro completes the task by writing information to the OCLC Connexion client. The macro knows how to work with OCLC, but knows next to nothing about authority records. The DLL does not know the source of the information it receives, or what will happen to the information it produces, but knows a lot (though not everything) about authority records. These complementary strengths and weaknesses fit together to produce the complete system.
Whenever possible, this document will refer to the whole package as the toolkit without bothering to identify the component that carries out a task; most people won't care, anyway.
When running in OCLC Connexion mode, the toolkit does not contribute a new authority record to the LC/NACO Authority File as made available on OCLC, and it does not replace an existing record in the LC/NACO authority file. Instead, the toolkit helps you prepare an authority record, and presents the results in the OCLC Connexion client for your final approval. What happens next is up to you; if you wish to contribute the new record to the LC/NACO authority file, you must perform that action yourself.
In independent mode, the tool reads files of bibliographic and authority records (exported, perhaps, from a local library system), and writes new and modified authority records to other files. This mode can be used by any who prefer not to do their authority-related work within the OCLC Connexion client. This mode is limited to the same kinds of records that could be contributed to the LC/NACO Authority File; for example, the independent mode of this tool cannot be used to create authority records for topical headings. Gary does not build a new installer for the independent toolkit whenever he updates the underlying modules, but only on request. (Gary doesn't think that this version is used very often.)
When running in independent mode, the tool consists of a single module (an EXE). This document will also refer to this single module as the toolkit.
When running in independent mode, the toolkit creates output files of records. What happens after the toolkit finishes its work on an authority record is entirely up to you. If you wish to send a file of records to a local system, or contribute them to a cooperative project, you must take that action yourself.
Users should follow the simple naming convention used in this document, and regardless of operating mode should refer to this tool as the toolkit or as the authority toolkit,4 but never as the marcro.5 When on rare occasion this document refers specifically to the DLL, the EXE or the macro, this means that it is important for the moment that you recognize the contribution made to the toolkit's operation by a particular component.
The differences in the operating modes chiefly relate to the manner in which you begin or complete a task. (The word "task" being used here in the most general sense.) For example, the modes differ in the manner in which you begin the work of creating a new authority record from an access field in a bibliographic record, and differ in their handling of the completed new authority record. This means that this documentation has to contain mode-specific descriptions for the initial and final parts of each basic operation. (These descriptions refer to the two modes by name: OCLC Connexion mode and independent mode.) Happily, the two operating modes are identical in the important parts—the enhancement of a new or existing authority record—so the descriptions in this documentation of the toolkit's many record-enhancement features generally don't need to refer to the operating modes.
The two operating modes differ in the file you select to install the toolkit.
Many fields in an authority record are, or can be, under some degree of vocabulary control. The toolkit contains features that help you construct such fields, and ensure their accuracy6. You should take advantage of every feature of this toolkit that helps ensure the consistency and accuracy of data in authority records.
The toolkit will help you add pieces of secondary information (for example: language, country of residence) to an authority record, but the toolkit will not always be able to formulate the information in a 670 field required to support those additions. Making sure that all of the assertions in the authority record are supported by appropriate source citations is part of your job.
It is your responsibility to review the results of the toolkit's work, and to make any appropriate and necessary changes to the authority record before saving the results to the LC/NACO Authority File as either a new contribution or an updated record, or using the finished record in any other manner. You always have the final say. Under no circumstances would it be appropriate for you to justify the presence of an incorrect, inappropriate or malformed element in an authority record by claiming "It's what the program gave me." Say it again: The entire content of each authority record that you create or modify with the toolkit is your personal responsibility.
The toolkit will help you build and enhance authority records, but it does not offer any assistance with any follow-up actions that may be required and/or appropriate. It is part of your job to understand the implications of your actions for other bibliographic and authority records, and programs in which you may participate. Here are two examples, out of many:
Although it may seem to go without saying, it still needs to be said that you can't use the OCLC Connexion version of this toolkit to create and modify records in the LC/NACO Authority File on OCLC if you aren't authorized to create and modify records in the LC/NACO Authority File on OCLC. Non-NACO participants who employ the OCLC Connexion mode can use the toolkit to create and modify records, and then either save the records to the online save file and then export the records from there to a file, or directly export the records from OCLC to a file. Non-NACO participants can also use the independent mode to create and modify authority records, and save the finished products to files for use elsewhere.
Use of any part of this system (macro, DLL, EXE, and the accompanying documentation) is subject to limitations on liability.8 Use of any part of the toolkit constitutes acceptance of those conditions.
The Connexion client runs under the Microsoft Windows™ operating system, as does the independent EXE module; the toolkit described in this document is restricted to Windows workstations.
The descriptions in this document are in general written as if this toolkit were used in OCLC Connexion mode, and used just once per authority record. This may be the most common case, but there is nothing inherent in the authority toolkit that prevents multiple uses for one record.
The toolkit is able to perform such back-and-forth operations without any loss or corruption of data.
Some of the examples in this document are fabricated to illustrate particular features of this toolkit. The examples do not necessarily represent real entities or their attributes. No attempt will be made to adjust examples that show actual bibliographic and authority records, when those records are changed. The situations shown in the examples are situations that occur during the normal course of authority work, even if the particulars are no longer applicable, or never were applicable, to the entities named. Feel free to suggest additional examples, or replacement examples, especially if they will help make clear the toolkit's capabilities.
The illustrations of the toolkit's main panel generally show the panel's appearance in OCLC Connexion mode. (The toolkit shows different menu items when running in independent mode, but is otherwise identical.) The illustrations do not necessarily show the latest version of all parts of the toolkit. For example, the usage and hdg. radio buttons were added to the Texts tab in mid-September, 2015. Illustrations in parts of this document that describe these radio buttons will of course show them, but illustrations of the Texts tab that illustrate other features of the toolkit will only be replaced (and so show all of the latest features) as they need to be changed for some other reason. Let Gary know if you find an illustration particularly jarring, and he'll arrange for a replacement.
The authority toolkit's features are open to additions and revisions. Whenever you discover the need for a change or enhancement let Gary know,9 and he'll see what can be done. A quick glance at the toolkit's revision history will demonstrate how much the toolkit can change in a short time. Most of these changes are the result of suggestions from users. With your help, the authority toolkit will become even more useful and powerful.
It's also likely that the code underlying the authority toolkit is not perfect in every detail. If something unexpected happens when you're using the toolkit, let Gary know about it. It will speed things along if you describe in excruciating detail all of the steps you took to arrive at the unexpected event, including (where relevant) OCLC bibligraphic record IDs and authority LCCNs. A full description will help Gary re-create the problem; and when he can re-create a problem, it's usually easy to come up with a fix.10
Also let Gary know if there's anything missing from the documentation, or if the documentation is unclear, or needs additional or different examples.
|
Follow these instructions to install the toolkit for the first time, and to install later updates. If you're installing either of the OCLC Connexion versions, always close the Connexion client before you run the setup program. (It may seem obvious to say this, but: you must install Connexion before you install the toolkit.) If you're installing an update to the independent version of the toolkit, always close the toolkit, then run the installation program.
There are separate installation packages for each of the toolkit's operating modes. These packages are available at the Northwestern University Library's download site. You can if you wish install the package for more than one mode on the same workstation, and use them in alternation. (You can't install the program for multiple OCLC Connexion versions on the same workstation.) Don't try to run multiple instances of the toolkit (either the same mode, or different modes) at the very same time.
After downloading one of these ZIP files, open the ZIP file and run the program setup.exe. (If you can't run setup.exe from within the ZIP file, formally extract the files from the ZIP file, and then run setup.exe.) You may need to acquire appropriate Windows privileges to run the setup program.
If you are installing the toolkit for Connexion version 3, the installation program has to do some extra work; and this extra work may require a decision on your part. Connexion version 2 stores all user macros in the same place; but Connexion version 3 stores user macros in the user's profile. (This means that if a workstation running Connexion version 3 is used by more than one person, the toolkit will need to be installed for each user.) The toolkit inspects all of the users named in C:\Users, to find those for which Connexion version 3 is installed; if Connexion 3 is installed for a user, the toolkit then looks for locally-installed Connexion macros under the user's name. If the installer finds only one user for which Connexion 3 is installed, the installer puts the toolkit's macro book into the appropriate spot for that user. If the toolkit finds more than one user for which Connexion 3 is installed, the installer pauses to ask for which user the toolkit should be installed.12
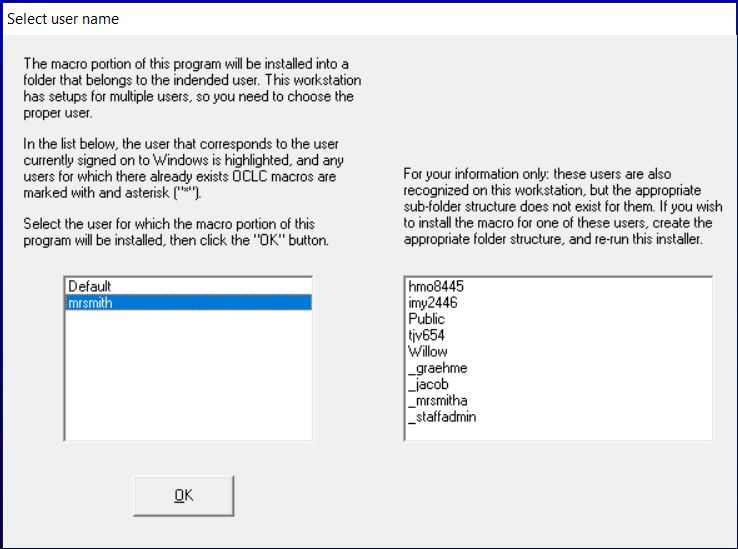
| If Connexion version 3 has been installed for more than one user, the toolkit's installation program will show a panel that looks something like the following. (The user names you see will of course be different. Note that the configuration for the user "Default" was modified on this workstation so that the installation program would show this panel and Gary could take this picture; under normal conditions, the installer will ignore the "Default" user.) | |
 |
|
| The list on the left shows all of the users for which Connexion version 3 has been installed; select the appropriate name, and click the "OK" button. The list on the right shows all of the users for which Connexion version 3 has not been installed; this is just for your information. (You cannot install the Connexion 3 version of the toolkit for a user if Connexion version 3 has not already been installed for that user.) |
If at any time during the installation you are informed that you already have a copy of this or that file with the same or a more recent date, click the button on the message box that means "I want to keep the file that I already have." The setup program will place files onto your computer's hard drive, but this is not the end of the things that need to happen before you can use the toolkit.
The installer places the toolkit's macro book (NulToolkit.mbk) into the folder used by the Connexion client for macro books. The installer places the file MarcRecordDLL.dll into the standard folder for DLLs (that is, standard for your version of Windows). You will leave both of these files alone.
The folder into which the setup program deposits its files depends on your version of Microsoft Windows. For the OCLC Connexion version of the program, the folder's name should be one of these two:
For the independent version of the program, the folder's name should be one of these two:
In this folder you will find the following:
The toolkit draws on information stored in a series of configuration files to inform, control and complement its work. These plain-text files have the extensions .cfg or .txt. Most of the configuration files used by the authority toolkit were originally designed for use by other tools developed at Northwestern University Library; some parts of the information in these files is not used by the authority toolkit.
The setup program deposits the configuration files needed by the toolkit into the same folder as AuthDllUtf8.dll or AuthorityToolkit.exe. These configuration files must all be in the same folder, and the default folder is usually good enough. However, the configuration files don't have to be in the default folder; you can copy them to some other folder if you wish. If you choose to put these files elsewhere, define the new folder, and copy all of the .cfg, .xlsx and .txt files to that folder. If you copy the configuration files to a different folder, you must also change the Folder for configuration files setting on the toolkit's Options panel to show the new location. And finally: If you copy the configuration files to a different folder, you must deal on your own with updates to the configuration files that may arrive when you install an updated version.
The OCLC Connexion client allows you to define a one-step method to start macros, such as the macro that forms part of the Connexion version of the authority toolkit. You can define either a toolbar icon or a keyboard shortcut to start the toolkit's macro. Just how you go about this is described in the Connexion documentation itself, not in this document. The object that you want to attach to either a toolbar icon or a keyboard shortcut is the macro called AuthorityCreate,13 which is contained within the macro book NulToolkit.
| In the following illustration, you have assigned the macro part of the toolkit to the keyboard shortcut "alt-minus". | |
 |
| In the following illustration, you have assigned the macro part of the toolkit to the "2" icon on the Connexion toobar. | |
 |
You can start the independent version of the toolkit from the Windows Start button (it's in the Northwestern University Library folder).
| The following illustration shows the toolkit's location in the Windows Start menu. (This menu has a different appearance in different versions of Windows. The programs included in the menu vary from one workstation to the next.) | |
 |
You can copy this shortcut to your desktop (or some other place of your choosing), making it even easier to start the toolkit.
When you first use the toolkit, most of the toolkit's options are set to default values, and you can leave all but one of these at their default values until you gain experience with the toolkit.
The one exception is the option that contains your institution's NACO symbol. (This is the code that appears in 040 subfields $a and $c.)14 The very first time you use the toolkit, it will ask you to supply this symbol, and you should take the opportunity to do so. (The toolkit will continue to ask you for this symbol each time you use the toolkit, until you change the option.) You can also go to the General tab on the toolkit's Options panel and directly change the value of the NACO symbol option. No matter how this option gets set, you should make sure that this option is correctly set to your institution's NACO symbol before you use this system to handle records that will update the LC/NACO Authority File.
Gary updates the installation packages for the Connexion version of the authority toolkit whenever he makes any kind of change.15 The change may be a minor bug fix or tweak, or it may involve the addition of a major new feature. (If Gary is working hard on the toolkit there can even be several updates in one day; but if Gary is working on some other project there might be a large gap between updates.) Whenever you have any problem with the toolkit, you should first install the latest version, to make sure the problem hasn't already been fixed. Whenever you think of something that the toolkit should do differently, or something new that the toolkit could do, first install the latest version, to make sure that the enhancement isn't already in place. Whether you're having problems or not, you should get into the habit of routinely checking the revision history section at the end of this document for notices of fixes and enhancements. (You can get to that section of the documentation easily at any time, via the toolkit's Help/Latest changes menu item.) Whenever you see something mentioned in the revision history that sounds like something you might be able to use, install the latest version and explore the new feature. Even if you're perfectly happy with the features in your current version of the toolkit, you should periodically update the installation, so you have all the latest bug fixes.
To install the latest version, simply fetch the correct updated installation package from the download site, and follow the general installation instructions. You don't need to un-install the previous version, and you don't need to worry about preserving your local settings.
If you use both the OCLC Connexion and independent versions of the toolkit on the same workstation, tell Gary when you install a new version for Connexion, so he can build you the corresponding independent version. This will ensure that both versions behave themselves, and work in exactly the same manner.
If you want to create a new authority record for one of the identities represented by an undifferentiated personal name authority record, see the special instructions.
You can also create a new authortity record by deriving a record from an existing record.
To create a new authority record, start with any OCLC bibliographic record that contains the access point you wish to establish as the 1XX field in an authority record. The bibliographic record can be a record in the online file, or a record from any of the various OCLC save files.16 The bibliographic record can contain changes that you have not yet saved. (The toolkit works with what it reads from the screen of the Connexion client; it does not pull the record from the Connexion database.) Click anywhere within the bibliographic access field that you wish to establish. (When you click on an access field in the Connexion client, Connexion puts a solid, dark frame around the field.) The bibliographic access field can contain subfields beyond those you wish to establish. The bibliographic access field can consist of a portion that is represented by an authority record plus a portion that is not represented by an authority record.17
The toolkit knows how to create an authority record from the following bibliographic fields: 100, 110, 111, 130, 24018, 24519, 49020, 600, 610, 611, 630, 651, 700, 710, 711, 730, 800, 810, 811, 830. If you ask the toolkit to use some other field as the basis for a new authority record, the toolkit will complain, and will not attempt to generate an authority record.
| In the following illustration, you have selected the bibliographic 100 field. When asked, the toolkit will create an authority record with a 100 field for $a Karsten, Minna, $d 1968- | |
 |
| In the following illustration, you have selected the bibliographic 240 field. When asked, the toolkit will create an authority record with a 100 field for $a Aubrey, John, $d 1626-1697. $t Brief lives. | |
 |
After selecting the access field that will serve as the basis for the new authority 1XX field, activate the toolkit by using a toolbar button or keyboard shortcut, depending on how you have configured Connexion. The toolkit gathers information from the bibliographic record.21 The toolkit will in some cases immediately show you its proposed new authority record, but in other circumstances the toolkit may first ask for your help in one or more matters it can't decide on its own. The following bullet points describe each of these issues.
For the following illustration, assume that you have selected a 110 field in a bibliographic record containing the text $a Dayton (Ohio). $b Board of Education. $b Attendance Department. This field represents three possible new headings: subfield $a by itself, subfield $a plus the first subfield $b, or all three subfields. (The toolkit makes no attempt to determine which of these may already be represented by an authority record.) The illustration shows the toolkit's presentation of this case; you have opened the drop-down list to reveal the three choices. The toolkit will create an authority record for whichever heading you select.
In the following illustration, assume that you have selected the bibliographic series field $a Tidvise skrifter. $p Organisasjon og ledelse. This illustration shows the toolkit offering two possibilities for the 1XX field in the new authority record: subfield $a by itself, or subfield $a plus subfield $p. (The toolkit makes no attempt to determine which of these may already be represented by an authority record.)
In the following illustration, you have selected the bibliographic 240 field $a Quintets, $m clarinet, violins (2), viola, cello. This illustration shows the toolkit offering two possibilities for the title segment of the 1XX field in the new authority record: the title by itself, or the title plus subfield $m. (The toolkit makes no attempt to determine which of these may already be represented by an authority record.) Because the original field in this example is the 240 field, the toolkit has changed 240 subfield code $a to $t. The mark of omission in each line indicates that the toolkit will eventually add the selected information from the 240 field to the end of the bibliographic 1XX field to create the authority 1XX field.
In the following illustration, you have selected a bibliographic 700 name/title field. This illustration shows the toolkit offering three possibilities for the 1XX field in the new authority record: the name by itself, the name plus subfield $t, and the name plus subfields $t and $p. (The toolkit makes no attempt to determine which of these may already be represented by an authority record. The toolkit knows that subfield $d is an integral part of a personal name, so in this case it does not offer subfield $a by itself as a fourth candidate.)
For example, assume that you wish to create an authority record based on a name/title 700 field in a bibliographic record for a sound recording, and further assume that the bibliographic record contains the 382 fields shown in the following illustration.
The toolkit will show all of these 382 fields (plus 380 fields, and other fields) in a multiple choice panel, and invite you to select one or more of them. You can select as many fields as you need.
In the following illustration, you have selected one of the 382 fields (shown in bold) for inclusion in the authority record. If you click the OK button, the toolkit will add the selected 382 field to the proposed new record.
After any such preliminaries, the toolkit shows the proposed new authority record on its main panel. The contents of the proposed new authority record will vary, depending on the type of entity the authority record represents, the information present in the bibliographic record, and the options you have selected. Although you cannot edit this record directly (meaning: you can't just click somewhere in a variable field and start typing), you can use the tools on the main panel to modify and enhance this record in many important ways.
Following your review and possible enhancement of the new record (and if you select the OK menu item), the toolkit calls up a blank authority workform in OCLC and writes the contents of the proposed authority record into the workform. The state of the record at this point is exactly the same as it would be had you called up a workform and filled it out yourself: you can modify the record some more, you can move the record to the online save file, you can contribute the record to the LC/NACO Authority File, or you can abandon the record without saving anything. The authority record created by the toolkit does not automatically become part of the LC/NACO Authority File; you must deliberately add it to that file yourself. The state of the finished record is entirely your responsibility.
If you want to create a new authority record for one of the identities represented by an undifferentiated personal name authority record, see the special instructions.
You can also create a record by deriving a new record from an existing record.
To create a new authority record, you need a file that contains a MARC bibliographic record, and that bibliographic record must contain an access point for the 1XX field of the new authority record.25 This bibliographic record can come from OCLC, your local system, or any other source to which you may have access; the only requirement is that the record must be in the MARC21 bibliographic format, and must be in some folder that can be "seen" by Windows from your workstation.
Select File and then Open from the toolkit's menu. (If you want to pull in a bibliographic record from a file you opened earlier, use File and then Resume instead and then pick the record from the list.) The toolkit will show you a standard Windows find-the-file dialog box. The toolkit starts in the folder you identified as the default folder, but you can of course navigate to another folder if you need to. When you've identified the file, click the OK button on the find-the-file dialog box. If the file contains multiple records, you will need to identify the record of interest.
The toolkit may next show you a dialog panel that looks something like the following illustration. Depending on conditions, the toolkit may or may not show you this panel; if the toolkit shows you this panel, the choices available and the wording of those choices may vary.
|
|
| In our current example, you're creating an authority record from a bibliographic record, so select the corresponding radio button (the first one), if it's not already selected, and click the OK button. |
The toolkit displays the bibliographic record, and invites you to identify the field that should serve as the basis for the 1XX field in the new authority record.
|
If the entire bibliographic field (minus obviously irrelevant subfields, such as 700 subfield $e, or 610 subfield $v) is to become the 1XX field in the new authority record, you can simply double-click on the bibliographic field. If only of some of the subfields in a bibliographic field are wanted in the 1XX field of the new authority record, carefully highlight all of the subfields to be included in the new 1XX field, and then click the OK button. If you want to create a name/title record that involves the bibliographic 240 field, use the 240 field to identify your wishes; the toolkit knows that it needs to include the bibliographic 1XX field in the finished authority 1XX field.
As is the case for the toolkit when running in OCLC Connexion mode, the independent toolkit knows how to create an authority record from the following bibliographic fields: 100, 110, 111, 130, 240, 245, 490, 600, 610, 611, 630, 651, 700, 710, 711, 730, 800, 810, 811, 830 (all subject to the restrictions mentioned above). If you ask the toolkit to use some other field as the basis for a new authority record, the toolkit will simply ignore your request.
From here on, the toolkit's behavior in independent mode parallels its behavior when used within OCLC Connexion (described above): the toolkit concerns itself with terminal punctuation of the new 1XX field, the toolkit considers 382 fields for name/title headings, and so on. (This is because the various operating modes start out differently, but funnel into a common body of instructions.) The toolkit eventually displays the proposed new authority record on the left side of its main panel, and displays the source bibliographic record on the right side. All of the system's tools for enhancing the authority record are available to you. When you finish your work on the authority record, select File and then Save from the toolkit's menu to write the record in MARC format to an output file, and use this output file for whatever purpose or purposes seem appropriate to you.
To modify an existing authority record, display the authority record in the OCLC Connexion client. The authority record can be a record in the online file, or a record from any of the various save files.26 The authority record as displayed may contain changes that you have not yet saved. (The toolkit works with what it can read from the screen of the Connexion client.) If the authority record contains code "b" in 008/32 (undifferentiated personal name) the toolkit will only allow you to work on the record under certain conditions.
Once you've displayed an authority record you wish to modify, activate the toolkit by using a toolbar button or keyboard shortcut, depending on how you have configured Connexion. The toolkit presents the authority record on its main panel. Use the tools on the main panel to modify and enhance the record.
| In the following illustration, the toolkit is presenting an existing authority record for enhancement. |
 |
Following your work with the record (and if you select the OK menu item), the toolkit replaces the original record in the OCLC Connexion client with your modified record.27 The state of the record at this point is exactly the same as it would be had you done all of this work yourself: you can modify the record some more, you can move the record to the online save file, you can replace the record in the LC/NACO Authority File, or you can close the record without saving anything. The authority record modified by the toolkit does not automatically replace the record in the LC/NACO Authority File; you must deliberately take that action yourself. The state of the finished record is entirely your responsibility.
To modify an authority record, you need a file that contains the MARC authority record. This record can come from OCLC, your local system, or any other source to which you may have access; the only requirements being that the record must be in the MARC21 authority format, and must be in some folder that can be "seen" by Windows from your workstation.
Select File and then Open from the toolkit's menu. The toolkit will show you a standard find-the-file dialog box. The toolkit starts in the folder you identified as the default folder, but you can of course navigate to another folder if you need to. When you've identified the file, click the OK button on the find-the-file dialog box. If the file contains multiple records, you'll need to identify the record of interest.
If the authority record contains code "b" in 008/32 (undifferentiated personal name) the toolkit will only allow you to work on the record under certain conditions. (This involves the extraction of one identity from the record to create a new authority record, and the modification of the undifferentiated name record.)
The toolkit may next show you a dialog panel that looks something like the following illustration. Depending on conditions, the toolkit may or may not show you this panel, and the choices available on this panel and their wording will vary.
|
|
| Select the radio button that tells the program your file contains an authority record to modify (as shown in the illustration), then click the OK button. |
The toolkit will display the authority record on the left side of its main panel. You can use any of the system's tools to make any change to the record that seems appropriate to you. When you have finished working with the record, select File and then Save from the program's menu to write the record to a file.
|
The toolkit can help you with some of the work involved in the extraction of information pertaining to one identity from an undifferentiated name authority record. This operation combines the modification of an existing record with the creation of a new record. Under your guidance, the toolkit will adjust the contents of an undifferentiated name record and put that record into the OCLC online save file; the toolkit will use information extracted from the undifferentiated name record to create a new record for one identity, and present that record to you on its main panel.
The toolkit will help you modify an existing authority record for an undifferentiated personal name, and create a new authority record for one identity formerly listed on that record, but that's probably not all that needs to happen. The toolkit will not perform any maintenance on bibliographic access points, and (if you're a NACO participant) the toolkit will not perform any of the additional steps described in LC's documentation.28
The authority record used to start this task must possess the following characteristics:
If an authority record has code "b" in 008/32 but does not have these additional characteristics, the toolkit will refuse to work with the record. The only task that the toolkit will allow you to perform on a record with code "b" in 008/32 is the task described in this section of this document.
The toolkit's presentation on its main panel of the new authority record for the extracted identity is identical to its presentation of any other new record. You can use any of the tools on the main panel to modify the record in whatever manner seems appropriate to you.
The very important first step in this process involves you telling the toolkit which of the personalities represented by the undifferentated name record it which extract into a new record. The manner in which you do this varies with the toolkit's operating mode, and is explained in a separate section for each operating mode. The immediately-following sections describe the steps in this work common to all operating modes.
At all times, remember that you bear the ultimate responsibility for the content of both the original record and the new record.
When working with an identity extracted from an undifferentiated personal name authority record, you must modify the 100 field in the new record.29 You may want to change the text in subfield $a, or you may want to add one or more subfields (perhaps you will do both).
If you have selected the appropriate option the toolkit will prompt you to adjust the 100 field even before the toolkit shows you the proposed authority record: the toolkit puts the 100 field from the undifferentiated name record into its field-change panel, and invites you to adjust the 100 field. You should take advantage of this opportunity to put the new 100 field into proper shape as early in the process as possible. In most cases you need to add a subfield or two to the 100 field, or make some change to the text of 100 subfield $a.
| The following illustration shows the toolkit's presentation of the 100 field from an undifferentiated name record. You are invited to make some change to the field. (In this particular case, adding $c (Turkey biologist), based on information in one of the 670 fields, is one possibility.) The toolkit will use the text from this box as the 100 field in the proposed new authority record for the extracted identity. | |
 |
|
| When you click the OK button, the toolkit uses your modified 100 field in the new authority record. If you select any 400 fields from the original record for inclusion in the new record, the toolkit may propagate information from the revised 100 field into those 400 fields. |
You can also change the 100 field at any other time. To change the 100 field, click anywhere on the 100 field, then select Edit and then Change 100 from the toolkit's menu, or double-click on the 100 field. The toolkit presents the 100 field on its field change panel.
 |
|
| When you click the OK button, the toolkit replaces the 100 field in the proposed authority record with your modified 100 field. In certain situations the toolkit also propagates information from the revised 100 field to the 400 fields. |
Some authority records for undifferentiated personal names contain one or more fields tagged 400 or 500.30 In some cases, one or more of these fields is relevant to the identity being extracted, and in some cases none is relevant; but it is not possible for the toolkit to figure this out on its own. When an authority record for an undifferentiated personal name contains 400 or 500 fields, the toolkit presents you with a box containing all of them, even before it shows you the preliminary new authority record. You can select one or more of these fields, and the toolkit will add the selected fields to the proposed authority record. (The toolkit does not remove the selected fields from the original authority record; an alternate access point may be applicable to more than one identity.)
| In the following illustration (showing the toolkit working within OCLC Connexion), you have indicated the need to create a separate authority record for the editor of Kuo lu she pei ti tzu, by clicking on one of the 670 fields belonging to that identity. This authority record also contains 4XX fields. The 670 fields for this entity identify two variant names for this person. | |
 |
|
| As part of its preparation for the new record, the toolkit presents all of the variant access points from the original record in its multiple choice panel, and invites you to select one or more of them; any lines you select will become 400 fields in the new authority record. In the following illustration, you have selected the first and third 400 fields (shown in bold); one of these is in a non-Latin script. If you click the OK button, the toolkit will add these two texts as 400 fields in the preliminary authority record. | |
 |
|
| The toolkit will use its standard scheme to propagate information from the record's 100 field into the selected 400 fields. |
|
When you discover information about one of the identities represented by an undifferentiated personal name authority record that will allow you to separate that identity from the others, retrieve the authority record in OCLC.
Click on any of the 670 fields in the record for the identity you wish to establish in a new authority record.
| In the following illustration, you have selected the bracketed Added entry of Real turkeys, the best known calls 670 field, and are about to activate the toolkit to ask for assistance with this identity. You could instead have selected the next 670 field, beginning Real turkeys …; the toolkit will recognize either of these fields as belonging to this identity. |
 |
After you select one of the 670 fields that belong to the identity to be removed from an undifferentiated personal name authority record, activate the toolkit by using a toolbar button or keyboard shortcut, depending on how you have configured Connexion. The toolkit inspects the conditions represented by the authority record. If this authority record satisfies all of the toolkit's tests, the toolkit will next do one of the following:
After making these changes to the existing LC/NACO authority record for an undifferentiated personal name, the toolkit saves the changed authority record to the online save file. The toolkit remembers the save file number, and will show it to you at the appropriate time.
The toolkit eventually displays the new authority record in its main panel.
| The following illustration shows a preliminary authority record for an identity extracted from an undifferentiated name record. This authority record contains the two 400 fields selected in an earlier step, the standard 667 field for any identity extracted from an undifferentiated name record, and in this case also a 667 field identifying the non-Latin 400 field as not evaluated. When the toolkit prompted you to modify the 100 field, you added $c (Writer on steam boilers); the toolkit has propagated the new 100 subfield $c to the 400 fields. The toolkit has set 008/29 (reference status) to the appropriate value. |
|
| The following illustration shows the initial authority record for an identity extracted from a different undifferentiated name authority record. In this example, when the toolkit prompted you to modify the 100 field, you added $c (Turkey biologist). The toolkit supplied the required 667 field indicating that this identity was formerly represented on an undifferentiated name authority record. There were no alternate access points in the original undifferentiated name record, so there are not yet any 400 fields in this proposed authority record. |
 |
The new authority record is open to modification using all of the tools provided on the toolkit's main panel. Everything on the main panel works exactly as it does for a proposed new authority record. As is the case for any new authority record, once you have determined that the record is as complete as it can be, you select the OK menu item; this causes the toolkit to write the new record into an authority workform in the Connexion client. At the end of this work, the toolkit tells you the save file number for the modified authority record. (The toolkit also gives you the save file number if you select the Cancel menu item; you probably want to delete the record from the save file. In any case, the toolkit did not lock the original authority record.)
|
As is the case when it is used in OCLC Connexion mode, the toolkit can help with some of the steps involved in the extraction of one identity from an authority record for an undifferentiated personal name, but it cannot help with all of them. Although the toolkit's behavior for this work in independent mode is slightly different from its behavior in OCLC Connexion mode, the same kinds of things happen, and all the restrictions and cautions mentioned above apply.
Create a file containing an authority record for an undifferentiated personal name from which you wish to extract one identity. Select File and then Open from the toolkit's menu. The toolkit will show you a standard find-the-file dialog box. The toolkit starts in the folder you identified as the default folder, but you can of course navigate to another folder if you need to. When you've identified the file, click the OK button on the find-the-file dialog box. If the file contains multiple records, you will need to identify the record of interest.
The toolkit may next show you a dialog panel that looks something like the following illustration. Depending on conditions, the toolkit may or may not show you this panel, and the wording of the options may vary.
|
|
| Select the radio button that tells the program your file contains an authority record from which an identity is to be extracted (as shown in the illustration), then click the OK button. |
The toolkit notices that the record contains code "b" in 008/32 (undifferentiated personal name). The toolkit displays the authority record, and invites you to identify any of the 670 fields that represent the identity to be removed from this record.
|
You can either double-click anywhere within any relevant 670 field; or you can click anywhere within a relevant 670 field and then click the OK button. If everything about this record and the 670 field checks out, the toolkit will extract from this record the 670 fields that belong to this identity and will save the modified record to a file. (The modified authority record in the file is the same as the record that the toolkit running under Connexion places into the OCLC online save file.) The toolkit then creates a new authority record for this one identity, and eventually presents it to you on its main panel for additional modifications.
The toolkit's main panel can help you add certain kinds of information to a proposed new or existing authority record, and can help you make other kinds of changes as well. All of these changes are performed by the toolkit under your control. You cannot use the main panel to edit the authority record directly; you can only modify the record indirectly, using the tools provided.
In OCLC Connexion mode, once you activate the toolkit, you will not be able to use Connexion until you close the toolkit's main panel (by selecting Cancel, Suspend or OK from the toolkit's menu). You can however, switch to other programs, such as your favorite web browser. As soon as you select Cancel, Suspend or OK from the main panel's menu, the toolkit returns you to Connexion.
| The following illustration shows a typical new authority record as presented on the main panel, ready for enhancement. This illustration shows the toolkit running in OCLC Connexion mode. (The program running in independent mode is exactly the same except for some parts of the toolkit's menu.) |
 |
Across the top of the main panel is a menu. The selections in this menu are accessible via the mouse, or via keyboard shortcuts consisting of the Alt key plus some other key. The sub-choices on some of the menu items also have direct shortcuts consisting of the Ctrl key plus some other key. Selections available in the menu vary, depending on the version of the toolkit you are using, on the conditions presented by the authority record, and any field in that record on which you may have just clicked.
The following table summarizes the Control-key shortcuts available for items on the toolkit's menu.
|
Toolkit display areas: record and tabs
The body of the toolkit's panel is divided vertically into two parts. The left side shows your authority record. Many of the methods that the toolkit makes available for changing the record involve clicking on a variable field, then making a selection from the Edit menu. (To change a variable field, you can also simply double-click on the field.) If the toolkit finds any problems with the authority record, it will list error messages in a small window at the foot of the authority record. If you have asked the toolkit to verify controllable parts of the record, the toolkit will put its verification report into this same little window at the foot of the authority record.
The right side of the toolkit's main panel offers tools arranged on several tabs. You manipulate the tools on the tabs at the right to indicate your wishes, and the toolkit makes the corresponding changes to the authority record on the left. The tabs are essentially the same whether you are creating a new authority record or modifying an existing authority record. The following bullet points briefly summarize the work performed on each tab; click on the link for a fuller description.
There are several ways to get information about the use of the toolkit.
The following illustration shows the ? button on the main panel.
The following illustration shows the ? button on the field-edit panel.
Please let Gary know if you find something in the documentation that's unclear or incomplete. Additional (or replacement) examples that clarify the toolkit's behavior are particularly welcome.
As you use the menu items and tools on the tabs to change an authority record, the toolkit will occasionally make secondary changes for you. Most of these changes have something to do with the 4XX/5XX fields, and 008/29 (reference status):36
You can turn off most automatic changes by adjusting the value of the appropriate option.
Let Gary know if there are additional changes of this kind that the toolkit could make automatically, as a natural consequence of some modification that you make to the authority record.
Every time you use any of the toolkit's tools or menu selections to change an authority record in any way, the toolkit passes the resulting record through a validation module that inspects the record's MARC coding and evaluates the relationships between the data elements in the record. If the record fails any of these tests, the toolkit shows you error messages in a small scrollable window at the foot of the authority record. (Some problems generate more than one error message.) Use these messages as pointers to parts of the record that need attention. The presence of messages in this box will not prevent the toolkit from sending the authority record to the Connexion client; you can ignore the toolkit's validation messages if you wish. Of course, the Connexion client has its own validation protocols; Connexion not allow you to contribute any record that breaks any of its own rules.37
Some of the toolkit's messages might be considered warnings, or queries, rather than outright descriptions of problems. In some cases, the toolkit can tell that a condition may represent a problem most of the time, but it can't make an absolute determination in any particular case.38 You must always excercise judgement when deciding to take an action based on any of the toolkit's validation messages.
| The following illustration shows an authority record with several validation messages. (This authority record was brought into the toolkit with the option to make changes to records turned off.) The window below the authority record contains error messages generated by the validation module. (The height of the window containing validation messages will change, depending on the number of messages.) You need to consider each message, and make changes when appropriate. |
 |
An asterisk (*) at the start of a validation messages means that the toolkit can make a change for you. For example, all of the messages in the preceding illustration begin with an asterisk.
The Fix messages with '*' item on the Edit menu (shortcut: CTRL-I) applies the corrections in all of the messages that begin with "*" at a single stroke.
If a message involves a change to a field's tag, indicators, or text; or suggests the addition of a new field; or suggests the addition of a subfield to an existing field, the Change [tag] with change item on the Edit (shortcut: CTRL-W) applies the change, and brings the changed field into the toolkit's usual field-editing panel. You can make additional changes to the field as you deem appropriate, and eventually see all the changes reflected in the authority record.
Some of the error messages may not be expressed as clearly as might be desired. It is also quite possible that this validation module does not detect every problem that the Connexion client can detect. Please let Gary know if you encounter any problems with or deficiencies in the toolkit's error-reporting feature.
If you have previously selected the Verify menu item for this authority record, this report will also contain information about any fields that the toolkit compared against external databases.
|
You will often need to change the content of a variable field in ways that are not otherwise provided for by the toolkit; and you will often need to add a field to an authority record in addition to the fields generated by the toolkit. The toolkit's field-change panel allows you to make any kind of change to a variable field, and to add any kind of new variable field.
The field-change panel has an optional feature that includes the display of the MARC definitions for indicators and subfield codes. To save space, most of the illustrations in this section show the appearance of the panel with this option turned off, but in most circumstances you'll probably want to turn on this very useful feature.
When you use any of these methods to tell the toolkit that you want to make some change to a variable field, the toolkit presents the variable field in its special editing panel.
The following illustration shows the toolkit's presentation in this panel of a 670 field from an authority record.
The following illustration shows the toolkit's presentation in this panel of a 100 field from an authority record. When changing an authority 1XX field, the panel has special features that are not present when creating or changing other variable fields.
You can use this panel to change the field's tag (by typing the new tag), indicators (by selecting the appropriate values from the drop-down lists) and/or text (by typing).
The following illustration shows the toolkit's presentation of this panel, ready for tag, indicators, and field text.
The Tag box contains the variable field's MARC tag. When you change the value in the Tag box, one or two things might happen:
The Ind 1 and Ind 2 boxes contain the values for the first and second indicators. In these drop-down lists, "#" represents a blank space.
The large box in the center of the panel is for the text of the variable field. Use the dollar sign to represent the subfield delimiter. (If the field text contains a dollar sign in its own right, the toolkit translates it into the symbol "{dollar}", as if it were a diacritic or special character.)
Click the Cancel button to abandon your work on this field.
Click the OK button when the tag, indicators and text of the field have the desired values:
If you select the appropriate option, the toolkit includes the current definitions for the indicators and subfield codes on its field-editing panel. (If you do not select this option, the toolkit lists all possible values (blank, and 0-9) for both indicator positions, and provides no information about valid subfield codes.) If you select this very useful option, the toolkit fetches from the LC web site the HTML page that gives the MARC information for a tag, scrapes from that page the definitions of indicators and subfield codes, and includes those definitions on this panel.40
To increase its responsiveness, the toolkit caches the MARC definitions for tags on your workstation, and checks periodically to see if the definitions have been updated. You can force the toolkit to clear its cache of MARC definitions and fetch new ones, by clicking a button on the Options panel.
| The following illustration shows the appearance of the panel with this option turned on, during the editing of a 100 field. The lists for the two indicator positions contain only the defined values, and show the meaning of each value. The display includes a list of the subfield codes defined for the authority 100 field. |
 |
| The following illustration shows the appearance of the panel with this option turned on, when creating a new variable field. As soon as you supply the 3-digit tag, the toolkit fetches the MARC definition for that field, and sets the lists of indicators and subfield codes to the current values. If there is nothing in the box for the text of the field other than the initial subfield code, the toolkit sets the values of the indicators to the default values specified by an option. |
 |
Whenever you change the text in the Tag box on this panel, the toolkit fetches the current MARC definition for that tag, and resets the lists on this panel to match. (The toolkit will complain if it can't find a definition for the tag.) To avoid driving yourself crazy, you should set the tag to the appropriate value first, and then deal with the other elements of the field.
Should it ever happen that you need to use the toolkit when the LC web site is unavailable, you should temporarily turn off the option that adds MARC information to this display. The toolkit's only clue that something is wrong with the LC web site will come when the attempt to fetch information times out; you'll quickly get tired of the long delays that this imposes on your work.
The large box in the center of the field-change panel (for the text of the variable field) uses labels within curly braces to display diacritics and special characters.41 For example, the toolkit uses the text label {grave} in this window instead of the actual diacritic character of that name.) When you tell the toolkit that you want to edit a field, the toolkit translates diacritics and many special chacters into their text equivalents within curly braces. The toolkit converts these special texts within curly braces back into their proper form when you click the OK button.
| The following illustration shows a 670 field as presented on the toolkit's field-editing panel. The toolkit has translated the umlaut character in the MARC record into the text label {umlaut}. If you click the OK button, the toolkit will translate this expression back into the umlaut character. | |
 |
The toolkit provies a simple and error-free way for you to add diacritics and special characters to a field, using the same convention of texts within curly braces. The drop-down list in the bottom left corner of the field-editing panel contains each of the toolkit's text equivalents for diacritics and special characters. To insert one of these characters into a variable field, select a label from this drop-down list, click within the variable field at the point at which you wish to insert the diacritic or special character (you can do those two steps in either order), and click the Insert button. The toolkit inserts the text equivalent for a diacritic or special character (within curly braces) into the text of the variable field at your insertion point. The toolkit shifts the insertion point for the next character to the right of the character's closing curly brace.
You can instead use textual character entity references to input diacritics and special characters. The toolkit does not support the full range of character entity references, but it does support all that represent a character plus a diacritic, and some of the others.42 If you type a textual character entity reference containing one of the recognized texts into the field-editing panel, the toolkit will translate it into its UTF-8 equivalent when you click the OK button; if you bring the same field back into the field-editing panel, the toolkit will replace the character with its curly-brace equivalent (if available), or will use its convention for non-Latin characters.
Finally, the toolkit also recognizes numeric character entity references for input (either "&#x" and the hexadecimal value for UTF-16 character followed by a semicolon; or "&#" and the decimal equivalent for a UTF-16 character followed by a semicolon). If the toolkit can translate the corresponding character into a recognized equivalent, it will use its text equivalent within brackets the next time you edit the same field. (For example, if you supply "&00C9;" in a variable field, the toolkit will echo this back to you as "E{acute}".) If the toolkit cannot translate the corresponding character into a recognized equivalent, the next time you edit the field the toolkit will use its convention for non-Latin characters.
To remove any notation for a diacritic or special character, carefully delete the entire expression, including the opening and closing curly braces (or including the opening ampersand and ending semicolon).
Because the toolkit uses the dollar sign in this panel to represent the subfield delimiter, the toolkit treats any dollar signs that appear natively in a field's text as just another diacritic or special character. A dollar sign in the text appears as "{dollar}" in the field-editing panel; the toolkit translates this back into a dollar sign when it puts the field into the MARC authority record.
The representation on the field-editing panel of any non-Latin characters will be a bit scary: the toolkit uses one of two substitutions. (The display mode is controlled by an option.)
Because either of these designations can be mapped directly to the information in the Unicode documentation, you can, if you are really careful and you know what you are doing, use the toolkit's field-editing panel to work with non-Latin characters. However, for most people, and in most cases, it's probably best to add the non-Latin characters once the record is in a more hospitable system (OCLC, your local system, or whatever).
| The following illustration shows the presentation in the field-editing panel of a 670 field that contains diacritics, and also three non-Latin characters (U+C724, U+C815 and U+C11D), with the option chosen to display the characters within square brackets. If you look carefully, you can see that there is a space between the first and second of these character representations, just as there is in the authority record itself. When you click the OK button, the toolkit translates the Unicode character labels back into the equivalent UTF-8 characters. |
 |
When you bring the authority record's 1XX field into the field-editing panel, the panel displays several check-boxes in a column at the center bottom of the frame; these boxes are not present for other variable fields:
The following illustration shows the modification of a 100 field in progress. The editing panel shows special 1XX-only check boxes at the bottom, between the ? and Cancel buttons.
These special 1XX-only check boxes are described in the following paragraphs.
A check-mark in the Propagate check-box tells the toolkit that you wish it to change 4XX fields in the authority record to correspond to the 1XX field. (If you check the Propagate box, the toolkit does this task whether or not there is any actual change to the 1XX field; so you can do a "dummy" edit of the 1XX field for the sole purpose of propagating information from the 1XX field to the 4XX fields.) The scheme that the toolkit uses to do this work is subject to change as experience is gained with it. At present the scheme consists of the following elements:
The toolkit does not use the Propagate feature to modify a 4XX field coded in subfield $w as a former heading.
Here are some examples of the use of this feature.
| For example, if you start with an authority record containing these fields: |
 |
| ... and if you use this panel to add $d 1952- to the 100 field, and if you check the Propagate box, like this: |
 |
| ... the toolkit will automatically add subfield $d to the 400 fields that contain only subfield $a, producing this result: |
 |
| For another example, if you start with an authority record containing these fields: |
 |
| ... and if you use this panel to add 1947 to the 100 subfield $d, and if you check the Propagate box, like this: |
 |
| ... the toolkit will automatically add the death date to the 400 fields that only have the birth date, producing this result: |
 |
| A feature that forms part of the 046 feature on the toolkit's Assist tab provides a different way to achieve a similar result. |
The 'Former 1XX to 4XX' and 'Suppress' check-boxes
Under most circumstances, when you make some change to the 1XX field, you will want to preserve the former 1XX field as a 4XX field, to serve as a record of the former heading (to enable automatic bibliographic corrections, or for some other purpose). If you wish the toolkit to transmogrify the former 1XX field into a 4XX field when you make some change to the 1XX field, check the Former 1XX to 4XX check-box; this tells the toolkit to create a new 4XX field, with subfield $w. If you check this box, the toolkit also offers the Suppress check-box. If you check this Suppress box, new 4XX field will contain $w nnea; if you do not check this box, the new 4XX field will contain $w nne.
| In the following illustration, you are about to make a significant change to the authority 100 field. You have checked the Former 1XX to 4XX box, but for whatever reason you have in this case decided to make the Suppress box not checked. |
 |
| When you click the OK button, the toolkit re-tags the 100 field as a 400 with $w nne, adjusts the value of 008/29, and inserts the new 100 field; all as shown in the following illustration. |
 |
When the Tag box on the field-editing panel contains a 3-digit tag that begins with a "5", the toolkit displays a drop-down list of recognized subfield $i texts in the center of the lower border of the panel, with an accompanying button captioned Fix $i. You can do three different things with this pair of controls.
In each case, the toolkit attempts to to provide subfield $w that corresponds to your action.
| In this example, you are adding a 500 field for a member of a rock band to the authority record for the band. You have selected Member from the drop-down list of recognized subfield $i texts | |
 |
| When you click the Fix $i button, the toolkid adds subfield $i, and the appropriate subfield $w, to the text of the field. | |
 |
| When you click the OK button, the toolkit adds the 500 field to the authority record (and changes the value of the reference status fixed-field element). |
 |
|
| In this example, you are modifying an existing 500 field. You have selected Founded corporate body of person from the drop-down list of recognized subfield $i texts | |
 |
| When you click the Fix $i button, the toolkit replaces the existing text of subfield $i with the new text. (Subfield $w is already the way it should be.) | |
 |
|
| Click the OK button to replace the existing 500 field with the modified one. |
When you modify a 670 field, if the field appears to contain a URL in subfield $a,43 and if the field does not alrleady contain subfield $u, the field change panel has a button with the caption Move URL to $u.
If you click the Move URL to $u button, the toolkit will attempt to isolate the URL, fetch the corresponding page, extract the title from the page, reformulate 670 $a, and add subfield $u for the URL removed from subfield $a. If all of these tasks meet with success, the toolkit will show you the reformulated 670 field.
| In the following illustration, you have brought into the field-editing panel a 670 field that contains a URL in subfield $a. The toolkit displays the Move URL to $u button. | |
 |
|
| When you click the Move URL to $u button, the toolkit isolates the URL, retrieves the indicated page, uses the <title> tag from that page to modify the text of 670 subfield $a, and adds 670 subfield $u. | |
 |
If the toolkit's changes appear correct (or correct enough), you can make other modifications to the field, and eventually click the OK button; click the Cancel button to abandon all changes to the field.
Many conditions can prevent the toolkit from successfully moving the URL from 670 subfield $a to subfield $u. For example, the web page might be behind a firewall requiring a signon; or the web site may be down temporarily; or the entire web site may have disappeared. If the toolkit can't handle the task on its own, and if you believe that the task is still worth doing, you'll have to adjust the text of the 670 field yourself.
When you modify a 678 field, the field change panel has a button with the caption Reformulate 678. You should only use this button for old-style 678 fields, which contain a miscellaneous hodge-podge of information. Do not use this button for newer-style 678 fields, which contain narrative descriptions of the entity represented by the authority record.
When you click the Reformulate 678 button, the toolkit re-casts the text of the 678 field as 670 subfield $b, and supplies text in a standard form for 670 subfield $a.
| In the following illustration, you have brought a 678 field into the field-editing panel. The toolkit displays the Reformulate 678 button. | |
 |
|
| When you click the Reformulate 678 button, the toolkit changes the tag to "670", supplies appropriate indocator values, modifies the text of 678 subfield $a for use in 670 subfield $b, and supplies a standard text for 670 subfield $a. | |
 |
If the toolkit's changes appear correct (or correct enough), you can make other modifications to the field, and eventually click the OK button; click the Cancel button to abandon all changes to the field.
The toolkit may discover that there is more than one way to handle your request to change a record. Here are some examples of situations that can involve a selection from a range of possibilities (details for each such choice are given at the proper location in this document):
When any such a condition arises, the toolkit will show you a list of possibilities on its multiple-choice panel, and invite you to make a selection. (If a choice is quite long, the toolkit will show only the first part in this list, followed by the mark of omission; the toolkit will use the full text if you select such a line.) Depending on the context, you may properly select only one, or more than one, or none, of the items from the list.
| The following illustration shows the toolkit's use of the multiple-choice form to present the possible formulations for 400 fields generated from text extracted from a bibliographic record: |
 |
Click once on any line in the big text box to select the line; the toolkit changes the font property on that line to bold. Click on any bold line to de-select it; the toolkit changes the font property on that line back to normal. You can select as many lines as seems appropriate to you in a particular situation. If you select any lines, the toolkit makes the OK button available; the caption on that button shows the number of selected lines.
| In the following illustration, you have clicked on three of the proposed texts to select them. The toolkit shows each of the selected lines in bold, and the caption of the OK button shows the number of selected lines. If you click this OK button, the toolkit will add three 400 fields to the authority record. |
 |
The ? button on this multiple-choice panel should take you to the point in this documentation that describes the situation that calls for your assistance. There should be a link in the documentation from that point to this section, describing the operation of this panel in general terms.
You cannot simply click the cursor into the authority record that the toolkit displays on the left side of its main panel, and start typing. This display version of the record is locked against such direct manipulation. Instead, you need to use the toolkit's various tools to change the record. Although you can always double-click on a variable field to bring it into the toolkit's editing window and then make whatever change you want, that's not always the most efficient way to make a change, and it's not necessarily the most error-free method, either. The items on the toolkit's Edit menu provide one way to make certain pre-defined changes to a record reliably, and with very little effort.
The toolkit makes the Add death date sub-element available on its Edit menu if your authority record presents all of the following characteristics:
If the Add death date sub-element on the Edit menu is available and you select it, the toolkit makes the following changes to the authority record:
For example, given this authority record:
... when you select the Add death date menu item, the toolkit changes the record like this:
The Add death date to 100 $d check-box on the 046 tab provides another way to make similar changes to an authority record.
|
It will happen from time to time that information in one authority record needs to be reflected in other authority records. Here are a few examples:
In such cases, information describing a change to the preferred name for an entity needs to be reflected in other authority records that involve that entity. The toolkit does not have any way to find the associated authority records and change them all for you, but it does provide substantial automated assistance in this work. You need to bring each affected record into the toolkit, and the toolkit does much of the rest.
All of the work described in this section takes place from the Batch item on the toolkit's Edit menu. This isn't really a "batch" correction, in the sense that a whole bunch of things get changed all at once, but the term "batch" seems like the best shorthand way to describe what's going on.
This work is controlled by several options.
The examples in this section were constructed to illustrate the toolkit's capabilities. These examples illustrate the toolkit's working method and results, but do not necessarily represent actual situations.
To begin the process of making a change to a group of authority records, bring into the toolkit an authority record that represents the change to be made. This authority record must include at least one 4XX field. (The 4XX field in the record need not necessarily reflect exactly the change you wish to make; the reason for this will become clear in a moment.) You simply tell the toolkit that this authority record defines a batch change, by selecting Edit, and then Batch and then Pick up from the toolkit's menu. The toolkit picks up the 1XX field and all of the 4XX fields, and stores them for future use.
| In the following illustration, you have brought into the toolkit an authority record for a personal name. In this case, you have changed the 100 field, and as part of that work the toolkit has created a 400 field for the former heading. (You have also made other changes to the record; many other changes are also needed, but they are not the focus of this example.) When you select Edit, and then Batch and then Pick up from the toolkit's menu, the toolkit saves the 1XX field, and both 4XX fields, for future use. (If the option to create 'shadow' references is turned on, in this case the toolkit will create additional virtual 4XX fields.) | |
 |
The toolkit stores the correction definition in the Windows registry, replacing any previous definition. This definition remains in place, and is avilable every time you start the toolkit, until you either replace it with a different definition, or clear it from memory.
If you have selected the appropriate option, after picking up a new correction definition the toolkit immediately displays that definition, so that you can make adjustments to it.
Display (and change) the definition
The current correction definition is available at any time for inspection and modification. To see the current definition (and possibly make changes to it), select Edit and then Batch and then Display/Adjust from the toolkit's menu. The toolkit displays the 4XX fields that form the critical part of the correction definition. To change or delete a field, highlight the field and then click the corresponding button. To add a field, click the Add button. The change and add functions use the toolkit's standard field-editing panel. You can delete multiple fields at one time; but you can only edit one field at a time.
| The following illustration shows the correction definition derived by the toolkit from the authority record shown in a previous illustration. (In this case, you have selected the option to generate shadow references.) You can change or delete any of these 4XX fields, and you can add any other 4XX fields that may seem appropriate. | |
 |
The changed definition must have at least one 4XX field in it. If you click the OK button, the toolkit replaces the 4XX fields in the existing definition with those listed in the display. If you click the Cancel button, the tookit retains the existing definition without any change.
The toolkit stores the changed definition in the Windows registry, replacing any previous definition. This definition remains in place, and is avilable every time you start the toolkit, until you either replace it with a different definition, or clear it from memory.
None of the changes that you make to the definition are reflected in the authority record from which the definition was derived. (For example: If you remove a 4XX from the definition, the toolkit does not remove the original 4XX field from the authority record.)
Make a change to an authority record
To make a change to an authority record, bring into the toolkit an authority record that contains an access point that involves one of the 4XX fields that form part of the current definition. Select Edit and then Batch and then Perform from the toolkit's menu. The toolkit applies the current definition to the 1XX, 4XX and 5XX fields in the record, and immediately shows you the changed record.
| The following illustration shows an authority record with access fields involving one of the 4XX fields in the current definition. (This is the definition shown in an earlier illustration.) | |
 |
|
| Select Perform from the toolkit's Edit/Batch menu. The toolkit compares the access fields in this record to the 4XX fields in the current definition. (This involves a normalized text match.) If the toolkit finds a match, it replaces the matching portion of the access field with the 1XX field from the current definition, and makes other adjustments as appropriate. The following illustration shows the toolkit's changes to this record, based on the definition decribed in an earlier illustration. In this case, because the toolkit changed the 1XX field (and because you selected this option), the toolkit created a new 4XX field to preserve the original field. | |
 |
Click OK in the toolkit's menu to send the record back to Connexion, and contribute the change to the LC/NACO Authority File. Proceed in a similar manner to change additional records involving the same name: bring each record into the toolkit, apply the correction definition to it, and save the record to the LC/NACO file. You only need to define the correction once, and then you can apply it to as many records as need that change.
If you want to obliterate the current correction definition, select Edit and then Batch and then Clear from the toolkit's menu. There's no particular need to do this—the toolkit only applies a correction definition when you tell it to do so—but there's also no harm in clearing the definition once you've finished with it.
|
Use the Edit/Add new menu choice to add a new variable field (tag 010-999) to the authority record. The toolkit presents you with a blank field editing panel. You supply tag, indicators, and text in the field editing panel, and the toolkit adds the new field to your record.
|
To change a variable field44, click on the field, then select the Edit/Change menu item. The toolkit places the field into its field editing panel. (You can achieve the same result by double-clicking on the field of interest.) In the field editing window, you can change the field's tag, indicators, and text.
| To arrive at the following illustration, you clicked on the 670 field in an authority record, and then asked the toolkit to present the field for editing. You can change any part of this field. After changing the field, if you click the OK button, the toolkit will replace the existing 670 field with the new field, and then validate the changed record. | |
 |
|
Many of the messages that the toolkit displays in its validation report begin with an asterisk ("*"), meaning that the toolkit will make the indicated change for you if you double-click on that line, or click once on the line and select the appropriate item from the Edit menu. If you agree that a change is basically appropriate, but you wish to make some further modification to a field, you can click on the message, and then select Change [tag] with change from the Edit menu. (Shortcut: CTRL-W.) This function is available for validation messages that begin with an asterisk, and involve the addition of a new variable field or the modification of an existing variable field.
If you click on a validation message that begins with "*" and make the appropriate menu selection or press CTRL-W, the toolkit applies the indicated change to the variable field, and presents the modified field in its usual field editing panel. You can make any additional changes to the field that you believe are appropriate. If you click the "OK" button on the editing panel, the toolkit replaces the field in the authority record.
| For example, the validation message in the following illustration suggests the addition of a comma to the subfield that precedes subfield $d in the 100 field. | |
 |
|
| If you select this message and then select Change 100 with change from the Edit menu, or press CTRL-W, the toolkit adds the missing comma to the end of subfield $q, and presents the modified field in its field-editing panel, ready for any additional changes. | |
 |
Use this menu choice to combine two or more fields into a single field containing all of the subfields from all of the fields. Click anywhere on the first instance of the field you wish to combine with others, then select this menu item; the toolkit finds remaining fields of the same type "lower" in the authority record, and combines them into a single occurrence.
The toolkit only makes this menu item available when you click on a field that the toolkit allows you to combine with others: the 034, 368, 370, 372, 373, 374, 376, 380, 381, 383, 385 and 386 fields. The toolkit will only combine fields with the same tag, indicators and subfield $2 information (or if neither field has subfield $2). The toolkit will not allow you to combine some fields if you have chosen any option to add URIs to fields.
| If you click on the first 046 field in this record and then select Combine 046 from the toolkit's Edit menu, the toolkit will produce a single 046 field, containing subfields $f and $g. The toolkit can combine these two 046 fields because both have the same identifying subfield ($2 edtf, in this case). | |
 |
The toolkit contains a special trick for combining 046 fields. If any of the subfields in a combined 046 field is fully redundant with another subfield, the toolkit will silently remove the redundant subfield.
| If you click on the first 046 field in the following record and then select Combine 046 from the toolkit's Edit menu, the toolkit will produce a single 046 field, containing only the two fuller versions of subfields $f and $g. The toolkit eventually discards subfields $f and $g found in the first 046 field because they are fully redundant with other subfields in the combined field. | |
 |
This menu choice is only available if you have indicated that separate fields may be combined. One option controls the combining of separate 046 fields, another controls the combining of all other fields. The toolkit will not combine fields in which subfield $0 is defined, if you have selected any of the options to generate URIs.
|
Use the Create 4XX menu item to combine information from two authority records to make a new 4XX field.45 This menu choice produces a hierarchial corporate 4XX field, a hierarchical title 4XX field, or a name/title 4XX field.
The toolkit will only make this menu item available if there is an authority record on the Texts tab labeled Additional, and if this record, and the authority record displayed on the left side of the toolkit's main panel, share certain characteristics.
You must take some deliberate action to bring an additional authority record into the toolkit.
Both the record on the left and the record on the right must have these characteristics:
The 1XX fields of the two records must match one of these pre-defined scenarios for combining two authority records to make a new 4XX field:
If the two authority records pass all tests, the toolkit makes the Create 4XX menu choice available. When you select this menu item, the toolkit does some manipulation of the 1XX field from the authority record on the left before combining fields.
The toolkit creates a new 4XX field that begins with the 1XX field from the authority record on the right, plus the (modified) 1XX field from the authority record on the left. The toolkit attempts to add appropriate punctuation between the two pieces that it assembles into the new 4XX field.
| Given this 130 field in the record on the left: | |
| $a Project report (Land Resources Development Centre (Great Britain) | |
| ... and this 110 field in the record on the right: | |
| $a Land Resources Development Centre (Great Britain) | |
| ... the toolkit will add this 410 field to the record on the left: | |
| $a Land Resources Development Centre (Great Britain). $t Project report |
| Given this 110 field in the record on the left: | |
| $a J.L. Kellogg Graduate School of Management | |
| ... and this 110 field in the record on the right: | |
| $a Northwestern University (Evanston, Ill.) | |
| ... the toolkit will add this 410 field to the record on the left: | |
| $a Northwestern University (Evanston, Ill.). $b J.L. Kellogg Graduate School of Management |
Let Gary know if you encounter additional cases in which the toolkit could combine 1XX fields from two authority records to produce a new 4XX field.
The Create 670 menu choice creates a new 670 field, based on information in a bibliographic record. This menu choice is only available if you have brought an additional bibliographic record into the toolkit.
You must take some deliberate action to bring an additional bibliographic record into the toolkit.
When you have a bibliographic record displayed as an Additional record on the Texts tab, the toolkit makes the Create 670 item on the Edit menu available. If you select this menu item, the toolkit pulls information from the bibliographic record, and shows you its proposed 670 field in its field change panel. If you click the OK button on this panel, the toolkit adds the 670 field to the authority record. See an example.
| In the following illustration, you have brought an additional bibliographic record into the toolkit, and you have selected the Create 670 menu item. The toolkit is presenting its default new 670 field (based on this bibliograpic record) in its field-editing panel. You may change this field in any manner that seems appropriate, and click the OK button to add the 670 field to the authority record. (In this case, you should at least add the word "Marks" to the end of 670 subfield $b.) | |
 |
|
The toolkit can help you begin work on a 670 field that summarizes the usages and headings found in the OCLC database. To do this, select the Create 670 OCLC item on the Edit menu. This menu choice is available for all kinds of records, at all times.
When you select this menu item, the toolkit creates a preliminary 670 field, using the 1XX field from the authority record as the access point, and information the record's first 670 field as the usage. The toolkit presents you this preliminary field in its field field editing panel, as shown in the following illustration. You can make additional changes to this field now, or at any other convenient time.
 |
The usage and hdg. radio buttons on the Texts tab offer another way to construct a 670 field showing patterns found in the OCLC database.
|
Use the Edit/Create 678 menu item to ask the toolkit to generate a preliminary 678 field (biographical or historical data). The toolkit only makes this menu item available if you're working on an authority record for a personal, corporate or conference name. To construct the proposed 678 field, the toolkit pulls information from the 1XX, 046, 370, 372 and many other fields, and mixes the various bits of information with suitable text and punctuation to produce a narrative statement. The toolkit only uses discrete bits of information that have been teased out into separate data elements; the toolkit does not attempt to parse the 670 fields to find useful bits of information. (The toolkit can also help you create a 678 field in a different way, using information drawn from a Wikipedia page.)
The following table outlines the elements that the toolkit may consider for use in the 678 field that it generates.46 For ease of reference, this table is in order by MARC tag; the toolkit plucks information from the authority record in whatever order seems appropriate in a particular context.
| Tag | Personal | Corporate | Conference |
| 046 | Yes; $f, $g, $s, $t | Yes; $q, $r, $s, $t | Yes; $q, $r, $s, $t47 |
| 368 | Yes; $a, $c | Yes; $a, $c | Yes; $a, $c |
| 370 | Yes; $a, $b, $c, $e, $f | Yes; $c, $e, $f | Yes; $c, $e, $f |
| 372 | Yes; $a, $s, $t | Yes; $a, $s, $t | Yes; $a, $s, $t |
| 373 | Yes; $a, $s, $t | Yes; $a, $s, $t | Yes; $a, $s, $t |
| 374 | Yes; $a, $s, $t | No | No |
| 377 | Yes | Yes | Yes |
| 378 | Yes; $q | No | No |
| 4XX | Yes | Yes | Yes |
| 5XX | Depends on $i text | Depends on $i text | Depends on $i text |
| 663 | Yes; $a, $b | Yes; $a, $b | Yes; $a, $b |
| 665 | Yes; $a, $b | Yes; $a, $b | Yes; $a, $b |
The toolkit's assembly of a 678 field using data pulled from the authority record is controlled by a large number of options. The toolkit contains substantial internal tables (not at present available as configuration files) that tell it how to manipulate commonly-occurring terms found in the 368, 372 and 374 fields for use in the 678 field.48
The toolkit may ask one or more questions as it pulls information from the authority record for re-use in the 678 field.
In the following illustration, the toolkit shows (on its multiple choice panel) the 100 field with the text from subfield $c presented at the beginning and end of the subfield $a text, and also presents the text of 100 subfield $a without subfield $c. You have selected the form that includes the subfield $c text following the subfield $a text (shown in bold). When you click the OK button, the toolkit will use the selected text at the beginning of the 678 field.
In the following illustration, the toolkit has presented a list of the 400 fields in the record (un-inverted, with forenames before surname, as specified by an option). You have selected one 400 field (shown in bold), representing a person's full name in the Cyrillic alphabet.
In the following illustration, the toolkit has presented a list of the 410 fields in the authority record. You have selected three of these fields (shown in bold): one non-Latin field, and two Latin-alphabet fields.
The toolkit eventually presents the proposed 678 field on its field change panel. You can modify the field as you see fit. Click the OK button to add the field to the authority record; click the Cancel button to abandon the 678 field.
It cannot be emphasized too strongly that you should regard the program-generated 678 field as a preliminary gesture, and not as the final form of the 678 field. You should also understand that the toolkit doesn't know what the various bits of text mean in any significant sense. If there's something nonsensical in the proposed 678 field, such as Smith is an English literature, you should cancel the operation, adjust the MARC content designation of the various bits of information, and then try the Edit/Create 678 menu item again.
| The following illustration shows the toolkit's preliminary 678 field for a person, based on the manipulation of data elements extracted from the underlying authority record. (A different selection of options would produce a slightly different proposed field.) The toolkit uses subfield $a for the entire text; you may choose to insert a subfield $b code at an appropriate point. Thorough though it may seem, this proposed 678 field requires your attention. |
 |
| The following illustration shows the toolkit's preliminary 678 field for a different person. (This 678 field shows the program's use of selected text from 510 subfield $i, when the record contains 510 fields that parallel 373 fields.) This proposed 678 field requires your attention. |
 |
| The following illustration shows the toolkit's preliminary 678 field for a corporate body, based on the manipulation of data elements extracted from the underlying authority record. This proposed 678 field requires your attention. |
 |
| The following illustration shows the toolkit's preliminary 678 field for a conference, based on the manipulation of data elements extracted from the underlying authority record. This proposed 678 field requires your attention. |
 |
If you have any suggestions for improving or expanding the preliminary 678 field generated by the toolkit, please let Gary know. (Proposals for including additional information must involve data elements that are separately identified in the authority record, and not buried somewhere in a 670 field.) There is above all great scope for the definition of additional options to tailor the content and appearance of the proposed field.
Use this menu choice to remove a variable field from the authority record. Click on the field, then select this menu item (or press CTRL-D). The toolkit removes the field for you. The toolkit will not allow you to delete the 00X, 040 or 1XX fields.
|
Whenever you are editing any authority record, you can use the Derive new record item on the toolkit's Edit menu to create a new record. Towards the end of its work, the toolkit will throw away the current authority record, so you should make sure that you've saved any changes to it that you wish to make, before you derive a new record. When you select the Derive new record menu item, the toolkit removes any 001 and 010 field, and replaces the 005 and 040 fields. Because the 1XX field of the new record must differ in some way from the 1XX field of the base record, the toolkit presents the existing 1XX field in its field change panel, inviting you to make some modification to the field. The toolkit eventually shows you the derived new record, ready for the many additional changes that will no doubt be required before the record can be contributed or otherwise saved.
If you want to create a new, blank record, use the New record item on the Edit menu.
| For example, if you start with this authority record: | |
 |
|
| And if after you issue the Derive command you delete "& English" from subfield $l, the toolkit will show this as the preliminary version of the new record: | |
 |
|
| You will need to make many other changes before this record could be considered ready for contributing, or saving for use in some other environment. |
If the record contains a 5XX field, you might want to 'flip' the record around, so that the 5XX becomes the 1XX in the new record and the 1XX becomes a 5XX. (This work is controlled by some options.) To do this, simply click first on the 5XX field and then select Derive new record from the Edit menu. The toolkit will prepare a preliminary new record for you, reversing what it is able to reverse. The toolkit's preliminary new record will almost certainly require a lot of additional changes before it can be contributed or saved.
| For example, if you start with this authority record and click the 510 field: | |
 |
|
| When you select Derive new record from the Edit menu the toolkit presents you with its preliminary version of the new record. Note that the toolkit has flipped the text of 500 subfield $i to reflect the change in meaning.50 | |
 |
|
| You will need to make many changes before this record could be considered ready for contributing, or saving for use in some other environment. |
This choice on the Edit menu is only available if you first click on a 1XX or 4XX field that contains subfield $t.
Use this menu choice to create a 430 field that contains subfield $t, and all following subfields, from a name/title heading. Click first on a name/title 1XX or 4XX field, then select Duplicate $t as 430 from the Edit menu. The toolkit adds a 430 field to the record consisting of subfield $t of the selected field, plus any following subfields (not including subfield $w, or $0-$9).
| For example, to create a 430 field for Exposition of the prophecies supposed by William Miller to predict the second coming of Christ in 1843, which is subfield $t of the 100 field, click anywhere in the 100 field. | |
 |
|
| When you select Duplicate $t as 430 from the Edit menu, the toolkit adds a 430 field to the record. | |
 |
|
The cataloger's toolkit attempts to keep the authority record's fixed fields (elements from the record leader and 008 field) synchronized with other parts of the authority record. On rare occasions, you may wish to make changes to a fixed-field element that are beyond the toolkit's capabilities.51 Select Edit/Fixed fields from the toolkit's menu to make any change to any of the fixed-field elements.
You can also begin editing the fixed fields by double-clicking anywhere within the fixed fields.
The behavior of the toolkit's fixed-field editing panel is controlled by a few options, but mostly by the configuration file FfdEdit.cfg.52
When you select Edit/Fixed fields from the toolkit's menu, the toolkit displays the fixed-field elements on a special editing panel. The toolkit's arrangement of fixed-field elements is based on the presentation in the OCLC Connexion client, and the editing panel works in a fashion similar to the Connexion client. The following illustration shows a typical example of the toolkit's fixed-field editing panel.
 |
The toolkit displays the value of "blank" as "#", and it displays the "fill character" as a vertical bar ("|").
To change an element, either select the new value from the list of defined values, or type the value. If you type an unacceptable value, the toolkit will instantly change the background color of the element to highlight the problem. The toolkit will not allow you to save the fixed-field values if any of the values is undefined.
For help with the values used in any element, click on the button with the element's name. The toolkit will open your favorite web browser to either the OCLC or Library of Congress documentation for that element, depending on the option you have chosen.
When you've finished changing the fixed-field elements (assuming they're all correct), click the OK button. The toolkit will not allow you to save fixed-field elements if any of them contains an unrecognized value. To abandon your work, click the Cancel button.
Use this menu choice to convert information in a 675 field into a 670 field, with the subfield $b code inserted at the correct spot in the new field.53 This menu choice was originally designed to work with 675 fields constructed according to the current model, with each source in a separate $a subfield, but was later expanded to handle 675 fields with all of the sources in a single $a subfield.
If there are multiple $a subfields in the 675 field
To extract a single 675 subfield $a into a 670 field, click anywhere within the text of the subfield, and the select Extract 675 as 670 from the toolkit's Edit menu. (This menu choice is only available when you click on a 675 field.) The toolkit extracts this subfield and examines it.
If the toolkit can find a reliable point in the subfield's text at which to insert the subfield $b code,54 the toolkit will simply delete the 675 $a subfield (if that's the only $a subfield in the 675 field, the toolkit deletes the whole field), and then add a 670 field.
| Example: To convert the second $a subfield of this 675 field into a 670 field, click anywhere within the second a subfield. | |
 |
|
| When you select Extract 675 as 670 from the toolkit's Edit menu, the toolkit modifies the record as shown below. The toolkit has inserted the subfield $b code into the text of the new 670 field. | |
 |
The toolkit will modify only one 675 $a subfield at a time; if you need to extract more than one 675 $a subfield to a 670 field, you will have to handle each one separately.
| Example: To convert the first $a subfield in this 675 field into a 670 field, click anywhere within the first $a subfield. | |
 |
|
| When you select Extract 675 as 670 from the toolkit's Edit menu, the toolkit modifies the record as shown below. The toolkit has inserted the subfield $b code into the text of the new 670 field. Because the original 675 field contained two instances of subfield $a, the record still contains a 675 field. In this particular case, you may well wish to repeat the operation, to convert the remaining 675 subfield $a into a 670 field. (This 675 subfield contains multiple sets of parentheses, but the toolkit will still be able to find the correct location for the subfield $b code.) | |
 |
If the toolkit cannot figure out on its own where to insert the subfield $b code, the toolkit will show you the proposed new 670 field in its field change panel. You can modify the text of the field in any way that seems appropriate to you. If you click the OK button, the toolkit creates a new 670 field, and removes your subfield from the 675 field. The toolkit does not inspect the text of the field that you have approved, to make sure that it contains a subfield $b code. (In some cases, it may be appropriate not to have subfield $b at all in the new 670 field.)
| Example:, To convert this 675 field to a 670 field, click anywhere within the 675 $a subfield of interest (in this record there's only the one). | |
 |
|
| When you select Extract 675 as 670 from the toolkit's Edit menu, the toolkit inspects the 675 field, and quickly realizes that it cannot figure out on its own where to insert the subfield $b code. The toolkit presents the putative new 670 field in its record-editing panel. You can make any change to this text that you want; you'll certainly want to insert the $b code just after "3rd ed.". | |
 |
|
| If you click the OK button on the field-editing panel, the toolkit deletes the 675 subfield $a (in this particular case, that means that the toolkit deletes the whole 675 field), and creates a new 670 field. | |
 |
If there is a single $a subfield in the 675 field
The toolkit also offers a way to extract one source from a 675 field, when the 675 field contains only a single instance of subfield $a, and that subfield contains multiple source citations separated from their neighbors by semicolons.55 You must be careful when using this method, because it is very sensitive to the formatting of the text in the 675 field. If this method produces incorrect results (either because it split the subfield at the wrong place, or converted the entire subfield into a new 670 field), you should undo the change, and edit the field yourself.
To extract one semicolon-delimited source citation from a 675 field, click anywhere within the source citation, and then select Extract 675 as 670 from the toolkit's Edit menu. (This menu choice is only available after you click somewhere in a 675 field.) The toolkit attempts to identify the segment of the 675 field that corresponds to the point at which you clicked.
If the toolkit is able successfully to isolate a source from the 675 field, it will use that text to create a new 670 field, and remove the citation from the 675 field.
| Example: To convert the second citation in this 675 field into a 670 field, click anywhere within the text of the second citation ("Proceedings of the ... Joint Conference on Digital Libraries, 2008: t.p. (Joint Conference on Digital Libraries)"). | |
 |
|
| When you select Extract 675 as 670 from the toolkit's Edit menu, the toolkit modifies the record as shown below. The toolkit has inserted the subfield $b code into the text of the new 670 field. | |
 |
As is the case with a 675 field containing multiple $a subfields, if you wish to extract more than one citation from the 675 field, you must extract each in a separate operation. And, as described above, if the toolkit cannot figure out where to insert the subfield $b code into the extracted text, the toolkit will ask for your assistance.
Whenever you bring an authority record into the toolkit, and every time you make any change to an authority record, the toolkit passes the record through its validation modules. This series of tests produces messages about conditions in the record that require your attention. Some of the toolkit's messages begin with an asterisk ("*"), meaning that you can double-click on the message, and the toolkit will make the indicated change for you. (If you have turned off the toolkit's automatic changes feature, the toolkit will probably generate lots of messages that begin with an asterisk.)
You should carefully inspect all of the toolkit's validation messages that begin with an asterisk. If, after this careful inspection, you decide that the toolkit can go ahead and make all of the associated changes, you can select Fix messages with '*' from the toolkit's Edit menu. The toolkit will change everything that it can, leaving you only with the remainder that you will have to deal with on your own, one message at a time.
There may be messages that begin with an asterisk that the toolkit will not change automatically with this menu choice. You will have to deal with each of these messages individually by double-clicking on them.
| Example (generated with the toolkit's automatic changes feature turned off): The toolkit has found 4 problems with this record. | |
|
|
| If you select Fix messages with '*' from the toolkit's Edit menu, the toolkit will delete the 375 field, add a URI to the 377 field, create a new 400 field, and add a 667 field related to the URI in the 377 field. In this case, there will be no validation messages left. |
Use this menu choice to change the relative position of a variable field in the authority record. This menu option has two sub-items: Down and Up. To move a field, click anywhere on the field, then select this menu item. To shift the field up one position in the record, select Move/Up; to shift the field down one position in the record, select Move/Down.
The toolkit can only change the position of a field within the context of the field-ordering rules defined in the ExtendedFieldOrder stanza of the configuration file authsup.cfg. The default version of this stanza produces the following sort order for the variable fields in an authority record:
Within this framework you could use Edit/Move to change the order of multiple instances of the 370 field, but you could not use Edit/Move to place a 370 field after a 374 field, and you could not use Edit/Move to put 4XX fields into some order other than alphabetical. If you ask the toolkit to move a field to a place that is contrary to the field's defined location, the toolkit will either appear to ignore your request altogether, or will move the field to the nearest place that satisfies its own field-order definition.
|
The New record menu choice is offered as a convenience to some users. Creating a new record in this manner forces you to supply the entire record yourself, one field at a time. Whenever possible, you should create a new record by pulling information from a bibliographic record, or by deriving one authority record from another.
To create a new, blank record, select New record from the Edit menu. The toolkit will show you its field-editing panel. You must take this opportunity to supply the 1XX field for the new record. If you do not supply a new 1XX field, the toolkit will not create the new authority record.
In some circumstances, the toolkit will use information in your new 1XX field to generate additional fields. Use the toolkit's various features to complete the authority record.
| In the following illustration, you are creating a new authority record for a personal name. The record contains default fixed field values, and a default 040 field. Because the new 100 field contains subfield $d, the toolkit has also created an 046 field. This record yet requires at least a 670 field, and may need additional fields. | |
 |
|
The toolkit contains a facility for converting authority access fields presented in certain vernacular scripts into the latin script, and converting some texts presented in the latin script into a vernacular script. (For example, the toolkit can convert a Russian-language 400 field given in the Cyrillic script into its latin-script equivalent, and can convert a 400 field containing a romanized Ukrainian name into the equivalent in Cyrillic script.) This procedure is commonly referred to as romanization.
The toolkit's romanization feature is controlled in large part by a series of configuration files,56 but in one case (Korean to latin)57 the conversion is coded into the program itself. The behavior of the toolkit's romanization feature is controlled by a number of options.
The toolkit's romanization feature is available from a sub-menu attached to the Romanize element in the Edit menu. This sub-menu contains a list of the available languages and scripts, showing you the languages and scripts that the toolkit knows about, and the directions of translation that the toolkit can perform. In this list, the designation "L-V" means that the toolkit can convert text in the latin alphabet into this vernacular script; the designation "V-L" means that the toolkit can convert text in this language/script into the latin-alphabet equivalent. For some scripts the toolkit can perform only a conversion from vernacular script to latin script, for some scripts the toolkit can perform only a conversion from latin script to the vernacular script, and for some scripts the toolkit can perform the conversion in both directions.58
 |
The general procedure for converting an access field from one representation to another is as follows:
| In the following illustration, you have clicked on the first 400 field (text is romanized from Russian) |
 |
| When you select Edit/Romanize/Russian from the toolkit's menu, the toolkit adds a 400 field for the vernacular equivalent. The toolkit made other standard changes to the record at the same time. |
 |
The toolkit keeps track of each change you make to a record; if you don't like the result of a particular change, you can use the Undo menu item to restore the record to its previous state. Because the toolkit tracks all of your changes, you can select Undo repeatedly, if you wish, until you have restored the original authority record.
The File menu is available on the independent version of the toolkit, not the OCLC Connexion version. As the name might imply, operations available from the File menu involve work with files; in this case, files containing MARC records.
Because it's expected in standard Windows programs, the toolkit's File menu also contains an Exit item.
The toolkit's File/Exit menu item closes the program. If you have not saved the current version of the authority record displayed on the left side of the toolkit's main panel, the toolkit will ask you if you wish to abandon your work on that record.
Use the toolkit's File/Open menu item to do the following:
When you select File/Open from the toolkit's menu, the toolkit presents you with a standard Windows file-open dialog panel. Use this panel to identify the file containing the record you wish to use.
The toolkit reads all of the records in the file. (The toolkit stops when it has read 200 records from the input file.) The toolkit shows you a panel like the one in the following illustration. (If the input file contains only one record, an authority record; and if you have not yet opened any records, the toolkit assumes that you want to open this authority record for modification. In this case, the toolkit doesn't bother to show you this panel.) This panel lists each authority or bibliographic record in the file. To identify the record with which you wish to work, highlight a row and click either the Open or Add button.
|
|
| The columns in this table tell you whether you've selected the record previously, whether it's an authority or bibliographic record, and give the contents of the 001, 010 and 1XX (authority) or 245 (bibliographic) fields. |
After you have opened a file, the toolkit makes the File/Resume menu item available. Use this menu item to select another record from the same input file. (The toolkit will not prevent you from opening the same record more than once; so you can "open" the same bibliographic record multiple times to create several authority records from various access points.)
If you use the File/Open menu item to pull a record from a file that contains more than one record, the toolkit shows you a list of all the records in the file, and invites you to make a selection. When the toolkit reads such a file, it retains a list of all of the records in the file. If you need to do something with a different record from the save file, select the toolkit's File/Resume menu item. (You can of course select File/Open again; but that takes longer, and won't tell you which records you've examined at least once.) The toolkit shows you the same list of records; the toolkit marks records you've already seen, to help you find other records with which you may wish to work. (You may wish to visit a bibliographic multiple more than once during a session, to create authority records for several access points.)
The following illustration shows the toolkit's display of records from a file, after you have already worked with several of them.
|
You can use File/Resume repeatedly, until you've done everything you need to do with the records in the source file.
The toolkit's File/Save menu item writes the current state of the authority record displayed on the left side of the toolkit's main panel to a file. A set of options control the name of the file, and whether the file contains just one record or a set of records.
When you are working on an authority record, you will often want to exploit information in authority and bibliographic records beyond the record with which you began the operation.
The various toolkit modes (OCLC, and independent) offer strikingly different ways to make it possible for you to add information from additional bibliographic and authority records to an authority record. In addition to the two modes described below, you can also use the Web tab to bring a bibliographic record from a source (such as OCLC) that supports the Z39.50 protocol, or an authority record from the Library of Congress into the toolkit.
|
When you wish to add information from another record, the obvious thing to do might be to return to the OCLC Connexion client, call up a bibliographic or authority record, and tell the toolkit to absorb information from it. However, this isn't possible (at least not in a simple and direct way), because the Connexion client is unavailable whenever the authority toolkit is active: you have access to one or the other, but not both at the same time.
The toolkit's solution to this problem (in OCLC Connexion mode only) is its ability to suspend work on an authority record. When you suspend work on a record, the toolkit's main panel disappears; you can return to Connexion to call up any bibliographic or authority record. When you invoke the toolkit again, it resumes work on the previous authority record, and it also presents you with the additional record, so you can draw information from it.59 When you resume work on an authority record in this manner, if the additional record is a bibliographic record the toolkit makes the Create 670 menu item available; if the additional record is an authority record, the toolkit makes the Create 4XX menu item available.
If the additional record is an authority record, the toolkit's Move button on the Texts tab has an enhanced capability. If the additional record is an authority record, the Texts tab also presents a Move as button under certain conditions.
Here is an outline of the steps involved in this work:
The following sequence of illustrations and commentary provides a simple example of the use of this feature, drawing information from an additional bibliographic record.
| In the following illustration, you are using the toolkit to modify an existing authority record. You could just as easily be working on a new authority record created from a heading in a bibliographic record. When you select Suspend from the toolkit's menu, the toolkit saves information about its status, and the toolkit's main panel disappears. |
 |
| You find a bibliographic record in OCLC that represents information not yet present in the authority record, such as the record shown in the following illustration (with its variant statement of responsibility). With this record displayed, you use a toobar button or keyboard shortcut to activate the toolkit again. |
 |
| The following illustration shows the toolkit's panel immediately after resuming work under these conditions. The toolkit presents on the left side of the panel the same authority record that you were working on the last time around. (Had you earlier made any changes to this record, the record on the left would reflect those changes.) The display on the Texts tab includes an active radio button for the additional bibliographic record. (The toolkit has automatically selected this Additional record radio button, because in this context it's likely you will first want to work with the additional record.) You can use the tools on the Texts tab to work with this bibliographic record, as long as the Additional record radio button is selected; you can select the Authority record radio button to make secondary uses of information in the authority record. You can use tools on the toolkit's other tabs to make additional changes to the authority record. |
 |
| Also under these conditions, the toolkit makes the Create 670 menu choice available on its Edit menu. |
 |
| If you select the Create 670 item from the Edit menu, the toolkit places the proposed 670 field (based on the additional bibliographic record) into its field change panel for consideration. |
 |
| If you click the OK button on this panel, the toolkit adds the 670 field to the authority record. |
 |
| The authority record is available for any other change that may be needed. (In the above example, the new 670 field certainly calls for a new 400 field.) Among many other possibilities, you can again suspend work on this authority record, find another bibliographic record in OCLC, or an authority record in the LC/NACO Authority File, and then resume work on this same authority record to draw information from the next additional record. |
The following sequence of illustrations and commentary provides a simple example of the use of this feature, drawing information from an additional authority record.
| In the following illustration, you are using the toolkit to create a new series authority record. You could just as easily be working on an existing authority record. If you select Suspend from the toolkit's menu, the toolkit saves information about its status, and the toolkit's main panel disappears. |
 |
| You find an authority record in the LC/NACO Authority File that contains information of use in the series authority record. (In this case, this authority record represents a corporate body responsible in an important way for the content of the series.) With this record displayed, you use a toobar button or keyboard shortcut to activate the toolkit again. |
 |
| The following illustration shows the toolkit's panel immediately after resuming work under these conditions. The toolkit presents on the left side of the panel the same authority record that you were working on the last time around. (Had you made any changes to this record, the record on the left would reflect those changes.) The display on the Texts tab includes an active radio button for the additional authority record. (The toolkit has automatically selected the Additional record radio button, because in this context it's likely you will first want to work with the additional record.) You can use the tools on the Texts tab to work with this authority record, as long as the Additional record radio button is selected; you can select the Authority record radio button to make secondary uses of information in the authority record, and you can select the Bibliographic record radio button to make secondary uses of information in the source bibliographic record. You can use tools on the toolkit's other tabs to make additional changes to the record. |
 |
| Also under these conditions, the toolkit makes the Create 4XX menu choice available on its Edit menu. The toolkit changes the caption on this menu item to match the tag of the field that it would add to this particular record. Given the two authority records used in this sequence of illustrations, the toolkit is able to add a name/title 410 field to the record on the left (using the name from the record on the right plus the title from the record on the left); so the caption for this menu item in this case is Create 410. |
 |
| If you select the Create 410 item from the Edit menu, the toolkit examines the two records, to see what opportunities they present. If the two records represent a condition that has been defined to the toolkit, the toolkit constructs a 4XX field that combines information from the 1XX fields of the two records, and adds the new 4XX field to the authority record. |
 |
| The authority record is available for any other change that may be needed. Among many other possibilities, you can again suspend work on this authority record, find another authority record in the LC/NACO Authority File, or a bibliographic record in the OCLC database, and then resume work on this same authority record to draw information from the next additional record. |
Multiple bibliographic records
It may happen that you wish to bring several additional bibliographic records into the toolkit, and use each of them in turn to enhance your authority record. You can do this as long as all of the records appear in the same search title list.
Here is an outline of the steps; these are identical with the general procedure except for one thing:
The toolkit does something that may seem a bit unusual when you bring in several records from OCLC: it puts a list of the records on the Web tab, for the Z39.50 choice, as if you had retrieved a group of records via a remote search. You can use this list to move from one record to another, as is the case for Z39.50 search results. The toolkit also displays a small left/right arrow on the Texts tab; use this to move sequentially from one record to the next.
| In the following illustration, assume that you have previously started work on an authority record, and selected Suspend from the menu. Then you did a search that resulted in a title listing, and you have selected five titles in the list. | |
 |
|
| When you re-activate the toolkit, the toolkit converts each highlighted record to MARC. The toolkit shows the first bibliographic on the Texts tab. (The rest are on the Web tab; see just below.) You can click the small left/right arrow just below the record display to move through the set of records, one at a time. | |
 |
|
| All of the records are listed on the Web tab, under the Z39.50 choice, on the Results sub-tab. To see any of these records, click anywhere on the record's line, then click the Show button. The toolkit displays the record on the Texts tab. | |
 |
When using the toolkit as an independent program, you don't need to leave the program in order to pick up an additional bibliographic or authority record. Instead, you simply open a MARC file.
|
Some of the fields in authority records can contain terms drawn from recognized standard vocabularies. For example, the authority 374 field (occupation) can contain terms drawn from a large number of controlled lists, such as LCSH or the Dictionary of occupational titles. The toolkit's Verify menu item gives you a way to test many of these fields against a few of these controlling vocabularies. When you select this menu item, the toolkit tests data in certain authority fields against lists of valid terms maintained elsewhere, and presents a report of its findings. At present, the toolkit's verification against external definitions is limited to vocabularies that are defined at the id.loc.gov and id.nlm.nih.gov sites, and are also capable of being searched via URL; these limitations may change in the future.61
The toolkit's verification of the fields in an authority record is controlled by options.
The toolkit takes a greater or lesser amount of time to verify the fields in a record, depending on the response of the underlying web site. The response time achieved by the id.loc.gov site varies widely (two identical requests issued within minutes of each other can require markedly different amounts of time), so there is no rule of thumb that can be used to provide an estimate of the time the toolkit will require to check the fields in a record. (As the toolkit checks each heading, it displays the heading on the main panel's title bar; this gives you some clue that it's not simply stuck.) Because the verification of the fields in a record can often take rather a long time, by default the toolkit only verifies the fields in a record when you select the Verify item from the menu on the toolkit's main panel.62 The toolkit's verification report does not change when you make a change to an authority record; if you wish the toolkit to re-verify an authority record, you must select the Verify menu item. (By way of contrast, the toolkit validates the contents of a record each time you make a change to the record, because the work of validation normally takes less than a second to perform.)
A search for an authorized term at the id.loc.gov and id.nlm.nih.gov sites is, unfortunately, sensitive to case, punctuation (sometimes!) and diacritics.63 This means that a search for an authorized term will typically find a match only if the text in the authority record exactly matches the established form.64 To confuse matters a great deal more, searches for headings that contain certain characters, such as the ampersand, refuse to find the matching heading at id.loc.gov, for reasons that are unknown.65 All of this means that you should not simply assume that the toolkit's "not found" report is accurate; when in doubt, follow through with your own search of the appropriate database.
The toolkit generally makes no attempt to adjust for minor errors present in the fields it verifies; the match is either perfect, or it is non-existent.66 There are of course exceptions to this general rule, to accommodate changes in practice over time.
| For example, given this text in 370 subfield $a: | |
| Dayton, Ohio | |
| The toolkit will search for "Dayton, Ohio" as the authorized term. Not finding any match, the toolkit will next search for this modified version of the text: | |
| Dayton (Ohio) | |
| Finding a match, the toolkit will change the text of the subfield in the 370 field to reflect current practice. |
| For example, given this text in 370 subfield $c: | |
| Vic. | |
| The toolkit will search for "Vic." as the authorized term. Not finding any match, the toolkit will next search for this modified text: | |
| Victoria | |
| Finding a match, the toolkit will change the text of the subfield in the 370 field to use the full name for the place, reflecting current practice. |
The following table shows the details that control the toolkit's verification of fields in an authority record.68 (The toolkit's use of this table is subject to the field-level limitations you define as part of the toolkit's options. You have control over which of the available vocabularies the toolkit will test, and the order in which it will test them. But at present, you have no control over the fine details of the toolkit's verification of fields.) This table, and so the toolkit's handling of fields in the authority record, is liable to be modified as experience is gained in this work. The toolkit's use of this table is explained in the paragraphs that follow the table.
| Tag | Subfields tested | URI possible? | Identifying subfields |
| 111 | c | No | N/A |
| 336 | a | Yes | 01268 |
| 368 | abcd | Yes | stuv01268 |
| 370 | abcefg | Yes | istuv012468 |
| 372 | a | Yes | stuv01268 |
| 373 | a | Yes | stuv01268 |
| 374 | a | Yes | stuv01268 |
| 376 | a | Yes | stuv0268 |
| 376 | b | Yes | stuv01268 |
| 377 | a | Yes | 01268 |
| 380 | a | Yes | 01268 |
| 381 | a | Yes | uv01268 |
| 382 | a | Yes69 | uv01268 |
| 385 | a m | Yes | 012368 |
| 386 | a m | Yes | 012368 |
| 388 | a | Yes | 012368 |
| 4XX | [all] | No | 014568 |
| 5XX | [all] | Yes | 014568 |
The toolkit considers all of these fields except 4XX and 5XX fields as decomposable and combinable.
If you have selected any option to add URIs to variable fields, the toolkit will always decompose all fields that can be decomposed (whether or not it is able to verify anything in those fields), and the toolkit will never combine fields.
When you select the Verify menu item, the toolkit compares the tag of each field in the record against its list of verificable tags. If the tag is defined as verifiable:
If a subfield is subject to verification according to the toolkit's internal definition, the toolkit tests the subfield, as given, against the terms defined for the vocabulary. If the entire subfield is defined in the vocabulary, the toolkit considers the subfield to be valid. If the entire subfield is not defined in the vocabulary:
The toolkit's verification report reflects each subfield that the toolkit checks. (The inclusion of terms in this report is controlled by an option.) For an LCSH subfield that contains double hyphens or full stop/space, the report may also show separate elements from the subfield. If the toolkit is able to determine (to the limits of its ability) that the an entire subfield (or an element from a subfield) is valid, the report shows the text of the subfield (or element) in lowercase; if the toolkit believes that an entire subfield (or element from a subfield) is not valid, the report shows the text of the subfield (or element) in uppercase. The toolkit presents its verification report in the same box as its validation report, at the foot of the authority record. (If you have selected the appropriate option, instead of showing all of the pieces tested, the toolkit's verification report only contains subfields or elements that the toolkit cannot identify as valid.)
| The following illustration shows the toolkit's verification report for a record that contains two verifiable single-element fields: a 372 field and a 374 field. The toolkit was able to determine that one these fields is acceptable (the 372 field contains the valid LCSH term "Computer music") and that the other is not acceptable (the 374 field contains "Computer musicians," a term not defined in LCSH). | |
 |
The verification report continues to show the results of the most recent verification each time you make any change to a record; the toolkit only changes the verification report when you explicitly request a new verification of the record by again selecting the Verify menu item. This means that if you change the text of any of the fields that the toolkit is able to verify, you will probably want to request a new verification report, so that the report accurately reflects the current contents of the record.
If the toolkit finds a match for a term, it may also discover that the form of name in the authority record does not match the preferred name for that entity. In this case, the toolkit will replace the name in the authority record with the preferred name found in the external database; the toolkit will list this change to the authority record as part of its report of other changes made to the record.
| The messages at the bottom of the following illustration show that the toolkit was able to find a match for the term found in 370 $e (Bénin), and that the toolkit replaced that term with the preferred term found in the LC/NACO authority file (Benin, without the accent). | |
 |
If a field contains multiple subfields to test, and if the toolkit is only able to verify some of those subfields, the toolkit creates a new field: one containing the verified subfield(s) (with subfield $2), the other containing the non-verified subfield(s). Conversely, if two fields with the same tag contain verifiable terms from a single vocabulary, the toolkit will combine them into a single field (unless options prevent the toolkit from combining fields.) For example, if a record contains two 372 fields without $2 and if the contents of those fields can be verified against LCSH and if those fields do not contain any other of the identifying subfields, the toolkit will merge those two fields into a single field, and add to that field $2 lcsh. By way of contrast, the toolkit will not tease apart fields that already contain subfield $2 if they contain unverifiable elements, but the verification report will show you the unverified subfields.71
If you have asked the toolkit to add URIs to verified subfields, it will do so. Because subfields $0 and $1 are among the subfields that the toolkit uses to determine whether or not two fields can be merged, selecting the option to add URIs means that each verified element marked containing $0 or $1 must appear in its own field.
| If you ask the toolkit to verify an authority record containing a 370 field like this (both subfields being valid NAF terms): | |
| The toolkit will add subfield $0 to each term, which will result in a separate field for each term, even though they are both NAF terms: | |
The toolkit's determination that the contents of a verified subfield do or do not correspond to the requirements of a particular vocabulary has nothing to do with whether or not the record can be added to the LC/NACO Authority File. Because information stored in these verifiable authority fields is devoid of most content designation, because searches at id.loc.gov may return "not found" even when a matching authority record is present, and because the information provided by a search of id.loc.gov does not contain everything that the toolkit could use to evaluate a string, the toolkit's judgement on a string (both found, and not found) must always be considered imperfect and provisional. If you disagree with the toolkit's judgments you can change the verified fields to match your own view of things, or leave things as they stand. As is always the case with the toolkit, you have the final responsibility for the contents of the records you create and modify.
The following paragraphs give additional information on some of the techniques the toolkit uses to verify headings. Because of the conditions under which it works, the toolkit's verification feature will never be able to evaluate the correctness of string with 100% accuracy; but if you encounter situations in which you think the toolkit's actions, or its report on its actions, could be improved, please let Gary know. The one thing that's certain, is that improvements are possible. Be sure to include the heading or headings of interest in your message.
When the toolkit is able to determine that the content of a subfield is a recognized term in some vocabulary, it is usually able also to determine the identifier that corresponds in that vocabulary to that term.72 If you have selected the appropriate option, and if appropriate information about the construction of the URI is available, the toolkt will convert that identifier into a URI, and add it to the field in an appropriate subfield. (In some cases, the toolkit may add two subfields to the field.)
In addition to adding URIs for "headings", the toolkit may also add URIs to recognized 024 fields, and convert a term used in some instances of subfield $i into a URI in subfield $4.
This feature, added to the toolkit in the first half of 2020, will be the subject of extensive investigation and modification as the practice for using URIs in authority records evolves. Please let Gary know if you have any ideas about how this feature may be expanded, modified or improved.
If you double-click on any line in the toolkit's verification report, the toolkit will give you more information about that line. The detail in the little pop-up message box will include identifiers for the databases searched, the actual heading strings searched, the tags of the source fields, and (if found) any standard identifier extracted from the returned information. You can only see details for one report line at a time.
The following illustrations show typical detail reports produced for the tested strings in an authority record.
 |
|
 |
|
 |
|
 |
|
 |
The little pop-up message window is not able to display all of the diacritics and special characters that may be present in MARC fields, so the toolkit may need to modify display text in this window. However, if the toolkit is able to find a match, it is because the diacritics and special characters in the authority record do indeed exactly match the characters in the corresponding authority record's 1XX field.
| The following illustration shows the verification detail for a place name in Vietnam, reconstructed from two elements in a 372 field. The characters in the authority record include the "u with hook" and "o with hook" characters, which the toolkit has translated into near equivalents for display in this little window. (The toolkit has also omitted the dot under the "o with hook", because this little window can't display that character, either.) You can know that the authority 372 field contains the correct characters, because searches at id.loc.gov only find a match if the diacritics and special characters in the search term agree precisely with the characters in the corresponding authority 1XX field. | |
 |
If a field being verified contains a recognized code in subfield $2, the toolkit will in general test the interesting subfields in that field only against the vocabulary identified in subfield $2. However, if the toolkit's search for the entire heading in the indicated vocabulary doesn't find a match, and if the subfield being tested doesn't contain any double hyphens, and if the indicated vocabulary is either LCSH or NAF, the toolkit silently performs a second search, using the "other" vocabulary. In addition, if you have turned on the appropriate option, the toolkit will extend the search to any other vocabularies you have defined for the field.
If the toolkit does not find a match in the vocabulary identified by the subfield $2 code but it is able to find a match in some other vocabulary, immediately after verification the toolkit will show you a list containing the affected heading or headings and the proposed new subfield $2 code for each. Use this display (as appropriate) to change the subfield $2 codes of the affected fields.
| The following illustration shows this special display immediately after the toolkit has completed its examination of the fields in an authority record, when it has found at least one term in the "wrong" vocabulary. The list identifies each distinct heading whose $2 code can be reassigned. | |
 |
|
| Highlight the lines that represent subfield $2 codes you would like the toolkit to change (by default, all of the lines are highlighted), and click the OK button. Given the above display, the toolkit will change the record as shown in the following illustration. Re-verify the record to get a new verification report. | |
 |
In addition, if any of the toolkit's searches of additional vocabularies finds a match, the line for the heading in the verification report begins with an asterisk. If you double-click on such a line, the toolkit will identify the vocabulary in which it found the term. You can use this information to change the code in subfield $2, or to take any other action that you deem appropriate.
| The following illustration shows the toolkit's verification report after it has completed its examination of the fields in an authority record, when it has found at least one term in the "wrong" vocabulary. One or more lines in the verification report at the bottom of the record display begin with an asterisk. | |
 |
|
| The detailed report for a heading found in the "wrong" file (produced by double-clicking on a line in the report) contains a bold statement to this effect, and identifies the vocabulary in which the toolkit found the term. | |
 |
|
| In this particular case, both of the "park" headings are authorized in LCSH, not NAF. The $2 code is wrong for both of these. |
The toolkit always checks first to see if it can find an authority record for the complete contents of a subfield in a particular vocabulary. If the toolkit cannot verify the entire contents of a subfield, and if the subfield contains at least one set of double hyphens (suggesting the presence of a main heading plus subject subdivisions) and if the field's vocabulary is defined as one that can contain subdivisions,73 the toolkit also attempts to verify the various parts and sub-units of the heading, moving from left to right. The possibility that the string contains an indirect geographic subdivision (involving one or perhaps two consecutive elements preceded by double hyphens) complicates the toolkit's fragmentation of a double-hyphen-containing string into verifiable parts.
| For example, given this subfield in a 372 field (for which no authority record exists as a pre-composed string): | |
| Soil conservation--France--Alsace--Congresses | |
| The toolkit will attempt to verify some or all of the following possible constructions (and perhaps others): | |
| Soil conservation | |
| Soil conservation--France | |
| Soil conservation--Alsace | |
| France | |
| Alsace (France) | |
| Soil conservation--Congresses | |
| In its work, the toolkit should find authority records for each of these units, except for Soil conservation--France and Soil conservation--Alsace. (See below for more information about the toolkit's reconstruction of indirect geographic subdivisions.) |
| The following illustration shows the toolkit's verification report for this heading. The toolkit was able to verify all of the pieces of the subfield, but not the whole thing as a single string. The report doesn't show everything that the toolkit tried, just the parts that the toolkit believes might be of interest. (For example, the report doesn't show the results of the toolkit's unsuccessful test for the strings Soil conservation--France and Soil conservation--Alsace because the toolkit was able to account for the relevant bits in another way.) | |
 |
The toolkit's behavior in this complex operation is influenced by the results of the work as it progresses. (In the preceding example, if the toolkit hadn't found an authority record for Alsace (France), the toolkit would have attempted to verify the string Soil conservation--Alsace--Congresses. Had the toolkit found an authority record for Soil conservation--France, it wouldn't have bothered to search France as a separate entity.) In addition to showing the toolkit's overall evaluation of the complete subfield, the verification report may also include information about various sub-parts of the subfield.
The fact that the toolkit was able to determine that authority records exist for all of the pieces in a multi-element heading is no guarantee that the complete string is valid. For example, the toolkit does not at present have any way to determine that indirect subdivision is allowed under a main topical heading; and the toolkit has no way to know whether a given topical or form subdivision is allowed, or even makes sense, under a particular topical main heading.
LCSH headings (in the 368, 372 and 374 fields, and perhaps others) may contain subdivisions, and some of those subdivisions may be geographic subdivisions. Geographic subdivisions may consist of a single unit (for example, the name of a country or region), or of two adjacent units (most commonly, the name of a country followed by the name of a city; but there are other possibilities). Because the definitions of the authority 368, 372 and similar fields do not support the subfield codes used in similar bibliographic fields (codes that would give the toolkit some notion of how to parse the string), whenever the toolkit cannot find an authority record for a subject string that contains two hyphens, the toolkit must consider the possibility that indirect geographic subdivision is involved. The path the toolkit must follow on its way to a resolution of the matter is occasionally a torturous one. This work is made more complicated by the fact that an LCSH indirect geographic subdivision might (when reconstituted) be validated against either LCSH or NAF.
| There are no LCSH records for the following subfields from 372 fields, as complete strings. When the toolkit encounters strings such as these, it must consider the possibility that indirect subdivision is present. | |
| Theater--Study and teaching--Africa | |
| Because there is no authority record for Theater--Study and teaching, but there is an authority record for the subdivision Study and teaching, the toolkit must consider the possibility that Africa is a geographic name. | |
| Mongols--China--Xinjiang Uygur Zizhiqu | |
| Because there is no authority record for Mongols--China, the toolkit must consider the possibility that China, Xinjiang Uygur Zizhiqu, or Xinjiang Uygur Zizhiqu (China) (and perhaps more than one of these) is a geographic name. | |
| Journalism--Study and teaching (Higher)--Mississippi | |
| Because there is no authority record for Journalism--Study and teaching (Higher), but there is an authority record for the subdivision Study and teaching (Higher), the toolkit must consider the possibility that Mississippi is a geographic name. | |
| Occasional verse--Baltic Sea Region--History | |
| Because there is no authority record for Occasional verse--Baltic Sea Region, but there is an authority record for the subdivision History, the toolkit must consider the possibility that Baltic Sea Region and Baltic Sea are geographic names. The possibility that the final subdivision in this string should be History and criticism is not a matter that the toolkit can, at present, do anything about. | |
| Veterans--Medical care--West Virginia--Beckley | |
| Because there is no authority record for Veterans--Medical care--West Virginia, the toolkit must consider the possibility that West Virginia, Beckley and Beckley (W.Va.) (and perhaps more than one of these) is a geographic name. | |
| Natural resources--Africa, West--Management | |
| Because there is no authority record for the whole subfield, but there is an authority record for Natural resources--Management, the toolkit must consider the possibility that Africa, West is a geographic name. |
Although the reconstruction of a geographic name from its indirect subdivision is in many instances a simple matter, there are many factors that complicate the issue. The following examples do not provide an exhaustive listing of all of the conditions that the toolkit attempts to resolve, but they should provide some indication of the kinds of problems present in the data, and the length to which the toolkit goes to find a matching authority record. If a string represents combinations of these and similar conditions, the toolkit applies various combinations of the reconstruction techniques.
| Name of country, state, etc. (perhaps requiring abbreviation or other modification), plus name of city: | |
| Given: --France--Paris | |
| Tested as: Paris (France) | |
| Given: --Illinois--Chicago | |
| Tested as: Chicago (Ill.) |
| One element contains a parenthetical qualifier (there are many possibilities!): | |
| Given: --Russia (Federation)--Moscow | |
| Tested as: Moscow (Russia) | |
| Given: --Ohio--Lebanon (Township) | |
| Tested as: Lebanon (Township : Ohio), Lebanon (Ohio : Township) and Lebanon (Township, Ohio) | |
| Given: --California--Santa Clara Valley (Santa Clara County) | |
| Tested as: Santa Clara Valley (Santa Clara County : Calif.), Santa Clara Valley (Calif. : Santa Clara County) and Santa Clara Valley (Santa Clara County, Calif.) | |
| Given: --Tunisia--Carthage (Extinct city) | |
| Tested as: Carthage (Extinct city) and not as: Carthage (Tunisia : Extinct city) or Carthage (Extinct city : Tunisia) | |
| Given: --Germany--Wolfenbüttel (Principality) | |
| Tested as: Wolfenbüttel (Principality) and only if not found also tested as: Wolfenbüttel (Principality : Germany) and Wolfenbüttel (Germany : Principality) |
| Headings for regions, watersheds, metropolitan areas, etc. | |
| Given: --Ohio--Dayton Metropolitan Area | |
| Tested as: Dayton Metropolitan Area (Ohio) and Dayton (Ohio) |
The presence or absence of an authority record for the part of a subject string that includes the place name can influence the toolkit's subsequent testing. (This is because, in this case, there is no way for the toolkit to know without doing yet another search that the terminal subdivision in an intermediate established heading string is a place name.)
| The following similar subject strings from 372 fields result in different verification paths (and so different verification reports), because of the authority records that the toolkit encounters in the course of its examination of each heading. | |
| Natural resources--Washington (State)--Management | |
| There is no authority record for the whole string. The toolkit will search for and find the LCSH authority record for Natural resources, and will search for but not find an authority record for Natural resources--Washington (State). The toolkit will try to find an authority record for Washington (State). Finding such a record, the toolkit will then attempt to find an authority record for Natural resources--Management. Finding such a record, the toolkit declares the full string to be valid. In this case, the toolkit does not perform a separate search for Management as a subdivision. | |
| Natural resources--Soviet Union--Management | |
| There is no authority record for the whole string. The toolkit will find the LCSH authority record for Natural resources, and then it will find an authority record for Natural resources--Soviet Union. The toolkit will also look for, and find, an authority record for the subdivision Management. The toolkit declares the full string to be valid. In this case, the toolkit does not perform a search for Natural resources--Management . |
If the toolkit cannot find matches for all parts of a heading, and if the first piece of the heading (which may be the entire subfield) contains at least one full stop plus a space, the toolkit tests for the possibility that the term represents the name of a corporate body plus one or more subordinate units. The toolkit behaves as if each full-stop-plus-space marks the end of one element and the start of the next. The toolkit also behaves in this manner if the candidate term does not contain any full-stop-plus-space, but does contain at least one comma-space.74) This clever yet arbitrary behavior often produces useful results, but does not always find the correct place to divide a string.
| United States. Army. Cavalry Reconnaissance Squadron, Mechanized, 2nd | |
| There is no authority record for the whole string. The toolkit will also search for United States and United States. Army. | |
| Note that this string contains a combination of full-stop-space and comma-space, any of which might serve as dividing points for subordinate units. When a string contains this mixture of punctuation, the toolkit only divides the string at the full stops. | |
| Universidad Nacional Abierta (Venezuela), Vicerrectorado Editorial | |
| There is no authority record for the whole string. The toolkit will also search for Universidad Nacional Abierta (Venezuela). If the toolkit finds a match for this portion of the heading, it will change the text of the subfield to: Universidad Nacional Abierta (Venezuela). Vicerrectorado Editorial | |
| University of Michigan. Business School. Frammis Club--Bibliography | |
| There is no authority record for the whole string, though there is a subdivision record for Bibliography. The toolkit will also search for University of Michigan and University of Michigan. Business School | |
| University of Michigan. W.K. Kellogg Foundation. Graduate and Postgraduate Dentistry | |
| There is no authority record for the whole string. The toolkit will also search for University of Michigan; University of Michigan. W.K. and University of Michigan. W.K. Kellogg Foundation |
These examples show the results of verification as it will behave when the option to combine fields is selected, and when none of the options to generate URIs is selected. (If different options are taken, the toolkit will display fields shown here with multiple subfields, as separate fields, each with its own single subfield; during verification, the toolkit will add subfield $2 to each such separate field, as appropriate.)
| Given the following fields in an authority record: |
| ... during verification the toolkit will change the record in this manner, because it found matches for all of the verifiable fields: |
| Given the following fields in an authority record: |
 |
| ... during verification the toolkit will change the record in the following manner (splitting the 372 field into two pieces), because it found matches for some but not all of the subfields. ("Children's fiction" is a non-preferred term in LCSH.) |
 |
| Given the following fields in an authority record: |
 |
| ... during verification the toolkit will do nothing. Each of the verifiable fields in this group differs from the ostensible preferred term in some matter of punctuation, capitalization, and/or abbreviation for which the toolkit has at present no accommodation. |
| Given the following fields in an authority record: |
 |
| ... during verification the toolkit will change the record in the following manner. The toolkit split the original 370 field into 2 pieces, because it found authorization for the place names in different sources. |
 |
| Given the following fields in an authority record: |
 |
| ... during verification the toolkit will change the record in the following manner, because it found matches for some but not all of the fields. |
 |
| You might notice that toolkit did not find a match for the "New York (New York State)" heading, and you might change the subfield to reflect the form used in the LC/NACO Authority File. If you again select the Verify menu item, the toolkit will notice that the changed subfield now matches an authorized string, and will change the record in the following manner. The toolkit has brought together all of the 370 subfields that it could verify in NAF. There are still two 372 fields, because one of the subfields doesn't contain an LCSH term. |
 |
| Given the following fields in an authority record: |
 |
| ... during verification the toolkit will change the record in the following manner. Not finding a matching authority record for the entire second subfield $a in the 373 field, the toolkit attempted to find an authority record for the "Delphi Automotive Systems" portion, but failed to do so because the name used in the 373 field lacks the parenthetical qualifier present in the NAF record. |
 |
|
The tools on the Texts tab transform a piece of text present in the record on the right side of the toolkit's main panel into something in the authority record on the left side. The main point of this tab is to save you from typing out text that someone has already typed out. (Typing something that's already been typed is a waste of your time, and introduces the possibility of new error.) Many of the authority fields you create via the Texts tab will require further attention, but judicious use of the tools on this tab will in many cases save you unnecessary retyping.
This tab's Add capability is its original and most fully-developed function. This feature uses small bits of text from the record on the right to create new fields in the record on the left. For example, you can use this tab to turn a person's name found in a bibliographic 508 field into a 400 field in the authority record, or to transform part of a bibliographic 264 field into a 370 subfield in the authority record. When you use the controls on this tab in this manner, there need be no correspondence between the tag assigned to the bibliographic field that contains the source text and the tag of the field to be created in the authority record; any piece of text in the window on the Texts tab can be re-purposed for the authority record in any manner that seems appropriate to you.
If you are creating a new authority record from a bibliographic access field, you can initially draw on information from either the original bibliographic record or the proposed new authority record. When you are modifying an existing authority record or working on a new authority record for an identity extracted from an undifferentiated name record, you can initially draw on information only from the authority record itself. Once you've started work on an authority record, you can pull an additional authority or bibliographic record into this tab, and draw information from that record as well. (You can bring as many additional records into the toolkit as you want; but just one at a time.)
Over time, this tab has acquired capabilities beyond the original Add feature. Two of these features involve the transfer of an entire field from one record to another.
The following illustration shows a source bibliographic record displayed on this tab as it would appear when you are creating a new authority record from a bibliographic access field. (This tab has a slightly different appearance when you are modifying an existing authority record, and also when you have brought an additional bibliographic or authority record into the toolkit.) The record display on this tab omits some of the 0XX fields;75 this is because it's unlikely those fields will find any use on this tab, and leaving them out reduces the amount of scrolling you may need to do to get to the useful parts of the record.
 |
The instructions immediately below describe this feature in general terms, and are applicable to most situations. Following sections of this document describe special uses of this feature to create 4XX fields, and to add information to 670 fields and 678 fields. A final section describes considerations that apply to text that contains non-roman characters.
To use a piece of text in the record on the right for some new purpose in the record on the left, proceed from the top of the tab to the bottom.
Example 1. In the following illustration, you have noticed that one of the subject headings in the bibliographic record succinctly describes the field of activity for the organization whose name is being established. You have selected the relevant text, and have selected the "372 Field of activity" radio button.
When you click the "Add 372" button, the toolkit creates a new 372 field, and adds corresponding information to the 670 field.
Example 2. In the following illustration, you have determined that the corporate body is headquartered in Edmonton, Alberta; happily the name of the place appears in the bibliographic record. You have highlighted the relevant text, and have selected the radio button for the location of an organization's headquarters (370 subfield $e)77.
When you click the Add 370 $e button, the toolkit will add a 370 field with $e Edmonton (Alta.) to the authority record, and adds the text as selected to the 670 field. When you create a 370 field from the Texts tab in this manner, the toolkit makes some attempt to generate an appropriate form for the 370 field; but in the 670 field the toolkit uses the text as presented in the bibliographic record.
When you use this tab to extract text from a bibliographic record (for example, when you're creating a new authority record from an access field in a bibliographic record), the toolkit will often add corresponding information to the end of subfield $b in the first 670 field in the authority record. The toolkit cannot predict the source of this information within the item; it assumes everything is on the title page (or credits, etc., depending on the type of material). You may need to adjust the text of the 670 to reflect the true source of the information. (You can use an option to prevent the toolkit from modifying the 670 field in this manner.)
| For example (continuing the preceding illustration), in this case the toolkit will add information for the location of the headquarters to the 670 field, as shown in the following illustration. Because this information may not actually be on the title page, this 670 field may require further work on your part. |
One of the radio buttons on this tab is labeled 4XX. As is the case with the other radio buttons, to use this feature you highlight some text, select a radio button (the 4XX button in this case), then click the Add button. When the 4XX radio button is selected, what happens next depends on the context.
In the following illustration (showing a name/title authority record in progress), you have highlighted the text Shakespeare's tragedy of Antony and Cleopatra in a 670 field of the authority record, and have selected the 4XX radio button. When you click the Add 4XX button, the toolkit will immediately add a 400 field with $a Shakespeare, William, $d 1564-1616. $t Shakespeare's tragedy of Antony and Cleopatra to the authority record.
In the following illustration (for a geographic name authority record), you have highlighted a Cyrillic script version of the name of the city. When you click the Add 4XX button, the toolkit will immediately add a 451 field with this text plus the qualifier (Ohio) to the authority record.
In the following illustration, you have highlighted the text District Council of Streaky Bay in the bibliographic record, and have selected the 4XX radio button.78 When you click the Add 4XX button, the toolkit will not simply add a 410 field with this text to the authority record. There are in fact several possible constructions for 410 fields using this text—alone, and in various combinations with the authority record's 110 field. The toolkit will formulate a number of possibilities, and ask you to make a choice. (This example is continued here.)
When the toolkit offers you a choice of potential 4XX fields, you can select as many of the possibilities as you like, and then click the OK button; or you can click the Cancel button to reject all of them. The following bullet points describe the different things the toolkit might do when requested to generate a 4XX field.
In the following illustration, assume that you selected the text "Jorge G. Castañeda y Alvarez de la Rosa" for use in a 400 field. The toolkit produced a list containing every possible rotation of this text, and also every possible location of an internal comma within the direct-order text. In this illustration, you have clicked on three lines, and the toolkit changed the font property on those three lines to bold to make the situation clear; if you click the OK button, the toolkit will add three 400 fields with the selected texts to the authority record.
The following illustration continues an earlier example, showing the highlighted text District Council of Streaky Bay. The toolkit formulates various combinations of the text plus information from the 110 field from the authority record on the left, and presents you with the possibilities. Click once to select a line; click on a highlighted line to un-select it; you can select as many lines as you like. In this illustration, you have clicked on the second proposed 410 field, and the toolkit has changed the font property on that line to bold to make the choice clear. When you click the OK button, the toolkit will add one 410 field to the authority record.
In certain cases, the toolkit completes the 4XX fields with information from the 1XX field. The scheme that the toolkit uses to do this work is identical with the scheme the toolkit uses when you check the Propagate check box while editing the authority record's 1XX field.
You may assume that the toolkit will learn additional tricks as experience is gained with the 4XX radio button. When you use this feature to create a 4XX field and the toolkit doesn't behave exactly as you'd like, send Gary the details.
One of the radio buttons on the Texts tab is labeled 5XX. As is the case with the other radio buttons, to use this feature you highlight some text and select the radio button, then click the Add button. (If you wish to re-purpose an entire access field on a bibliographic or authority record as a 5XX field, click anywhere in the field, select the 5XX radio button, and click the Move as button instead.)
Getting from the selected text to a finished 5XX field requires a couple of steps. This is primarily because there is no way for the toolkit to know what tag to use for the new 5XX field. And, if the tag is to be 500, the toolkit has no way to know what the entry element for the name should be. The toolkit first shows you a panel that allows you to select the tag, and the proper form of name to use in the new 5XX field. You can also select a text for subfield $i of the new 5XX field. After you supply this information, the toolkit presents the 5XX field in its field-editing panel, so you can make additional adjustments to it. If you select OK from the field-editing panel, the toolkit adds the finished 5XX field to your authority record.
| In the following example, you have selected the text Wilmot Spencer in the 245 field, and you have selected the 5XX radio button. | |
 |
|
| When you click the Add 5?? button, the toolkit presents you with the following panel to gather more information. Here, you have selected the tag 500, the subfield $i text Real identity, and Spencer, Wilmot for the text of the field. | |
 |
|
| When you click the OK button on this panel, the toolkit presents your field on its field-editing panel. You can make whatever additional changes you wish to make to the text of the field, the tag, and/or the indicators. | |
 |
|
| When you click the OK button on the field-editing panel, the toolkit adds your field to the authority record. | |
 |
Three of the radio buttons on the Texts tab help you add information to 670 fields in the authority record.
(The Create 670 OCLC item on the Edit menu is another way to begin a 670 field describing information found in the OCLC database.)
The usage and hdg radio buttons
The following illustrations and accompanying text show the application of the usage and hdg radio buttons. These buttons only apply to a 670 field that summarizes information gleaned from the OCLC database.
| Assume that you wish to create a 670 field that summarizes information gleaned from records in the OCLC database. You have decided to start by recording the person's usage in this bibliographic record, by selecting text in the statement of responsibility, and selecting the usage radio button. |
 |
| When you click the Add 'usage' button, the toolkit inspects the authority record. In this case, because the authority record does not already contain a 670 field citing the OCLC database, the toolkit adds a new 670 field. (Had the authority record already contained such a 670 field, the toolkit would have added to any existing 'usage' clause, or would have created one.) So far, subfield $b in the new 670 field contains only the usage information you provided in this transaction. |
| Continuing with the same bibliographic record, you have in the next illustration highlighted the relevant part of an access point, and have selected the hdg. radio button. |
 |
| When you click the Add 'hdg.' button, the toolkit inspects the authority record. In this case, the toolkit finds that the record already contains a 670 field citing the OCLC database, and that this 670 field does not already contain information about access points. The toolkit adds a new clause to the authority record, identifying the access point. (Had the 670 field already contained a recognizable clause citing access points, the toolkit would instead have added this access point to the existing clause.) |
| You can use the toolkit's suspend/resume capability to bring another bibliographic record into the toolkit, and enhance the OCLC database citation with additional usages and access points. |
Because there are (unfortunately) no firm rules governing the construction of 670 fields, the toolkit will not always be able to identify an existing 670 field that cites the OCLC database; in this case, the toolkit will create a new 670 field. If the toolkit can find an existing 670 for the OCLC database, it may not be able to recognize that it already contains access point or usage information; in this case, the toolkit will add a new clause to the existing 670 field. All this means that after the toolkit has done what it can with the information you provide, you may have to perform some tidying-up on the resulting 670 field.
The New and Add buttons have special behaviors when you select the 670 $b radio button.
New button: When you select the 670 $b radio button, and when you have also clicked on a 670 field in the authority record on the left, the toolkit makes the New 670 $b() button available. If you click this button, the toolkit will put the highlighted text into a new set of parentheses at the end of the selected 670 field, and offer the modified field to you in the field change panel. At the least, you will probably want to insert some relevant phrase (such as "added title page" or "brochure") before the new parenthetical expression to indicate where the information comes from.
| In the following illustration, you have clicked on the 670 field in the record on the left, highlighted some text, and selected the 670 $b radio button. The toolkit makes the New 670 $b() button available. |
 |
| When you click the New 670 $b() button, the toolkit adds the selected text, within parentheses, to the end of the 670 field, and makes the field available for additional changes. |
 |
| You should add some explanatory text in front of the new parentheses, to indicate where in the item this information appears. Other changes may also be appropriate. |
Add button: When you select the 670 $b radio button, the toolkit makes the Add 670 $b button available. If you click this button, the toolkit adds the highlighted text to the end of the last parenthesized expression in subfield $b of the first 670 field in the authority record. If this 670 field does not contain subfield $b already, the toolkit will add the subfield. The toolkit does not present the modified 670 field for editing, but you can if you wish edit the field in the usual manner.
Use the radio button labeled 678 on the Texts tab to re-purpose text for use in in a 678 field. If the record already contains a 678 field, the toolkit appends the new text to the end of that field; if the record does not contain a 678 field, the toolkit creates a new one. In either case, you will need to edit the resulting 678 field to integrate the text properly.
| In the following illustration, you have selected an important piece of information from the text of one of the authority record's 670 fields, and have clicked the 678 radio button. Because this authority record already contains a 678 field, when you click the Add to 678 button the toolkit will append the selected text to the 678 field. After possibly adding other pieces of text to the 678 field, you will then need to edit the 678 field (using the field change panel) to produce a biographical note that's clear and succinct. |
 |
The toolkit uses a standard device to display MARC authority and bibliographic records; this device is able to display most of the Unicode character set. To achieve a correct display of many characters (including non-Latin characters) the toolkit has to translate some native MARC characters from one representation to another; this shift is a simple mechanical process that can be performed and reversed without loss. There is, however, one point at which the difference in representation techniques breaks down; this is only a problem with certain scripts, and then only on some workstations. (The cause of this problem is unknown. Perhaps the problem has its origin in certain versions of Windows, or certain versions of the font file.) It appears that this problem is only important if you select non-Latin characters for re-use in the authority record; and then, only certain scripts are affected.
This section concludes with a long and boring description that may contain more information than you want to bother with, so here's a somewhat shorter description of what you really need to know: When you ask the toolkit to make a secondary use of non-Latin data, one of four things will happen:
In the following illustration, you have just asked the toolkit to build a 400 field from the selected text. In this case, the resulting 400 field is correct.
In the following illustration, you highlighted some text in subfield $c of the 880 field linked to the 245 field (your selected text is unfortunately not visible in this illustration), and clicked the 4XX radio button to tell the toolkit how to use the selected text in the authority record. When you clicked the Add 4XX button, the toolkit recognized that the selected data presents a character-translation problem. The toolkit has isolated 880 subfield $c (paralleling 245 $c) from the MARC record that underlies the display on the Texts tab, and has presented a panel containing each space-delimited word from that subfield on a separate line. You have clicked on the two lines that represent the text of interest, and the toolkit has responded by showing those lines in bold. When you click the OK button, the toolkit will re-assemble the text (removing the terminal comma in the process), and will use that text in the next step. (In this case, because you clicked the 4XX radio button, the toolkit will use the text in its standard routine for generating candidate 4XX fields; because this authority record is for a personal name, the next thing you will see is a list of candidate 4XX fields from which you may choose one or more.)
The addition of this technique to the toolkit in mid-September, 2015 may mean that you never encounter either of the two remaining possibilities, described just below.
Please let Gary know if you have any thoughts about how this feature of the toolkit could be improved to make this task better or simpler.
In the following illustration, you have just asked the toolkit to make a 400 field from the selected text. In this case, the resulting 400 field contains nonsense characters instead of the expected non-Latin characters. You need to select the Edit/Undo menu item to remove the 400 field; this 400 field will have to be created in OCLC instead of within this toolkit.
A more detailed discussion of the situation follows. Skip this if you want to.
The toolkit sends to the display device a formatted version of the MARC record79, with diacritics, special characters, and non-Latin data translated into a notation that is parallel to the Unicode designations for those characters: namely, a base-10 equivalent for the hexadecimal UTF-16 character designations. The display device understands this representation of special characters, and knows how to present the characters correctly.
| For example, the UTF-16 designation for the acute accent is U+0301. The base-10 equivalent of the hexadecimal value 0301 is 769; the representation of the acute accent that the toolkit sends to the display device is "\u769?", and the display device knows what to do with that representation. If you select this character, the display device tells the toolkit that the selected character is "\u769?", and the toolkit translates this back into the representation of the character used in a MARC record.80 |
A difficulty arises because for some characters, at least on some workstations, the string containing the selected text that is returned by the display device employs a different scheme to report certain characters than was used in the string that the toolkit sent to the display device.
For example, the UTF-16 representation of a certain Hangul character is U+D5D5. The base-10 equivalent of hexadecimal D5D5 is 54741, so the representation of this character that the toolkit sends to the display device is "\u54741?". The display device understands this code, and shows the correct character. However, if you select a string containing this character, the display device tells the toolkit that the selected character as "\'c2".
When this unfortunate event occurs, there is an additional clue in the data returned by the display device: this is a "character set" number. (The expression "\'c2" can mean different things, relative to the character set number.) The toolkit has been taught about some of these alternate character sets, but not all of them.
Note that this problem does not apply to non-Latin data present in a new authority record, or an authority record being updated, as long as the text arrives in the initial record. This problem should also not occur in non-Latin data placed by the toolkit into a field created from information that the toolkit pulled from the internet. If the data displayed in the record on the left side of the main panel is correct, it is safe, and it will stay safe. The problem only occurs (when it occurs at all) when the toolkit moves data from the display on the right to the authority record on the left.
| The non-Latin characters in the 400 and 670 fields of the following authority record will be represented correctly in the finished authority record. |
 |
|
The authority toolkit has two features that involve transferring an entire field from the record on the right to the record on the left. These features are activated via two buttons on the Texts tab whose captions begin Move plus something more. These features are produce markedly different results, and are only available in appropriate contexts.
|
There are cases in which you will want to move an entire field from a record displayed on the right side of the toolkit's panel, to the record on the left side. The record on the right side can be the bibliographic record serving as the basis of a new authority record; or it can be an additional bibliographic or authority record brought in via the toolkit's suspend/resume feature or retrieved from the id.loc.gov site. One of the buttons on the Texts tab has as its caption the word Move plus a tag. This button does exactly this: it moves an entire field from the record on the right to the record on the left, preserving the field's tag in the process. The behavior of this button varies a bit, depending on whether the record displayed on the right side is an authority record or a bibliographic record.
If you wish to move a field from the record on the right to the record on the left while preserving the field's tag, click anywhere on the field. (You don't need to select a block of text; just click on the field.) If you click on a field that the toolkit will allow you to move, the toolkit will make the Move button available at the bottom of this tab, and will change the caption on that button to show the MARC tag. Click this Move <tag> button, and the toolkit will copy an entire field from the record on the right to the authority record on the left.
| In the following illustration, you have clicked on the 383 field in the bibliographic record on the right. (The 383 field is defined in both the authority and bibliographic formats.) The toolkit responded to this click by making the Move button available, and by changing the button's caption to match the selected field's tag: Move 383. (The tag on the Add button still reflects the selected radio button, as it should, because you have also selected the 034 radio button.) When you click the Move 383 button, the toolkit will transfer the entire bibliographic 383 field into the authority record. |
 |
If you ask the toolkit to move the 1XX field from the authority record on the right to the authority record on the left, the toolkit will change the tag of the field from 1XX to 5XX. (The toolkit transfers 4XX and 5XX fields from one authority record to another without changing the tag.) If you use this toolkit feature to transfer a 1XX field into a new 5XX field, or to move an authority 5XX field (when the original 5XX field does not already contain subfield $i), it's likely that you will want to supply some text for subfield $i. In these cases, the toolkit will present a small window containing the same values for subfield $i as are contained in the list on the Choices tab. You can select the subfield $i text you want from this list, and it'll appear in the new 5XX field. The toolkit will automatically add the appropriate subfield $w for you.
| The following illustration shows the small dialog window that the toolkit presents when you transfer the 1XX field, or a 5XX field that does not already contain $i, from an "additional" authority record into the authority record on the left. Select the appropriate $i text and click the OK button, or click the No $i button to transfer the field with no subfield $i. | |
|
If you don't use this small dialog box to add subfield $i to a new 5XX field, you will often want next to switch to the Choices tab, click on the new 5XX field, and add subfield $i to the new 5XX field.
When moving a field from a bibliographic record on the right to the authority record on the left, a few cautions apply.
These errors, and others like them, will be reported by the toolkit's validation module, but careful use of this feature will prevent most of them.
|
When the Texts tab displays an 'alternate' record, and when that alternate record is an authority record,82 the toolkit makes available a button whose caption begins Move as plus a tag (and perhaps also a subfield code). This button moves the authority 1XX field from the record on the right into a different field in the record on the left. For example, you can use this feature to turn the 110 field in the authority record on the right into subfield $a in a 373 field in the authority record on the left. (This largely duplicates the effect produced by selecting the entire text of the 1XX field, and then using the Add button; but it's faster, because you don't need to select text.)
The toolkit makes this button available whenever the alternate authority record is an authority record. The toolkit changes the caption of the Move 1XX as button to correspond to the radio button selected. When you click the Move 1XX as button, the toolkit extracts the 1XX field from the authority record on the right. Except as noted below [move as 4XX], the toolkit removes any internal subfield codes from the field, and adds a new field to the record on the left, using the tag (and subfield code, as appropriate) corresponding to the radio button you selected.
| In the following illustration, you are modifying an existing authority record. You suspended work on this record, called up the LC/NACO authority record for People's Computer Company, and then resumed work on the authority record. You have clicked on the 110 field in the record on the right, and have selected the 373 radio button. The toolkit responded by changing the caption on the central button of the Texts tab to Move as 373. If you click this button, the toolkit will add a 373 field with the text People's Computer Company in subfield $a to the record on the left. Because the record on the right is an LC/NACO record and because the 373 field includes a definition for subfield $2, the finished 373 field will contain $2 naf. |
 |
There is one exception to this general procedure. If you have selected the 4XX radio button, the toolkit combines all or part of the 1XX field from the record on the right with all or part of the 1XX field from the record on the left to produce a new 4XX field. In this work, the toolkit uses exactly the same logic as it uses when you use a menu item to create a 4XX field. Because the toolkit uses the same code block for both operations, the results should be exactly the same either way. If the toolkit does not have a defined scenario for combining the two 1XX fields into a new 4XX field, the toolkit simply copies the 1XX field from the alternate record as a 4XX in the record on the left.
| In the following illustration, you are creating a new series authority record. You suspended work on this record, called up the LC/NACO authority record for Suomen Maantieteellinen Seura, and then resumed work on the authority record. You have clicked on the 110 field in the record on the right, and have selected the 4XX radio button. The toolkit responded by changing the caption on the central button of the Texts tab to Move as 410. If you click this button, the toolkit will add a 410 field with the text $a Suomen Maantieteellinen Seura. $t Fennia to the record on the left. |
 |
|
In some circumstances, you may wish to create an authority 4XX or 5XX field from a bibliographic 1XX or 7XX field. For example, you may have brought into the toolkit a additional bibliographic record containing an access field with an alternate name for the entity represented by the authority record on the left side of the toolkit's display. Or, you may be creating an authority record for a work from a bibliographic access field, and a different field in the same bibliographic record identifies a related entity; in this case, you may wish to add a 5XX field for the related entity to the authority record.
Click anywhere in the bibliographic 1XX or 7XX field you wish to re-use in the authority record. Select either the 4XX or the 5XX radio button, and then click the Move as ... button. The toolkit adds a 4XX or 5XX field to the authority record, adjusting the bibliographic indicators as necessary to fit the model used for authority records. The toolkit omits bibliogrpahic subfields (such as X00 subfield $e) that don't belong in the authority record.
Note the following about subfield $i in the new 5XX field:
The following illustrations show how this all works.
| Example 1. You have clicked somewhere within the 7XX field (you don't need to highlight a block of text), and have selected the 4XX radio button. When you click the Move as 4XX button, the toolkit will create an authority 400 field with the same text as the bibliographic 7XX field, in this case minus subfield $4. | |
 |
|
| Example 2. You are modifying the authority record for a musical composition. The bibliographic record contains a 700 field citing the work on which this work was based; you wish to preserve this information as a 5XX field in the authority record. When you click on the 700 field, the toolkit makes the 5XX radio button available, and you select this radio button. | |
 |
|
| When you click the Move as 5XX button, the toolkit uses the bibliographic 700 field to create an authority 500 field. In this case, the toolkit supplied subfield $w because the bibliographic 700 field contains subfield $i.83 | |
 |
|
You can add a new field to the authority record by selecting Edit and then Add new from the toolkit's menu. You can also create a new field from the Texts tab, if the tag of the new field corresponds to one of the radio buttons on this tab. Select the radio button that corresponds to the tag (and subfield code, where applicable) for the field you want to create, then click the New button. (The toolkit changes the caption on this button to correspond to the radio button you select.) The toolkit populates its field-adding panel with tag, indicators and first subfield code, and presents that form to you.
Change the indicators as necessary, and supply the complete text for the new variable field. When the field is just the way you want it, click the OK button; the toolkit adds the new field to the main authority record. (Click the Cancel button to discard the field.)
| In the following illustration, you have clicked the 373 radio button. The toolkit responded to this click by changing the caption on the New button to New 373. |
 |
| When you click the New 373 button, the toolkit presents its field-editing panel, primed for the text of the new 373 field. |
 |
| You should either complete the field as appropriate, and then click the OK button to add the field to the authority record; or click the Cancel button to abandon the field. |
This method for creating new fields may have a small advantage (over the Edit/Add new menu item) for those who are new to authority records in the MARC format, or who use certain fields only rarely: the text that accompanies each radio button on the Texts tab helps remind the user which tag contains which bit of information.
When you use the Texts tab to add a field, the toolkit will occasionally give you more than you asked for. As is often the case, the toolkit's behavior depends on the context.
In the following illustration, you are modifying the authority record for Schubert's Die Winterreise. You have highlighted the thematic index number "D. 911" in a 670 field, and have selected the 383 radio button.85 When you click the Add 383 button, the toolkit will compare the selected text against the recognized thematic index designations for Schubert. In this case, the toolkit will discover that D. is a recognized designation for a Schubert-related thematic index, and that the full designation for this index is Deutsch. The toolkit will add a 383 field with $c D. 911 $d Deutsch $2 mlati to the authority record.
In the following illustration, you have selected the text Electronic music in a 650 field with second indicator 0, and you have selected the 372 radio button. When you click the Add 372 button, the toolkit will add a 372 field with $a Electronic music $2 lcsh to the authority record.
In the following illustration, you have selected the text California in subfield $z of a 650 field with second indicator 0, and you have selected the 370 $e radio button. When you click the Add 370 $e button, the toolkit will add a 370 field with $e California to the authority record, but the 370 field will not contain subfield $2. If you Verify this record, the toolkit will automatically add the appropriate subfield $2 code.
Let Gary know if you think of additional similar automatic changes that the toolkit can make when you use the Texts tab to add information to the authority record.
|
Use the tools on the Choices tab to add information that comes from closed lists. (For example, there's a tool on this tab to add RDA content types to an authority record. The list of RDA content types is closed; you aren't supposed to define your own.) You choose an item from a list, and the toolkit adds it to the authority record for you. Some of the values in the lists on this tab are drawn from the toolkit's configuration files, and some are hard-coded within the toolkit.87
Where appropriate, the toolkit will automatically add subfield $2 to variable fields you create from this tab.
If you have selected the option to add URIs, some of the fields you create from this tab will also include subfield $0.
The following illustration shows the work areas on the Choices tab. There is a drop-down list on this tab for each controlled vocabulary from which you can draw terms to add to an authority record.
 |
Each of the drop-down lists is accompanied by one or more Add buttons. If there is more than one Add button for a list, you can use the items in the associated list in more than one way.
To add information from one of these lists to the authority record, select the value from a list, then click the corresponding Add button. The toolkit will automatically add any corresponding subfield $2 code.
| In the following illustration, you have selected the term Ukraine -- e-un--- from the 043/370 list. When you click the Add 370 $c button, the toolkit will add a 370 field containing $c Ukraine to the authority record. (Select Verify from the menu to add a URL and/or URI to the field.) |
 |
There are a few important things to note about this tab:
In the following illustration, you have typed the text kalimba ensemble into the box for the 382 field. When you click the Add 382 $a or Add 382 $b button, the toolkit will add to the authority record a 382 field with the text kalimba ensemble, but the toolkit will not add $2 lcmpt.
In the following illustration, you have clicked on the word "Rovaniemi" in 370 $e on the left, and have selected "Finland" on the right. The toolkit changed the caption of the Add to ... button to match the clicked-on subfield.
When you click the Add to 370 $e button, the toolkit adds the country name in parentheses to the selected subfield:
The Assist tab helps you build fields that present particular problems. At present, the tab offers assistance with the following fields:
At the top of the Assist tab is a frame whose contents control the behavior of this tab. The toolkit initially sets the values in this frame to match the selections on the Options panel, but you can adjust them at run-time as necessary. Manipulating the values on this tab does not change the default values themselves.
 |
|
The toolkit presents the 046 work area when you select the 046 radio button in the box at the top of this tab. Use this work area to build a date for the authority 046 field (special coded dates). This work area is designed to produce dates that embody most of the commonly-used features of the Extended date-time format (EDTF) scheme, without requiring that you actually know how to construct an EDTF date. (This toolkit does not at present know how to formulate some exotic and rarely-needed kinds of EDTF dates, such as multiple dates.) You can also use this work area to create an 046 field containing dates expressed as centuries, although century dates are, inexplicably, not part of the EDTF scheme. (Century dates are part of the ISO-8601 standard that underlies the EDTF scheme.)
The following illustration shows the 046 work area.
 |
If you're interested in the $f Birth, calculated radio button, see the special instructions.
Most of the time, you'll use the various controls on this form to construct a date, and proceed from the top of the tab to the bottom. The Scan the 670s button is an exception to the general method.
In most uses of this work area, you'll start at the top of the panel and work your way to the bottom.
When everything on this tab is set to your liking, click the Add date button. The toolkit formulates the date and adds it to the authority record. (The toolkit will either add the new date to an existing 046 field or create a new 046 field, depending on its view of the conditions presented by the record.) If the date satisfies the EDTF scheme, the toolkit adds $2 edtf to the 046 field.
| Example 1. You have selected the $f Birth radio button, supplied the year 1952, selected the month October and the day 8. You have not checked any of the Uncertain or Approximate boxes. When you click the Add date button, the toolkit will add an 046 field to the authority record with the text $f 1952-10-08 $2 edtf. |
 |
| Example 2. You have selected the $g Death radio button, supplied the year 1811 and checked the Uncertain box for the year. You have selected the month March; you have not checked either the Uncertain or Approximate box in the Month/Season frame. Day of the month is set to NONE. When you click the Add date button, the toolkit will add an 046 field to the authority record with the text $g 1811?-03 $2 edtf. |
 |
If you want to clear the tab and start over, click the Reset button. (When you click the Add date button, the toolkit automatically resets the tab for you.)
|
Level 2 of ISO8601-2019 (same in the EDTF standard) defines a type of date called one of a set. This kind of date consists of two (or more) dates separated by commas, the whole enclosed within square brackets. This type of date is used when there is more than one possibility for a date, and the selection of one date as the correct date cannot be made based on the available evidence. This condition commonly arises for persons whose birth or death date is given only as a year in a calendar other than the Julian calendar (such as the Islamic or Jewish calendar). (Because the years in non-Julian calendars are not co-extensive with years in the Julian calendar, it is usually not possible to determine which of the possibilities is the correct year.) This condition may also arise in other contexts.
One-of-a-set dates may include a two-dot notation to indicate that all of the dates between two indicated dates are included in the choice list. The tools on the toolkit's 046 tab support all aspects of one-of-a-set dates, except for the two-dot notation. If your 046 field requires one of these features, you will need to modify the 046 field created by the toolkit.
Follow these steps to create an 046 subfield containing a set of dates:
As an example, take the following steps to create the 046 field for a person known to have been born in either 1945 or 1946.
Repeat these steps if the set of possibilities contains more than two dates.
Each of the dates in the set can contain any allowed combination of year, month, day or season; and any portion of any of the dates can have associated Uncertain or Approximate attributes.
If you create a one-of-a-set death date, and if you also check the Add death date to 100 $d check-box, the toolkit will use as the death date the two years in the finished 046 subfield $g, separated by "or".
|
Level 0 of ISO8601-2019 (same in the EDTF standard) defines a type of date called an interval. This kind of date defines a period of time during which an event occurred; a more precise date is not possible. (This is different from one-of-a-set dates, which represent a choice of discrete possibilities.) An interval is expressed as two dates, separated by a forward slash. The first date specifies the start of the interval, the second the end of the interval.
Level 1 of ISO8601-2019 (same in the EDTF standard) defines an extended interval, in which the beginning or ending date may be replaced by two dots, or omitted entirely. Level 1 also defines the use of markers to identify uncertain and approximate dates, as long as the markers apply to the entire date. Level 2 of ISO8601-2019 (same in the EDTF standard) defines a further refinement for intervals, allowing markers for undertain and/or approximate on individual parts of a date.
The tools on the toolkit's 046 tab support all aspects of Level 1 and Level 2 interval dates, except for the two-dot notation, and empty beginning or ending dates. If your 046 field requires one of these features, you will need to modify the 046 field created by the toolkit.
Follow these steps to create an 046 subfield containing an interval:
As an example, take the following steps to create the 046 field for a person known to have died at some time between February 1, 2004 and the end of 2005.
Either of the dates in the interval can contain any allowed combination of year, month, day or season; and any portion of either of the dates can have associated Uncertain or Approximate attributes.
|
When you are working with an authority record for a personal name and you select the $g Death radio button on the 046 tab, the toolkit makes the Add death date to 100 $d check box available, as well as two subsidiary check boxes: Create 4XX and Suppress93. If you check the Add death date to 100 $d box and then click the Add date button, and if the available data passes all of these tests:
... the toolkit makes these additional changes:
For example, given this authority record:
... and this configuration on the 046 tab (note the checkmarks in the Add death date to 100 $d, Create 4XX and Suppress boxes):
... when you click the Add date button the toolkit will change the record so that it looks like this:
The Add death date item on the toolkit's Edit menu is another way to make similar changes to the 100 field.
|
In some cases you will not be able to find a clear statement giving the date of a person's birth, but you will have other information that can produce at least an approximate date of birth for use in 046 subfield $f. Two pieces of information are needed to calculate the approximate birth year: a statement of the person's age at a particular moment, and the date of that moment. Most frequently, this information is found in an obituary or other post-death writing (for example: a person was so many years old on a specified date of death), but the same calculation can also be based on a statement giving the person's age at the time of any other event (for example: date of retirement, the date of an interview, the date of enlistment in a branch of military service). The critical pieces of information are a date, and the person's age as of that date.94
| Date of death in the following 670 field: 2015-11-29; age at death: 70. Information derived from this 670 field can be used with this feature. | |
 |
|
| Date of report in the following 670 field: 2015-04; age at time of report: 66. Information derived from this 670 field can be used with this feature. | |
 |
|
| Age at time of joining the regular army given in the following 670 field: 18; date of joining the army not given. This 670 field does not provide information that can be used with this feature. | |
 |
Although the actual calculation of an approximate birthdate from a date and an age is simple enough, this feature must be used with a great deal of caution. The accuracy of this work is utterly dependent on the quality of the data taken from the source.95 This calculated date, which is no more than a best guess, should not be used in access fields.96
The toolkit's calculated birth date is almost always expressed as an one of a set expression97, but if information in sufficient detail is available, it will be a single date.
This tool is not able to calculate early dates. You cannot use this tool if the date of the report is earlier than 200 A.D.
To calculate an approximate date of birth from a known age and date, select the $f Birth, calculated radio button. The toolkit changes the bottom part of the work area to match this selection. (Clicking any other radio button restores the tab to its normal appearance.)
| This is what the bottom part of the tab looks like when you select the $f Birth, calculated radio button: | |
 |
Select the radio button that corresponds to the kind of information you have: age at the time of death, or age at the time of some other event. (Other parts of this frame change a bit, depending on the radio button selection.)
Supply the date of death or other event, and the age at the time of the event, in the corresponding boxes. Give the date and age in one of the specified formats, using only numerals and hyphens. (Leading zeroes are required for early years, but are not required for the month and day portions of dates.)
| For example, supply this information for a person who died on February 25, 2016 at the age of 84 (the leading zero in "02" is not required): | |
 |
If you have the age at time of death, the toolkit makes available a check-box with the caption "Include 046 $g"; if you check this box, the toolkit will include subfield $g for the date of death in its 046 field.
After you supply the required information, the toolkit makes the Calculate button available. Click this button to tell the toolkit to generate 046 subfield $f from the data provided. If the toolkit accepts your data as valid, it will display the suggested 046 subfield $f text in the frame at the bottom of the tab, and will make the Use this date button available.
| This illustration shows the 046 subfields $f and $g generated from the supplied data: | |
 |
Click the Use this date button to add the calculated 046 subfield(s) to the authority record. Because the toolkit generates valid EDTF dates, the toolkit will supply subfield $2. The toolkit will add this information to an existing 046 field with $2 edtf if that field does not already exist; if no existing 046 field contains $2 edtf, the toolkit will create a new 046 field.
| Here is an authority record, with an 046 field built from data in its second 670 field. | |
 |
|
The work described in this section applies only to:
For a carefully-defined set of authority records, the toolkit is able to scan the 670 fields for detailed date information. For personal names, this means birth and death dates. For conference names, this means the opening and closing dates. The toolkit performs this work for appropriate authority records when you first bring a record into the toolkit. If, in your work with the 670 fields in a record, you make changes to the 670 fields that should be reflected in the 046 field, you can use the Scan the 670s button to pull the date information out of the 670 fields into the 046 field.
All you have to do, once the 670 fields are in order, is click the Scan the 670s button on the 046 tab. If the toolkit is able to find useful information in the record, it will either replace an existing 046 field, or add a second 046 field. (The behavior depends on the content of any existing 046 field.) If the toolkit is not able to find useful information in the record, it will show you a brief explanatory message.98
| Here is a typical preliminary new authority record for a conference, created from an access field in a bibliographic record. At this point, the 046 field supplied by the toolkit is simply a copy of the year in 111 subfield $d. | |
 |
|
| In the next illustration, you have modified the 670 field to show the full dates for the conference. | |
 |
|
| When you click the Scan the 670s button, the toolkit looks for fuller dates in the 670 fields. In this case, the toolkit is able to find satisfactory information, and changes the 046 field to match the information in the 670 field. | |
 |
Use the 371 feature on the Assist tab to build a 371 field (address). Unlike the 046 feature on this same tab, which builds a field one subfield at a time, the 371 feature constructs an entire field at one stroke.
The toolkit provides work areas for each subfield in the 371 field. You must provide a value for at least one of the data subfields ($a, $b, $c, $d, $e, $m); you may optionally include values for the remaining subfields ($s, $t, $v, $z, $4).
The toolkit presents a work area for each principal subfield in the 371 field. In general, the subfields are in alphabetical order by subfield code; however, the toolkit presents the work area for subfield $d (country) as the first work area, because the selection of the country affects some of the other work areas. You should always choose the country first, and then provide values for the remaining work areas.
| The following illustration shows a typical presentation by the toolkit of the work areas for the 371 field. | |
 |
Most of the work areas are simple text boxes: to create a subfield in your 371 field, you simply type your text into the appropriate box. If a work area is not applicable to your address, leave it blank.
Two of the work areas contain drop-down boxes.
Following the work area for subfield $z is a drop-down list containing standard diacritics and special characters. To add a diacritic or special character to the text in a text box, place the cursor in the text box at the proper place, select the name of the characater from the drop-down list, and click the Insert button. This is identical with a similar feature on the toolkit's field-editing panel.
|
Use the tools on the Web tab when you have found a web resource containing information that you wish to include in the authority record. The toolkit offers substantial assistance for resources known to be of particular use when constructing authority records, and which make information available in a structured manner that the toolkit has been taught to understand. (The toolkit offers a small amount of help for web resources other than those listed below.)
Here are the web resources that the toolkit knows about in detail:
The methods that web resources use to deliver information are constantly changing. It's entirely possible that a conversion for one of these resources that worked perfectly well one day won't work at all the next day. When this happens, be sure to let Gary know.
Note: If you commonly use some other web resource in your authority work, let Gary know; he may be able to add more web resources to this tab.99
The following illustration shows the Web tab. The features presented on this tab vary with the web resources selected in the drop-down list at the top of the tab. The default values for each resource are controlled by options.
 |
Using information from an external resource involves these steps, once you have identified information in an external resource that you want to apply to the authority record on which you're working:
The toolkit's schemes for using information retrieved from Web resources is not at present open to local change, because they have to be written directly into the toolkit's program code. (However, suggestions for changes to these schemes are welcome.)
If the toolkit extracts any data from the record for some secondary use (046 field, 370 field, etc.), and if you have asked the toolkit to do so, the toolkit shows you this information in a special display. You manipulate this display to tell the toolkit which fields to add to your authority record. It is normally the case that secondary fields (046, 370, etc.) added to an authority record based on information extracted from a web site will require some degree of adjustment before the record can be considered acceptable; but at least you've been saved a lot of tedious copy-and-paste operations, or (even worse) typing.
If you have asked the toolkit to do so, it adds a 670 field to your authority record describing the web resource.
| The following illustration shows a 670 field constructed from information provided by GeoNames. Because the data includes the coordinates for the place, the toolkit could also suggest an 034 field to add to the main record. If the name or alternate name elements in this field do not replicate information already present in the 151 and 451 fields of the authority record, the toolkit could also suggest one or more 451 fields. The toolkit's handling of the information pulled from a web service is under your complete control. The toolkit's 670 field always represents all of the information that the toolkit pulled from the web source, whether or not any secondary use was made of the information, and whether or not that information duplicates information found in other 670 fields. | |
 |
When it has completed its work with the data extracted from a web source, and if you have asked the toolkit to do so, the toolkit will take you immediately to the Texts tab. You will often wish to make some secondary use of data extracted from a web source beyond the uses that the toolkit makes on its own; turning on this option puts you in a position to continue your work with a bit less fuss.
The following sections of this document describe this work in substantial detail.
Select the web resource of interest from the drop-down list at the top of the tab. (You can use an option to set the default selection in this list to the resource you use most often.) As you change the selection in this list, the toolkit displays corresponding instructions for the use of that resource. (The various sub-sections of this document give detailed instructions for working with each of the web resources listed on this tab.) If you are going to supply a complete URL to tell the toolkit where to find information, you don't actually need to select the resource from this list, because the URL tells the toolkit everything it needs to know. (When you paste a URL into the toolkit's box, it changes the selection in the list to correspond.)
If you click the Click here to launch … button just below the drop-down list of web resources, the toolkit will open the indicated resource in your default web browser.101 In the preceding illustration, you have selected Canadian geographic as the web resource; you can click the Click here to launch … button to launch the interface for Canadian geographic information in a web browser.
In the empty box near the bottom of the Web tab, you supply the information the toolkit needs to request information.
The toolkit can do a number of things with information it pulls from a web resource, depending on the resource. All of the things that the toolkit does with the data it pulls from an external resource are under your control. The kinds of things that are possible vary somewhat with the web site; of the available possibilities, you can choose whichever action or actions seem to you to be the most suitable.
As you change the selection in the drop-down list on the Web tab, the toolkit changes the display in the central part of the tab to show the possibilities available for that service.
| The following illustration shows the work areas available for id.loc.gov, which has the maximum number of possibilities. For other web sources, the toolkit may present fewer possibilities. | |
 |
When you ask the toolkit to pull data from an external source, you must select at least one action for the toolkit to perform with the data. If you do not select at least one action, the toolkit will do nothing.
As the toolkit digests information from web sources, it builds a 670 field (or, for VIAF, multiple 670 fields), and at the same time it considers whether a given piece of information could have a secondary use outside of the 670 field. (For example, if the toolkit discovers a person's date of birth, it includes it in the 670 field, and also considers it for use in an 046 field.) If the toolkit finds a piece of information with such a potential secondary application, it compares that information to corresponding fields already present in the authority record. If the toolkit finds any such information in a web source that's not already present in the authority record, and if you have requested it, the toolkit will show you a list of those pieces of information, and invite you to modify the list in a manner that best suits your needs. To present this information to you, the toolkit uses its multiple choice panel, with an additional button. The following illustration shows a typical display of such information extracted from a web source. (This illustration, and other illustrations in this section, show data extracted from VIAF. The displays for information taken from other web sources are similar, and behave in exactly the same manner.)
 |
If the text of a line contains more than a set number of characters, this display shows only the first part of the field, with the mark of omission (...). You can double-click on such a field to see the full text.102
If a line in this display is shown in boldface, the toolkit will (when you click the OK button) add it to your authority record, along with the corresponding 670 field(s). If a line in this display is not shown in boldface, the toolkit will not add it to your authority record. You can set an option to tell the toolkit which fields should be boldfaced when the toolkit first shows you this panel. Click on any line to change it from plain to boldface, or from boldface to plain. The caption on the OK button tells you how many lines are boldfaced at the moment; the toolkit will eventually add this many lines to your authority record.
The following illustration shows one possible way the information (in this case, extracted by the toolkit from VIAF) could be tailored for re-use in an authority record. You have de-selected many lines.
 |
When the list of fields is to your liking, click the OK button. (To cancel the operation altogether, click the None button.103) If the toolkit displays the 670 fields only button, a click of this button tells the toolkit to add one or more 670 fields, but not to add any of the fields shown in this display.
The following illustration shows the original LC/NACO authority record after you click the OK button in the preceding illustration. The toolkit has added 4 variable fields. The toolkit has also added a 670 field to the record, to justify the new information. (The toolkit's addition of 670 fields when working with VIAF is controlled by an option that does not apply to other web information sources. In this particular case, you selected the option to restrict VIAF 670 fields to the minimum needed to justify the new data elements, and in this case one database happens to contain all of the selected bits of information.)
 |
If the toolkit creates any 4XX fields from the data extracted from a web site, the toolkit applies the same scheme to the new 4XX fields that it uses when you edit the authority record's 1XX field and check the Propagate box (For example: for geographic names, the toolkit will copy a parenthetical qualifier from the 151 field to the 451 fields.)
The Art and Architecture thesaurus is a "structured vocabulary, including terms, descriptions, and other information for generic concepts related to art and art history." The authority toolkit uses RDF representations of AAT information.
You can only use terms from AAT to build the 372, 374 and similar fields. The authority toolkit does not convert AAT data into an authority record so you can pick bits of information from it, it does not build a 670 field for AAT data, and it does not propose secondary uses for AAT data.
If you find an AAT term that you would like to use in an authority record, copy the term's URL into the toolkit's box; or (if you're really careful) type just the term's identifier (a string of numerals) into the toolkit's box and select AAT from the drop-down list at the top.
| Here is part of a typical AAT display for a term. Copy the term's URL into the toolkit's box on the Web tab. | |
 |
When the toolkit realizes that you're going after an AAT term, it makes its Immediate use frame available. Select the radio button in this frame that corresponds to the use to which you wish to put the AAT term, then click the Go button. The toolkit will fetch the data from the Getty web site, extract the term, and make the indicated use of the AAT term.
| When you click the Go button, the toolkit will fetch data from the Getty site, and use the preferred term to create a 372 field. | |
 |
The Canadian geographical names database describes places in Canada. You can use information found in this database to build the 370 and similar fields. The toolkit also can build a MARC21 authority record from the Canadian geographical information, and present it on the Texts tab.
| Here is part of a typical display for a place. | |
 |
If you find a term in the Canadian geographical names database that corresponds to an entity in the LC/NACO authority file, or if you wish to make some secondary use of the information in the Canadian geographical names database, copy the URL for the individual display page (or just type the identifier, which appears always to be a random sequence of uppercase alphabetic characters at the end of the URL) into the toolkit's box, select Canadian geographic from the drop-down list, and click the Go button.
The toolkit fetches the data, converts it into the MARC21 format, and carries out your instructions for applying that data to the authority record on the left side of the toolkit's display panel.
The CERL thesaurus is a product of the Consortium of European Research Libraries. It includes the names of places, persons and organizations related to the period of hand-press printing, and is able to present information in the MARCXML format (using UNIMARC content designation).
| Here is part of a typical display for the CERL thesaurus information for a person. | |
 |
If you find a term in the CERL thesaurus that corresponds to an entity in the LC/NACO authority file, and if the CERL thesaurus data include information not already present in the authority record, copy the URL for the display of the single CERL thesaurus term into the box on the Web tab, and click the Go button. (You can also type just the term's identifier into the box on the Web tab, select CERL thesaurus from the drop-down list, and click the Go button.)
The toolkit fetches the CERL data, identifies data elements of interest, and presents them for selection. You choose the elements to include in the authority record; the toolkit adds those elements, and creates a 670 field.
The the Find a grave site provides a wealth of information about a person (birth and death dates and locations), and about the person's parents, spouses, siblings and children. All of this may be of use in an authority record's 670 field, and some of it can have an application in other parts of an authority record.
The toolkit's behavior when examining information from the Find a grave site is controlled by a few options.
| The following illustration shows the critical part of a typical display for a person at the Find a grave site. This page contains information about the person, her spouse, and her children. (This particular page does not identify any siblings, and it does not contain a textual biography.) |
 |
To add information from the Find a grave web site to an authority record, copy the URL for the page that represents an individual person into the box on the toolkit's Web tab, then click the Go button. The toolkit retrieves the page from the site and parses it to build a 670 field, and to identify information that might be of use elsewhere in the authority record.
| The following illustration shows a new authority record for a person, built by the toolkit solely from information found in the source bibliographic record. |
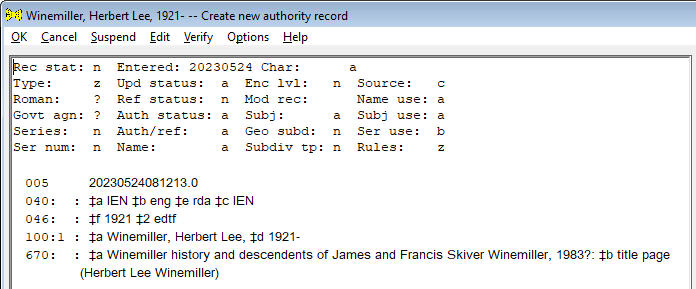 |
| This is the Find a grave page for this person. It contains vital information for the person, but in this case has no separate listing for family members. |
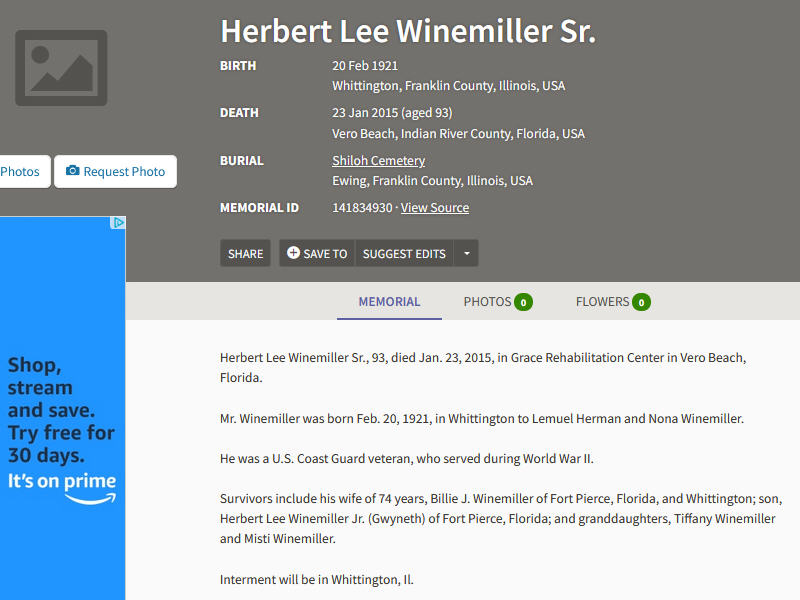 |
| The following illustration shows this authority record as modified by the toolkit with information from the Find a grave site. (This example shows the toolkit's behavior with the options to create 046 and 370 fields turned on, and the option to create a 678 field turned off.) The toolkit has supplied a 670 field with each identifiable piece of information found on the person's page. Since the full birth and death dates are avaialble, the toolkit has replaced the 046 field with a new version. Because the death date is known, the toolkit has modified subfield $d in the 100 field. (Had there been 400 fields in the record with subfield $d—other than a 400 field for a former heading—the toolkit would have added the death date to them, as well.) The toolkit has added 370 fields for the cities of birth and death. |
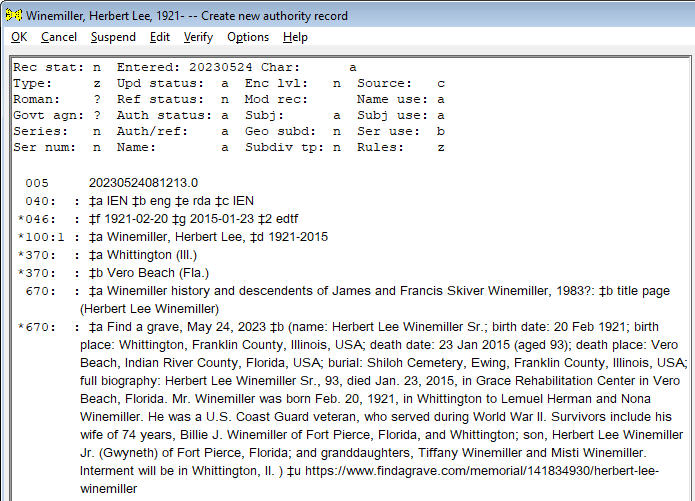 |
To do all of this, the toolkit retrieves the full web page from the Find a grave site, and uses clues in the HTML coding of the page to find data elements of interest. (This is often called "screen scraping.") Any change to the scheme by which information is coded in Find a grave pages will probably cause the toolkit to omit or misinterpret information. If the toolkit's ability to digest a page from the Find a grave site appears to have any defect, be sure to let Gary know; include the URL for the page in question.
Non-roman characters in Find a grave pages
Data in a Find a grave page may contain roman-alphabet characters that are modified with diacritical marks; the authority toolkit should be able to handle these correctly. A page may contain non-roman characters; unfortunately, these will probably create a problem for the toolkit. (The toolkit itself knows about UTF-8 data; but it uses a standard tool to fetch the web page, and this tool appears not to understand UTF-8 data.) Non-roman characters will probably appear in the 670 field as a string of question marks.
| Here is part of a Find a grave page that contains characters that are not in the roman alphabet. |
 |
| Here is part of the 670 field created by the toolkit from this data; note that the name of the cemetery has become a string of question marks. |
 |
If the toolkit detects a string of question marks in the 670 field, it will display a brief message.
 |
When you see this message, you need to inspect the 670 field, and other fields the toolkit may have created, for corruption of this kind. If you find any such problem, follow these steps:
The toolkit will use this file in exactly the same manner it would use a web page retrieved directly. The new 670 field should contain the correct characters.
 |
GeoNames is a searchable user-maintained database that integrates geographical data from dozens of sources, including the National Geospatial-Intellegence Agency and the U.S. Board on Geograhic Names (names outside the United States), and the U.S. Geological Survey Geographic Names Information System (names in the United States).
The toolkit will only convert GeoNames data if the authority record has a 151 field.
The display of data for a place at the GeoNames site105 includes a number in the upper right corner. (A GeoNames display page typically shows many identified points, so the individual identifier for any one point is typically not part of the URL for the web page.)
| In the following illustration, the number of interest is 2657820. |
 |
| In the following illustration, the number of interest is 2640358. |
 |
If you click on the label for the place you're interested in, the display changes, and the URL contains the unique identifier for the place.
| In the following illustration, the URL contains the GeoNames place identifier. |
 |
You can either carefully type the identifier (a number) into the box on the Web tab (there's no way to do a copy-and-paste operation with this number), or you can click on the label to display the page for the single feature, and copy the URL for that page (which includes the identifier) into the box on the Web tab; then click the Go button. The toolkit fetches the information from the GeoNames site and parses it for use in the authority record. The toolkit makes whatever use of the data you have selected.
If the GeoNames data contains a link to a Wikipedia article for a place, the toolkit will automatically fetch that Wikipedia page and attempt to convert it as well. This means that you can occasionally save yourself a couple of steps if, for suitable place names, you search GeoNames first.
| The following illustration shows what can happen when you give the toolkit a GeoNames identifier. (The toolkit made changes to this record based on the user's selection of all possible uses of the data pulled from the source.) The toolkit first fetched the GeoNames data and created a 670 for the GeoNames data. (Since the data includes coordinates and variant names, the toolkit will have shown you the corresponding 034 and 451 fields for approval; if you had selected any of those fields, the toolkit would have added them to the authority record as well.) The GeoNames data includes a citation to a Wikipedia article, so the toolkit applied its standard method to convert Wikipedia information into a second 670 field. Because this article comes from the English-language Wikipedia, the toolkit also extracted the first paragraph from the page and proposed it as a 678 field. (In this case, you accepted the proposed 678 text as-is.) These three fields (not to mention 034 and 451 fields and perhaps other fields, all added under your control) are the result of the toolkit's processing of a single GeoNames identifier. | |
 |
The toolkit will only convert GNIS information if the authority record contains a 110 or 151 field.
There does not appear to be a way for the toolkit to retrieve information directly from GNIS. If you wish use GNIS data in an authority record, you must do more work than is required for other information sources:
The following illustrations and comments show an operator enhancing a simple authority record with GNIS data.
First, search GNIS to find information about the place of interest.
| This illustration shows a typical GNIS display of information following a simple search. The operator has clicked on the second item in the list of matches (Washington Court House, Ohio). | |
 |
Next, click the "details" link for the place of interest. GNIS produces a secondary display, containing more information about the place.
 |
Highlight the entire text of the detail display, from "Feature Details" at the top, all the way through "Map" at the bottom.
 |
Press Control-C to copy all of the selected text to the Windows clipboard.
Back at the authority toolkit, select GNIS on the Web tab, and click the Go button.
 |
The toolkit sets to work on the information it finds in the Windows clipboard. The toolkit will create a 670 field, and (if data is available) suggest other fields.
If the toolkit finds any information within the GNIS data that might become a secondary field in the authority record (such as coordinates that could become an 034 field), the toolkit will present each piece of information as a potential field, in a special display. You can choose the fields created from GNIS data that you want to include in your record.
 |
| The following illustration shows the authority record as it might be enhanced, if the operator tells the toolkit to add all of the variable fields suggested (in the picture just above) by the GNIS data. The 670 field contains all of the information extracted from GNIS, whether used elsewhere in the authority record, or not. |
 |
If the preferred name for a place given in the GNIS data does not match the name (minus any parenthetical qualifier) in the authority 151 field, the toolkit will ask a question. The question that the toolkit asks at this point depends on the content of the authority record.
From the web site: "The Geographic Names Server (GNS) is the official repository of standard spellings of all foreign geographic names, sanctioned by the United States Board on Geographic Names (BGN)."
The toolkit will only convert GNS data if the authority record has a 151 field.
Pulling information from GNS into an authority record is not a simple matter of copying a URL or an identifier into the box on the toolkit's WEB page. Instead, you will have to take several steps before you can tell the toolkit to look at the GNS data. Here is an outline of the steps you need to take. This outline is followed by a fuller description, with illustrations.
Here is some more information about this process.
A search in GNS may produce no responses, a single response, or multiple responses.
| The following illustration shows the result of a search of GNS that produced a single response. In this case, the operator does not need to indicate which row of data should be exported, because there is only one possibility. (The operator can select this line by clicking the leftmost box, but that's not necessary.) | |
 |
| The following illustration shows the result of a search of GNS that produced multiple responses. The first two rows of data in this search result each represent two lines; in both cases, an authorized name and a single variant name. The operator has clicked on the empty box at the very left of the second line, causing a check-mark to appear in that box. | |
 |
Once the single line of interest has been identified (if there's only one row of data, that line is identified by default), click the "Export" button to see the menu of choices.
 |
Select the "Export SELECTED to CSV" line. All of the export formats contain the same basic data, but CSV is the only format that the toolkit knows about. When you select that line, GNS shows you its "Export to CSV" panel.
 |
Give any name you want in the "File name" box, and click the "Detailed - Default" button. (The "Simplified - Default" button writes fewer data elements to the output file; we want all of them.) GNS opens a standard Windows file-save dialog box.
 |
After saving the file, open the ZIP file using an appropriate tool, and extract the CSV file.
| In this illustration, the ZIP file has been opened using a tool called "WinZip," exposing the four files within the ZIP file; you may have a different tool for working with ZIP files, so this could look different for you. No matter what the tool, you need to extract the CSV file from the ZIP file, so the toolkit can find it. | |
 |
On the toolkit's Web tab, select "GNS" from the drop-down list, and use the "Browse" button to find the extracted CSV file. The toolkit will proceed immediately to read the file and work with the data that it finds there. (This is the fastest part of the whole process.)
The toolkit builds a 670 field from the GNS data; it adds coordinates (034 fields), and variant names (451 fields), if they are contained in the data and differ from information already present in the record.
| In the following illustration, the toolkit has added to this new authority record a 670 field constructed from the GNS data; this 670 field includes the authorized name, one variant name, and coordinates expressed two ways. The toolkit has also added a 451 field for the new variant name, and two 034 fields for the coordinates of the place. | |
 |
The id.loc.gov web site serves up information drawn from many vocabularies created at or maintained by the Library of Congress. At present, the toolkit's Web tab knows how to pull information from these vocabularies:106
In the OCLC Connexion version of the toolkit, for LCGFT, LCSH and NAF terms, the outcome of using the toolkit to retrieve information from id.loc.gov is functionally identical with the outcome produced by using the toolkit's Suspend feature to bring an LCGFT, LCSH or NAF record into the program from OCLC. Either way, you end up with an Additional authority record, ready for whatever purpose seems appropriate. The choice of one technique over the other has everything to do with convenience and context, and nothing to do with the outcome. (OCLC does not at present make LCDGT and LCMPT available; using the Web tab is the only way to bring authority records for terms from those vocabularies into the toolkit.) In the independent version of the toolkit, the outcome is identical to the outcome produced by using File/Open to show the toolkit an additional authority record. (In the independent version of the toolkit, the File menu item can be used to bring in authority records for vocabularies not present in OCLC.)
To use this feature, open your favorite web browser to the id.loc.gov web site, and do a search for a term of interest in any of the vocabularies that the toolkit recognizes. From the search results page, go to the display page for one heading of interest. Copy the URL for the display page for an individual heading into the Windows clipboard. (The URL will contain the LCCN for the term; but the toolkit needs the whole URL, not just the LCCN.) On the toolkit's Web tab, select the id.loc.gov source from the drop-down list, paste the URL for the individual term display into the box, and click the Go button.
The toolkit converts the URL for the display of a heading into a request for the corresponding MARCXML data, and submits that request to the LC site. The LC site returns information about the term in the MARCXML format; the toolkit converts the MARXML data into the MARC authority format, and follows your instructions for making use of the information.
| If you give the toolkit the URL from this LCSH web page: |
 |
|
| ... the toolkit will present the LCSH record on its Texts tab: |
 |
| If you give the toolkit the URL from this NAF web page: |
 |
|
| ... the toolkit will present the NAF record on its Texts tab: |
 |
| If you give the toolkit the URL from this LCGFT web page: |
 |
|
| ... the toolkit will present the LCGFT record on its Texts tab: |
 |
Alternatively, you can search NAF or LCSH in OCLC (or any other source at your disposal) to find the 010 for an authority record of interest, select id.loc.gov on the Web tab, and paste the LCCN (010 subfield $a) into the box. The toolkit will convert the LCCN into the corresponding URL, and will then behave as described above. (The toolkit uses the first characters of the 010 text to tell it how to construct the URL to request the record from id.loc.gov.)107
Medical Subject Headings is "a hierarchically-organized terminology for indexing and cataloging of biomedical information."
You can only use MeSH terms to build the 372, 374 and similar fields. The authority toolkit does not convert MeSH data into an authority record so you can pick bits of information from it, it does not build a 670 field for MeSH data, and it does not propose secondary uses for MeSH data.
If you find a MeSH term that you would like to use in an authority record, you will need to scroll down in the display to find the "Unique ID." (Unfortunately, the unique identifier appears not to be part of the URL for the display page.) Carefully type the identifier (the letter "D" plus a string of numerals; or that much plus "Q" and some more numerals) into the toolkit's box and select MeSH from the drop-down list at the top.
| Here is part of a typical display for a MeSH term. The unique identifier is the piece of information that the toolkit needs to fetch MeSH data for you. | |
 |
OpenVIVO is a project to join data pulled from multiple instances of VIVO into a common search interface. Because the URL for a person represented in OpenVIVO incorporates the ORCID identifier for the person, the toolkit can create an 024 field using data from the OpenVIVO URL. In addition, the toolkit can extract some data elements from the packet provided by OpenVIVO for use in the authority record.
The Thesaurus of geographic names is one of the Getty vocabularies; it contains the names of places.
| Here is part of a typical display of TGN information for a place. | |
 |
If you find a term in TGN that corresponds to an entity in the LC/NACO authority file, and if the TGN data include information not already present in the authority record, copy the URL for the display of the single TGN term into the box on the Web tab, and click the Go button. (You can also type just the term's identifier into the box on the Web tab, select TGN from the drop-down list, and click the Go button.)
The toolkit fetches the TGN data, identifies data elements of interest, and presents them for selection. You choose the elements to include in the authority record; the toolkit adds those elements, and creates a 670 field.
The Universal list of arists' names is one of the Getty vocabularies. It includes the names of persons and organizations.
| Here is part of a typical display for the ULAN information for a person. | |
 |
If you find a term in ULAN that corresponds to an entity in the LC/NACO authority file, and if the ULAN data include information not already present in the authority record, copy the URL for the display of the single ULAN term into the box on the Web tab, and click the Go button. (You can also type just the term's identifier into the box on the Web tab, select ULAN from the drop-down list, and click the Go button.)
The toolkit fetches the ULAN data, identifies data elements of interest, and presents them for selection. You choose the elements to include in the authority record; the toolkit adds those elements, and creates a 670 field.
|
VIAF is a web site hosted by OCLC that serves up information pulled from over 35 name authority files with a single search. Information discovered in VIAF can often be used to amplify a preliminary authority record created from an access field in a bibliographic record, or to supplement an existing record.
The toolkit's handling of information found in VIAF is controlled by options.
At present, the toolkit's VIAF feature only works for plain names (personal, corporate/conference, and geographic); it does not work for titles, or name/title access fields. This limitation may be altered or removed in the future. There is also an interesting exception: if you are creating a new authority record and the VIAF cluster contains an authority record taken from the LC/NACO Authority File, the toolkit will refuse to do anything. (If there's an LC/NACO record for your entity, you should be using that record.)
A search in VIAF produces a summary results page. The following illustration shows the first part of a typical summary page of VIAF results. Each numbered item in the VIAF search results represents a cluster of access fields from various authority databases that represent, or appear to represent, a given entity. (Some clusters represent only a single database.) The display for a cluster lists each distinct authorized access string for the entity, followed by one or more flags or other icons to identify the databases that authorize that string.
 |
If you click on any of the names in a cluster, VIAF presents you with a detail page containing fuller information about the authority databases and the information they contain. The following illustration shows the first part of the detail page for the first cluster listed in the previous illustration.
 |
If you click on any of the lines in the Preferred forms frame on the detail page, VIAF will show you the authority record from one source, in all its glory. Some of the authority records shown in VIAF use the MARC21 format for authority data to label data elements; others use the UNIMARC authority format; so be wary of differences in tagging.108 The following illustration shows the first part of a UNIMARC authority record prepared by the Bibliothèque nationale de France.
 |
It is your responsibility to review all of the information presented in VIAF to identify a cluster that corresponds to the entity represented by your authority record. If you find such a cluster, you can do one of two things.
 |
Select the entire URL, and press CTRL-C to copy the URL to the Windows clipboard. Go to the toolkit's Web tab, select VIAF from the drop-down list of web sources, and press CTRL-V to paste the VIAF URL for the cluster detail page into the toolkit's box on the Web tab. Click the Go button.
Alternate method: If you want the toolkit to inspect all of the information available in VIAF, you can also carefully type just the VIAF identifier (that's the number between slashes following "viaf/" in the URL; in the preceding illustration, the number is 248606154) into the toolkit's box on the Web tab, and then click the Go button.
The toolkit will fetch the VIAF detail page and parse it to identify each of the authority databases that participate in that cluster. The toolkit will then convert the page for each database's authority record into the MARC21 authority format. As the toolkit converts each record, builds a 670 field to represent all of the information found in that record, and also extracts secondary information (such as 370 $a, or a 667 field) that is not already present in your authority record. (The toolkit keeps careful track of which piece of information comes from which database.)
 |
Select the entire URL, and press CTRL-C to copy the URL to the Windows clipboard. Go to the toolkit's Web tab, select VIAF from the drop-down list of web sources, and press CTRL-V to paste the VIAF URL for the individual institution's page into the toolkit's box on the Web tab. Click the Go button.
The toolkit will fetch the single page and convert the data on that page into the MARC21 authority format. As the toolkit converts the record, it builds a 670 field to represent all of the information found in on the institution's page, and also extracts secondary information (such as 370 $a, or a 667 field) that is not already present in your authority record.
If the toolkit finds any information within the VIAF data that might become a secondary field in the authority record (such as coordinates that could become an 034 field), the toolkit will present each piece of information as a potential field, in a special display. You can choose the fields created from VIAF data that you want to include in your record.
Wikidata is a collection of structured data elements that are related to entities. Information in Wikidata is of three general types:
In addition to the general options that govern the toolkit's handling of Web-derived information, there are special options for Wikidata information.
To tell the toolkit to find and process Wikidata information for an entity, paste the Wikidata URL (containing the Wikidata identifier—"Q" plus numbers) into the box on the Web tab; or select "Wikidata" from the drop-down menu, paste just the Wikidata identifier into the box. When you've done one of these, click the "Go" button.
As soon as you provide appropriate information about Wikidata to the toolkit, it fetches the package of Wikidata information, digests it into its components, sorts the data elements into categories, and processes them into a form that can comfortably reside in a MARC record. The toolkit has its own rules for dealing with the structured data elements. However, the toolkit cannot make reliable decisions about aliases and labels, descriptions, or identifiers; it displays these data elements on one or more helper panels, and you use these panels to make decisions about them.
| The following illustration shows the toolkit's presentation of information gleaned from the Wikidata information for the actor George MacKay, displayed on 3 tabs; the tab showing alternate names is currently selected. |
 |
After the toolkit digests the Wikidata information, it presents you with its first selection panel. (Whether or not the toolkit shows this panel is actually controlled by an option; but that's an option that you should leave turned on.) This panel has three tabs: one for aliases and labels; one for descriptions; and one for identifiers. You should inspect and deal appropriately with the information on each of these tabs. When you click the 'OK' button, the toolkit will include each line in the lists of aliases and descriptions in the Wikidata 670 field; and (if you have selected this option) it will include each line in the list of identifiers in the Wikidata 670 field as well. This means that you need to delete any lines from the aliases and descriptions tabs that you don't want in the 670 field, and (if you have selected the option to include identifiers in the 670 field) you also need to delete any lines from the identifiers tab that you don't want to include in the 670 field. (In the illustration shown above, the line "Ultima pelicula: 1917" is clearly not a possible alternate name for the actor; at least this one line should be deleted from this tab.) To delete a line, click anywhere on the line to highlight it, then click the "Delete highlighted" button. (You can highlight several lines, and delete them all at the same time.) Alternatively, if you only wish to save a few of the lines on a tab, highlight just the lines to keep and then click the "Keep highlighted" button. You need to make additional decisions about items in the aliases tab (create 4XX fields?) and in the identifiers tab (crete 024 fields?).
After you have helped the toolkit work through the Wikidata information, the toolkit displays the enhanced authority record, with the new 670 field (and other fields).
Remove from the list on this tab any names that should not appear in the 670 field.
If you wish also to make a 4XX field out of one or more of the names on this tab, click on that line to highlight it, then click the "Make 4XX" button. (You can highlight several lines, and mark them all for use as 4XX fields at the same time.) The toolkit will add "(4XX)" to the end of each highlighted line. To remove the "(4XX)" label, highlight the line and clikc the "Make 4XX" button again.
| The following illustration shows the list of aliases and labels, after the operator has identified several lines as appropriate for use in 4XX fields. (The operator has deleted other lines originally shown on this tab, because they were not wanted in the 670 field. All of these choices were made arbitrarily, solely for the purposes of this example.) |
 |
When you click the "OK" button on this panel, the toolkit inspects each name marked "(4XX)" to see if contains an internal space. If a name contains an internal space, the toolkit needs your help to identify the correct entry element. (The names in Wikidata are always presented in direct order. The name may be a series of forenames that need to be retained in that order; or may be a name in surname-first form that needs to remain in that form (but with a comma inserted); or may be a forename-first form that needs to be rotated to expose the surname (and the surname may consist of more than one element).
The toolkit uses a second panel to help you select the apropriate entry element for each name intended for a 4XX field that contains a space. The panel gives each such name in direct order (with and without a comma following the first element), and all possible "rotated" forms of each name. Each group separated by a line contains all of the forms available from one name.
Highlight all of the forms of each name that the toolkit should use as 4XX fields. You may select as many variations of each name as you deem appropriate. To select a name for use in a 4XX field, simply click on the name to highlight it. (The toolkit will not create 4XX fields from forms of name on this panel that are not highlighted.) When all of the names that should become 4XX fields are highlighted, click the "OK" button.
| The following illustration shows the toolkit's presentation of variant forms of name for aliases and labels identified in an earlier step as being wanted for use in 4XX fields. All of the variations produce from a single basic name are in a group; groups are separated by a row of hyphens. The operator has highlighted the forms of name that should actually appear as 4XX fields. |
 |
When the toolkit creates a 400 field from a name highlighted on this panel, it adds to it subfield $d (and other secondary subfields, if pesent) from the 100 field, to make the 400 as close to the desired final form as is possible.
| The following illustration shows the 400 fields added to the authority record for George MacKay, with subfield $d copied automatically from the 100 field into each 400 field. |
 |
Remove from this list any lines that shuld not appear in the 670 field.
| The following illustration shows the toolkit's presentation of descriptions gleaned from the Wikidata information for the actor George MacKay. |
 |
An operator working in an English-language context will probably remove every line from this list except the "British actor" line. (There is an option that can do this automatically for you.)
If you have selected the option to include identifiers in the 670 field, you need to remove from this list any lines that should not appear in the 670 field. If you have not selected the option to include identifiers in the 670 field, you do not need to bother to delete things from this list. Regardless of the setting of this option, you need to decide if you want the toolkit to construct an 024 field out of any of these identifiers.
| The following illustration shows the toolkit's presentation of identifiers gleaned from the Wikidata information for the actor George MacKay. In this case, the operator has selected the option to include all identifiers on this tab. |
 |
You can use this tab to tell the toolkit add 024 fields to the authority record. (The toolkit can only create 024 fields if it knows the subfield $2 code that corresponds to the name for the identifier used by Wikidata.) A small number of identifiers have been designated by the PCC as core identifiers. (There are different core identifiers for different types of authority records.) If any of the identifiers found in Wikidata is designated as a core identifier for the current authority record, the toolkit will display it as boldface when it first shows the selection panel.
| The following illustration shows the toolkit's presentation of identifiers gleaned from the Wikidata information for the actor George MacKay. In this case, the operator has selected the option to inclode in the display only those identifiers that have a corresponding subfield $2 code, and so can be used in 024 fields. Two of these identifiers are highlighted by the toolkit, because they are core identifiers for this type of authority record. (These are highlighted by the toolkit because it's likely you'll want to make 024 fields for these, but you must still take the extra step of telling the toolkit that this is what you want to do.) |
 |
To instruct the toolkit to create an 024 field for an identifier, highlight the field and click the "Make 024" button. The toolkit will add the designation "(024)" to the line for each identifier. (To remove the "(024)" designation, highlight a line and click the same button.)
The toolkit will create an 024 field for each identifier marked with the label "(024)." If you have selected the option to create URIs for 0XX fields, and if a URI is defined for this field, the toolkit will automatically add the URI to the 024 field.
| The following illustration shows an 024 field created by the toolkit from a Wikidata identifier for the Virtual International Authority File. In this case, the operator has turned on the option to create URIs for 0XX fields, and the toolkit knows how to create a URI for this kind of 024 field. |
 |
If you delete any identifiers from this list, the toolkit will present a new panel, listing each of the deleted identifiers. You can use this panel to tell the toolkit that you never want to include these identifiers in future 670 fields. The toolkit will discard any identifiers you so mark, whenever it finds them in Wikidata in the future; they will never appear in the toolkit's selection panel. You can use a button on the Options panel to examine the list of identifiers you have marked for permanent deletion, and perhaps reinstate one or more of them.
Wikipedia is an online collaboratively-edited source of information. The authority toolkit is interested in the following pieces of information found in a Wikipedia page:
At present there are only a few very general options available for controlling the toolkit's behavior when examining a Wikipedia page.
To use the Wikipedia method, copy the URL for a Wikipedia page110 into the box on the Web tab, and click the Go button. The toolkit retrieves the HTML page, and parses it for use in the 670 field, and possibly for other fields.
One important are of information in a Wikipedia page is the "information box", which appears near the top of a Wikipedia page. (In Latin-alphabet pages, the information box appears on the right side.)
| The following illustration shows the first part of the information box from the English-language Wikipedia page for The Venture Bros. |
 |
| The following illustration shows the 670 field generated by the toolkit from the Wikipedia information box on the Venture Bros. page. |
 |
Because this "Venture Bros." Wikipedia page is an English-language page, the toolkit will reformat the first paragraph of text into a 678 field:
 |
If the Wikipedia HTML page contains a reference to Wikidata information, the toolkit will retrieve and process that information as well.
Wikipedia information is available in two different manners, and the toolkit offers a corresponding choice of conversion methods. Neither method provides satisfactory results in every case, though one method is better than the other in most cases.
Unfortunately, you can't tell for certain that structured Wikidata data is available just by looking at a Wikipedia page; and you can't tell by looking at a page of the English-language version of Wikipedia that the page is coded in a manner that the toolkit can recognize. This makes the selection of the conversion method for a given Wikipedia page a rather murky matter: the decision relies on factors that are not immediately apparent.
The best approach is this: Whenever you find a Wikipedia page for an entity (using any language edition of Wikipedia), select the Wikidata via Wikipedia method, drop the Wikipedia URL into the box, click the Go button, and see what happens. The absolute worst thing that can happen is that nothing will happen; and quite often you'll be pleasantly surprised. (If you start with the URL for an English-language Wikipedia page but Wikidata provides no information, the toolkit will automatically try to convert the Wikipedia page for you, using the Wikipedia method.) If the toolkit finds information on Wikidata but you believe that the results are in some manner unsatisfactory, and if there is a page for your entity in the English-language version of Wikipedia, then you can use the Wikipedia method to convert the English-language Wikipedia page directly.
This is the preferred method for making use of Wikipedia data. This method involves the discovery of highly-structured information extracted from Wikipedia pages,111 and the use of that information in an authority record. To use this method, paste the URL for a Wikipedia page into the box on the Web tab, and click the Go button. It doesn't matter which language edition of Wikipedia you use; the results will be the same because each page for a given entity in each edition of Wikipedia contains the same Wikidata identifier. (For example, the Dutch and Japanese Wikipedia pages for Leonardo DiCaprio contain the same Wikidata identifier; both Wikipedia pages lead to the exact same set of structured information.) The toolkit requests the Wikipedia page, extracts from the page the Wikidata identifier, retrieves the Wikidata information, and parses that information for use in the authority record.
The toolkit draws on information stored in a configuration file (described just below) to direct its conversion of much of the Wikidata information into an authority 670 field. This same configuration file also tells the toolkit how to convert some of the information that goes into the 670 field into other fields, such as 046, 370 and 372 fields. The default version of this configuration file is certainly good enough to get you started; but you may eventually choose to adjust it to suit your particular needs.112
| The following illustration shows the 670 field that the toolkit might create from the (not very extensive, in this case) Wikidata information for a person, using the default configuration file; the default configuration acting on this Wikidata information also produced an 046 field (not shown here). |
 |
Wikidata information can contain any of a large number of elements (nearly 1600 at the time this feature was introduced); most of these elements occur only rarely. To overcome differences in language, these elements are identified by Wikidata not with names, but with tags or codes beginning with the letter "P"; and there are display equivalents available for these tags in various languages. (See below for the handling of Wikidata information that is not assigned a "P" tag.) The toolkit uses a configuration file to direct its consideration of Wikidata information. This file links each "P" tag to an English-language display equivalent, and tells the toolkit how to use that element in an authority record. In truth, there are actually two Wikidata configuration files. The toolkit uses a tab-delimited text file for its own purposes; but to make things easier for you there is a parallel spreadsheet in Microsoft Excel format. If you want to change the toolkit's handling of Wikidata information, open the configuration spreadsheet (the file called WikimediaPLabels.xlsx) in Excel, and modify it as necessary.113 When you're done, save the Excel spreadsheet in two different formats: first as an Excel spreadsheet (replacing the existing one), then as a tab-delimited text file (WikimediaPLabels.txt, again replacing the existing one). You use the spreadsheet to make changes because that's easier and safer for you; the toolkit reads the text file because that's faster for the toolkit.
| The following illustration shows an extract from the Excel version of the configuration information for Wikidata resources. |
 |
The columns in the Wikidata configuration spreadsheet are:
Example: If the instruction in column D is 374:##:$a and column E contains "Y", the toolkit will change the text psychologist to Psychologist for use in the 374 field. The toolkit will use the text psychologist in the 670 field, because that's exactly what it found in the source data.
It is certain that as experience is gained with the use of Wikidata information in authority records, the need will arise for additional information in this configuration file, better to tailor the resulting 670 field. Keep alert for ways in which the conversion of Wikidata information could be improved, and let Gary know.
In some cases the toolkit has special instructions for manipulating pieces of text extracted from the Wikidata information (that is, data elements to which "P" tags are assigned). For example:
These special manipulations are not, at present, controlled via the WikimediaPLabels configuration file, or user options. The need for additional, similar transformations may become apparent as experience is gained with Wikidata. Be sure to let Gary know if you come across a data element that should be manipulated in some manner when it is put to a secondary use.
If the toolkit encounters a "P" code that's not listed in the configuration file, the toolkit will include the information in the 670 field, but it will not make any secondary use of it. The toolkit will ask Wikidata for the English-language display equivalent for the code. If Wikidata supplies such an equivalent, the toolkit will include it in the label for the information in the 670 field; if Wikidata doesn't supply such an equivalent, the toolkit will just use the "P" code in the 670 field to identify the data. Whenever you see a "P" code in a 670 field, you should tell Gary about it (include the "P" code itself in your message), and Gary will add it to the configuration spreadsheet.
 |
|
| You should tell Gary about the code "P1997" that occurs in this 670 field derived from Wikidata information. |
In addition to elements tagged with "P" codes, the Wikidata contains information assigned the more general tags aliases, descriptions, and labels. These tags appear to contain a best-guess characterization of information that couldn't be assigned a specific tag; but (no doubt because of the varying methods used to code Wikipedia pages) even these general characterizations are not unfailingly accurate. The items tagged as aliases are nearly always versions of a person's name, but versions of a person's name can also be tagged as descriptions or labels. (For example, the Wikidata information for Ludwig van Beethoven tags some representations of Beethoven's name as aliases, and others as labels.)
The toolkit provides two methods for handling this collection of miscellaneous data elements:
The following illustration shows a 670 field created from the Wikidata information for a person, using the default option. The toolkit has labeled the raw data in each category, but has done no other processing on it. The labels tag is highlighted for clarity; the descriptions tag is two lines below this, and the aliases tag two lines further down.
These data elements can contain expressions in a large number of languages. Some of these languages are written in scripts that are not recognized by the display mechanisms used by the toolkit, and it's likely that the same scripts are also not allowed in LC/NACO records. See the discussion of the Languages/scripts to ignore option for information on this vexing situation.
The following two illustrations show the toolkit's initial presentation of the raw Wikidata information for a person, sorted onto two tabs: one tab for data elements tagged by Wikidata as aliases, the other for data elements tagged by Wikidata as descriptions or labels. The lists on these tabs have a behavior similar to the list on the toolkit's field choice panel: click on a line to select it (the toolkit displays the line as bold); click on a bold line to de-select it; the buttons at the bottom of the panel apply to the selected lines.
You can perform several tasks with this panel:
The following two illustrations show one way in which the Wikidata information for this person might be manipulated for use in a 670 field. Appropriate information is given on each tab, and some of the items on the Aliases tab are marked for possible use in 4XX fields.
When you click the OK button on this panel with this configuration, the toolkit adds information to its 670 field for Wikidata, preceded by appropriate labels. For all types of authority records except personal names, the toolkit automatically creates 4XX fields for the appropriately-tagged lines on the Aliases tab. For personal names, the toolkit automatically creates 400 fields for tagged lines that do not contain any spaces. For tagged lines for personal name authority records that contain internal spaces, the toolkit generates all possible permutations of each text, and presents them for review on its field choice panel. (The method the toolkit uses to generate these permutations for personal names is the same as the method it uses when you select the 4XX radio button on the Texts tab.)
The following illustration shows this display of permutations of selected lines from the Aliases tab.
Click on as many of the permutations as you wish to use as 400 fields in the authority record (the toolkit renders each selected line in bold). When you click the OK button, the toolkit adds the selected lines to the authority record as 400 fields.
The toolkit presents any 4XX fields you may have created in this manner, plus any other secondary fields created from instructions in the configuration spreadsheet, in a special display. You can choose the fields created from Wikidata information that you want to include in your record.
The following illustration shows how the authority record might look after all this work.116 The Wikidata 670 field contains only the information from the aliases, descriptions and labels categories that you selected, and the record contains additional 400 fields that you selected. Because you gave the toolkit an English-language Wikipedia page, the toolkit also presented the first paragraph of the page for use as a 678 field, which in this case you have accepted without modification.
Please let Gary know if you have any ideas about how the processing of Wikidata data might be made simpler or better (or both).
To use this method, copy the URL for an English-language Wikipedia page into the box on the Web tab, and click the Go button. The toolkit retrieves the HTML page and parses it for use in the 670 field, and perhaps in other fields.
Most of the time, you will use the Wikidata via Wikipedia method instead of the Wikipedia method, but you'll want to be alert for exceptional cases. Every now and then, for reasons that remain unclear, the structured information available from Wikidata does not contain all of the information shown in the information box on a Wikipedia page. Note the differences in the following illustrations, both related to the television series The Venture Bros.
| The following illustration shows a 670 field built from the Wikidata information available for the television series The Venture Bros. |
 |
| The following illustration shows the first part of the information box from the English-language Wikipedia page for The Venture Bros. |
|
| You can see even from this extract that the information box contains data (genre, and the names of responsible parties) not present in the structured Wikidata information. The reason for this discrepancy is not clear, and perhaps a future harvest of the Wikipedia page will produce enhanced Wikidata information; but this is how things stand at the moment. |
If you notice such a discrepancy, you can ask the toolkit to attempt to convert the Wikipedia information box directly (rather than fetching the Wikidata structured information):
You won't do this second conversion for every Wikipedia page, but only when you have direct evidence that it would be useful. If the toolkit finds any information within the Wikipedia data that might become a secondary field in the authority record (such as coordinates that could become an 034 field), the toolkit will present each piece of information as a potential field, in a special display. You can choose the fields created from Wikipedia data that you want to include in your record.
The following illustration shows the 670 field generated by the toolkit from the Wikipedia information box on the Venture Bros. page. Some of this is redundant with information found at Wikidata, and you may remove some of it before the authority record makes its way into the LC/NACO authority file; but there is also useful information here that ought to be preserved.
|
The Wikipedia conversion method will only work, when it works at all, for the English-language version of Wikipedia. Even then, the toolkit will not always be able to convert an information box on a Wikipedia page into authority information—there is more than one way to present an information box on a Wikipedia page, and the toolkit doesn't understand them all. If the toolkit isn't able to recognize and convert data in a Wikipedia info box, it will give you an appropriate message. If you find that the toolkit is consistently unable to digest an information box for just the sort of Wikipedia pages you're interested in (in the absence of suitable information available from Wikidata), let Gary know. He may be able to devise a solution.
Whenever the toolkit examines an English-language Wikipedia page, it will extract the first paragraph from the page, remove the HTML tags (and, if possible, the pronunciation guide), and present the text to you as a potential 678 field (biographical or historical data), together with any other fields extracted from the Wikipedia page.
If the authority record is for a simple personal name, the toolkit will use first indicator "0" for the 678 field; otherwise, it will use first indicator "1".
| The following illustration shows the toolkit's presentation of data extracted from Wikipedia, including a 678 field based on the page's first paragraph. Because the 678 field is very long, this display only contains the first part. As is the case with any other field in this display, you can click once on the 678 field to change it from boldface to plain (thereby telling the toolkit not to include it in your authority record), and you can double-click on the field to examine or change the full text of the field. |
 |
The Edit/Create 678 menu item offers an additional way to create a 678 field.
Z39.50 is a protocol for searching a remote bibliographic database, and retrieving records from it. This protocol has been around for a long time, and is widely supported by library systems and OCLC: just the kinds of sites we want to draw on for bibliographic information to supplement an authority record.
The toolkit's Options panel has a feature that allows you to define as many Z39.50 connections as you may need. You define your Z39.50 sites on the Options panel, then you use those definitions on the Web tab to bring bibliographic records into the toolkit.
When you select Z39.50 from the drop-down list on the Web tab, the appearance of the tab changes to provide the input spaces you need to define a search, and examine the search results.
| The following illustration shows the Web tab, when the Z39.50 item is selected. | |
 |
There are two sub-tabs on the Web tab when you select Z39.50.
To search a previously-defined remote database via Z39.50, select the database name from the drop-down list. Use the appropriate sub-tab to define the records you wish to retrieve.
After you supply the appropriate search term elements, click the Go button. The tookit formulates a Z39.50 request from your information and submits it to the site you've selected. If there are any matches for the search, the toolkit immediately begins to retrieve them. (The toolkit shows you how many records it's retrieving, and where it is in the process. If you want, you can click the Cancel button that replaces the Go button, to call a halt to the record retrieval.)
If there is just one record in the retrieval set, the toolkit puts it onto the Texts tab, and flips the display to show that tab. If there is more than one record in the retrieval set, the toolkit presents the records on the Results sub-tab.
| The following illustration shows the Web tab, when a Z39.50 search retrieves more than one record. Bibliographic records are listed in the order the remote system supplied them. | |
 |
|
| Click on any item, then click the Show button to display the record on the Texts tab. |
If you've done a Z39.50 search and if there is more than one match in the Z39.50 result set, the Texts tab has a small left/right arrow control just below the box that contains the record. The easiest way to move from one record to an adjacent record is to click the left or right arrow; you can also return to the Results sub-tab on the Web tab and select a different record. (If you rest your mouse on this little arrow control, the pop-up explanation will show the number of records in the result set, and the position of this record within the result set.)
 |
Once you've displayed a record on the Texts tab, you can use all of the fetures available on that tab to bring information into your authority record.
Use the Other option on the Web tab to generate a preliminary 670 field for any web page you choose. Copy the URL for the web page into the toolkit's box, and click the Go button.
The toolkit retrieves the web page, extracts from the page the text enclosed by the HTML <title> tag, and uses this title plus today's date and the supplied URL to construct a skeletal 670 field for the page; this field has an empty set of parentheses in subfield $b. The toolkit presents this field on its field change panel. You must supply appropriate information in subfield $b, and you may choose to make other changes. If you click the OK button on this panel, the toolkit adds the 670 field to the authority record.
| For example, if you give the toolkit the URL from this web page: |
 |
| ... the toolkit will propose this 670 field (this picture was taken on August 30, 2015): | |
 |
|
| You can now complete the text for 670 subfield $b, and make any other changes to the 670 field that seem necessary. |
The toolkit uses whatever text it finds in the <title> tag. In some cases, the text supplied in this tag by the web site may indicate that there is some kind of problem: for example, the toolkit may not have permission to access the web site via direct URL. If this happens, you'll need to supply an appropriate text for 670 subfield $a yourself.
 |
|
| The <title> tag of the web page supplied by the site indicates that the toolkit does not have permission to access this site via the supplied URL. In some cases, you may be able to reformulate the URL in a different manner and try again; but in most cases, you will need to provide the appropriate text for 670 subfield $a, as well as the text for subfield $b. |
Data in the MARC record must be encoded as UTF-8 (this is one way to represent the Unicode character set), but web pages can be encoded in a large number of character sets. This poses a problem for the toolkit, because the toolkit must know how to translate each variant character set into UTF-8. If a web page is encoded using a character set that the toolkit doesn't understand, the toolkit will display a message to that effect, and it will not be able to supply the preliminary 670 field for you. When this happens, your only immediate solution is to build the 670 field yourself. If this happens to you a lot, let Gary know about it (Gary will need examples of problem URLs) and he'll see what can be done.
 |
|
| The toolkit does not understand the encoding used for the data in this web page. The cataloger needs to build the new 670 field in some other manner. |
Use the My fields tab to define authority variable fields that occur frequently in your work. You can insert these fields into authority records as the need arises.119 The toolkit saves the fields you define from one session to the next.
The list at the top of the tab shows the fields you have already defined.
| In the following illustration, you have defined seven fields for re-use in authority records. |
 |
The toolkit provides default fields on this tab when there are no other fields defined. You can change and delete these fields in exactly the same manner as any other fields. If you delete all of the fields listed on this tab, the toolkit will restore these default fields for the next session.120
The buttons below the list of fields help you work with the list.
The fields you define on this tab include the same labels for diacritics and special characters within curly braces that the toolkit uses when you create or edit a variable field in an authority record. The difference here is that the toolkit does not translate these codes into their MARC equivalents until you add a field to an authority record—they're displayed in their raw form in the list of fields on this tab. In addition to the codes for diacritics and special characters, you can use the following codes, also within curly braces, to tell the toolkit that it should insert today's date when it creates a field in the authority record. Among other things, this feature may be of use in the construction of skeleton 670 field texts.
Example: If you define your field text in this manner:
On August 6, 2015, the toolkit will add this field to your authority record:
When you are creating or modifying a field for the My fields tab, the field-editing panel has an additional check-box at the bottom, labeled Edit before add. In most cases, you will simply want the toolkit to add your field to the authority record; of course, you can always edit this field later. (So, for the majority of fields defined on this tab, this check-box will not have a check-mark in it.) In some cases, you may find it convenient to edit the field even before it gets into the authority record; in such cases, you can put a check-mark into this box. When the definition of a variable field has a check-mark in the Edit before add box, the toolkit will display the field in its field-editing panel, and invite you to make changes to the field. When you click the OK button, the toolkit adds your field to the record.
| For example, you might define a field in this manner, with a check-mark in the Edit before add box: | |
 |
|
| If you ask the toolkit to add this field to an authority record, the toolkit will present the field in its field-editing panel, and invite you to complete the field. (In this case, the toolkit has already inserted the current date in the specified format. You need to identify the sender of the e-mail message in subfield $a, and the information found in the message in subfield $b.) When you click the OK button, the toolkit adds the field to the record. | |
 |
The authority toolkit's behavior is controlled by a large number of options. The toolkit preserves your choices for these options from one session to the next. The toolkit presents these values for inspection and modification when you select the Options menu item on the toolkit's main panel. With the exception of the NACO symbol, the default values that the toolkit provides for these options are probably good enough to get you started in your work with the toolkit, but you'll eventually want to investigate the full range of possibilities.
| The following illustration shows the toolkit's Options panel. (Some of the values shown in this illustration are not the default values.) The options presented in this panel, the number of tabs, and the arrangement of options on those tabs, will change from one version of the toolkit to the next; the following illustration does not necessarily reflect the current appearance of this panel. However, the description of options in the following sections of this document is exhaustive. |
 |
Some of these options apply only to new authority records, some apply only to existing authority records, and some apply to both kinds of records.122 The toolkit will create perfectly nice authority records with the default settings; but those settings, and so the finished authority records, may not suit your needs or taste. You can change the settings at any time, to produce results more to your liking, but you should start with the default settings and later change them as you discover the need. Whenever you encounter some aspect of the toolkit's behavior that you don't like, first look to see if that behavior is controlled by an option. Be sure to let Gary know if there are aspects of the toolkit's behavior that you would like to be able to control, but which are not covered by any of the options.
The toolkit cannot apply all of the changes you make as soon as you click the OK button; some options will only come into effect the next time you start the toolkit. After changing options, it's always best to leave the toolkit and start it up again.
All of the toolkit's options have default values. These default values are the values the toolkit presents the first time you use the program. After you use the program once, the toolkit restores the values you have set on the Options panel. (Although many of these may have the same values as the defaults, they are now your values.) The toolkit preserves your options when you install a new version of the program.
Gary is faced with an interesting problem when he adds a new option to the toolkit, if that option controls an existing feature. For existing users, Gary prefers to set the default value for the new option so as to preserve the toolkit's previous behavior123, but for new users Gary prefers to set the default value for a new option so that the toolkit's behavior matches the needs of the most most common cases.124 These contrasting principles often produce the same value, but sometimes they produce different values. For this reason, the toolkit sometimes provides different default values for current users and for new users. No matter what, after an option has been introduced into the toolkit, the default value is no longer relevant; the relevant value is your value.
The OCLC Connexion and independent versions of the toolkit store options in the Windows Registry.125 Earlier versions of the toolkit stored settings in an initialization file. The switch was made to use the Registry solely because of ongoing permissions problems with files; but that doesn't mean that all problems have disappeared. If you change one or more options but the toolkit doesn't appear to save your changes, it's possible that your local IT staff have locked down your computer in such a way that programs cannot use the registry. If this happens to you, let Gary know; there may be a devious way around this problem. (But in the meantime, feel free to complain to your local IT people.)
No matter what version of the toolkit you have, you can create a portable file that contains your settings, and you can also restore settings from such a file.
The toolkit's ability to save settings to a file, and restore settings from a file, means that you can copy settings from one workstation to another. This can save you some time if your settings are particularly elaborate, and you wish to have the same settings on multiple workstations.
The variables on the General tab on the Options panel control the toolkit's behavior in a general fashion. The General tab also shows, in the lower right-hand corner, the toolkit's version number.126
0: The toolkit will only consider LCSH headings. This is the defualt value for this option.
07tlsh: The toolkit will only consider LCSH and TLSH headings.
There's a good reason that the toolkit offers different values for the display size of an authority record's fixed fields and variable fields. Although you can set the value to whatever you wish, if you set the display size high enough, the lines that comprise a record's fixed fields won't fit in the alotted space, and will "wrap" around to the next line. This makes the display very difficult to interpret. (The variable fields wrap around in a reasonable manner, so this isn't a problem for them.)
In the following illustration, you have set the toolkit's options for the display size of the fixed and variable fields to a high number. The line-wrap present in the fixed fields area makes the record difficult to interpret.
In the following illustration, you have set the toolkit's option for the display size of the fixed fields to a value appropriate for the display width. The fixed fields appear as they should, with values following the corresponding label.
If your choice produces an uncomfortable result, select smaller font sizes here. For example, if you see a display similar to that in the following illustration, you should select a smaller value for this option.
For example, the following setting for this option establishes the default indicators 1-blank for personal names, 2-blank for corporate and conference names, blank-0 for uniform titles, and blank-blank for topical and geographic names. It also defines 0-blank default indicators for the 678 field.
This option does not control chages that the toolkit makes during verification. If you ask the toolkit to verify the contents of a record, it will proceed to make any changes to the record that are indicated byj the results of that verification. The toolkit creates a message that identifies each change made, which the toolkit includes in its list of messages if the Validation and verification: show messages box is checked.
The variables on the Menu details tab of the toolkit's Options panel control the behavior of items on the toolkit's menus. Because there are so many options for verification, these options are distributed onto a series of sub-tabs.
The variables on the Edit/Fixed fields sub-tab control in small part the behavior of the toolkit's ability to edit an authority record's fixed fields. (The configuration file FfdEdit.cfg describes each fixed-field element in detail.)
In the following illustration, you have chosen a light purplish color for this option. In its fixed-field editing panel, the toolkit displays the undefined value for the Source fixed-field position against this background color.131
The toolkit also uses the value of this property for records in its main window. If a fixed-field position contains an invalid value, the value is shown against a colored background. This coloring is redundant with a validation message in the frame at the bottom of the record display.
The variables on the Romanization sub-tab control the behavior of the toolkit's Edit/Romanize menu item.
The variables on the Verify sub-tabs control the behavior of the toolkit's Verify menu item. If you have already invoked the toolkit's verification feature during your current session, changes to many of these options will not take effect until your next toolkit session.
When the toolkit determines that the current task will exceed the limit imposed by these options, the toolkit pauses for the appropriate amount of time (depending on what it has already done, and when), so that the current request will not cause LC to block your IP address. If the toolkit needs to pause, it displays a message in the form "PAUSED for <number> seconds because of the Library of Congress limitation on retrievals" on its title bar. The displayed number counts down to zero; when the required amount of time has elapsed, the toolkit resumes its work.
There are two boxes for each tag that the toolkit can verify. The top box for a field lists the vocabularies that the toolkit will test, in the order in which the toolkit will test them; the bottom box lists the other vocabularies that the toolkit is able to test, but which are not currently selected.
Default value: The toolkit lists all available vocabularies in the top box (which means that the bottom box is empty), and it highlights the first vocabulary in the top box. This is almost certainly not the appropriate setting for any of the fields that the toolkit can verify. Before you use the toolkit's Verify feature, you should carefully review and adjust all of the information on these two tabs.
The following illustration shows the options area that controls the verification of the 370 field, as it has been configured by one user. The options area for the 370 field works exactly the same as the options areas for other fields. With the choices shown here, you are asking the toolkit to verify terms in the 370 field first against the LC/NACO Authority File, and then (if not found in NAF) against the LCSH vocabulary, MeSH and LC's "annotated card" (children's) headings, in that order; you have decided not to use AFSET, LCDGT, LCMPT and several other vocabularies to test terms appearing in the 370 field. Other toolkit users can adjust this options area on their own toolkit's Options panel to define a different verification scheme for the 370 field.
To move a vocabularly from the upper box to the lower box (thereby removing it from consideration for the verification of terms found in that field), click the designation for the vocabulary in the upper box, then click the "v" button between the two boxes.
To move a vocabularly from the lower box to the upper box (thereby selecting it for use in the verification of terms found in that field), click the designation for the vocabulary in the lower box, then click the "^" button between the two boxes.
If you use the "v" button to remove all of the designations from the upper box for a tag, the toolkit will not attempt to verify the contents of that field.
When the toolkit is testing a term found in a field that does not include subfield $2, the toolkit tests the term against vocabularies in the order listed in the upper box. You can adjust the relative positions of the vocabularies in the upper box to control the order in which the toolkit tests a term. To change the relative position of a vocabulary in the upper box, click on the designation for the vocabulary in the upper box, then either click the "^" button to the left of the upper list to move the highlighted vocabulary up one position, or click the "v" button to move the highlighted vocabulary down one position.
The variables on the Tab details of the toolkit's Options panel control the behavior of items on the various tabs on the right side of the toolkit's main panel. Because there are so many options related to the various tabs, the options are distributed onto a series of sub-tabs.
The options on the Texts tab sub-tab control the behavior of the toolkit's Texts tab.
If the last comma-delimited or space-delimited piece of the text is a candidate term, or has the appearance of a Roman numeral, the toolkit places the text in subfield $c. If the last piece of the text is not in the list of candidate terms but ends with a full stop (and is not an initial), the toolkit asks whether the text should be placed in subfield $c. If the first space-delimited piece of the text is a candidate term, the toolkit places the text in subfield $c. If the first piece of text is not a candidate term but ends with a full stop (and is not an initial), the toolkit asks whether the text should be placed in subfield $c.
If there is a checkmark in this box and given the text Marcus Frammis, Jr. for use in a 400 field, the toolkit will automatically move the text Jr. into subfield $c:
Given the text Dr. Mary Frammis for use in a 400 field, the toolkit will automatically move the text Dr. into subfield $c:
The options on the Choices tab sub-tab control the behavior of the toolkit's Choices tab.
For example, if there is a check-mark in the 377: Language box here, and if the last time you used the 377 drop-down list on the Choices tab to add "Serbian" to an authority record, then the next time you start the toolkit the 377 drop-down list will show the value "Serbian".
These check-boxes control the toolkit's manipulation of these boxes when the toolkit is initializing its main panel, on start-up. Once the tookit has started, the drop-down lists retain whatever value you may give them. The toolkit will restore the last use you make of these lists the next time it starts up.
There are two parts to deciding which $i texts to display.
Default values: all of the boxes are checked, and all of the items are selected.
The options on the Web tab sub-tab control the behavior of the toolkit's Web tab. The drop-down list at the top on the left side of the sub-tab has an entry for each resource that the toolkit makes available on the Web tab itself. As you change the name displayed in this list, the toolkit displays the options pertaining to that resource on the right side of the sub-tab.
The right side of this sub-tab displays the options that apply to the web resource indicated by the drop-down list on the left side. Most of these options simply set the default values that the toolkit presents on the Web tab; you can always adjust these to match the needs of an individual case. All web resources have a number of options in common. A few web resources have additional options. To see the options that the toolkit uses for a resource, select the resource from the drop-down list on the left side of the panel.
The toolkit presents the following options for every resource. However, some of these options only apply to certain resources, so they're not all selectable for every resource.
Several web resources have additional options. These options are described in the following sections.
The toolkit will always create a 670 field from data from this web site. The following options tell the toolkit whether you wish to create additional fields.
This option controls the toolkit's behavior when handling information from GNIS.
The following options control the toolkit's behavior when handling information pulled from VIAF.
These options control the toolkit's behavior when handling information from Wikidata.
For example, given this initial authority record:
And this information available from Wikidata:
The authority record will end up with an 046 field like this:
This option provides universal control for all scripts; the Languages/scripts to ignore option provides more detailed control over scripts that the toolkit should ignore.
The toolkit does not (at present) apply this test to other data elements supplied by Wikidata.
The toolkit also does not apply this test to the first paragraph extracted from a Wikipedia page, which the toolkit presents as a potential 678 field. (Such a paragraph may contain a mixture of scripts.)
For example, the toolkit has extracted this first paragraph from a Wikipedia page, and has made it into a 678 field. The text contains some characters that are not allowed in NACO records; until such time as all scripts are allowed in NACO records, you will need to edit this field to remove the Thai characters. (Other changes may also be necessary.)
The following illustration shows part of the toolkit's transcription of Wikidata information for Ludwig van Beethoven. In this display, each piece of Non-Latin data is prefixed with the corresponding Wikidata language/script code.
Unfortunately, some of these scripts (and, occasionally, individual characters within a script) are not defined in the font used by the toolkit for display. The toolkit displays unrecognized characters as open squares. The following illustration shows a different part of the Wikidata information for Ludwig van Beethoven; there are unrecognized characters for Amharic, Arabic (but some characters in this script are recognized), Myanmar and Malayalam (one character). 145
At least in the case of this particular set of Wikidata information, OCLC has problems with exactly the same characters as does the toolkit: the same characters appear as open squares in the Connexion client, and OCLC complains about invalid characters when it validates the record. (OCLC may also complain about scripts that display correctly within the toolkit.)
You can use the toolkit's Languages/scripts to ignore option to define scripts and languages that the toolkit should omit when it is digesting information from Wikidata. (Normally, you'll only discover the need to modify this option after you've used the toolkit to transform a particular Wikidata collection.) Place in this text box the two-character Wikidata language codes that the toolkit uses to label each of the non-Latin languages/scripts. Use spaces to separate codes from each other.
Example: If you wish to exclude Arabic- and Myanmar-script data from converted Wikidata text, your configuration should look like this:
As you can see from the strings labeled with the code "ar" in a preceding illustration, eliminating all occurrences of a given script/language from the transformed Wikidata text will sometimes eliminate potentially useful information. Unfortunately, at present it's a matter of everything, or nothing: either the toolkit removes all occurrences of a given script/language from the 670, or it leaves them all in.
This option provides for the exclusion of individual languages or scripts. The Allow all Unicode characters option provides for a blanket exclusion of scripts not allowed in NACO records.
The toolkit offers in this frame a set of options that can help ameliorate the problem caused by this Wikidata practice. You can tell the toolkit to accept "January 1" dates in all cases, to discard "January 1" dates in all cases, or to ask you how it should handle each "January 1" date. (The last option is the default value, and is probably the best.) If the toolkit ignores a "January 1" date (either because you select the second option, or you select the third option and tell the toolkit that "January 1" in a particular date is incorrect), the toolkit will change the month and day portion of the date in the Wikidata information recorded in the 670 field from "-01-01" to "-00-00". (The toolkit does not include month and day in any 046 field it creates if month or day are represented in the raw data as zeroes.) Changing the date in the 670 in this manner will make it less likely that another person coming along later will incorrectly modify the 046 field to contain an incorrect value.
The following options define the toolkit's ability to retrieve bibliographic records from remote sites, and display them on the Texts tab. Here you can define as many different Z39.50 connections as you want; on the Web tab, you search the information available at one of these connections to find bibliographic records that may be of some use in constructing an authority record.
The toolkit makes a number of data elements available in a Z39.50 definition, but some of them may not be used for certain data sources. (A local library system may not require signon and password, for example.)
If you delete all of the Z39.50 connection definitions, the toolkit will supply a definition to search OCLC's WorldCat. (This definition is also the default definition.) This definition for WorldCat is incomplete: you'll need to change it to supply your own signon and password.
The options on the Assist tab sub-tab control the behavior of the toolkit's Assist tab. The Assist tab helps you build two complicated fields: 046, and 371.
The default values in this frame lock the tab to the 046 work area. This preserves the original behavior for this tab, so users are not surprised by an unusual new behavior.
The options on the My fields tab sub-tab control the behavior of the toolkit's My fields tab.
|
The variables on the 0XX-3XX tab of the toolkit's Options panel control the toolkit's handling of fields with tags in the range 010-399. Options elswewhere control the verification of these fields.
The toolkit will attempt to create an 046 field in a new record:
You can also use the 046 tab to create subfields in an 046 field.
The toolkit only applies this option to parenthesized expressions; if the name of the larger place is preceded by the old-style punctuation (comma-space), the toolkit won't apply this option. However, if you verify a record that contains old-style punctuation in the 370 field, and if the toolkit can find a matching record by adjusting the punctuation, the toolkit will change the 370 text and then go on to supply subfield $c when possible.
For example, if there is a checkmark in this box the toolkit will change Xenia, Ohio in subfield $a of a 370 field to Xenia (Ohio). The toolkit will only make this change to a term once in a given record (though it will change all such uses in the record); if you change the text of a subfield so that it again uses a comma, that change will stick.
To generate a field for an associated group, the toolkit inspects 110, 111 and 130 fields with terminal subfield $a or $b that ends with a parenthetical qualifier. The toolkit considers such qualifiers to be of three types: date, place, and 'other.' The 'other' terms are potential associated groups. If there is a checkmark in the appropriate box on the options panel, and if the toolkit can confirm that the term in a qualifier is the name of an organization, the toolkit creates a field, using the LC/NACO form of name for the organization. If the authority record itself represents a corporate body, the toolkit will not create a field if the same corporate body is already present as a 5XX field.
The tag that the toolkit uses for a recognized corporate name varies with the type of record: if the term comes from the qualifier of a 11X field, the toolkit uses the 373 field; if the term comes from the qualifier of a 130 field, the toolkit uses the 381 field. 151 The toolkit uses exactly the same process to parse parenthetical qualifiers in 11X and 130 fields; but at the end, if the qualifier comes from a 130 field, the toolkit uses the tag 381 instead of the tag 373.
The toolkit can also create a 381 field when a corporate body is used in the parenthetical qualifier for 130 field. This work, oddly enough, is controlled by the options for the 373 field.
The variables on the 4XX-675 tab of the toolkit's Options panel control the toolkit's handling of fields with tags in the range 400-675.
Here are the conditions under which the toolkit can automatically generate one or more 400 fields:
For example, if there is a checkmark in this box, and if the bibliographic record for a continuing resource contains these fields:
588 ## $a Description based on: Vol. 20, No. 10 (December 1996); title from caption.
The toolkit will construct a 670 field that begins like this:
670 ## $a WPFF newsletter, Vol. 20, No. 10 (December 1996): $b caption
In the following illustration, the toolkit is presenting the texts of the 245 and 26X fields from the source bibliographic record. You may take this opportunity to isolate the English and Arabic names of the conference, as well as the number, date and place, for use in 670 subfield $b.
If the toolkit applies this option:
The value of this checkbox also comes into play when you invoke the Create 670 menu item after having brought in an additional bibliographic record: if there is no 670 subfield $b, there will be no 670 field. (So if you use the Create 670 feature you may well wish to turn on this option.) The value of this check box has no other effect on existing authority records.
| Material type | 670 $b introductory text |
| Book/Other | title page |
| Computer file | title screens |
| Poster | poster recto |
| Series | series title page |
| Videorecording | title/credit sequence |
| CD | disc label |
| Cassette | cassette label |
| Other sound recording | label |
| Music score | title page |
|
The variables on the 678-8XX tab of the toolkit's Options panel control the toolkit's handling of fields with tags in the range 678-899.
The items in this frame control the toolkit's automated generation of 678 fields from information present in the authority record.
If there is no checkmark in this box, the toolkit might produce a 678 field that contains text like this:
Associated with Gainesville, Fla. and Birmingham, Ala., Bamman is associated with the University of Florida, Department of Physiology; the University of Alabama at Birmingham, Department of Nutrition Sciences; and the University of Alabama at Birmingham, Department of Cell, Developmental and Integrative Biology.
If there is a checkmark in this box, the toolkit might from the same information produce a 678 field that contains text like this:
Bamman is associated with the University of Florida, Department of Physiology; the University of Alabama at Birmingham, Department of Nutrition Sciences; and the University of Alabama at Birmingham, Department of Cell, Developmental and Integrative Biology.
The variables on the Incoming tab of the toolkit's Options panel tell the toolkit how to handle incoming records: new authority records created by the toolkit, and authority records brought into the toolkit for modification.
Unless otherwise stated, the items in this frame control the handling of all series authority records upon arrival in the authority toolkit.
|
The variables on the Files tab of the toolkit's Options panel tell the toolkit about input and output files. Some of these options only apply when the toolkit is running under OCLC Connexion, some only apply when the toolkit is running as an independent program, and some apply to the program in all cases.
If you extract one identity from an undifferentiated name record, and you are using the toolkit as an independent program, the toolkit will write a modified version of the original undifferentiated name record (minus the 670 fields belonging to the identity just extracted) to a separate file. The above options for output files also apply to the file containing the undifferentiated name record, but the toolkit uses "Undifferentiated" instead of "Output" in the file name.
Important fixes and changes (and many minor ones), starting in mid-August 2015, are listed here in reverse chronological order. Click on a link to read a fuller description, or see an illustration, of the area of the toolkit affected by the change. This list does not show, in full detail, changes to modules that are also included in the music toolkit.
| Original 5XX $i text | Replacement 5XX $i text | Conditions |
| founded | founded corporate body of person | 500, indicator 2 is not "3" |
| founded | founded corporate body of family | 500, indicator 2 is "3" |
| founded | founded corporate body of corporate body | 510 or 511 |
| founder | founding family | 500, indicator 2 is "3" |
| founder | founding corporate body | 510 or 511 |
| sponsored | sponsored corporate body of person | 500, indicator 2 is not "3" |
| sponsored | sponsored corporate body of family | 500, indicator 2 is "3" |
| sponsored | sponsored corporate body of corporate body | 510 or 511 |
| sponsor | sponsoring family | 500, indicator 2 is "3" |
| sponsor | sponsoring corporate body | 510 or 511 |
As it happens, handling non-matches in this manner also fixes a long-standing problem with ligatures: until today, a heading verified against id.loc.gov that contains ligatures was reported as a non-match, even when the ligatures are all present in exactly the right places. (This has been reported to LC.) The new search without diacritics finds a match, and the toolkit behaves accordingly.
The "logic" for doing verification is quite a complicated thing, and the test for diacritics needs to be added at each point that the toolkit may fail to find a match. I'm sure that I haven't found them all; so if you verify a heading that does, or should, contain diacritics but the toolkit reports a non-match, let me know (be sure to give me the problem heading) and I'll figure it out. It's also entirely possible that in adding this new business I've broken something else; let me know about any unexpected results.
1. When the toolkit is digesting VIAF information, the toolkit often needs to re-code UNIMARC authority data with MARC21 equivalents, but all of the toolkit's substantive work involves only the MARC21 coding.
2. There was formerly a third mode, intended for use at the Library of Congress. This mode interacted directly with LC's Voyager database. Disappointingly, this program was never implemented at the Library of Congress.
3. The DLL has its origin in a component first developed at Northwestern University Library for use under the NOTIS system in 1994. This component was later modified and expanded for use under the Voyager system (it was part of the cataloger's toolkit); further expanded and modified, it is now available to all users of the OCLC Connexion client.
4. No copyright or trademark claim is made for these terms.
5. Referring to the whole thing as the macro is inaccurate, because the Connexion macro is only a small part of one of the toolkit's operating modes. More importantly, referring to the whole thing as the macro tends to annoy the programmer.
6. For example, the 372 field can contain terms drawn from an externally-defined vocabulary. The toolkit can help you construct a 372 field by pulling information from external resources. Transferring information in this manner eliminates the possibility of typographical errors. The toolkit can also verify the accuracy of some texts you type yourself against the appropriate vocabulary standard.
7. This is undeniably true. Note, however, that the toolkit can, with your assistance and under your direct control, make changes to a group of authority records.
8. Northwestern University and Gary L. Strawn shall not be held liable for any loss or damage, lost profits, loss of business, loss of or damage to data, downtime or unavailability, of or in connection with use of these materials. Northwestern University and Gary L. Strawn shall have no liability for any claims arising from use of these materials, based on infringement of copyright, patent, trade secret or other right, libel, slander or invasion of privacy or claims based on errors, inaccuracies, or omissions in or loss of the data. Northwestern University and Gary L. Strawn make no express warranties or representations and disclaim all implied warranties with respect to these materials as to their accuracy, merchantability or fitness for a particular purpose. These materials are supplied "as is."
9. You can find Gary's e-mail address in slightly disguised form at the top of this documentation.
10. If at all possible, stop work on the problem authority record, and do not save your results. This will help Gary reconstruct the problem exactly as you encountered it.
11. If the authority toolkit is installed on a workstation under Connexion version 2, the installer for Connexion version 3 will automatically move the macro part of the authority toolkit to the new location. You do not need to do anything special related to the authority toolkit at the time of migration. To update the toolkit after the migration to version 3.X, you must use the toolkit installation package for Connexion 3.X.
12. If the installer program finds that Connexion 3 has not been installed for any users on a workstation, it will install the toolkit in the folder for the current Windows user.
13. In case you're wondering, the macro name AuthorityCreate was defined when this system could only create new authority records. Although the toolkit's capabilities have grown, the macro's name remains unchanged.
14. If your institution is not a NACO participant, use your institution's symbol.
15. Gary strives also to keep this documentation up to date in parallel with those changes, but this doesn't always happen for minor changes.
16. It's possible to work in the local save file in Connexion without logging onto OCLC; but you must log onto OCLC before you can use the toolkit.
17. The Connexion macro language has a function called IsHeadingControlled that should allow a program to distinguish between controlled and uncontrolled access fields. However, this function does not distinguish between access fields that are fully controlled and those that are only partially controlled, rendering its results meaningless in the context of the toolkit. The toolkit therefore relies on you to know which parts of a heading are uncontrolled and so require establishment in an authority record. In the end, of course, OCLC will prevent you from creating an authority record whose 1XX field matches an existing authority access field.
18. If you select the 240 field in a bibliographic record, the toolkit adds it (beginning with subfield $t) to the end of the bibliographic 1XX field to create the authority 1XX field.
19. If you select the 245 field in a bibliographic record, the toolkit adds it (beginning with subfield $t) to the end of the bibliographic 1XX field to create the authority 1XX field.
20. The toolkit will only create a new authority record from a 490 field if the first indicator is '0'. Only use the 490 field as the basis for a new authority record if the series is not traced; if the first indicator of the 490 field is '1', create the new authority record from the corresponding 8XX field.
21. The toolkit knows to omit certain bibliographic subfields as it creates the 1XX field for the new authority record, such as subfields $v, $x, $y and $z in bibliographic 6XX fields, and subfield $e in a bibliographic 700 field. The toolkit will use some excluded subfields elsewhere in the authority record. For example, it will not include bibliographic subfield $v from a bibliographic 830 field in the authority 130 field, but it will use this subfield $v in the authority 642 field.
22. The texts in this drop-down list will not represent in all details the eventual form of the authority record's 1XX field. Most notably, the toolkit only troubles itself about terminal punctuation after you select a segment.
23. The toolkit knows that it can remove some terminal full stops without asking. For a simple example, the toolkit will remove without asking a full stop that follows a numeral. Other rules are more elaborate. For example, the toolkit will remove a full stop from the last workd of a heading if the same word occurs in the 245 field followed by a space.
24. For example, the toolkit knows that a full stop that's part of an initialism or a recognized abbreviation must be retained. (There are many abbreviations not in the toolkit's list of recognized abbreviations.)
25. The bibliographic access field can contain more subfields than you wish to use in the new authority 1XX field. For example, you can create a personal name authority record from a 600 field that also contains subfield $v, you can create an authority record for a main corporate body from a 710 field that contains both $a and $b, and you can create an authority record for the name part of a name/title access field.
26. It's possible to work in the local save file in Connexion without logging onto OCLC; but you must log onto OCLC before you can use the toolkit. The toolkit cannot work on a record that someone has sent for review; if an authority record is displayed with a uniform grey background, the record can't be edited, and therefore the toolkit can't work with it.
27. If you started your work with a record from either the online or local save file, the toolkit should replace the record in that file. This should be the case even if you have used the toolkit's Suspend feature to bring additional information into the record.
28. See the page describing the coding of 008/32 in section Z1 of the Descriptive cataloging manual.
29. Unless you make some change, the 100 field in the new record will match the 100 field in the original undifferentiated name record; but OCLC won't allow you to save a new record whose 100 field matches the 100 field in another record.
30. The presence of the tag 500 in an authority record for an undifferentiated personal name almost always means that, under the conventions in force at the time, it was not possible to construct a 400 field that did not conflict with a 100 field in a different authority record. A 500 field in an undifferentiated personal name authority record only rarely identifies a related entity, such as a pseudonym. The toolkit assumes that all 500 fields in undifferentated personal name authority records really would like to be 400 fields.
31. In other words, the record before modification contains one and only one bracketed 670 field.
32. You will eventually need to modify this 667 field to include the LCCN of the replacement record.
33. In other words, the record before modification contains exactly two bracketed 670 fields.
34. In other words, the record before modification contains three or more bracketed 670 fields.
35. The id.loc.gov part of the Web tab is a different way to bring an LCSH or NAF authority record into the toolkit.
36. It is likely that the scheme that the toolkit uses to make such secondary changes will be expanded as experience is gained with this tool. Be sure to let Gary know if you encounter a situation in which the toolkit could eliminate an extra step for you.
37. Many of the toolkit's validation rules were created because the Connexion client reported a problem with an authority record; the toolkit's validation rules often duplicate Connexion's validation rules.
38. For example, the toolkit will display a message whenever an authority 1XX field contains a dollar sign. This is because the dollar sign has often been used in library systems as the delimiter character. The toolkit has no way to know whether the dollar sign in any particular heading correctly represents the name, or should be changed to a delimiter; all the toolkit can do, is notify you that the condition should be considered carefully.
39. Fetching the definition for a MARC tag from the LC web site normally just takes a moment; but the amount of time needed depends entirely on the performance of the LC web site. The toolkit saves MARC definitions for re-use; the first time you work with a field having a given tag the toolkit has to fetch the field's definition fropm the LC web site, but the next time you work with a field with the same tag the toolkit uses its saved definition. The toolkit periodically refreshes its cache of MARC definitions, and you can also force the toolkit to refresh its MARC definitions whenever you like.
40. Because the toolkit has to scrape the definitions from an HTML page, and because the HTML pages follow several different encoding models, the toolkit may occasionally not be able to list the correct indicator and subfield code definitions for a tag. Let Gary know if this happens; he should be able to devise a solution.
41. The device that the toolkit uses to present the field for editing isn't able to present diacritics and special characters in a more natural manner that also makes them easy to modify.
42. The authority toolkit recognizes all of the character entity references listed in the following table (preceded by "&" and followed by ";"), and will translate them into equivalents appropriate for use in a MARC21 record. (For example, the toolkit will translate "è" into the letter "e" followed by the grave accent character.)
| Aacute | curren | gbreve | lang | oelig | REG | uarr |
| aacute | Dagger | Gcedil | laquo | Ograve | reg | uArr |
| Abreve | dagger | Gcirc | larr | ograve | rfloor | Ubreve |
| abreve | dArr | gcirc | lArr | oline | Rho | ubreve |
| Acirc | darr | Gdot | Lcaron | Omacr | rho | Udblac |
| acirc | Dcaron | gdot | lcaron | omacr | rlm | udblac |
| acute | dcaron | ge | Lcedil | Omega | rsaquo | Ucirc |
| AElig | deg | gt | lcedil | omega | rsquo | ucirc |
| aelig | Delta | harr | lceil | Omicron | reg | Ugrave |
| Agrave | delta | hArr | ldquo | omicron | Sacute | ugrave |
| agrave | diams | hearts | le | oplus | sacute | Umacr |
| alefsym | div | hellip | lfloor | or | sbquo | umacr |
| alpha | divide | Hcirc | Lmidot | ordf | Scaron | uml |
| Amacr | Dstrok | hcirc | lmidot | ordm | scaron | upsih |
| amacr | dstrok | Hstrok | lowast | Oslash | Scedil | Uogon |
| amp | Eacute | hstrok | loz | oslash | scedil | uogon |
| and | eacute | Iacute | lrm | Otilde | Scirc | Upsilon |
| ang | Ecaron | iacute | lsaquo | otilde | scirc | upsilon |
| Aogon | ecaron | Icirc | lsquo | otimes | sdot | Uuml |
| aogon | Ecirc | icirc | Lstrok | Ouml | sect | uuml |
| apos | ecirc | Idot | lstrok | ouml | shy | Uring |
| Aring | Edot | Igrave | lt | para | Sigma | uring |
| aring | edot | igrave | macr | part | sigma | Utilde |
| asymp | Egrave | iexcl | mdash | permil | sigmaf | utilde |
| Atilde | egrave | Imacr | micro | perp | sim | Wcirc |
| atilde | Emacr | imacr | middot | Phi | spades | wcirc |
| Auml | emacr | image | minus | phi | sub | Xi |
| auml | empty | imath | Mu | Pi | sube | xi |
| bdquo | emsp | imped | mu | pi | sum | Yacute |
| Beta | ENG | infin | nabla | piv | sup1 | yacute |
| beta | eng | inodot | Nacute | PlusMinus | sup2 | Ycirc |
| brvbar | ensp | int | nacute | plusmn | sup3 | ycirc |
| bull | Eogon | Iogon | nbsp | pm | sup | yen |
| Cacute | eogon | iogon | Ncaron | pound | supe | Yuml |
| cacute | Epsilon | Iota | ncaron | prime | szlig | yuml |
| cap | epsilon | iota | Ncedil | prod | Tau | Zacute |
| Ccaron | equiv | iquest | ncedil | prop | tau | zacute |
| ccaron | Eta | isin | ndash | Psi | Tcaron | Zcaron |
| Ccedil | eta | Itilde | ne | psi | tcaron | zcaron |
| ccedil | ETH | itilde | ni | quot | Tcedil | Zdot |
| Cdot | eth | Iuml | not | Racute | tcedil | zdot |
| cdot | Euml | iuml | notin | racute | there4 | Zeta |
| cedil | emul | Jcirc | nsub | radic | Theta | zeta |
| Ccirc | exist | jcirc | Ntilde | rang | theta | zwj |
| ccirc | fnof | jmath | ntilde | raquo | thetasym | zwnj |
| cent | forall | Kappa | Nu | rarr | thinsp | |
| Chi | frac12 | kappa | nu | rArr | THORN | |
| chi | frac14 | Kcedil | Oacute | Rcedil | thorn | |
| circledR | frac34 | kcedil | oacute | Rcaron | times | |
| clubs | frasl | kgreen | Ocirc | rcaron | trade | |
| cong | gacute | Lacute | ocirc | rcedil | Tstrok | |
| copy | Gamma | lacute | Odblac | rceil | tstrok | |
| crarr | gamma | Lambda | odblac | rdquo | Uacute | |
| cup | Gbreve | lambda | OElig | real | uacute |
43. For the toolkit's purposes, a URL begins with the text "http://" or "https://" and ends at the first space, or at the end of the subfield. The toolkit removes any terminal punctuation.
44. The toolkit won't allow you to change the 001-009 fields. You can use the toolkit's fixed field editor to change the 008 field.
45. If this menu choice is available at all, the toolkit sets its caption to represent the field that it will add: Create 400, Create 430, and so on.
46. As you might expect, the details are rather more involved than this simple table might suggest. The circumstances presented by a particular record will direct the toolkit's use of these elements. For example, if the authority record for a personal name contains 046 subfield $f, the toolkit will ignore 046 subfields $s and $t.
47. For conferences, the toolkit also considers the value in subfield $d of the 11X field.
48. For example, given the text "Art, Modern" in a 372 field, the toolkit will use "modern art" in the 678 field. The toolkit's table of these translations is based on an analysis of the texts appearing in these fields, as of about August of 2015. Developing this table took quite a lot of work, and Gary is not interested in repeating the entire job to pick up new terms that may see frequent use. However, if in your work you encounter a term in one of these fields that could be translated into something that fits well into a 678 field, but is not so translated, please let Gary know, and he'll add that term to the toolkit's table.
49. The toolkit assumes that any non-Latin personal name variants that you select represent the native representation of the person's name; it assumes that other variant personal names are simple variants. The toolkit treats all corporate/conference variant names as simple variants.
50. To flip the subfield $i text the toolkit uses the configuration file RdaRelationships.cfg, which lists RDA relationship terms in pairs.
51. For example, if you add a 642 field to the authority record for a series, the toolkit will change the value of 008/13 (series numbering) from 'b' (not numbered) to 'a' (numbered), but it cannot possibly know that the correct value is 'c' (sometimes numbered, sometimes not).
52. This file defines each element displayed on the toolkit's editing panel--whether the element is editable or not; its source in the authority record, and the allowed values. The list of values defined in this file includes all defined values, but the toolkit will omit values not allowed in NACO records if you select an option.
53. The definitions of the 670 and 675 fields were shifted subtly in about 2012, with the result that some information contained in 675 fields would now be more properly housed in 670 fields. This menu choice allows you to convert selected 675 $a subfields into 670 fields.
54. The toolkit's rules for inserting the subfield $b code are not very elaborate, and yet they appear to produce successful results for more than 90% of the 675 subfields tested that contain a parenthetical expression.
55. Here's a more detailed explanation: the toolkit assumes that the single 675 $a subfield can be divided at each semicolon that occurs outside of any parentheses.
56. The configuration files are in the same folder as all of the toolkit's other configuration files. These files were originally devised for use in the cataloger's toolkit, and programs with similar capabilities, and were created and edited by a number of institutions (many of which are credited in the headers to individual files). Let Gary know if you discover any case where the toolkit has mishandled a translation.
57. The scheme for converting Korean characters into latin text is taken wholesale from an elaborate Connexion macro written by Joel Hahn, of the Niles Public Library District. Although the actual instructions had to be rewritten completely for the toolkit to work in a different context and with a different character representation, the details, and the general logic, are all Joel's, and I acknowledge the great debt we all owe him for having sorted this out and made the results publicly available.
58. In general terms, the toolkit can perform romanization in both directions for alphabetic scripts that include vowels; it can romanize from latin to vernacular for alphabetic scripts that do not include vowels; and it can romanize from vernacular to latin for scripts that use glyphs for whole syllables. If you routinely need to use a romanization feature for a language/script that the toolkit doesn't yet understand, let Gary know; with your help, he may be able to devise a suitable configuration file for that language or script.
59. Here's another way to describe what happens: Every time you start up the toolkit, the toolkit first asks itself if work on some authority record was suspended during the previous use of the toolkit. If so, the toolkit resumes work on the previous authority record, making information from the bibliographic or authority record currently displayed in the Connexion client available for your use. (When you start up the toolkit after having suspended work on an authority record, if the Connexion client doesn't display an authority or bibliographic record, the toolkit simply takes you back to the record you were working on, with no additional information.) You have exactly one chance to resume work on an authority record (but you can suspend and then resume work on a given authority record any number of times).
60. The toolkit will activate Connexion to display each of the records in turn, and this happens quite quickly; so it will momentarily seem as if Connexion has gone mad. Please don't interfere while this work is in progress; everything is fine.
61. There are some authority fields that could be verified at a site such as id.loc.gov which the toolkit verifies instead by drawing on a definition in a configuration file. For example, the toolkit tests the contents of the 043, 382 and 377 fields against information contained in its configuration files, instead of submitting a request to id.loc.gov. The toolkit uses a configuration file for some pieces of information largely for practical reasons (but there are also historical reasons, and there is even simple programmer convenience). For example, the id.loc.gov service appears to offer a way to obtain a language code when the name of the language is known, but does not appear to offer a way to determine that a given language code is valid (at least, not without downloading the entire list); so using this site to validate a language code appears not to be possible. Not every authority record theoretically available at the id.loc.gov site can be found via the obvious search; sometimes the failure is a member of a recognized category of problem, sometimes the reason remains unclear. For example: searches of the id.loc.gov site for terms that contain the ligatures commonly found in romanized headings consistently fail to find the matching authority record. The reason for the failure is not known; but there it is. There are no doubt other things yet to be learned about searching the id.loc.gov site. If you believe that the toolkit incorrectly reports the state of a heading, please let Gary know; provide the appropriate details: the authority record, the problem heading, and the expected verification results. Also: the toolkit has a certain amount of internal coding to handle a few additional vocabularies.
62. The toolkit has options the allow you to tell the toolkit to verify a record automatically, when certain events occur.
63. There are several different ways to search these sites. Gary has chosen to use the 'exact term' search; this is equivalent to asking the question "Is there an authority 1XX field for this?". The Yes/No response to this search simply tells the toolkit whether or not something is established. (Other searches look for keywords in both established terms and variant terms; but this requires a lot of digging through the search results, and that can take a very long time.) This search does not tell the toolkit that there is a 4XX for the term, which means that the toolkit is not able to flip a non-preferred term to the preferred term. Normally, a response of "found" means that the term exists at id.loc.gov in the exact same form as given in the authority record, but this is not always the case. If the established form varies in some particular (punctuation, diacritics, etc.) from the term used in the authority record, the toolkit will replace the term in the authority record with the established form.
64. The toolkit makes some allowance for this behavior when the search for the entire heading finds no match. For example:
65. And for which no explanation has as of yet been offered by LC.
66. The problem caused by the sensitivity of the id.loc.gov site to differences in punctuation is heightened because some punctuation that is an integral part of authorized terms appears to have been stripped; for example, the LCSH term "Comic books, strips, etc." can be found at id.loc.gov only if the terminal full stop is removed from the search term.
67. The toolkit's list of abbreviations that can be expanded are carried in an internal table, and is not currently susceptible to user modification.
68. The toolkit has a different way to handle the contents of the 043, 377 and 382 fields.
69. URI is only possible when the 382 field identifies a single instrument or ensemble
70. The use of main headings with subdivisions in fields such as 372 and 374 is considered by some to be inappropriate. (Some NACO participants prefer the use of distinct elements, such as topic and place, rather than a pre-coordinated string.) Although Gary has a strong opinion on this question, the toolkit makes no attempt to legislate this matter; it does its best to evaluate what it finds.
71. The reason the toolkit doesn't take any action when it can't verify an element from a field containing subfield $2 has already been mentioned: just because a search of id.loc.gov indicates that there's no matching authority record for a term doesn't actually mean that there's no matching authority record for a term. You need to follow up "not-found" reports yourself, and change the record yourself as appropriate.
72. For example, if the toolkit finds that a term is a recognized LCSH term, the toolkit will also have found the associated "sh" number.
73. At present, the only vocabulary containing subdivisions that the toolkit is able to verify is LCSH. All valid combinations of MeSH main terms with qualifiers are contained in individual authority records, so although MeSH headings have a structure similar to LCSH headings, the extra step used for LCSH is not needed for MeSH.
74. If the toolkit is able to verify part of the term by pretending that the commas are full stops, it will change the punctuation in the partially-verified field in the authority record.
75. Specifically, the toolkit omits fields 002-009; 049; 090 and 092 (if subfield $a is not present); and 040 (unless the record is an authority record).
76. If you are interested in re-purposing text from the authority record shown on the left, you may, instead, select text in the version of the authority record displayed at the left. The toolkit will reconfigure itself in an attempt to accommodate your intention; among other things, the toolkit will de-select any text you may have selected on the Texts tab to avoid confusion about which text to use. The instructions in this section are written as if you are selecting text from the version of the record displayed on the Texts tab.
77. The caption of this radio button is $e HQ for corporate and conference names; it is $e Res for other kinds of names.
78. Note about this illustration: The word "Council" is a member of the list of terms in X10 subfield $b that may indicate that the X10 field represents a conference. This has caused the toolkit to add a 667 field to the authority record, under the assumption that the 1XX field represents a basic conference name. In this case, this assumption is incorrect, and you will need to delete the 667 field.
79. In case you're interested: the display device uses the Rich Text Format (RTF) encoding scheme.
80. Actually, the reverse translation is slightly more complicated than this; but this doesn't affect the main point, that the back-and-forth translations are mirror images of each other, and can be performed without loss or corruption of data.
81. The most interesting points of correspondence lie chiefly in the 3XX group of fields; there are also a number of 0XX fields in this category. Here's the complete list: 034 043 046 050 052 055 060 070 072 080 082 083 086 336 380 382 383 384 385 386 388. This list of tags is at present not available as an option.
82. This will be the case ifyou have suspended work on an authority record and then resumed work while bringing in an additional authority record; or if you have retrieved an authority record from id.loc.gov via the Web tab.
83. The toolkit passes the text of the new 5XX field to its standard routine that examines the state of any terminal full stop. In this case, the routine was not able to determine that the full stop either formed an integral part of the field or could be removed in every case; so the toolkit asked you if it could remove the full stop.
84. The toolkit's handling of thematic index numbers is regulated by the configuration file ComposerThematic.Authorized.txt. This file is based on a web site maintained by the Music Library Association.
85. You could instead have selected the text "D911" in the preceding 670 field. In that case, the toolkit would still recognize this as a valid number for Schubert, and would modify the selected text slightly, ending up with "D.911".
86. The fact that 6XX fields with second indicator "0" are all "LCSH" headings is beside the point. Subfield $2 identifies the controlled vocabulary from which the term is taken; a NAF term used in a bibliographic 6XX field without subfields $v, $x, $y or $z is still a NAF term.
87. If you find that some of the lists on this tab are empty, it's probably because you moved the toolkit's configuration files to a different folder, but you haven't correctly made the corresponding change to the toolkit's configuration on its Options panel.
88. As often happens, the full story is slightly more complicated. If you type your own term but your term is actually present in the list, then the toolkit will supply any associated subfield $2, just as if you had simply selected the item from the list.
89. Once 383 subfield $e is allowed in NACO records, you can select the 382: Use $e for ensembles option, and the toolkit will use subfield $e for the number of ensembles instead of subfield $n.
90. The EDTF scheme does not at present encompass dates expressed as centuries. Century dates created from this tab will not contain $2 edtf.
91. B.C. dates: Give the date as found in the source. The toolkit will prefix the year or century with a minus sign. If the date in the Year/century box is a year consisting of four numeric digits, the toolkit will subtract 1 from the year for you, in accordance with ISO 8601: for example, if you input 0032, the toolkit uses -0031. (The toolkit will not attempt to make any adjustment to a B.C. date that contains "x" or "u".)
92. This includes adjustments to the number of days available for February (29 in leap years, 28 in common years). However, if the date in the Year/century box does not contain four digits, the toolkit shows 29 days for February by default, because it can't know for certain what it should do.
93. The Create 4XX box is always checked by default. The toolkit sets the value of the Suppress box to match the corresponding setting on the Options panel.
94. Note that 'date of the report' is not the same as 'date of publication' or 'date page viewed.' Information about a death or other event may be published at any time; but it is the date at which the age was fixed, and not the date of publication of that date, that's wanted. If the date that you have is not the date on which the age was determined, you must not use this feature. For example, if you know that a person was 23 years old at the time of an interview, but do not know the date of the interview (though you know the date on which the web page containing the interview was created), you must not use this feature.
95. To test the routine that calculates birth dates from age and date, Gary fed it information pulled from 670 fields in authority records, when those records already had a birthdate in 046 subfield $f (providing a standard for comparison). Of the 16 records tested, 4 had discrepancies between the calculated birthdate and the actual birthdate; all of these discrepancies could be traced to bad source data. The fact that these may all have been caused by simple typographical errors ("died in 1987 at the age of 71", when the actual age was 81), doesn't make reliance on the result any less dangerous. Sources may also be subject to systematic errors. For example, the source may round the age up to the next year if it's "close enough" according to some arbitrary standard; or the source may not correctly identify a date that's given as "old style", resulting in some cases in the difference of a year in the calculated date.
96. Even if the full date (day, month, year) and the full age (years, months, days) are available and reliable, the calculated birthdate may be off by a day—and the difference of a day can in edge cases push the calculated date into a different month, or even a different year.
97. Two years separated by a comma, within brackets.
98. The toolkit makes this button available whenever you are working on a personal name or conference name record, without a more detailed consideration of appropriateness. Even though the button is available, it isn't necessarily appropriate to use it; if you use the button in an inappropriate situation the toolkit will explain the matter to you.
99. The web resource must make information available in a structured manner; this means something like MARCXML, or JSON, not simply an HTML page. The toolkit does not privilege web resources (though that term has unfortunately been applied), it simply exploits those that are open to exploitation. Gary is simply not interested in doing the programming required to scrape information from HTML pages; HTML coding is subject to frequent changes, requiring constant maintenance of the program code. Note further that the Internet movie database not only doesn't provide information about individuals in a structured manner, but explicitly states that its pages may not be scraped for use in other applications. Please don't ask Gary to add IMDb to the list of web resources on this tab; he'd like to, but he can't.
100. If the toolkit only makes one kind of action available for a resource (for example: create an 024 field), when you supply a URL in the box the toolkit will automatically click the Go button for you. The toolkit will immediately proceed to do whatever single item of work is possible for that resource.
101. The toolkit passes the URL for the resource to Windows, which is responsible for recognizing that this is indeed a URL, and then passing the URL to your default web browser for handling. The toolkit has no control over what happens after it asks Windows to open the URL (most importantly, the toolkit has no way to wait until the browser is actually open), and it pays no attention to any error message returned by the Windows function.
102. This change was made for a very interesting (at least to Gary!) reason having to do with the Windows device that the toolkit uses to display text that contains non-roman characters, and/or needs to be displayed in boldface. (This device is a very important thing for the toolkit.) The toolkit gives this device a chunk of displayable text formatted according to the Rich Text Format (RTF) specification. When it receives a block of RTF text, this device creates a parallel plain-text version of it. Unfortunately, this "plain text" form obliterates non-roman characters, and makes other adjustments. Now, when you click on a line in this toolkit display, the toolkit needs to know where the click occured, so that it can react properly. As it happens, this Windows device offers two methods for telling the toolkit where a click occurs: The distance of the click from the beginning of the text, and the line of the text on which the click was made. The first method (distance of the click from the start) presents difficulties, because the distance is expressed in terms of the plain text, not of the RTF text; because the plain text and RTF text have different lengths, using the plain text distance means that the toolkit can miscalculate the click position in the RTF text. (For reasons that are not at all understood, the presence of Hangul characters adds an extra uncertainty to this determination.) The second method (count of the line clicked) supplies the number of the line in terms of lines in the display, not the lines (each containing a single variable field) that the toolkit has created and supplied to the device; if a field is long and wraps to multiple lines the toolkit may be told that the click occurs on (say) line 5, even if there are not 5 variable fields in the display. (The toolkit has no way to determine how many lines in the display each variable field requires.) The solution involves the use of the line count; but this count only maps reliably to a particular variable field if each field is displayed as a single line; and the only way to guarantee that each variable field occupies only one line is to truncate the displayable part of a long field to an arbitrary length. The important thing to remember is that this business only affects the name as it is displayed in this panel; the toolkit has the full text of each field in a separate place; if you select a "truncated" line for use in your authority record, you will eventually see the full text. (You can also double-click on a truncated line in the display, to bring the full text of the field into the toolkit's field editing panel.)
103. The None button has slightly different behaviors, depending on the web source. For VIAF, clicking this button tells the toolkit not to put any information from VIAF into the authority record; for GeoNames, GNIS, Wikidata and Wikipedia, this button tells the toolkit not to put any of the isolated pieces of information into the authority record, but the toolkit will still add a 670 field for the web source.
104. The method for doing this may vary with the browser. In both Chrome and Firefox, CTRL-S takes you to the "Save page as" dialog box. You want to save the page as an HTML file (in both Chrome and Firefox, this is called "Web page, HTML only"). The HTML file can be saved into any folder that the toolkit will be able to "see."
105. That is, the geonames.org site, not the geonames.nga.mil site. The latter site does not appear to provide a way to request information about an individual place, even when its unique feature identifier is known. (The documented API appears deliberately to exclude a way to use a feature identifier to retrieve information.) The detailed display of information for a place at this site does not include longitude and latitude, so scraping an HTML page isn't useful, either. Tell Gary if you discover how to get structured information from the geonames.nga.mil site.
106. These are vocabularies for which the LC site is able to return information in the MARCXML format.
107. You can also paste just an 010 for an LCDGT, LCMPT or LCGFT term into this box, if you want. (If for some reason the toolkit doesn't recognize the 010 and select id.loc.gov from the drop-down list for you, you'll need to select it yourself.)
108. Yes, the toolkit knows how to convert the relevant parts of a UNIMARC authority record to MARC21.
109. Most of these information units consist of the "P" code, and an alphanumeric identifier beginning with the letter "Q". The toolkit must make a separate query of Wikipedia data to find the displayable text that corresponds to each "Q" identifier.)
110. This can be a page from any of the many language and script versions of Wikipedia.
111. In case you're interested: the information provided by Wikidata is delivered in a format called JSON.
112. If you think that a change to this configuration spreadsheet would benefit everyone, pass the information along to Gary, so he can include it in a future installation package.
113. When you install an updated version of the toolkit, the version of the configuration file in the installation package will overwrite your version. This means that if you want to modify this configuration file you'll need to find a place to store a copy of your version, so you can restore it after updating the toolkit.
114. For reasons that remain obscure, Wikidata often supplies the month and day January 1 when only the year is known. The toolkit contains a set of options that will help with this problem, although its effects cannot be eliminated entirely.
115. There appears to be no useful distinction to be made between the things that Wikidata calls descriptions and labels, so the toolkit lumps them together in a single category.
116. In order to fit the important parts of this record into one illustration, some of the existing 670 fields had to be removed. Obviously, this isn't something you'd normally do when updating an authority record.
117. Omit any initial article, and give as many additional words as you wish.
118. This date qualifier is compared against the date in bytes 07-10 of the bibliographic record's 008 field; so just give four digits and nothing more.
119. There is a size limit imposed by the tool used to display the list of available fields, which means in turn that there is a limit to the number of fields you can include in your repertoire. The toolkit displays up to 125 characters from each field in this list (the toolkit retains the full text in a hidden area), and the total number of characters in the displayed list cannot exceed about 32,000 characters. This means that if all of your fields are at least 125 characters long, you can define at most about 256 variable fields; but because most of the fields you define will probably be shorter than 125 characters, you should be able to define many more than 256 fields. If this limit is too restrictive for your needs, let Gary know. (There may be a way to provide for multiple lists of fields.)
120. Let Gary know if you think of other commonly-used fields that the toolkit could supply as a defaults on this tab.
121. Or even the same workstation, when a different user is logged in.
122. Some settings that currently apply only to one kind of record will no doubt be extended to all kinds of records as experience is gained with the toolkit. Let Gary know if you think that an option that applies only to one kind of record can also be applied to other kinds of records. Note that the need for the application of some of these options to existing authority records may be obviated by the performance of Phase 3B of the conversion of the LC/NACO Authority File for use under RDA.
123. Gary makes an occasional exception to this rule, when Gary thinks that preserving the toolkit's expected behavior is not in the best interest of current users. For example, when Gary created an option that tells the toolkit to create a suppressed 400 field for the former heading when you add a death date to 100 subfield $d, Gary set the default value to True even though that represented a change in behavior. In this case, there really should be such a 400 field, and the toolkit's earlier behavior was not in line with NACO practice.
124. For new options that control new features, Gary sets the default value to whatever seems to be the best thing for the majority of users.
125. If you want, you can see the toolkit's registry information by starting the program regedit from the Windows start button. (Sadly, this program may be forbidden to you by your local systems people.) The toolkit's values are stored in the path HKEY_CURRENT_USER/Software/VB and VBA Program Settings/AuthorityCreate. This folder has a number of sub-folders. Feel free to browse around if you want to, but be very careful not to change anything.
126. If you report a problem with the toolkit, Gary may ask for this version number.
127. This includes the 040 field in new records. OCLC supplies its own 040 field when the toolkit asks for a blank workform, and the toolkit leaves that 040 field as it finds it.
128. In this work, the toolkit adds whatever tags might already be in its cache to a mandatory minimum set of tags. (For example, it will create definitions for the 400, 410 411, 430 and 451 fields, even if you have not yet used the toolkit to modify any of those tags.) This means that the toolkit will be ready to work with the most common variable fields as quickly as possible.
129. Similar characteristics means that they have the same subfields $2, $s, $t, and so on (or similarly lack those subfields).
130. The Connexion version of the toolkit uses authority records as found in OCLC. At present, authority records in OCLC all use the paired diacritic half-characters.
131. In this case, this record arrived with the incorrect value. The toolkit will not allow you to click the OK button on the fixed-field editing panel if any of the values is undefined.
132. The problem that this option attempts to resolve, is the problem created by a series heading that consists solely of a description of its contents, such as Educational administration. Such titles may exactly match the description of a person's field of interest in a 372 field, but should not be used to declare that the term in the 372 field is a valid one. (It's a rare case indeed when a person's field of activity is an actual series.)
133. Depending on response time, the toolkit is capable of making dozens of requests within a single minute. The information provided by the Library of Congress concerning its limit does not match the observed behavior of LC's site. Specifically, Gary was told that any request—requests both for searches, and for the retrieval of MARCXML records—counts against the total number of operations allowed: 10 operations per minute is the maximum. Extensive testing has demonstrated that, in fact, searches do not count against the total number of operations allowed within any given minute. It appears instead that only retrievals of MARCXML records are counted. The default values for these options are set with with this belief in mind. The Library of Congress does not indicate the length of time that an IP address is blocked; but it appears to be at least several days.
134. If in your authority records you routinely use a vocabulary not listed for a field, let Gary know about it. If that vocabulary can be searched by program, Gary can teach the toolkit how to use that vocabulary and add it to the repertoire of vocabularies listed on these tabs. You can then incorporate that vocabulary into your verification scheme.
135. The toolkit has two lists of words, some of which may occur at the beginning of a name, some of which may occur at the end of a name. (There is a substantial overlap between the two lists.) These lists contain terms such as "Captain", "Doctor", "Lama", "Madame", "Rabbi", "Saint", "Sister", "Swami", and common abbreviations of these terms. The lists also contain terms that are normally abbreviated, such as "Ph.D." The toolkit considers roman numerals at the end of a personal name to be in the same category.
136. The "most recently used value" is the value shown when you click an Add button on the Choicies tab; this is does not include any selection you may make from a drop-down list on the Choices tab without clicking the corresponding Add button. For example, if on start-up the drop-down list for the 384 field shows "A major" and you change the list to show "C# minor" but do not actually click the Add button to insert that value into an authority record, the next time you start the toolkit the 384 list will show "A major" again.
137. ISO 639-2 defines a number of codes that represent groups of languages (such as the code 'nic' for languages in the Niger-Kordofanian group that do not have an individual code); while ISO 639-3 defines a code for each recognized language. There are thousands more codes in ISO 639-3 than there are in ISO 639-2.
138. The toolkit pulls this list of terms from the RdaRelationships.cfg configuration file.
139. Until Appendix L actually contains something, a more complete description would be You must check at least one box other than the box for Appendix L.
140. If you click the Reload button, the Option panel's Cancel button will not back out of this change.
141. The toolkit changes the display caption for this drop-down list on the Choices tab, and its accompanying button, to match the tag of the 5XX field you select in the authority record.
142. This does not, as some have claimed, privilege Wikidata over other sources; there must be some default value, and Wikidata is one of the web sites most commonly cited. Whether or not it should be so cited is not a matter that this program should legislate. In any case the default value is simply the thing that shows up before you take any action. You often do not have to change the drop-down box for the source before you drop a URL into the toolkit's box on the Web tab; if the toolkit recognizes the URL, the toolkit will automatically adjust the drop-down list to match the URL.
143. Gary doesn't agree, but he makes the option to ignore 910 fields available for others.
144. These codes appear to be mostly the two-character ISO 639-1 codes, but they are sometimes expanded to more than two characters. Anglo-Saxon, for example, is represented by the code "ang". Yes, there really is an Anglo-Saxon Wikipedia site.
145. A careful examination of the 670 field that lies behind this illustration shows that the field does indeed contain correct UTF-8 representations of valid Unicode characters. The problem is with the range of characters recognized by the display mechanism and allowed in LC/NACO records, not with the data itself. The problem of the display of certain scripts is, by the way, not restricted to this toolkit, the Connexion client, or to MARC records in general. Note the problems in the following display of a page from the Amharic Wikipedia in a well-regarded web browser.
146. It is not yet clear if Wikidata follows a similar practice when the year and month are known, but not the day. It would certainly be consistent for Wikidata to give the first of the month as the date in such cases.
147. There's a good reason for this: The program takes a fraction of a second to read the configuration file that contains the names of countries, states, and so on. (These appear as drop-down lists in the 371 work area.) The toolkit only does this work when it needs to. If the default work area on the Assist tab is the 371 work area, then the program will do this work every time it starts up. If you set 046 as the default work area, the program will only do this work when you ask for the 371 work area, saving your time.
148. The configuration file ConfigurationFile781.txt (used for both the 043 field and for the indirect subdivision form shown in the 781 field) tells the toolkit how to map a geographic name found in the qualifier to a 151 field to an 043 geographic area code.
149. The toolkit's scan for the specific dates of a conference produces correct or at least acceptable results in most circumstances; but, because it's working on free text, it cannot produce a perfect 046 field every time. (This applies equally to the scan of the 245 field for new records, and the scan of 670 fields for existing records.) The toolkit will not be able to produce a full date if the month is given as a numeral (including a roman numeral). The toolkit is also easily confused when a conference has multiple exclusive dates (for example, an exhibition held in several cities over a span of years). The toolkit will not attempt to produce an 046 field if subfield $d of the 11X field contains unexpected text. If the toolkit cannot produce an acceptable 046 field, you'll need to do it yourself.
150. You can also change the 100 field at any time during your work on the record by clicking on the 100 field, then selecting the Edit/Change 100 menu item; or by double-clicking on the 100 field. The toolkit presents the 100 field in its field change panel, and you can make any change that seems appropriate to you.
151. Section Z1 of the Descriptive cataloging manual tells us that a corporate body used in a parenthetical qualifier for a work should appear in a 381 field, not a 373 field. Gary doesn't actually understand why this is the case; but he follows the policy as closely as he can.
152. Chanson de geste; Choral work; Choreographic work; Computer file; Libretto; Motion picture; Musical; Opera; Poem; Play; Radio program; Series; Songs; Tapestry; Television program
153. The toolkit's criteria for assigning these designations are given in the notes attached to each designation. The toolkit first applies tests based on Leader values, then tests based on 007 fields, then tests based on the 337 field. The toolkit stops work whenever the application of any test results in the assignment of a designation; the toolkit does not assign all possible designations and then attempt to assign the "best" one.
154. The toolkit applies the designation "[CF]" (computer file) if Leader/06 (type of record) contains the code "m" (computer file).
155. The toolkit applies the designation "[FS]" (filmstrip) if 007/00 (category of material) contains the code "g" (projected graphic) and if 007/01 (specific material designation) contains the code "c" (filmstrip cartridge), "d" (filmstrip), "f" (filmstrip, type unspecified) or "o" (filmstrip roll).
156. The toolkit applies the designation "[KI]" (kit) if Leader/06 (type of record) contains the code "o" (kit).
157. The toolkit applies the designation "[MI]" (microform) if Leader/06 (type of record) contains the code "a" (language material), "c" (notated music), "d" (manuscript notated music), "p" (mixed materials) or "t" (text) and either 008/23 (form of item) contains the code "a" (microfiche), "b" (microfilm) or "c" (microopaque) or Leader/07 (bibliographic level) contains the code "b" (serial component part), "i" (integrating resource) or "s" (serial) and 008/22 (form of original item) contains the code "a" (microfiche), "b" (microfilm) or "c" (microopaque). The toolkit also applies this designation if 007/00 (category of material) contains the code "h" (microform). The toolkit also applies this designation if 337 subfield $a contains "microform".
158. The toolkit applies the designation "[MP]" (motion picture) if 007/00 (category of material) contains the code "m" (motion picture).
159. The toolkit applies the designation "[SL]" (slide) if 007/00 (category of material) contains the code "g" (projected graphic) and if 007/01 (specific material designation) contains the code "s" (slide).
160. The toolkit applies the designation "[SR]" (sound recording) if Leader/06 (type of record) contains the code "i" (nonmusical sound recording) or "j" (musical sound recording). The toolkit also applies this designation if 337 subfield $a contains "audio"
161. The toolkit applies the designation "[TR]" (transparency) if 007/00 (category of material) contains the code "g" (projected graphic) and if 007/01 (specific material designation) contains code "t" (transparency).
162. The toolkit applies the designation "[VR]" (videorecording) if 007/00 (category of material) contains the code "v" (video recording). The toolkit also applies this designation if 337 subfield $a contains the term "video".
163. The criteria that the toolkit uses to define each type of material are rather elaborate; they're similar to the criteria that the toolkit uses to assign GMDs in 670 fields, but the toolkit here makes an added distinction between authority records for series, and other types of authority records. If there are additional material types with distinctive introductory texts that you think the toolkit could recognize here, please let Gary know. Also let Gary know if you think that the toolkit has applied the wrong designation to a particular 670 field; in this case, you must give Gary the OCLC number of the relevant bibliographic record, because the coding of the bibliographic record determines the toolkit's introductory text.
164. Even if this option is not selected, the toolkit will use its internal tables to change Museums in the 368 field to museum, Computer networks--Reliability in the 372 field to computer network reliability, and Watercolorists in the 374 field to watercolorist. These terms (and hundreds of similar terms) are used frequently enough in authority records to have caused them to be included in an internal table.
165. The idea behind the work controlled by these options is that adding the word 'the' when appropriate can help make the text of the 678 field read more smoothly: "associated with the University of Michigan" will probably seem better English to many than "associated with University of Michigan". But not every corporate body needs 'the': we probably don't want to say "associated with the Metro-Goldwyn-Mayer". The toolkit assumes that everything named in the 373 field is a corporate body; but the fact that this is not always the case further complicates the issue.
166. The lists are identical, except for 'COLLEGE' and 'UNIVERSITY', and are based on a sample of corporate names together with Gary's best guess about what behavior is appropriate for the majority of names.
167. Of course, existing NACO records shold not contain fixed-field values that are not permitted in NACO records. However, this interesting condition does arise from time to time.
168. Recoding a non-RDA authority record as RDA involves changing the value of 008/10 (cataloging rules) to "z", adding subfield $e containing "rda" to the 040 field, and removing any 667 fields that contain the text (in a normalized comparison) "cannot be used under RDA." The toolkit will not, however, re-code an authority record for an undifferentiated personal name as RDA.
169. Yes, in the earlier code, the parentheses were unbalanced.
170. A recent attack on the LC web site has caused programmatic access (such as that used by the toolkit) to be blocked. Although there may eventually be a work-around for trusted programs (I hope the toolkit is one such program!), at present there's nothing to be done.
External NU Links: Northwestern Home | Search | Directories
Northwestern University Library •
1970 Campus Drive • Evanston, IL • 60208-2300
Phone: (847) 491-7658 • Fax: (847) 491-8306 • E-mail:
library@northwestern.edu
© Copyright 1994-present Northwestern University Library. World Wide Web Disclaimer and Policy Statements
Last Revision: February 12, 2024