|
Northwestern University Library |
Printing folder and box labels for archival materials |
Program and documentation by Gary L. Strawn, Northwestern University Library.
Comments and questions to: mrsmith - at - northwestern.edu
This document describes a program that generates for the containers that house archival materials. The program inserts information that you supply (or that the program discovers for itself) into a set of templates, producing labels with a uniform appearance. Once this program is configured to match your needs, producing the labels for an archival resource takes very little effort on your part.
| A note about container terminology: This documentation uses the term box for the top-level containers in which archival materials are housed, and it uses the term folder for secondary housing units within top-level containers.1 These terms are used here only for the sake of simplicity.2 The terms for types of containers that appear on your labels are whatever you have decided they should be: they are either part of the data that the program retrieves from ArchivesSpace, or are part of the data that you supply to the program in some other manner. A primary container might actually be called Carton or Tube, and the things within a primary container might be called Item, Reel or Cassette. |
This program was initially written to produce labels using data found in a file: a tab-delimited text file or a Microsoft Excel spreadsheet. (The layouts of both of these kinds of files are defined by the user, and not part of the program itself.) The ability to read an Excel spreadsheet was extended to include a spreadsheet in the special format used to load data into ArchivesSpace via a plug-in. The program was later taught how to pull data directly from ArchivesSpace. Because ArchivesSpace is the most authoritative source for the data used in box and folder labels, the most recently added capability has become the most frequently used part of the program.
To generate labels with this program, you need:
|
|
Look here for a summary of the steps needed to generate a set of labels, and some worked-through examples. |
Strictly speaking, this program does not print labels; instead, it produces files that you can send to a printer. This separation between the generation of label files, and the printing of those label files, has several important advantages:
Every time you use this program to run through a data set, it produces the output files that you can use to print box labels and folder labels. The program produces the full set of files (both box labels and folder labels) every time you run it; it is up to you to decide whether you want to use the output files to print box labels or folder labels, or both kinds of labels, or neither kind.5
This program bases its work on themes. Each theme defines the characteristics of one set of labels (one flavor of input data, one kind of folder label, one kind of box label; all possibly tailored for the requirements of a single repository). You create and modify themes to suit your needs. The program comes with a default theme, cleverly called Default, which you should modify to reflect your overall preferences (for example, the order of elements on folder labels, and the text used at the top of every box label). You create as many themes as you need for label production by deriving new themes from the default theme, or from other themes. The whole matter of themes is discussed elsewhere in this document; the important thing to remember is that themes give you control over the patterns you use to create labels.
The label program achieves its results by inserting pieces of text (either text read from ArchivesSpace, or pulled from a file that you supply) into template files. These template files define the basic properties of folder and box labels, such as font name and general layout. Several sets of template files, for commonly-used folder and box label stocks, are included as part of the program’s installation; you can modify them to produce labels with different characteristics, if you wish; and you can create your own template files and tell the program about them.
The illustrations in this documentation are designed to clarify the points under immediate discussion, and for those points the illustration may be assumed to reflect the current version of the program's panels. However, illustrations are not always updated right away to reflect changes that do not affect the point made by an illustration. For example, a third Box title drop-down list was added to the Data mapping tab on April 7, 2017. Illustrations that accompany descriptions of the use of the Box title drop-down lists were updated to show the third box; but illustrations that may include the Box title area of the tab but do not discuss the Box title drop-down lists were not necessarily updated on April 7. (Some of these illustrations were later updated as other changes were made.) If at any time you find such secondary discrepancies jarring, please send off an e-mail message (address at the top of this document).
This documentation and the program it describes are made available at no cost to all interested parties. The program and its documentation may be freely reproduced and distributed. The following restrictions are placed on the redistribution of this program and its documentation:
Use of this program and its documentation is subject to limitations on liability. Northwestern University and Gary L. Strawn, separately or together, shall not be held liable for any loss or damage, lost profits, loss of business, loss of or damage to data, downtime or unavailability, of or in connection with use of this program or its documentation. Northwestern University and Gary L. Strawn shall have no liability for any claims arising from use of this program or its documentation, based on infringement of copyright, patent, trade secret or other right, libel, slander or invasion of privacy or claims based on errors, inaccuracies, or omissions in or loss of the data. Northwestern University and Gary L. Strawn make no express warranties or representations and disclaim all implied warranties with respect to this program and its documentation as to their accuracy, merchantability or fitness for a particular purpose. This program and its documentation are supplied "as is." Use of any part of the documentation or program constitutes acceptance of these conditions. If you have at any time opened this documentation, you have already agreed to these conditions.
This section of the documentation contains a generalized outline of the steps you could take to produce a set of folder and box labels. This section is followed by examples to further illustrate the use of the program. All of the steps needed to use the program are described in even more detail elsewhere in this document.
The program's main panel looks something like the following illustration. The first time you run the program, the list of themes in the large list will contain only the Default theme. (You can create as many different themese as you need.)

The following example illustrates the use of this program, when the program is reading data directly from ArchivesSpace. This example uses a previously-defined theme and a set of template files known to reflect your preferences. Once you have defined themes and template files that match your requirements, much of your work with this program may be just as easy as it appears to be from this description.
We'll imagine that you're creating labels for the Mr. Smith papers, a resource record in ArchivesSpace. This resource has the EAD identifier "II-3", and the internal ArchivesSpace numeric identifier 1926.
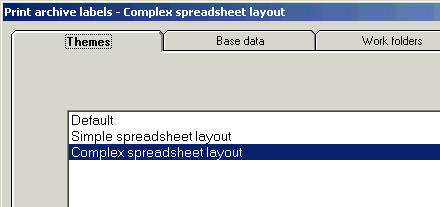
Start the labels program. As always the program starts at the Themes tab. You know that the theme called Generic regular from AS #2 generates labels with the desired appearance, so that's the one you select.

|
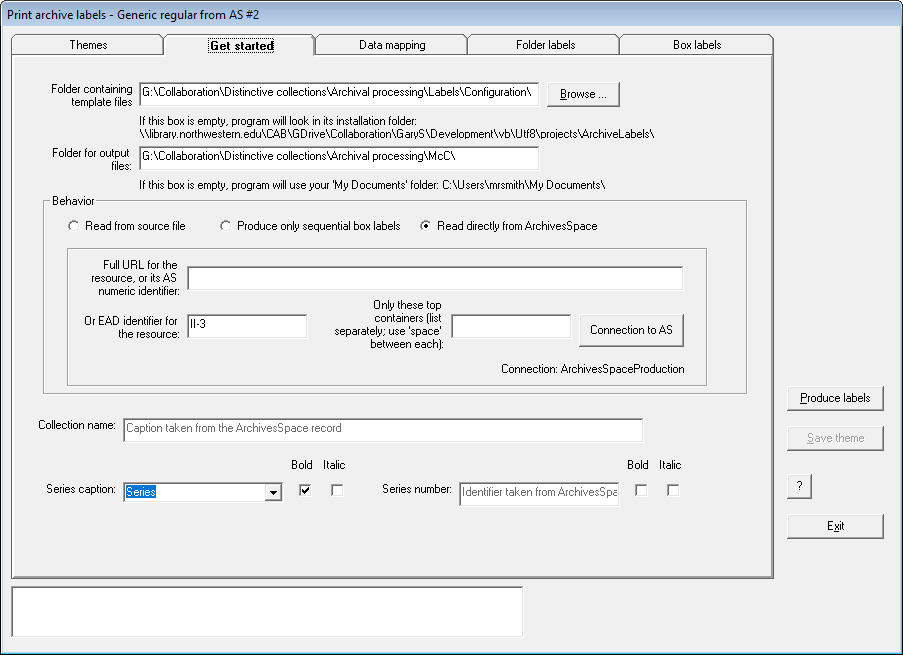
Move to the Get started tab (shown below). The Read directly from ArchivesSpace radio button is already selected. You supply any one of these pieces of information:
If you have established more than one connection to ArchivesSpace, click the Connection to AS button to make sure that the program is set to read from the correct connection. (The program displays the name of the currently-selected connection just below this button.)
| In the following illustration, you have supplied the EAD identifier II-3 for the resource. Assume that the rest of the configuration on this tab is OK as it stands. Note that the program will supply the name of the resource and the series number from data it pulls from ArchivesSpace. | |
|
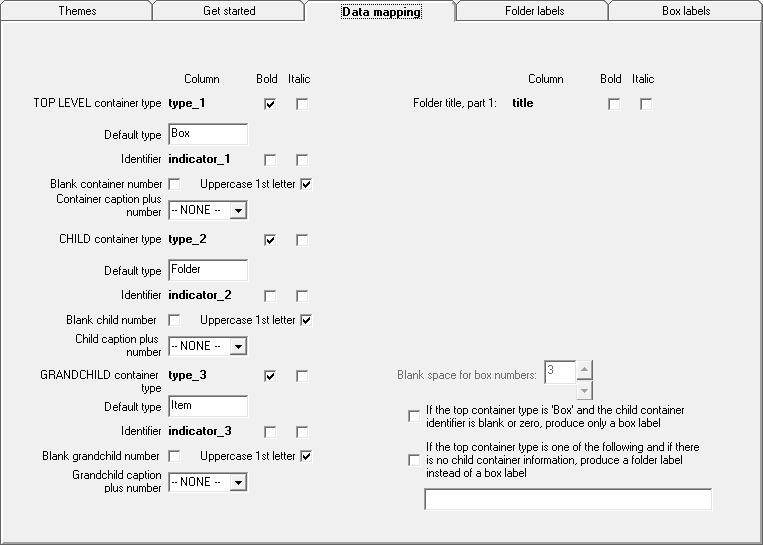
Move next to the Data mapping tab (shown below). (The program is going to be reading from ArchivesSpace, so many elements on this tab are hidden. Definitions for elements are written directly into the program's code, and you can't change them.) No changes are needed here.

|
Everything on the Folder labels tab is also correct as it stands. Note again that the program will supply the resource title from data it pulls from ArchivesSpace.

|
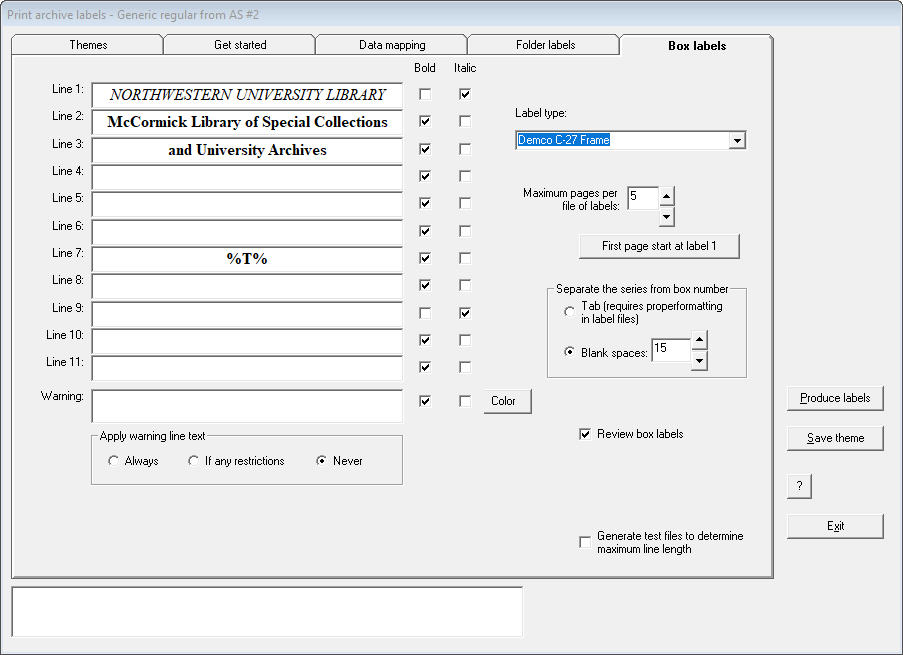
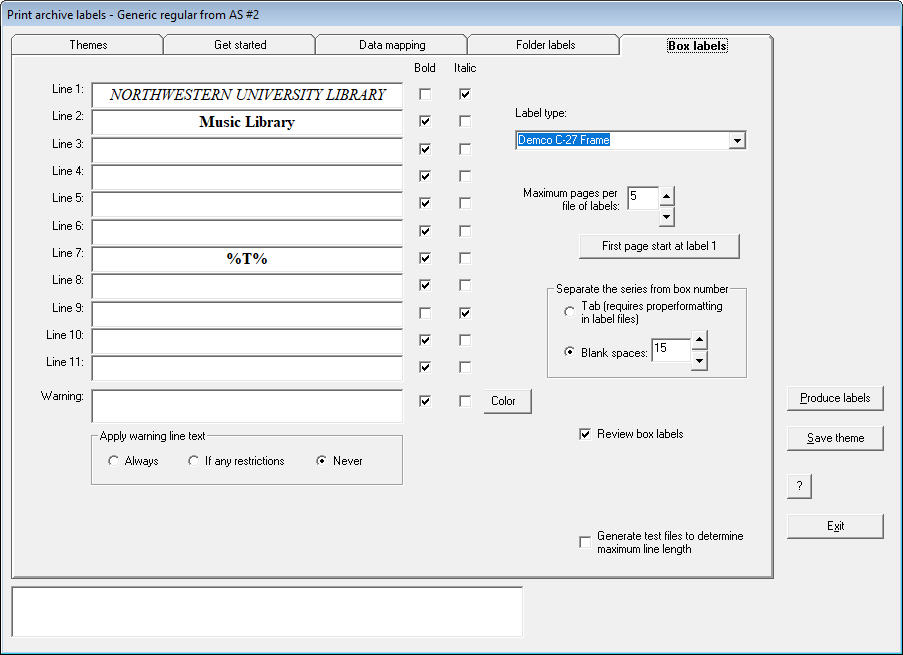
Finally, everything on the Box labels tab is correct as it stands. (The "%T%" on line 7 tells the program where to insert the resource title.)
|
Having set up the program to produce your labels, you click the Produce labels button. The program establishes a connection to your ArchivesSpace database, reads data from it, and produces files of box and folder labels. The program writes these files to the folder named in the Folder for output files box on the Get started tab.
When the program is done, the folder you identified on the Get started tab contains the program's output files of folder and box labels. The names of these files begin "ArchivesSpaceData", followed by the internal ArchivesSpace numeric identifier for the resource. This basic name continues with either "Box" or "Folder", plus a numeric sequence number. You will check these files to make sure that everything is just as it should be, and then (if they're OK) send the files to a printer. (One way to send a group of files to a printer is to select the files in the listing, right-click on the selected group, and choose Print from the pop-up context menu; but this only works if all of the default print settings are appropriate for box and folder labels. Beware of printers that print on both sides of a page by default!)
The following example illustrates the use of this program, using a source file (a spreadsheet) in a special format: the format expected by the ArchivesSpace plug-in. (The layout of this spreadsheet has become more elaborate with successive versions of the plug-in; the labels program understands them all.) This example uses a previously-defined theme and a set of template files known to reflect your preferences. Once you have defined themes and template files that match your requirements, much of your work with this program may be just as easy as it appears to be from this description.
Here's a small part of the spreadsheet that you prepared as you were processing this collection. The layout of this spreadsheet is set by the needs of the ArchivesSpace plug-in that will load the data.

|
You start the labels program, and as always the program lands on the Themes tab. You know that the theme called Elle band spreadsheet generates labels in the correct format for this repository and is set to read from a source file, so that's the one you select.

|
You move to the Get started tab (shown below), and change three things. The rest of the configuration on this tab is OK as it stands.

|
You move next to the Data mapping tab (shown below). The labels program has recognized your spreadsheet as being of this special type, so it displays the names of data elements (from row 4 of the spreadsheet), instead of allowing you to pick column names. No changes are needed here.
|
On the Folder labels tab (shown below), you verify that the program has copied the collection name correctly into the Collection name box, and you verify that the label format is the correct one. Everything here is already correct.

|
Finally, on the Box labels tab (shown below), you check that the program is set to echo the collection name correctly into the appropriate line, and that the correct label format is selected. Everything here is already as it should be.
|
|
Having set up the program to produce your labels, you click the Produce labels button. The program reads the source spreadsheet file and produces files of box and folder labels, writing them to the folder named in the Folder for output files box on the Get started tab.
When the program is done, the folder you identified on the Get started tab contains the program's output files of folder and box labels. You will check these files to make sure that everything is just as it should be, and then (if they're OK) send the files to a printer. (One way to send a group of files to a printer is to select the files in a listing such as this one, right-click on the selected group, and choose Print from the pop-up context menu; but this only works if all of the default print settings are appropriate for box and folder labels. Beware of printers that print on both sides of a page by default!)
The following example illustrates the use of this program, using a source file (a spreadsheet) prepared in a straightforward manner, and employing a previously-defined theme and an set of template files known to reflect your preferences. Once you have defined themes and template files that match your requirements, and have settled on a layout for source files that suits your needs, much of your work with this program may be just as easy as it appears to be from this description.
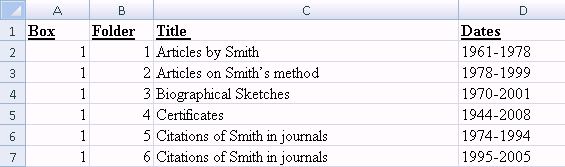
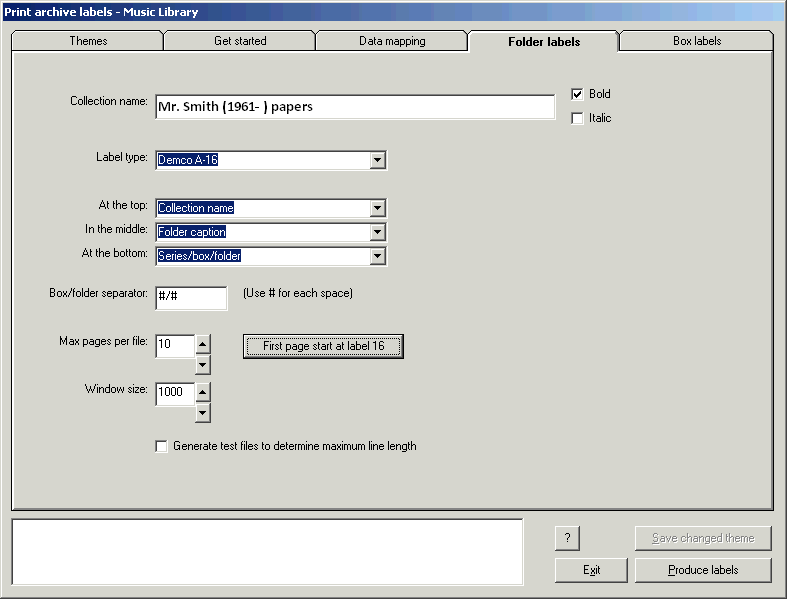
We'll imagine that you're creating labels for the Mr. Smith papers, which are held by the Music Library.
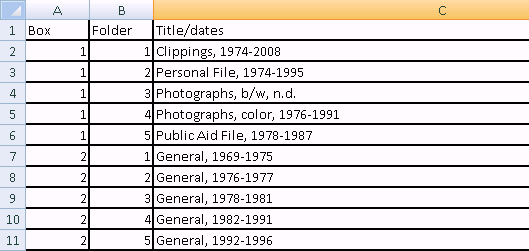
Here's a part of the spreadsheet that you prepared as you were processing this collection. There are columns for the box and folder numbers, a column for the folder caption, and a column for a date associated with the folder. The captions for the primary containers (Box and Folder) are in the first row of the spreadsheet.
|
You start the labels program, and as always the program lands on the Themes tab. You know that the theme called Music library generates labels in the correct format for this repository and matches your spreadsheet layout, so that's the one you select.
|
You move to the Get started tab (shown below), and change three things. The rest of the configuration on this tab is OK as it stands.

|
You move next to the Data mapping tab (shown below). You're using the same spreadsheet layout for this project as you used for the last one: the box number is in column A, the folder number is in column B, and the two parts of the title are in columns C and D. No changes are needed here.

|
On the Folder labels tab (shown below), you verify that the program has copied the collection name correctly into the Collection name box, and you verify that the label format is the correct one. Everything here is already correct.

|
Finally, on the Box labels tab (shown below), you check that the program is set to echo the collection name into the appropriate line, and that the correct label format is selected. Everything here is already correct.
|
Having set up the program to produce your labels, you click the Produce labels button. The program reads the source spreadsheet and produces files of box and folder labels, writing them to the folder named on the Get started tab.
When the program is done, the folder you identified as the Folder for output files on the Get started tab contains the program's output files of folder and box labels. (The musical Mr. Smith left us a large body of papers: about 100 linear feet, so there are lots of folders and boxes to be labeled.) You will check these files to make sure that everything is just as it should be, and then (if they're OK) send the files to a printer. (One way to send a group of files to a printer is to select the files in a listing such as this one, right-click on the selected group, and choose Print from the pop-up context menu; but this only works if all of the default print settings are appropriate for box and folder labels. Beware of printers that print on both sides of a page by default!)
The following example illustrates the use of this program, using a more elaborate source file than in the preceding example, and calling for the creation of a new theme.
We'll imagine that you're creating labels for the Jerry Mahoney papers, which are held by the Transportation Library. This collection is subject to access restrictions: it's closed to users until 2023.
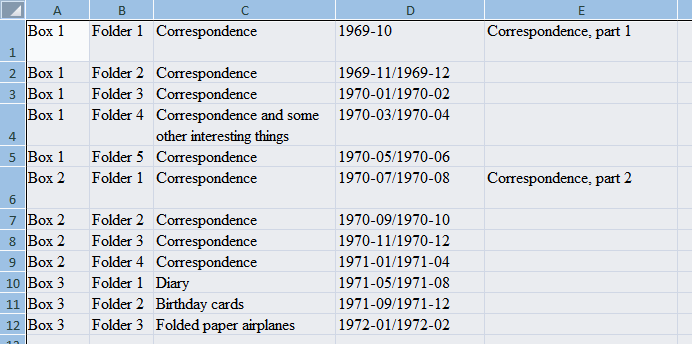
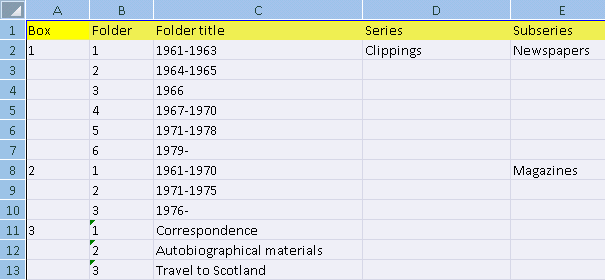
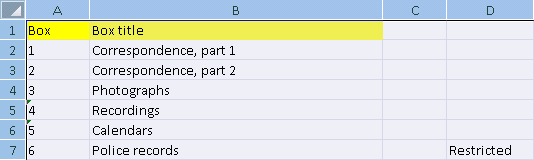
Here's the entire spreadsheet that you prepared as you were processing this collection. (This is a small collection.) You developed a new layout for this spreadsheet, which means that you need to do some work before you can print your labels. This spreadsheet has columns for box and folder numbers, but in this case the numbers are paired with their captions. There are separate columns for folder titles and associated dates. Finally, there is a column (column E) for titles that you want to put onto the box labels. (Box 3 has a mixture of things in it, so it doesn't have an individual title.)
|
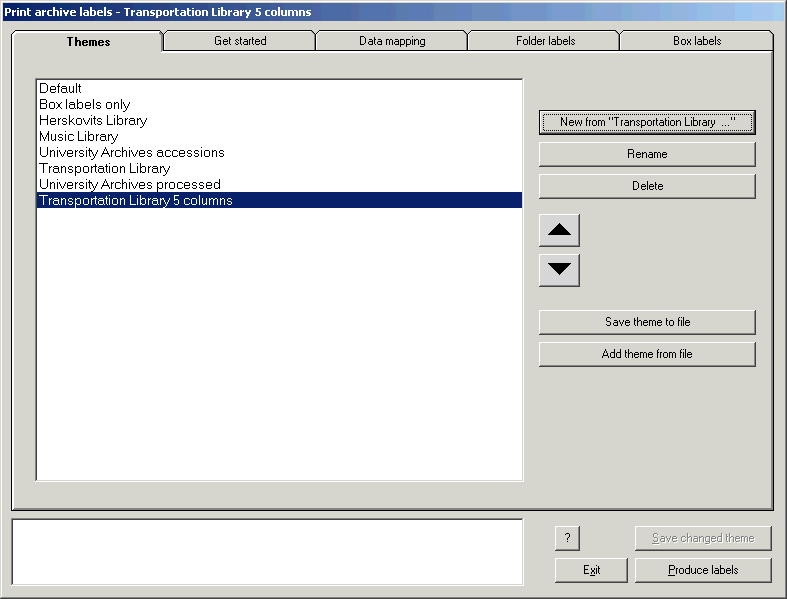
You start the labels program. You know that the theme called Transportation Library has many of the features that you want to use for the Mahoney labels, but the existing theme uses a different spreadsheet layout. Instead of modifying the existing theme (you may need it in the future for some other collection), you are going to create a new theme. You select the Transportation Library theme, and then click the New from "Transportation Library" button. The program asks you for the name of the new theme. (You have decided to call the new theme Transportation Library 5 columns.)
|
The program makes a copy of the existing theme under the new name. (Later, you might want to re-name the existing theme to make the difference between the two themes clearer. You might also want to change the order of the themes, so that the two Transportation Library themes are next to each other.) You're now ready to set up the new theme so you can print the Mahoney labels.
|
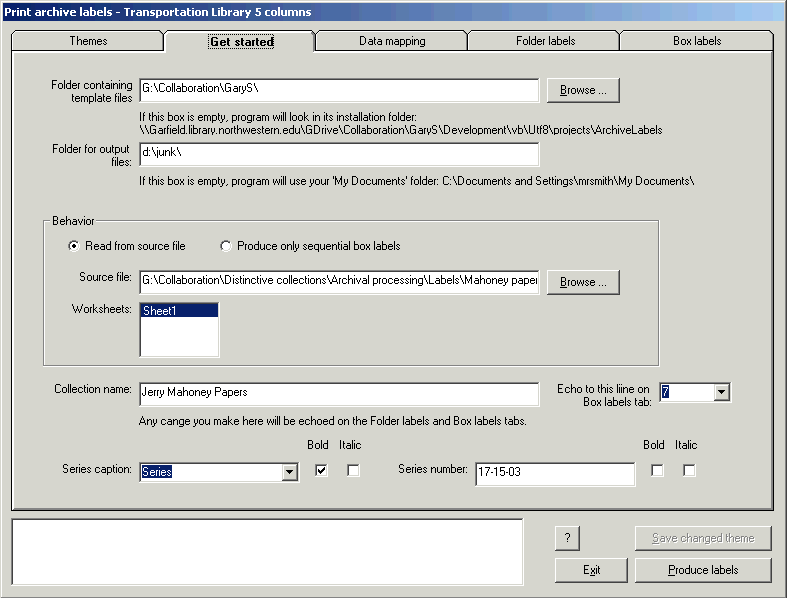
You move to the Get started tab (shown below), and use the Browse button next to the Source file box to find the spreadsheet that contains the box and folder information for the Mahoney collection. This spreadsheet only contains one worksheet (called Sheet1) so that must be the right one. You type the name of the collection in the Collection name box, and the series number in the Series number box. The rest of the configuration on this tab is OK as it stands.
|
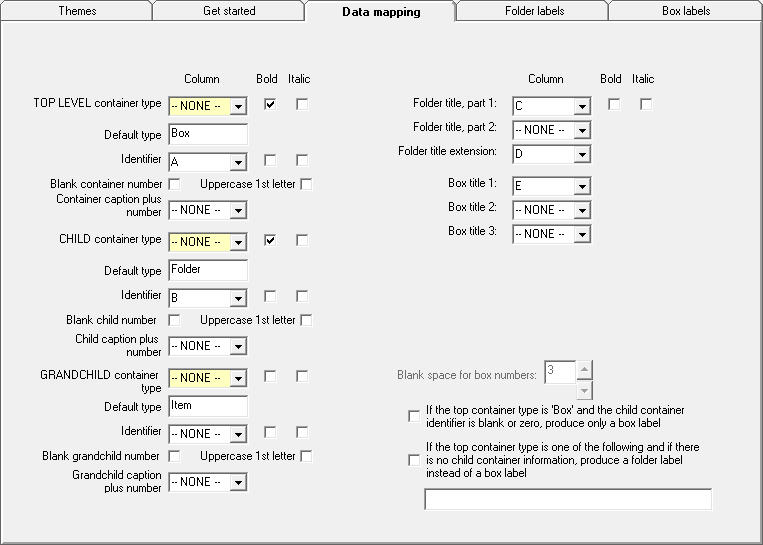
You move next to the Data mapping tab. When you arrive here (shown below), the tab still reflects the spreadsheet layout of the original theme, so you're going to need to make some changes: the box and folder numbers have a different configuration, there's an additional column for folder dates, and there's a column for box titles.

|
Here's the same tab, now changed to match the layout of this collection's spreadsheet. Column A contains the pre-assembled box number and caption; column B contains the pre-assembled folder number and caption; columns C and D contain the title and an associated date. Finally, column E contains a title that you want to use on box labels. You've identified this last item in the Box title 1 area; you'll need to remember this when you come to the Box labels tab.
|
On the Folder labels tab (shown below), you verify that the program has copied the collection name correctly into the Collection name box, you verify that the label format is the correct one, and everything else appears correct. Not much to do here, because the label layout for this repository doesn't change from one collection to the next.

|
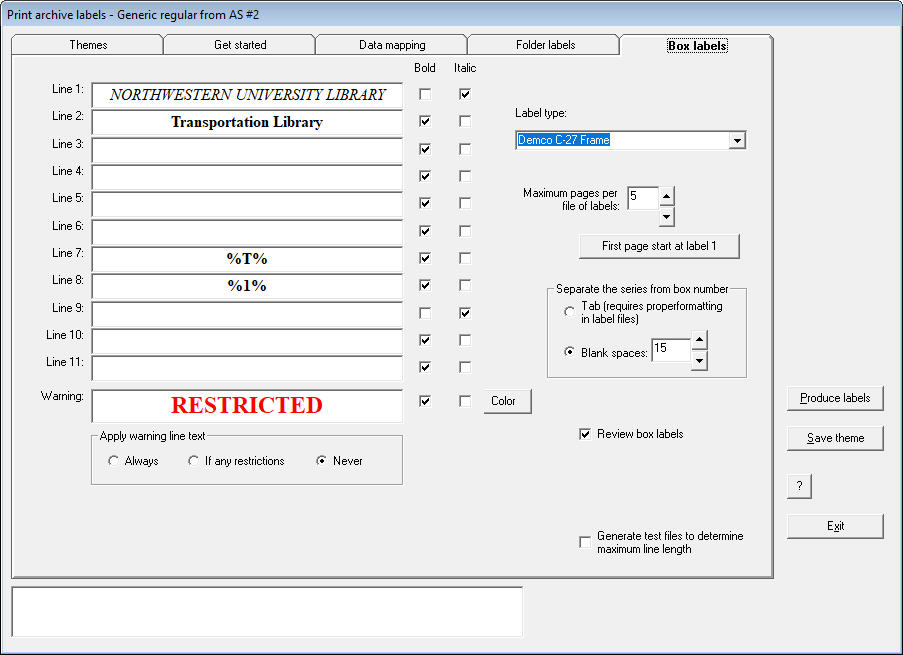
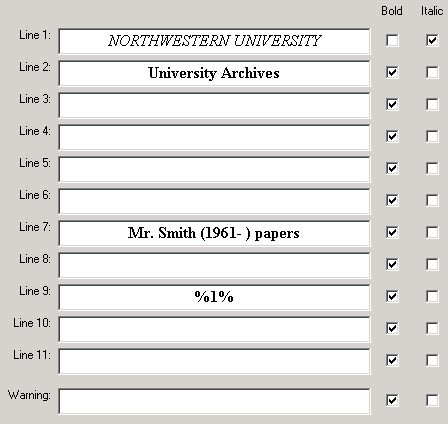
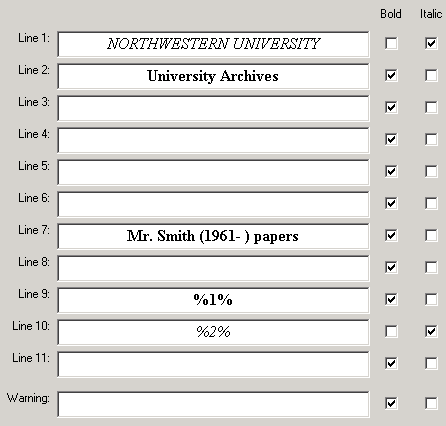
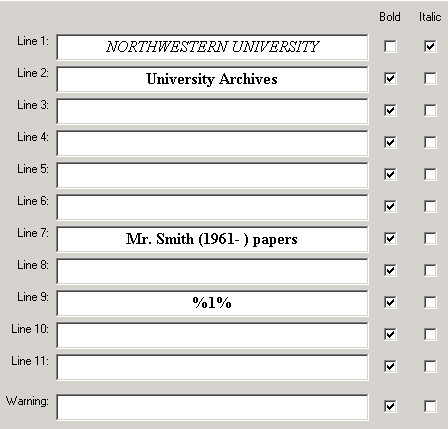
On the Box labels tab (shown below), you see that the program is set to echo the collection name into the appropriate line on this tab, the correct label format is selected, and everything else here appears correct. (Again, no major changes are called for, because the theme from which we derived this theme already represented this repository's choices.) You need to tell the program where to put the title from column E of the spreadsheet, which you defined as Box title 1. You do this by giving the code "%1%" on the line where you want this title to be printed. (And you've chosen to display this title in bold.) For this repository, you've chosen to use line 8 for the box title; but you could instead have used any other line that wasn't already in use.

|
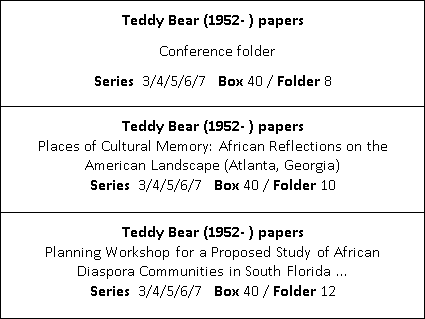
Finally, because this collection currently has access restrictions, you type the appropriate text in the Warning box, and use the Color button next to this box to tell the program to print the warning in red.
|
Having set up the program to produce your labels, you click the Produce labels button. The program reads the source spreadsheet and produces files of box and folder labels. When the program is done, the folder you identified as the Folder for output files on the Get started tab contains the program's output files of folder and box labels. You will check these files to make sure that everything is just as it should be, and then send the files to a printer. Because the box labels have a warning message to be printed in red, the file of box labels needs to be sent to a color printer, and the name of the file of box labels reminds you of this.
|
|
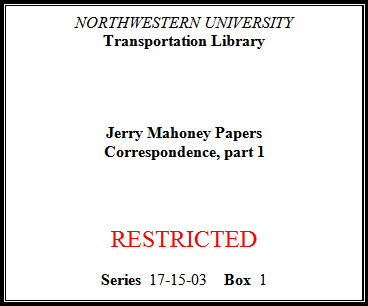
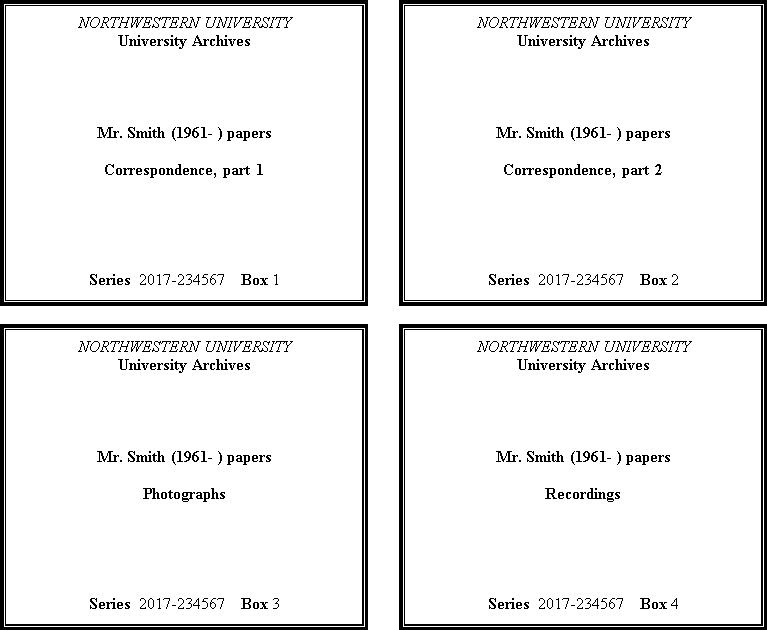
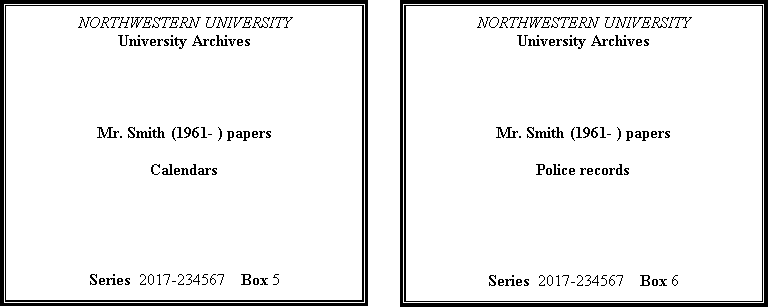
Just for fun, here's one of the box labels, with the box title inserted from the spreadsheet, and the restriction warning in red.
|
Each of the program's display panels has a button whose caption is just a question mark. This button gives you immediate access to this online documentation.
| Here is the lower right-hand corner of the program's main panel. Click the "?" button to open this online documentation. | |
|
When you click the "?" button, the program opens this documentation in your favorite web browser. For the program's main panel, the documentation opens at the point that describes the tab you're currently viewing, so you can immediately get information about the settings contained on that tab. For the program's other panels, the documentation opens at the point that describes that panel, so you can find out about the task that the panel controls.
If you can't figure out why the program does what it does, or won't do what you want it to do, write Gary and ask. His e-mail address is at the top of this document.
The labels program has a large set of options that together control the appearance of folder and box labels. Because you may need repeatedly to produce labels in more than one manner, the program allows you to save all of the settings that produce each different kind of label under a name, and to recall that group of settings whenever you need it. In this program, all of the settings for a given type of label is called a theme. The program saves all of the themes that you create, and makes each available to you with the click of a mouse button.
For example, you might define separate themes to suit the requirements for labels of any of the following (singly, or in combinations):
You can create as many themes as you need, and then choose the most appropriate one to generate a particular set of labels. You can modify your themes whenever the need arises. You can also share themes with your co-workers.
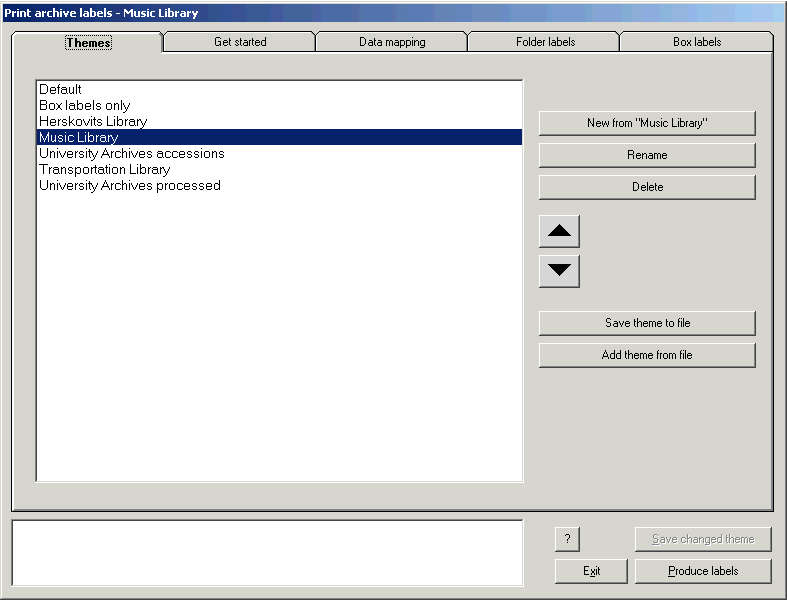
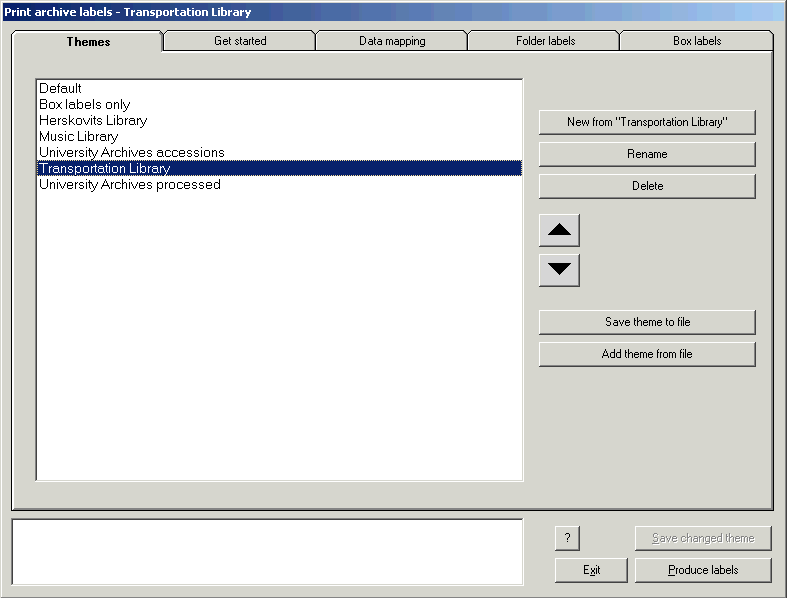
The program’s Themes tab (the tab that the program shows when it starts up) contains a list of the themes in your current repertoire, and offers a set of buttons to help you manage the list. To work with a theme, click on the name of a theme in the list. Each time you select a theme in this list, the program loads that theme's current values onto the program's remaining tabs, and changes its caption (in its title bar) to include the name of the currently-selected theme. Visit each of the program's tabs to examine and adjust the values that define the currently-selected theme.
| Here is a typical display on the Themes tab. The list at the left contains definitions of seven themes; the second theme is currently selected. The program's caption (or title bar), and the caption of the New ... button, reflect the name of the currently-selected theme. You can see the theme name in the program's caption from each of the program's tabs, so you are constantly reminded of the theme with which you are working. | |
|
|
Whenever you change any part of a theme, the program activates the Save changed theme button. You can click that button whenever it is avalable, to make sure that your changes are preserved. The program automatically saves the current theme whenever you take any action that causes the program to move away from the the currently-selected theme (derive a new theme from the current theme, display a different theme, or produce a set of labels).
When the program loads a theme, and whenever you make any change to a theme, the program examines the theme's settings for completeness and consistency. If the program finds something in a theme that it does not like, it will show brief descriptive messages in the window in the lower left-hand corner of its main panel. The program allows you to save a theme that appears to have errors (the theme may be an incomplete one that you are going to use only as the basis for other, more complete themes);7 but the program will not allow you to produce labels from a theme that contains errors.
| The program's messages in this illustration indicate that the theme contains two critical errors. You must resolve these issues to the program's satisfaction before you can use this theme to produce labels. | |

|
Use the buttons on the right side to manipulate your repertoire of themes:
The first item in the list is called Default and it has a few special properties: you cannot delete it, you cannot rename it, and it is always the first item in the list. However, you can change the properties that comprise this theme just as you can change the properties of every other theme. Before you set about creating your first themes, it's a good idea to adjust the Default theme to reflect properties that will be common to all of your labels. (For example, if decide that the first line or two on box labels should be the name of your institution, you should change the default theme to do this. If you spell all of the words right in the default theme, you won’t need to check the spelling in the themes you derive from the default theme.) If you take the trouble to configure the Default theme appropriately, all of the labels you derive from the Default theme will automatically have many of your preferred characteristics.
The labels program produces two kinds of output files: files of folder labels, and files of box labels. The program writes these files to the output folder you identify on the program's Get started tab. The program constructs the names of its output files from several elements:
| If the program is reading directly from ArchivesSpace, the program will create output files with names like these (for this excample, assume that the ArchivesSpace numeric identifier for the resource is 1719): | |||||||||||||||||||||
|
|||||||||||||||||||||
| If the program is reading from a source file called Smith.Final.txt, the program will create output files with names like these: | |||||||||||||||||||||
|
|||||||||||||||||||||
| If the program is reading from a source file called Smith.Final.txt, and if the Warning line is defined to be printed in a color, and if the Warning line contains some text, the program will create output files with names like these: | |||||||||||||||||||||
|
|||||||||||||||||||||
| If the program is reading from an Excel spreadsheet called Smith.Final.xlsx that contains two worksheets, called Letter size and Legal size, the program will create output files with names like these (assuming that you have told the program to produce labels from both of these worksheets): | |||||||||||||||||||||
|
|||||||||||||||||||||
| If the program is generating a set of sequentially-numbered box labels, the file names will take this form: | |||||||||||||||||||||
|
The .rtf extension used for the program's output files files identifies them as being in the rich text format. This is a special encoding understood by Microsoft Word (and perhaps other programs). In your configuration of Microsoft Windows, files with the .rtf extension should be assigned to Microsoft Word. (This is probably already the default setting for files with the .rtf extension.) You can use Word to inspect and adjust the contents of these files, and to send them to a printer to produce the finished labels.
The following sections describe the program’s output files in a bit more detail.
The program provides three areas for data on its folder labels. You select the contents to be printed in these three areas from a list of four data elements. You can choose to place these elements onto your folder labels in any order.
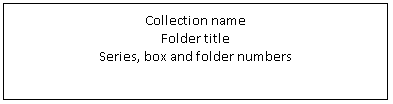
| The following illustration is is a schematic representation of a default folder label, as seen by the program.9 All of the lines in folder labels in the default template files are centered. (You can change this if you want.) | |
|
In its default behavior, the program prepares a folder label by placing text you supply into each area.
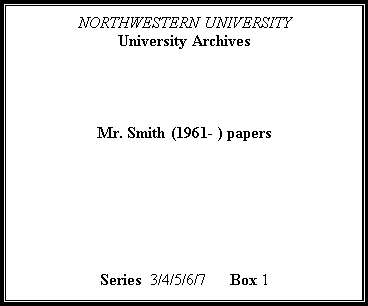
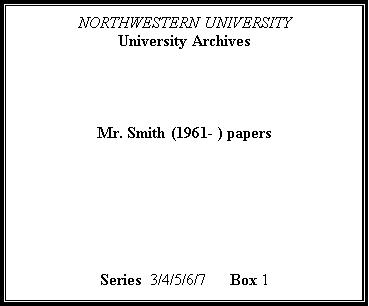
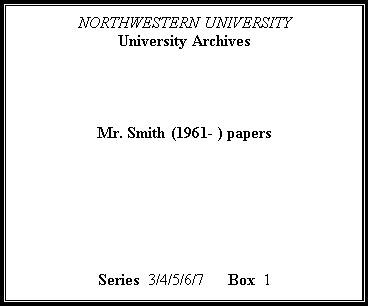
| Here is a typical folder label produced by this program (as displayed in Microsoft Word), based on the default template file for folder labels. The text Mr. Smith (1961- ) papers is the collection name, the text "Notes found in a Klein bottle," 1970 is the folder title pulled from a row in the source file, the series caption and series number come from the Get started tab, and the box and folder numbers come from the source file. | |

|
The above shows the program's default behavior. If you wish, you can tell the program to change the relative positions of the three elements of a folder label (collection name, folder caption, series/box/folder numbers).
The texts for the collection name, repository name, and series/box/folder areas must be short enough to fit onto a single line of the label. The folder caption can occupy one or more lines. If a folder caption is too long to fit into the available space, the program will truncate it, and add the mark of omission (…) to the remainder. The setting for Folder window size affects the manner in which the program splits a folder caption into lines.
| The following illustration shows a group of labels defined to hold two lines of folder caption text. The folder caption in the first label in the following illustration fits comfortably on a single line; the space above and below this single-line caption is controlled by the value of AvailableLabelSpace for the selected type of labels in the program's configuration file. For the second label, the program divided the longer folder caption into two lines. The caption for the third label would not fit into two lines, so the program used as much as it could fit into the two available lines, and truncated the rest. | |
|
When the program is reading from ArchivesSpace, it creates one folder label for each object to which an instance is attached. When the program is reading from a source file, it creates one folder label for each row of data in the source file. (However, when reading from a source file, the program does not produce a folder label if a row of data does not have a folder caption.10)
The program recognizes three areas on its box labels. A box label contains several lines of text, a special Warning line (optional), and a line for the series and box identifiers.
| The following illustration is a schematic representation of a typical box label, as seen by the program. The frame shown in this example is part of the definition of the box label in this particular set of template files. (A different set of template files for box labels may have no frame.) All of the lines in box labels in this set of template files are centered. (You can use a different alignment if you want.) | |
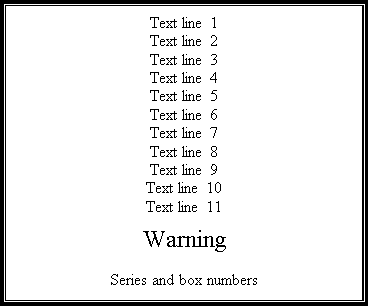
|
The program prepares a box label by placing text you supply into each area.
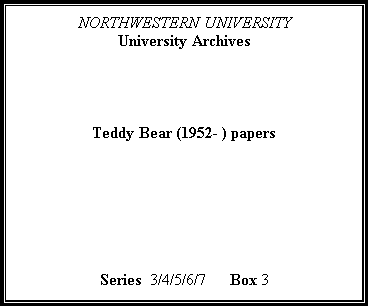
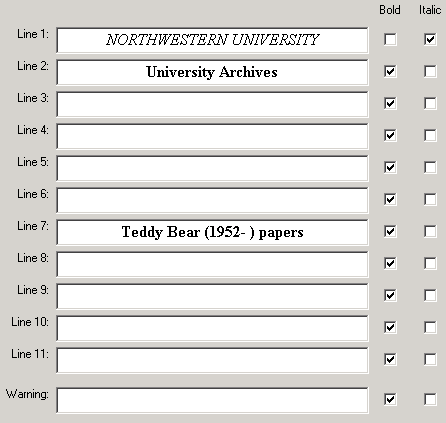
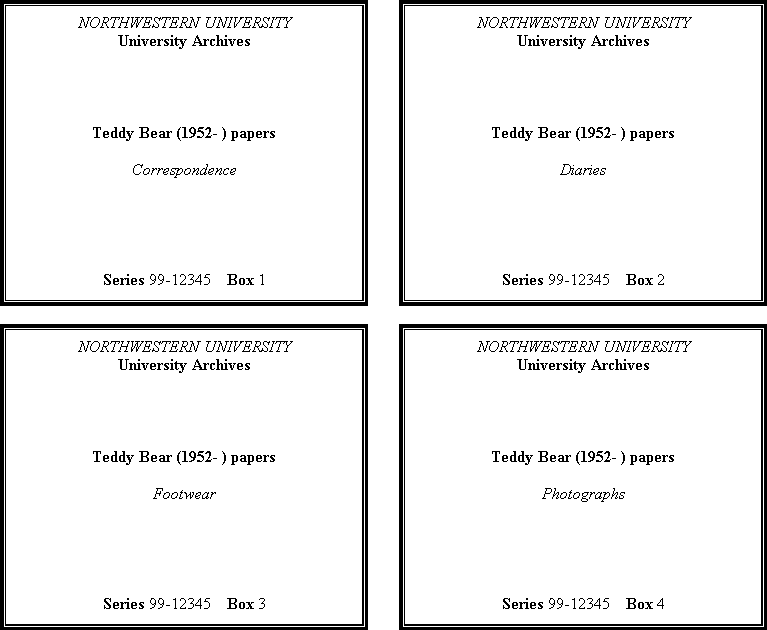
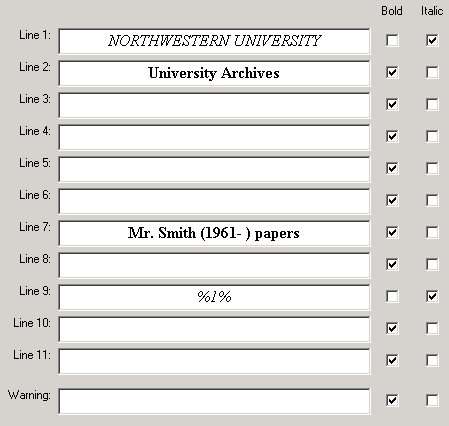
| In the following illustration of a typical box label generated from a default template file, the text NORTHWESTERN UNIVERSITY comes from the Line 1 box on the Box labels tab (the text of this line is defined as being displayed in italics), the text University Archives comes from the Line 2 box (defined as being displayed in bold), and the text Teddy Bear (1952- ) papers comes from the Line 7 box (also defined as being displayed in bold). The Warning line, though defined in this template, is blank. The series number comes from information on the Get started tab; the box number comes from data in the source file. A file generated from data that the program pulls from ArchivesSpace for the same resource wuld be identical to this label. | |
|
|
| The following box label was constructed in a similar manner, but from a different source file. The collection name in the center comes from the Line 7 box. The RESTRICTED label is from the Warning line, and is defined as being printed in red.12 | |

|
The program creates one box label for each distinct top container (top container type plus top container identifier) that the program discovers in ArchivesSpace, or that is present in your source file.
The labels program does not have a group of settings that are common to all of the labels produced by the program. Instead, each them defined to the program contains a complete set of instructions (called a theme) that the program can use to produce labels.
The program's settings for each theme are distributed over a series of tabs. The program saves the complete suite of settings for each theme you create. Each time you use the program to print labels, you need to visit each of the program's tabs that define the characteristics of your chosen theme and adjust settings as needed. When the settings reflect your wishes, you can ask the program to produce folder and box label files. The program preserves your settings from one run to the next; so after you have a theme set to your liking you should only need to worry about those settings that apply to a particular set of labels (series number, collection name, source file, and so on). The program's Themes tab is described elsewhere, together with a discussion of the concept of the theme itself; the remaining tabs on the label program's main panel are discussed in the following sections.
The following paragraphs describe features that are common to the label program's tabs.
Lines of text that are too long
Work areas that contain text to be used in folder and box labels have a feature that will help you know that the text will fit into the available space. If the program believes that your text will not fit into the avialable space, the program will reverse the foreground and background colors of the text box. (The program's calculation takes into effect the current font selection, bold and italic properties, and the defined maximum line length for the type of label.)
| In the following illustration, the text supplied by the operator is too long to fit into the available space. (This particular piece of text is a line within the frame of a box label.) The program has reversed the foreground and background colors of the text, so you can know immediately that there is going to be a problem with the finished labels. | |
|
|
The program's boxes that allow you to supply a piece of text, and also some of the program's drop-down lists, have two associated check-boxes. These check-boxes have the column captions of Bold and Italic. These check-boxes tell the program whether the text defined by the text box or drop-down list should be displayed in bold, italic, or both.
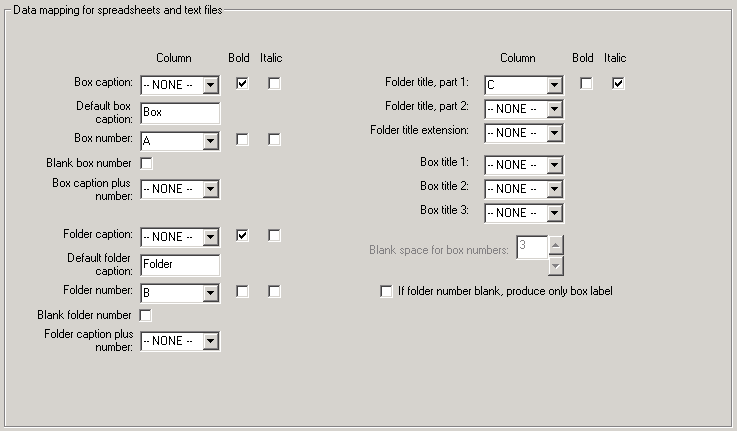
| The following illustration shows the central part of the program's Data mapping tab. Some of the elements defined here have check-boxes next to them, in columns headed Bold and Italic. In this case, the operator has decided that the box and folder captions should be printed in bold, and the folder title should be printed in italics; the remaining elements should be printed in plain text. | |
|
Whenever you ask the program to save the current theme it will do so, in whatever state the settings may be in. If you ask the program to save a theme that the program believes to be incomplete or contradictory, it will show you messages that describe these conditions in the box in the program's lower left-hand corner, and then write the settings to a file. Although you can save a theme that does not satisfy all of the program's tests, the program will not allow you to use a theme to produce labels if the program believes that the theme is not defined correctly.
Unless stated otherwise, the unit of measurement used on the program's tabs to set lengths and distances is the twip. One twip is a twentieth of a point (hence the name), which works out to 1/1400 of an inch, or 0.01763888889 mm. (To convert inches to twips, multiply by 1400; to convert millimeters to twips, multiply by 56.69.) A twip is s a very small distance indeed, so a change of just a few numbers will usually not produce a visible result.
The Get started tab gives the program basic information that it will use in the production of box and folder labels. This information applies generally to both box and folder labels. Some of the elements defined here have check-boxes that you can use to tell the program to print them in bold, italic, or both.
If this text box is empty, the program will assume that the template files are in the program's own folder, which is probably not correct. (The label just below this box shows the location of the program's own folder.)
If this text box is empty, the program will send its output files to your My Documents folder. (The label just below this box shows the location of your My Documents folder.)
Use the Browse button to find the source file. If your file is an Excel spreadsheet, the program will pause to open the spreadsheet and see what it contains. This takes the program a few seconds, during which it will appear to be frozen.
The labels program will only look into worksheets that are highlighted in this box. If the program recognizes your spreadsheet as one prepared for loading into ArchivesSpace via the plug-in, it will highlight only the "Data" worksheet by default, and this is the only one that the program should use; if your spreadsheet is of any other type, the program will highlight all worksheets by default, and you should un-select any that are not appropriate for the program to use.
All of the worksheets you select in this list must have the same column layout, as identified on the Data mapping tab.
List each top container separately, or as a range separated by hyphens (such as "15-19"). Separate each top container identifier or range from its neighbors with a space. The program will find, and include in the output, all top containers of any type that have the requested identifier. (For example, if you ask for top container "3", the program will include both "Box 3" and "Volume 3" in its output.)
If you supply a limiting list of top containers, the program will compare the number of top containers needed, to the total number of top containers used to house the resource, and then decide on a course of action. (The program is attempting to do its work in the most efficient manner possible.) If the ratio of containers requested to total containers is small, the program will request the contents of the containers of interest, and work upwards through the hierarchy of objects to construct folder captions. 13 If, on the other hand, the ratio is above the program's threshold, the program will proceed in its usual manner (reading the entire hierarchy of the resource), but will discard information about those items not held in the top containers of interest.
This feature will probably not work correctly if your top container identifiers contain internal spaces or hyphens.14
List each top container separately, or as a range separated by hyphens (such as "15-19"). Separate each top container identifier or range from its neighbors with a space. The program will find, and include in the output, all top containers of any type that have the requested identifier. (For example, if you ask for top container "3", the program will include both "Box 3" and "Volume 3" in its output.)
If you supply a limiting list of top containers, the program will compare the number of top containers needed, to the total number of top containers used to house the resource, and then decide on a course of action. (The program is attempting to do its work in the most efficient manner possible.) If the ratio of containers requested to total containers is small, the program will request the contents of the containers of interest, and work upwards through the hierarchy of objects to construct folder captions. 16 If, on the other hand, the ratio is above the program's threshold, the program will proceed in its usual manner (reading the entire hierarchy of the resource), but will discard information about those items not held in the top containers of interest.
This feature will probably not work correctly if your top container identifiers contain internal spaces or hyphens.17
When you click the Connection to AS button, the program displays a separate panel. You use this panel to define up to 3 different ODBC connections, and to select from among the various ODBC connections the one the program should use for the current set of labels. The following illustration shows this special panel, with two ODBC connections defined; the first connection has been selected by the operator for use to produce a set of labels.18
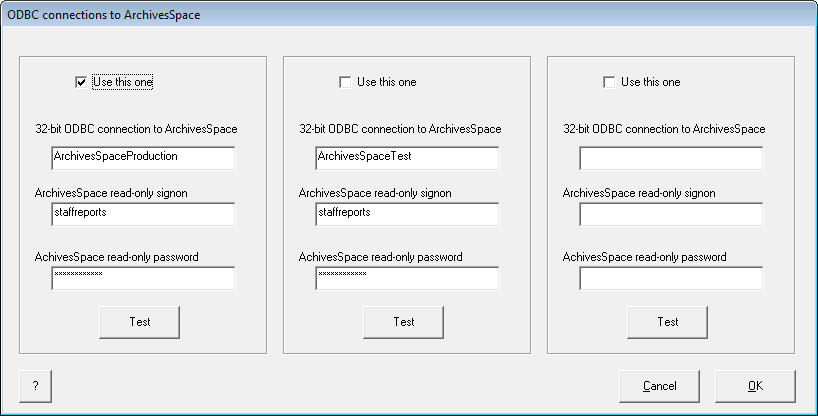
To define a connection to the program, supply the connection name as defined in the 32-bit ODBC data source administrator, and the read-only signon and password. To tell the labels program which connection to use, check the "Use this one" box for that connection.
The collection name may contain special characters, such as letters with diacritical marks, and non-roman characters.
If the text you supply is too long to fit into a line on the folder or box label, the program will display a warning message.

This tab tells the program about the contents of your source file, and how you want it to display it on labels.
The program changes the display on this tab to match the selection you make in the Behavior box on the Get started tab: the program includes different elements when the program will be reading directly from ArchivesSpace, when it will be reading from a spreadsheet prepared for loading into ArchivesSpace, and when it will be reading from a spreadhseet in a locally-defined format. (If you're creating box folders using the "box folders only" selection, nothing on this tab is relevant.) The comments in this section of this documentation describe everything that might appear on this tab, regardless of the way the program will be working. If something described here does not show up when you're working with the program, that's because it is something that the program can figure out on its own, or because it doesn't have any relevance for the way the program will be working under conditions as defined.
Many of the options on this panel allow you to indicate that a data element should be printed in bold, italic, or both.
If this box contains a check-mark, and if (when constructing a folder label) the program finds that it has a box identifier but no folder identifier, the program will not produce the folder label. (It will still produce a box label.)
This business of labels that may be printed when a folder identifier is not present, can be a bit confusing. Perhaps the following will help.
| Assume that your input file looks like this (with some of the folder numbers being blank, because some boxes do not contain individual folders): | |
|
|
|
| If the If folder number blank, produce only box label box is not checked, the label files that the program generates from this data will look like the following illustration. Boxes 10-13 have only box information, not folder information. | |
|
|
|
| If the If folder number blank, produce only box label box is checked, the label files generated from this data will end with Box 9, Folder 8. In both cases, the program will generate box labels for boxes 9-13. |
Note that this is different from the Blank child number check-box; that check-box tells the program to print the folder caption, with a blank space instead of the folder number.
| The following illustration shows the program configured for a very simple spreadsheet layout: the box number in column A (the box caption to be shown in bold), the folder number in column B (the folder caption to be shown in bold), and the entire folder title in column C. The values for container types are supplied in the appropriate boxes. | |
|
|
| The following illustration shows the program configured for a more elaborate spreadsheet layout. The explicit box caption and number are in columns A and C of each spreadsheet row, the explicit folder captions and numbers are in columns B and D, the folder title is in column E, and the title extension in column F. The captions are in bold; the remainder of the elements are in plain text. | |
|
Additional illustrations of settings on this tab for common and not-so-common source file layouts (including pictures of the corresponding source files themselves) are available here.
This tab gives the program information about the folder labels that it will prepare.
Some of the elements defined here can be printed on your labels in bold, italic, or both.
If the program will be reading directly from ArchivesSpace, you cannot modify this text; the program will use the name that it finds in ArchivesSpace. (If the program discovers that the name is too long to fit, it will pause and ask you to truncate it.)
The following configuration places the collection name at the top of the label; followed by the series, box and folder numbers; followed by the folder caption.
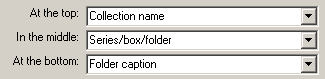
This configuration produces labels with this general appearance:

If the program will be reading from ArchivesSpace, it will use the repository name that it finds there.
This feature only affects the first page of folder labels to be printed. The program assumes that it can use all of the labels on the remaining sheets of folder labels.
If you wish the program to skip a certain number of labels on the first page of folder labels, click this button. The program will show you a crude mock-up of a sheet of labels; in this mock-up each of the buttons represents a label.
| This panel represents a page of labels that has two columns of ten labels each: |

|
Click on the button that represents the first label on the sheet that's printable. The program marks all of the preceding buttons with "X".
| In the following illustration, you have just clicked the third button button from the bottom in the right-hand column. The program has marked the preceding buttons with "X". This means that for the first page of folder labels, the program will skip the first fifteen labels and begin printing with the sixteenth label. |

|
If you click the OK button the program will change the caption of the button on the Folder labels tab to reflect your choice, and will skip labels on the first page as you have instructed. If you click the Cancel button, the program will assume that you want to start printing with the first label on the first page.
| Here is the Folder labels tab, after the work described above. The caption on this button now indicates that the first page of labels will begin with the sixteenth label. |
|
If a label caption is defined to contain more than 2 lines, the program applies a similar logic to the last two lines of the caption.
| The program generated this label without using this feature. Having just one short word on the second line might be considered unfortunate. |

|
| The program generated this label with this feature enabeled. The label caption is split more evenly onto two lines. |

|
The value of Window size helps the program determine which folder caption lines should receive this special attention. If a caption's length is longer than the maximum line length minus the Window size and is also shorter than the maximum line length plus the Window size, the program will attempt to split the line at a reasonable middle point.21 (If the line is shorter than the maximum length minus the Window size, it will fit comfortably on a single line; if it is longer than the maximum length plus the Window size, the program will split the line into two or more lines using its default break-point mechanism: fill each line, with the remainder on the last line.) When a folder caption's length falls within the range defined by Window size, the program scans the caption first to the right of the mid-point, and then to the left of the mid-point, in search of a place to divide the caption. (This means that most of the captions the program divides in this manner have a first line slightly longer than the second line, as in the above example.) The default value of 1000 twips (50 points, or about 0.7 inches, or about 18 mm) gives reasonably pleasing results. Available values are 500-1500 twips. The program does not apply this extra logic if the folder caption is longer than the width of a line plus the Window size.
|
|
If you choose this option, the program will simply insert a tab between the two elements, which will generate a certain amount of space. You may wish to make changes to the lines in your folder template files that will contain series and box/folder information, to produce a different effect: format the lines to be left-justified, and with one tab (at the right margin of the label and set for right justification). This will push the two elements to the left and right edges of the label, with the maximum space between them. |
The program applies the Caption hierarchy set of options to data read directly from ArchivesSpace, as well as to data read from a spreadsheet to be loaded into ArchivesSpace via the plug-in.
Use the up-down buttons to tell the program to accumulate a certain number of hierarchy elements (but no more) in the folder caption for an object. This number includes the caption for the object itself. A value of "3" means that the program will include the caption for the object itself, plus the captions for up to 2 superior levels of the resource's hierarchy; a value of "1" means that the program will only include the caption for the object itself in the folder label.
| Assume this hierarchy of objects in an ArchivesSpace resource record: | |
| Books by Tribune authors | |
| Dubois, Jules. Dictators of the Americas, 1965 | |
| Volume 1 | |
| Volume 2 | |
| If the value of Caption hierarchy is "3", the candidate folder caption for Volume 1 will be "Books by Tribune Authors. Dubois, Jules. Dictators of the Americas, 1965. Volume 1"; if the value of Caption hierarchy is "2", the candidate folder caption for Volume 1 will be "Dubois, Jules. Dictators of the Americas, 1965. Volume 1"; if the value of Caption hierarchy is "1", the candidate folder caption for Volume 1 will be just "Volume 1". |
The 'Omit Series' and "Omit Subseries" options tell the program whether to include the captions of series and subseries when constructing its folder captions. The program does not count any such ignored lines when applying the limitation on the number of hierarchy levels included in folder captions.
The following examples show the varying date formats possible with this option.
| Option | Begin: 1872, end: 1927 | Begin: 1952-01-01, end: 1987-08-31 |
| Hyphen | 1872-1927 | 1952-01-01-1987-08-31 |
| Space, hyphen, space | 1872 - 1927 | 1952-01-01 - 1987-08-31 |
| Slash | 1872/1927 | 1952-01-01/1987-08-31 |
| Space, slash, space | 1872 / 1927 | 1952-01-01 / 1987-08-31 |
| ... to ... | 1872 to 1927 | 1952-01-01 to 1987-08-31 |
| from ... to ...22 | from 1872 to 1927 | from 1952-01-01 to 1987-08-31 |
The program does not apply this option when there is also a date expression. (The program uses the date expression instead of the beginning and ending dates, and assumes that the date expression contains all appropriate text and internal punctuation.)
This tab gives the program information about the box labels it will prepare. The current choice for the Label type controls the appearance of this tab. There are three areas on box labels into which the program will insert text; two of these are defined on this tab.23 Texts for these areas are presented on this tab as a set of boxes: there are numbered lines for the institution name, the collection name, or anything else you might care to use on all of the box labels for a collection.24 There is an additional box labeled Warning. (The Warning line is optional, and need not be included in the definition of a given label format.) Each box label that the program produces will have exactly the same texts on all of these lines (with the exception of the "Warning" text, which can be made conditional, depending on your option). Any of these lines can be defined as being in bold, italic, or both. The Warning box (if present and used) also has a Color button that allows you to pick the color in which the line's text will be printed.
| Here is one way the text in these boxes might be defined (the label configuration that lies behind this illustration provides for eleven lines of text, and a warning line): |
|
If you have defined columns in the input data for individual box titles to be drawn from your source file, you also need to use special symbols on this tab to tell the program where in the box label to insert the title. The complex matter of getting titles for individual boxes into the box labels is discussed elsewhere.
The radio buttons below the box for the warning line text allow you to control the application of the warning line text on individual box labels. (Of course, the program only applies the action indicated by the radio button, if there is some text in the warning line text box.)
| Here is one way the text in this box might be defined: |

|
When the If any restrictions button is selected, the program notes the state of the Restrictions apply check-box for the resource, and for each object attached to the resource (or the value in the corresponding "restrictions_flag" column of the spreadsheet). The program reads the objects for a resource in a hierarchical manner (mirroring the way that ArchivesSpace lists the objects in the staff client), and it applies restriction information in a hierarchical manner.27 Given the choices made in the illustration just above, the program will add the warning text only to those top container labels that contain an object marked as restricted; other top containers will display no warning text.
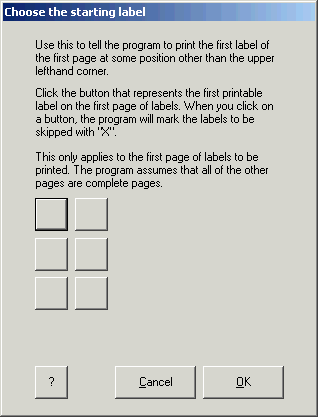
This feature only affects the first page of box labels to be printed. The program assumes that it can use all of the labels on the remaining sheets of box labels.
This feature is available both from the Box labels tab and the box label review panel.
If you wish the program to skip a certain number of labels on the first page of labels, click this button. The program will show you a crude mock-up of a sheet of labels; in this mock-up each of the buttons in the center of the panel represents a label.
| This panel represents a page of labels that has two columns of three labels each: |
|
Click on the button that represents the first label on the sheet that's printable. The program marks all of the preceding buttons with "X".
| In the following illustration, you have just clicked the middle button in the right-hand column. The program has marked the preceding buttons with "X". This means that for the first page of labels, the program will skip the first three labels and begin printing with the fourth label. |

|
If you click the OK button the program will change the caption of the button on the Box labels tab to reflect your choice, and will skip labels on the first page as you have instructed. If you click the Cancel button, the program will assume that you want to start printing with the first label on the first page.
| Here is the Box labels tab, after the work described above. The caption on this button now indicates that the first page of labels will begin with the fourth label. |

|
|
|
If you choose this option, the program will simply insert a tab between the two elements, which will generate a certain amount of space. You may wish to make changes to the lines in your folder template files that will contain series and box information, to produce a different effect: format the lines to be left-justified, and with one tab (at the right margin of the label and set for right justification). This will push the two elements to the left and right edges of the label, with the maximum space between them. |
The labels program provides two different ways for you to supply the information it places on your box and folder labels: you can tell the program to read directly from ArchivesSpace, or you can create a data file, called here the source file, and pass that to the program. You are probably already producing files in some format or other as you go about processing archival collections. If you wish to create labels from such a file rather than from data in ArchivesSpace, you should be able to devise a layout for your data file that this program can use it to produce satisfactory labels while at the same time meeting your other needs. If you choose to produce labels from a source file, your success with this program depends on devising a suitable design for the layout of your source file, coupled with a rigorous adherence to your design as you supply the data.
|
|
Nothing said in this section applies to Excel spreadsheets that are formatted for loading into ArchivesSpace via the plug-in. Prepare such spreadsheets according to their own requirements; this program will know what to do with them. Some details regarding information in such spreadsheets can be found here |
This label program recognizes source files in the following formats.28
If your input file is an Excel spreadsheet that contains more than one worksheet, you can select just those worksheets from which you wish to produce labels. Each worksheet within a given spreadsheet from which you wish to produce labels during a single run of this program must have the same column layout. (In other words, the column identifications on the Data mapping tab must be applicable to all of the selected worksheets. If different worksheets have different layouts, you will have to produce a separate set of labels from each different layout.) The program will produce a separate set of labels from each worksheet that it reads suring a single run.
The tool that the program uses to read an Excel worksheet (as opposed to the one that it uses to read tab-delimited text files) does not recognize an explicit end-of-file marker; this tool simply returns blanks when it is asked for data from rows that are beyond the worksheet's last row. Because of this odd limitation, the program defines its own rule for figure out when it's reached the end of data in a worksheet: the program stops reading from a worksheet when it finds five consecutive rows that do not have a caption for the folder label. The program will ignore single blank rows interspersed throughout the worksheet, but a sequence of five consecutive blank rows at any point (even if they're in the middle of otherwise valid data) will cause the program to stop reading from that worksheet. (The program does not make any allowance for blank lines in text files: blank lines should not be present in text files.)
Your worksheets may contain any number of columns; however, the program is at present only designed to look for information somewhere within the first 26 columns (columns A-Z).
Text files used as source files must be in the Windows text file format, with carriage return and line feet characters marking the ends of lines. If you suspect that your text file is not in Windows format, open it in a tool such as the Windows WordPad, and save the file as a Windows text file.
If your favorite method for processing an archival collection involves creating a table in a Microsoft Word document that lists box numbers, folder numbers and captions (and so on) in separate columns, you must take an extra step to convert the Word table into an Excel spreadsheet before the program can read the data. (This method has been used successfully to convert finding aids prepared in the past, into valid ArchivesSpace data, though often with some additional fiddling at an intermediate stage.) You give the program the name of the Excel spreadsheet that you've derived from the table in the Word document, not the name of the Word document itself.
Because tab- and comma-delimited text files can be opened in Excel and handled as if they were spreadsheets, and because the information in those files is also presented in columns and rows, just like a regular spreadsheet, this document uses the generic term spreadsheet for all of these input formats.29 If some comment in this document applies only to Excel spreadsheets or only to text files, this document will use the more specific term.
Although some variety is possible, depending on what information you want on your box and folder labels, your source file will in most circumstances have at least the following information:
Your source file may contain additional columns that also play a part in the generation of box and folder labels, and it may contain yet other columns that this program will ignore.
The program does not inspect the captions that may be present in the first row of a spreadsheet to figure out what kind of data data is in which column. You must use the program's Data mapping tab to tell the program about the layout of your source file.
The program knows how to handle the following different data elements in a source file. Each element (when intended to be used by this program) must be in a separate column of the spreadsheet. Your spreadsheet must contain columns for box number, folder number, and one column that contains text to use as the folder title.30 All of the other possible kinds of data are optional.
A note about the text in your source file: If you create your file by typing from the keyboard and by selecting special characters from the Microsoft Word or Excel Insert/Symbol dialog, the program should be able to print all of the text in your source file without any problems. However, if you create your file by copying text from some external source into your file, there may be problems with some characters. If the text already looks bad in Word or Excel, then obviously enough you should take immediate action. However, it is possible that text that you copy into your file will look right at the time, but come out funny when it's printed. All of which goes to say that if you copy text that contains special characters into your source file, you should carefully inspect your labels, to make sure that they have not become unreadable.
| The following illustration shows a collection name formed in part by copying text from an online source. In this case, the acute accent is present in the source text as a separate character. The program will print this text exactly as presented in this textbox; but the operator should instead formulate a replacement for the accent and the preceding character. | |

|
The program recognizes those parts of the list of entity references that involve characters with diacritics, and special characters; it also recognizes the "&xNNNN;" notation for all Unicode characters.
The examples in the following sections should help you understand how to tell the program about the layout of your spreadsheet, to produce labels containing the correct information.
The examples in this section show spreadsheets that have separate columns for box and folder numbers. The first row in these spreadsheets contains the captions for box and folder numbers; these captions apply to all of the numbers in those columns of the spreadsheet.31
In the following examples, the columns of the source spreadsheet are shown in a straightforward order, for clarity. In your spreadsheet, the columns can be in any order that satisfies your needs; the important thing is that the definition of data columns that you give the program must match the layout of your speadsheet.
If your data looks like this, you need to supply column letters for the Box number, Folder number and Folder title, part 1 drop-down lists on the program's Data mapping tab. All of the other drop-down lists must be set to NONE.
This configuration produces folder and box labels like these:
|
|
If your data looks like this, you need to supply column letters for the Box number, Folder number, Folder title, part 1 and Folder title, part 2 drop-down lists on the program's Data mapping tab. All of the other drop-down lists must be set to NONE.

This configuration produces folder and box labels like these:
|
|
The examples in this section show spreadsheet layouts that differ in some way from the straightforward layouts show in the previous section. The examples shown in this section do not by any means exhaust the possibilities for variations in spreadsheet layout that the program can accommodate.
In the following examples, the columns of the source spreadsheet are shown in a fairly straightforward order, for clarity. In your spreadsheet, the columns can be in any order that satisfies your needs; the important thing is that the definition of data columns that you give the program must match the layout of your speadsheet.
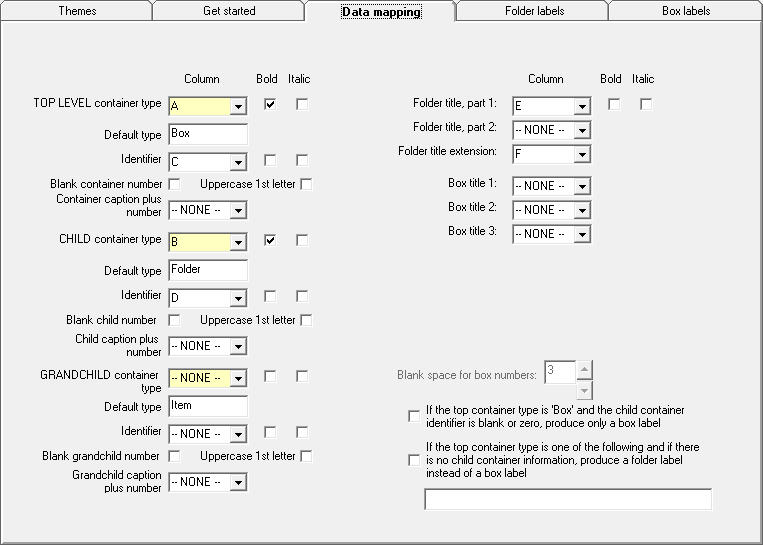
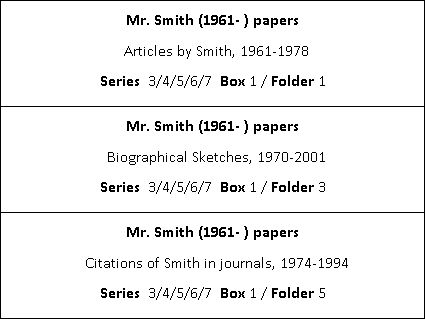
If your data looks like this, (with pre-assembled captions and numbers) you need to supply column letters for the Box caption plus number and Folder caption plus number drop-down lists (as well as, in this case, the Folder title, part 1 and Folder title, part 2 drop-down lists) on the program's Data mapping tab. All of the other drop-down lists must be set to NONE.

This configuration produces folder and box labels like these. Since the box and folder captions (but not the numbers) are defined as being printed in bold, the program parsed the pre-composed units so that it could insert the appropriate printer instructions.

|
|
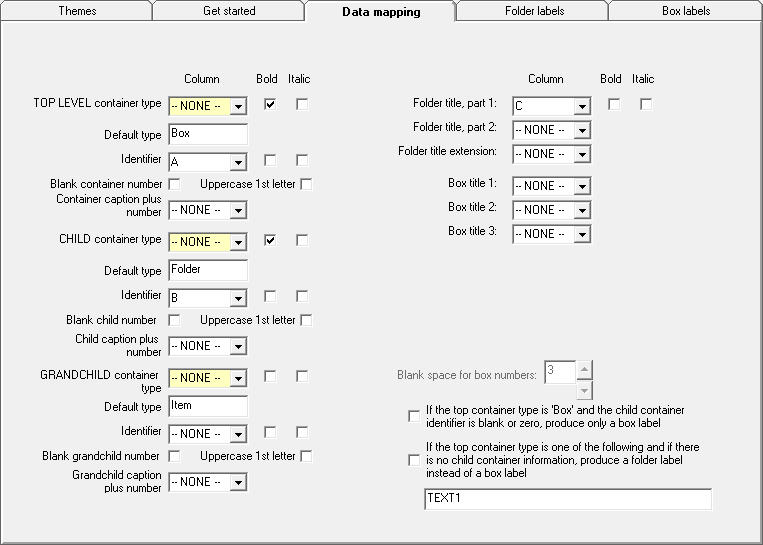
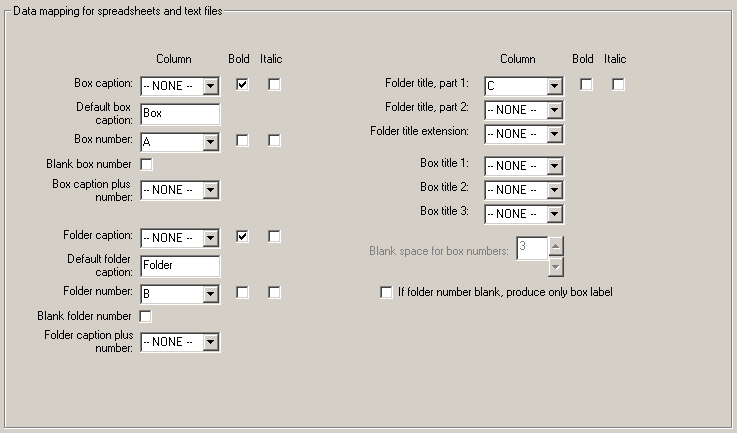
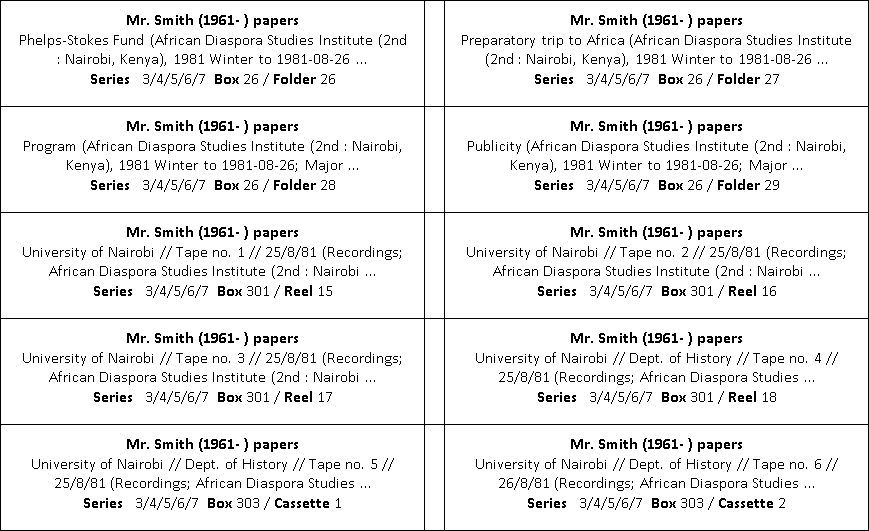
If your data looks like this, you need to supply column letters for the Box caption, Box number, Folder caption, Folder number, Folder title, part 1 and Folder title extension drop-down lists on the program's Data mapping tab. All of the other drop-down lists must be set to NONE.
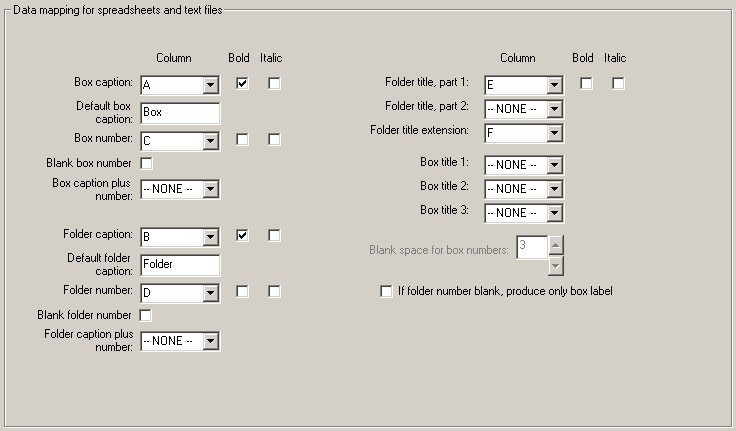
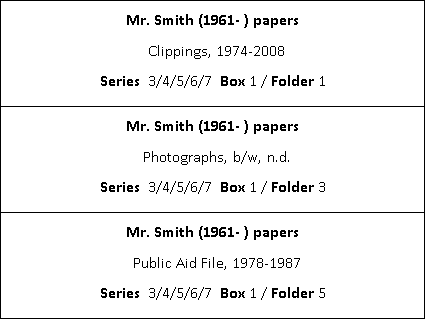
This configuration produces folder labels like these. (The box labels produced by this configuration are similar to box labels shown for other configurations.) The program produces folder labels in the order given in the source file, but the program attempts to sort box labels by the numeric value of the captions before printing them. So the labels for boxes 301 and 303 will not fall somewhere before the label for box 27, but closer to the end of the series of box labels.
Your source file may contain titles or other designations that you wish to include in individual box labels, but that do not apply to all box labels. For example, you might wish to place the name of the series, or the series and subseries, that forms the contents of a box, on the box label itself. It goes without saying (but probably needs to be said anyway) that you should only place individual titles on box labels if all of the materials in a given box can be assigned the same title. (This is not the most common case.) However, there are some collections that do in fact have one kind of thing per box. There probably are more collections that have a mixture: a few boxes contain a single type of item, and the remaining boxes contain more than one type of material. (For such collections, some boxes have an individual title, but most do not.) Although the program may not (yet) be capable of handling all possible configurations and contingencies, it contains a set of features that will assist in the printing of individual titles on box labels in many cases.
| The following illustration shows box labels that make use of this feature. The information on the the box labels is identical on each, except for one line: the line printed in italics near the center of the label. The program drew this variable line from information in the source file, as directed by elements in the program's configuration. | |
|
Getting individual titles onto box labels requires that three different things be in alignment.
| Symbol | Meaning |
| %1% | Insert information from the column identified by the Box title 1 drop-down box here |
| %2% | Insert information from the column identified by the Box title 2 drop-down box here |
| %3% | Insert information from the column identified by the Box title 3 drop-down box here |
Information for the program to use as variable titles on box labels must be placed in the source file on the first line that identifies each box. The program only looks at the column that is defined to contain a box title when it first encounters a new box number. (Other rows in the file for the same top container can contain the same title information, no title information, or different title information; the prdogram only considers the first row encountered for each top container.)
If the box title information that the program pulls from your source file will not fit into the available space, the program will truncate it. The program does not attempt to continue too-long box titles into other lines of the box label.
| The line on this box label beginning "This long caption" was pulled from a source file, using the technique described in this section. The supplied text was too long to fit into a single line, so the program truncated it. | |

|
This complex feature is perhaps best demonstrated with a few examples.
The configuration on the program's Data mapping tab gives column letters for the box number, folder number and folder title, as well as for Box title 1.

The configuration on the program's Box labels tab tells the program that the contents of the column identified by the Box title 1 drop-down list on the Data mapping tab (represented by the symbol %1%) should be printed on label line 9, in bold.
This combination of data in the source file, configuration on the Data mapping tab, and configuration on the Box labels tab, produces the box labels shown in the following illustration.

The configuration on the program's Data mapping tab gives column letters for the box number, folder number and folder title, as well as for Box title 1 and Box title 2.

The configuration on the program's Box labels tab tells the program that the contents of the column identified by the Box title 1 drop-down list on the Data mapping tab (represented by the symbol %1%) should be printed on label line 9, in bold, and the contents of the column identified by the Box title 2 drop-down list on the Data mapping tab (represented by the symbol %2%) should be printed on label line 10, in italics.
This combination of data in the source file, configuration on the Data mapping tab, and configuration on the Box labels tab, produces the box labels shown in the following illustration. The label for box 3 does not have an individual title, because none was present in the source file.

The configuration on the program's Data mapping tab gives column letters for the box number, folder number and folder title, as well as for Box title 1. There is a check-mark in the If folder number blank, produce only box label box.
The configuration on the program's Box labels tab tells the program that the contents of the column identified by the Box title 1 drop-down list on the Data mapping tab (represented by the symbol %1%) should be printed on label line 9, in italics.
This combination of data in the source file, configuration on the Data mapping tab, and configuration on the Box labels tab, produces the five box labels shown in the following illustration.


Here are the folder labels produced from this data and configuration. The program only produced labels for folders in boxes 1 and 2, because those are the only boxes for which folder titles were given.
In the example shown just above, box labels were produced even though no folder labels were produced for some of the boxes. This technique can be extended, to produce just a set of box labels, if that's what you want to do.
In some circumstances you may only want a set of box labels. This program offers several ways to do this.
Source file with only box information
Use the instructions in this section if you have a source file that has box numbers (and perhaps also box captions) but not folder numbers, and you wish to produce just a set of box labels. The configuration that produces this result may seem a bit odd, but it works.
The examples in this section makes use of the program's ability to add box titles to box labels, but using this feature is not part of the task of producing box labels from a source file that contains no folder information.
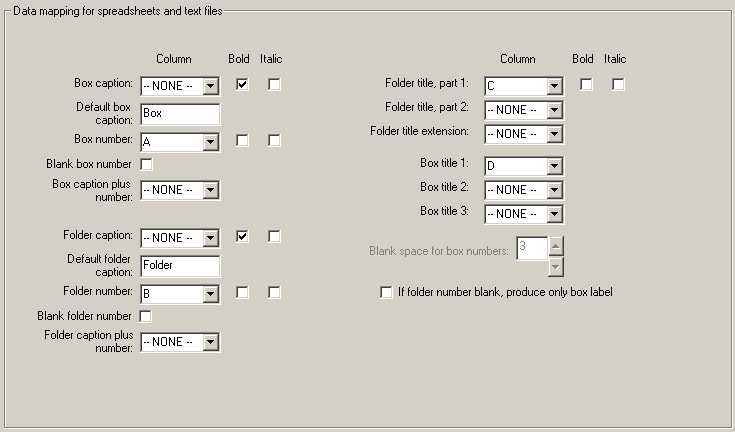
The configuration on the program's Data mapping tab shown in the following illustration gives column letters for the box number, folder number, folder title, and (because the source data contains individual box titles, and we're interested in having those titles on our box labels) for Box title 1. This configuration has the following important features:

Because we happen also be interested in putting individual titles on the box labels, the configuration on the program's Box labels tab tells the program that the contents of the column identified by the Box title 1 drop-down list on the Data mapping tab (represented by the symbol %1%) should be printed on label line 9, in bold. (This is a nice thing for this particular set of labels, but it's not an integral part of the production of box labels from a source file that contains no folder information.)
This combination of data in the source file, configuration on the Data mapping tab, and configuration on the Box labels tab, produces the six box labels shown in the following illustration. The program produced no file of folder labels.
The important thing to note about the configuration on the program's Data mapping tab is that the Box title 1 and Box title 3 drop-down lists the column identifiers for the column of variable data that will appear on box labels. (This example also indicates that although it may be reasonable to do so, it is not necessary that you use the Box title drop-down lists sequentially. Note also that although this particular example uses Box title 3 to put text onto the Warning line of a box label, there is no direct correspondence; the operator could just as well have used Box title 2 for this purpose.)

The configuration on the program's Box labels tab tells the program that the contents of the column identified by the Box title 1 drop-down list on the Data mapping tab (represented by the symbol %1%) should be printed on label line 9, in bold, and the contents of the column identified by the Box title 3 drop-down list on the Data mapping tab (represented by the symbol %3%) should be printed on the Warning line. (The Warning line is defined here as being printed in bright red.)
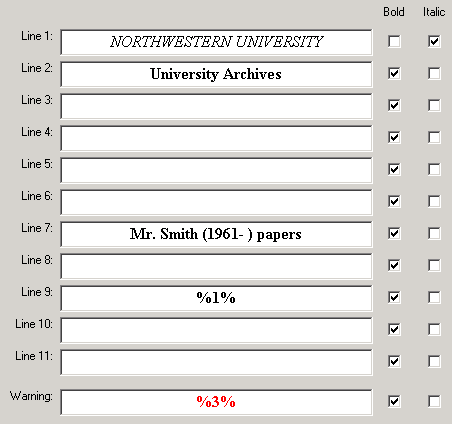
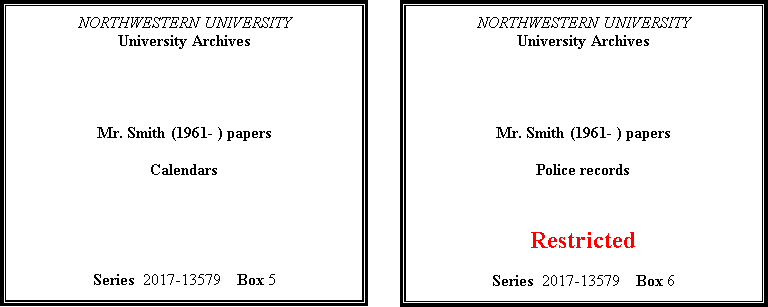
This combination of data in the source file, configuration on the Data mapping tab, and configuration on the Box labels tab, produces the six box labels shown in the following illustration.

A final word about this method:
Taken to the extreme, you could produce a set of box labels (though without individual titles) from a source file that contained only a single column (we can assume this is column A), containing box numbers of interest. You would tell the program that the box numbers are in column A, that folder numbers are in one of the empty colums (column B, perhaps), that folder captions are also in column A, and that the program should not produce folder labels if there is no folder number. However, if the only information you have is a consecutive sequence of box numbers, there's an even easier way to get box labels.
Set of sequentially-numbered box labels
If you want to produce a set of sequentially-numbered box labels (starting from any number, and ending with any number):
| This configuration asks the program to produce a set of 33 labels, beginning with Box 3 and ending with Box 35. |

|
The files of box labels that the program produces when you use this method have names that begin BoxLabelsOnly.
Box labels produced in this manner look just like any of the program's other box labels. There is one important difference: since this method does not use a source file, there's no way for the program to put individual titles into particular box labels. (If you need individual box titles, you can open the file of box labels in Word, and add them yourself.
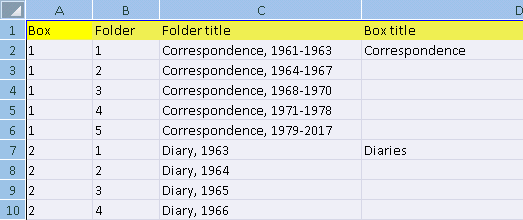
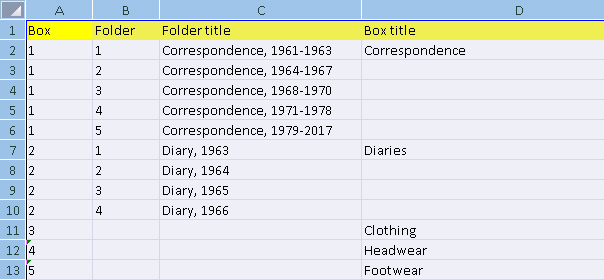
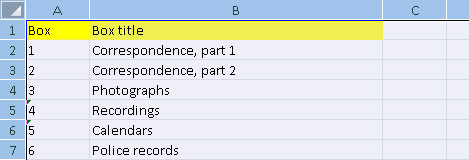
If your spreadsheet does not have an explicit box number in each row, but instead only indicates each box number when it changes, the program will still produce the correct designations on your folder labels. When the program encounters a blank box number, it uses the most recently encountered box number: the box number 'sticks' until it's changed by your data.
| The column for box numbers in this spreadsheet only lists each box number once, in the same row as the first folder number in that box. | |
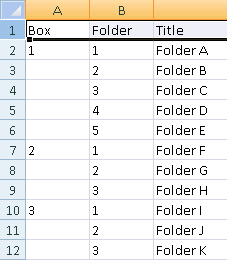
|
|
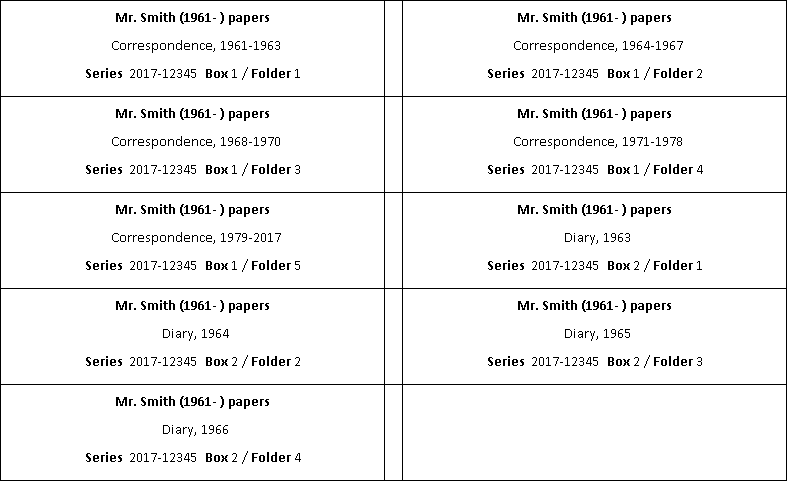
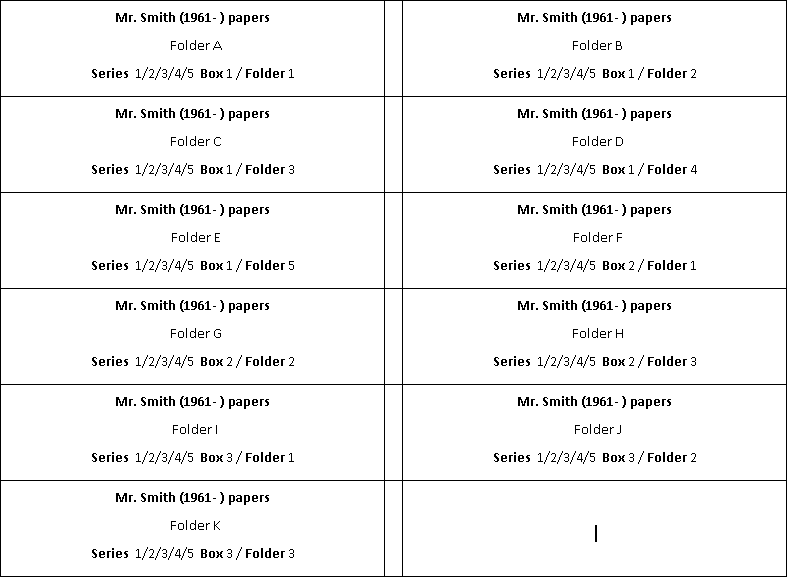
| The program assumes that an empty box number in a row means that the box number is the same as the most recent non-blank box number. The above spreadsheet will produce the following set of labels. | |
|
If your favorite method for processing an archival collection involves creating a table in a Microsoft Word document that lists box numbers, folder numbers and captions (and so on) in separate columns, you can use your Word file as a source file, but you need to convert the Word data into an Excel spreadsheet, and then use the Excel speadsheet as your source file. Here's an outline of the steps:
You do not need tediously to re-enter the Word data one line at a time into a second program. You use your Excel spreadsheet as a source file for the archive labels program, and configure the program to correspond to the layout of the spreadsheet.
| This illustration shows a Word document containing a folder list formatted as a table: box numbers, folder numbers, and folder captions are in separate columns (in this case, there is also a separate column for a date, which is not present for all rows). The operator has selected the entire text of the folder list (shown by the blue highlighting; the selected text runs for many pages), and is about to issue the Edit/Copy command. | |
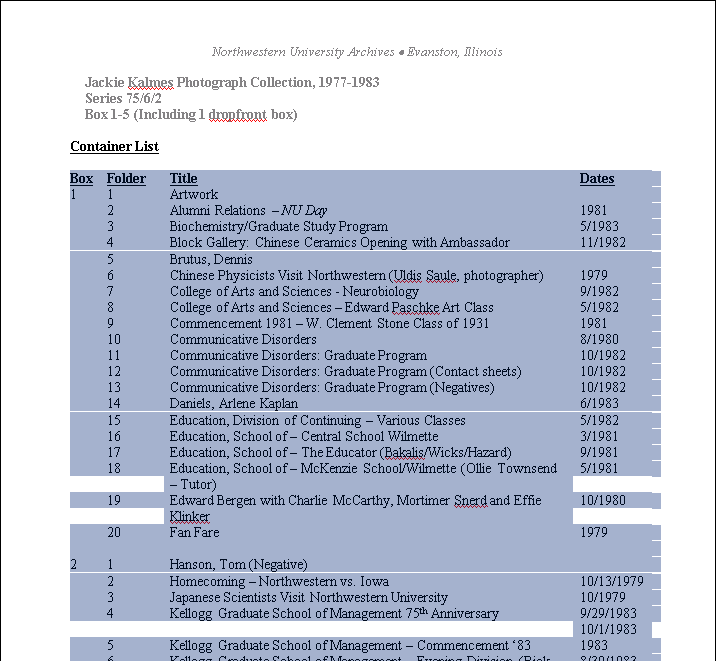
|
|
| In the next illustration, the operator has created a new blank spreadsheet in Excel, put the cursor into the A1 cell, and issued the Edit/Paste command. The data from the Word document arrived safely. (For reasons best known to Microsoft, the cells containing copied data often have a lot of extra space in them; this doesn't matter.) The operator will save this spreadsheet as an Excel spreadsheet, and then use the Excel spreadsheet as a source file for the archive labels program. | |
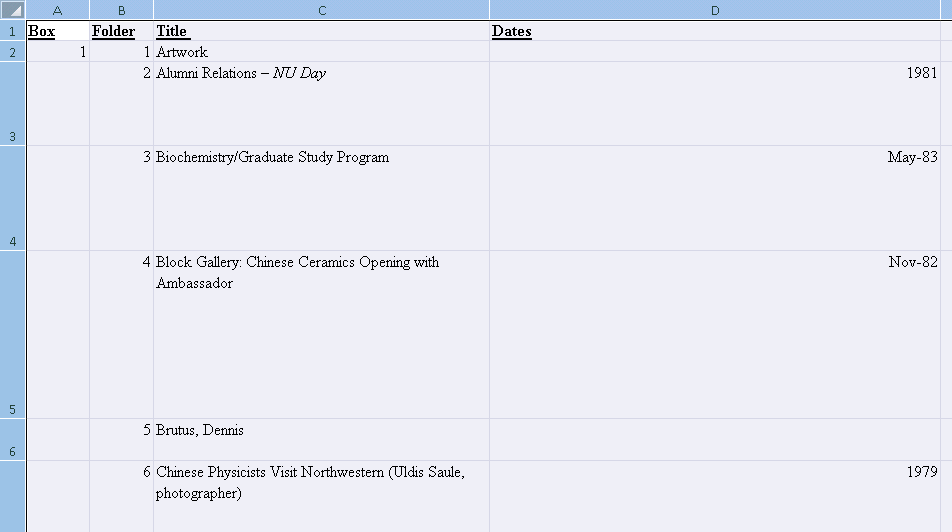
|
|
| The configuration for this source file is fairly simple: the box number is in column A, the folder number in column B, and the two parts of the folder title are in columns C and D; captions are in the first row of the spreadsheet. The following illustration shows the first few labels produced from this Word file. This was achieved simply by copying the Word table, as a block, in to an Excel spreadsheet; the operator did not need tediously to copy data, one piece or line at time, from one form to another. | |
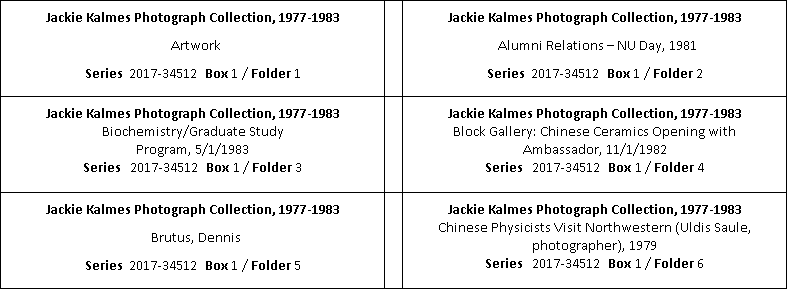
|
All of this depends, of course, on the data in your Word table being presented in a reasonable manner. This may not necessarily be the case. The following points describe problems encountered with tables copied from sample Word documents while this program was in development. (In all fairness, these files were not prepared with an eye to their possible re-purposing as data.) In some cases, it is possible to compensate for problems in the data; but on other cases, the program cannot use the data as found in the Word document. If your labels do not come out as you expect, you should carefully review the Word data as it exists in Excel; if you find a problem that has a solution, modify your spreadsheet, save the spreadsheet, and run the data through the program again.
In the following extract from a Word file, the line for box 3 folder 3 is followed by a blank line, a caption, a second blank line, another caption, and a third blank line. When this data is pasted into Excel, the blank lines becomes blank rows, and the two lines of text become text in column C, with nothing in the remaining columns of those rows. From the program's point of view, these five lines are devoid of useful content; the program will stop producing labels at this point. Because these lines of text have no part to play in the production of folder or box labels, the simplest solution is to delete them from the Excel spreadsheet.
In the following extract of an Excel spreadsheet created from a Word file, the date is sometimes given in column D, and sometimes in column E. The program cannot be configured to work with this data successfully. The program could, of course, be configured to pull the date from either column D or column E, which means that some labels would not have a date; or it could be configured to ignore columns D and E altogether, which means that none of the labels would have a date. But there is no way to produce consistent folder labels that contain all of the dates present in this source file.

The following Word table uses two different columns for the folder number, two different columns for the folder caption, and three different columns for the date. Because the program allows for the definition of two different title sections, a configuration could be devised to pick up the title whether it occurs in column C or D; but none of those configurations could then include any of the dates from the remaining columns, or make sense of the folder numbers.
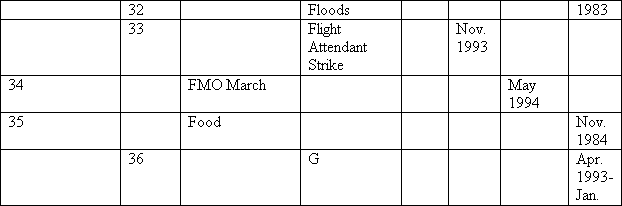
Each of the lines in the following extract from a Word document is just that: a line of text. Although this may appear to the casual observer to be formatted in columns, this is not the case.

The folder numbers and folder titles in the following extract are in a single string, so the program cannot deal with them. The fact that box numbers are given by themselves on a separate line is an additional problem, but that particular problem could be overcome by copying the box numbers into columns in the same row as the other data.
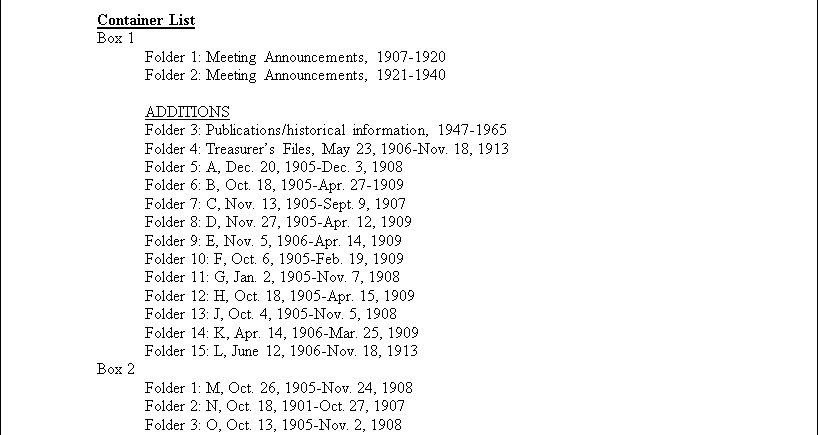
The following extract from a Word document has the track-changes feature turned on. This text transfers into Excel exactly as given (for example, "ColorSidesColorSlides:"). Turn this feature off before you copy the table from Word into Excel.

The comments in this section apply to:
Both of these sources will be referred to in this section as ArchivesSpace data.
If the materials that comprise a resource are housed in boxes in the same order as they are listed in the ArchivesSpace data, you may wish the box labels to indicate the series held in each box.34 The technique that this program employs to place series information on box labels borrows part of the box titles technique already defined for data read from spreadsheets.
To tell the program that you want it to include series information on box labels when it is reading ArchivesSpace data, place the marker "%1%" on the box label line that should contain the series information. (The markers "%2%" and "%3%" that are available when the program is reading data from a spreadsheet prepared according to a locally-defined scheme, are not available when the program is reading ArchivesSpace data.)
| In the following illustration (to be used when the program is reading ArchivesSpace data), the operator is instructing the program to collect information about series, and display it beginning on line 8 of box labels. The operator has also told the program to display the resource title on line 7; so with this configuration the series information will appear immediately below the resource title, with no intervening blank line. | |
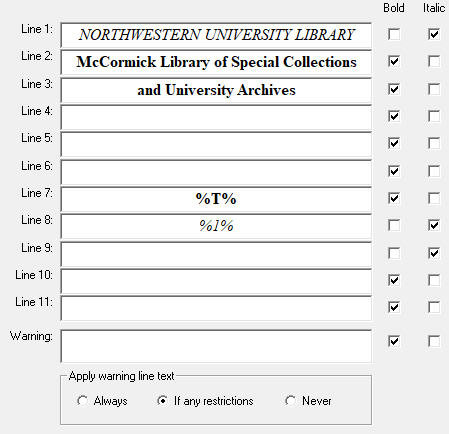
|
If the definition for box labels conains the "%1%" symbol on any line, the program will collect information about the series contained in each box, in the order encountered in the ArchivesSpace data, and use the collected series title(s) on box labels.
This technique is subject to the following conditions:
| The following illustration shows the record in ArchivesSpace for a resource that contains 7 main series. | |

|
|
| The Biographical material series is in box 1; the Correspondence series is in boxes 2-5; the Teaching Files series is in boxes 6-11; the Speeches series is in box 11; the Publications series is in boxes 12-13; the Photograph Albums and Scrapbooks series is in boxes 13-15; the Musical scores series is also in box 15. | |
| The box labels tab that will be used to produce labels for this resource has this definition: | |
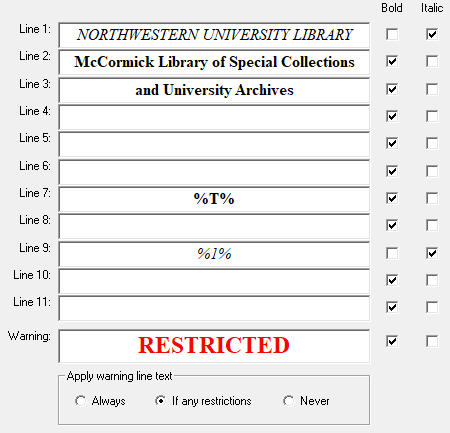
|
|
| The resource title will begin on line 7 (continuing to additional lines if needed). The listing of series titles will begin in line 9 (which the program will adjust, if the resource title requires more than one line). If the resource title only occupies one line, there are 3 lines available on box labels for series information. | |
| The following illustrations show selected box labels produced from this resource using this definition, and this ArchivesSpace data. (No part of this resource is restricted.) | |
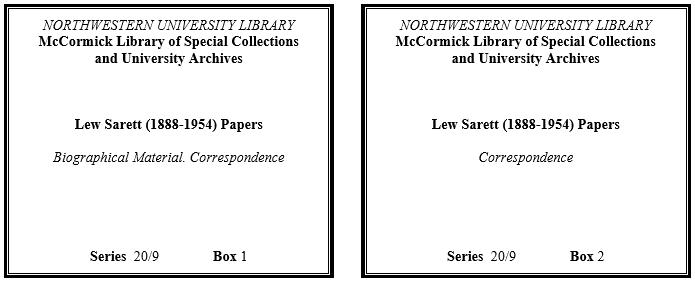
|
|
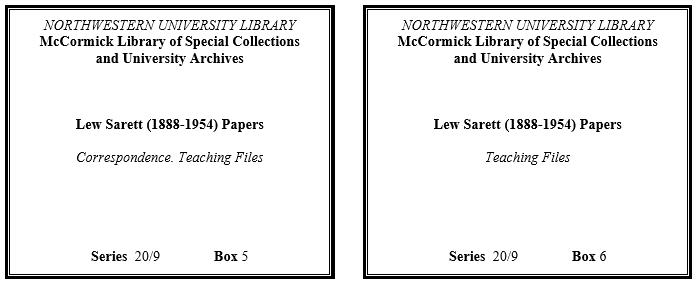
|
|

|
Most of the data that this program uses to populate folder and box labels comes from ArchivesSpace, from your source file, or from information you provide as part of the program's settings. To make it possible for individual institutions to have their preferred values for the remaining items, this program also pulls information from a configuration file. This file, called ArchiveLabels.Local.txt resides in the same folder as the program's template files for folder and box labels. A default version of this file comes with the program's installation (as do default versions of the template files). You can modify this file to reflect your local practice, if you wish. The ArchiveLabels.Local.txt file is a plain text file, and you can use a simple program such as Notepad to edit it.
If you decide to change the ArchiveLabels.Local.txt configuration file, that file (and by extension all of the program's template files that reside in the same place) needs to be in a folder that allows you to make changes.
This configuration file has the same structure as a standard Windows INI file: data elements are grouped under headings into stanzas. The lines in each stanza consist of a key of some kind, an equals sign, and a value. Lines that begin with a pound sign (#) are comments.
| This illustration shows part of the program's configuration file. The text SeriesCaption, enclosed within square brackets, is the heading for a stanza. This stanza begins with some comments (the lines beginning with "#"), and contains two lines that define values. In this stanza, the keys are sequential numbers, but in a different stanza constructed using other conventions they could be text strings. | |

|
The configuration file has two main areas of interest: one area provides values for the Series caption drop-down list on the program's Get started tab, the other describes the program's template files.
The SeriesCaption stanza in the program's configuration file defines the values that the program presents in its Series captiondrop-down list. The keys in this stanza are consecutive numerals, beginning with 1. Each line defines a value that becomes an item in the drop-down list. You do not need to define the value NONE in this stanza; the program always includes NONE as the first item in drop-down list for series captions.
| The configuration file in the following illustration defines two values for the Series caption drop-down list: Series and Acc. no. | |
|
|
|
| The program presents these values in its drop-down list; you choose the appropriate value. | |

|
The texts you define in this stanza are the texts the program presents for you to select from its drop-down list. On your labels, the program will use whatever text you select.
The program uses template files to direct its printing of the box and folder labels for an archival collection. Template files embody your preferences for font, margins, paragraph alighment and decorative features such as frames or borders: in fact, they control almost everything about your labels except the label texts themselves. In some cases, your preferences for label features must be reflected not only in the template files themselves, but repeated in the program's configuration file. With limited exceptions, the program does nothing to override or adjust the formatting instructions given in the template files; it inserts texts into whatever it finds there.
To produce the labels needed for any one archival collection, the program uses one set of folder template files to direct its production of folder label files, and it uses one set of box template files to direct its production of box label files. The program comes with several sets of default template files for both folder and labels. You can modify these files, add your own files to the default files, or replace the default files with with your own files. You can have as many sets of template files for box and folder labels as you need.
If you use the default label stocks and are satisfied with the font choices and layout options used in the default template files, you can use the default label template files without change. If you use these label stocks but prefer a different font, you can modify the default template files to match your wishes. If you prefer some other label stock, or some other layout, you can create a new set of template files, and tell this program to use your template files instead. The program's use of template files and a configuration file, combined with its options for handling pieces of text pulled from your source file, should make it possible for you to produce labels in your favorite style without any change to the program itself.
If you decide to make any changes to the program's template files—either by adjusting the default template files, or by creating a new set of template files—you should first create a new folder; copy into that folder all of the program's default template files and its configuration file, and then work with the files in that folder. Doing this means that you will also need to change the value of Folder containing template files in the program's configuration, to point to the files in this new folder rather than the files in the default folder. There are two good reasons for you to work with these files in a separate folder, rather than with the files in the default folder.
If you decide to change something in the default template files, note the following:
Similar considerations appliy if you wish to create your own template files:
The program's template files use the RTF format. The program cannot understand template files in any other format. You can use Microsoft Word to create and modify RTF files.
The program's configuration file contains several stanzas that tell the program about the configuration files available to it. Information in the configuration file centers around the name assigned to a set of template files; each set of template files needs a unique name. This name is used as a link within the configuration file, as a display element within the program, and as the lead element in the names of the template files.
Names assigned to sets of template files must follow these rules:
The names used in the default template files include designations for the type of label stock: Demco_A-16, Demco_C-17_Frame, Demco_C-17_No_frame and Demco_C-17_No_frame_no_warning. This is a reasonable convention to follow, but it is not a requirement. It only matters that the name be used consistently within the configuration file, and that the name be applied uniformly to the names of a set of template files. For all the program cares, the name used for a group of template files could be the name of one of the months, or of a prominent street in your neighborhood.
|
Two stanzas in the configuration file list the sets of folder and box template files that are available to the program.
Both of these stanzas contain one or more lines, keyed sequentially with integers starting with 1. Each line identifies one set of template files, using the name for a set of template files as the value. The default configuration file identifies one set of folder template files and three sets of box template files.
| The following illustration shows an extract from the program's default configuration file. The FolderLabels stanza defines one group of folder labels, assigned the name Demco_A-16. The BoxLabels stanza defines three groups of box labels, assigned the names Demco_C-27_Frame, Demco_C-27_No_frame, and Demco_C-27_No_frame_no_warning. The default configuration file only defines these sets of template files; but you can add as many sets of files as you need. | |
|
The configuration file also contains one stanza for each set of template files defined in the FolderLabels stanza, and one stanza for each set of template files defined in the BoxLabels stanza. The name of this additional stanza (enclosed within square brackets) is the name assigned to a set of template files. Each such stanza contains a group of elements (keyed with pre-defined text strings) that together describe one set of template files. As is the case for other stanzas in this configuration file, lines that begin with the pound sign (#) are comments.
| The following illustration shows an extract from the program's default configuration file, and continues the previous illustration. The Demco_A-16 stanza gives the characteristics of the set of folder template files identified in the FolderLabels stanza; the three stanzas with names beginning Demco_C-27 define the characteristics of the three sets of box template files identified in the BoxLabels stanza. | |
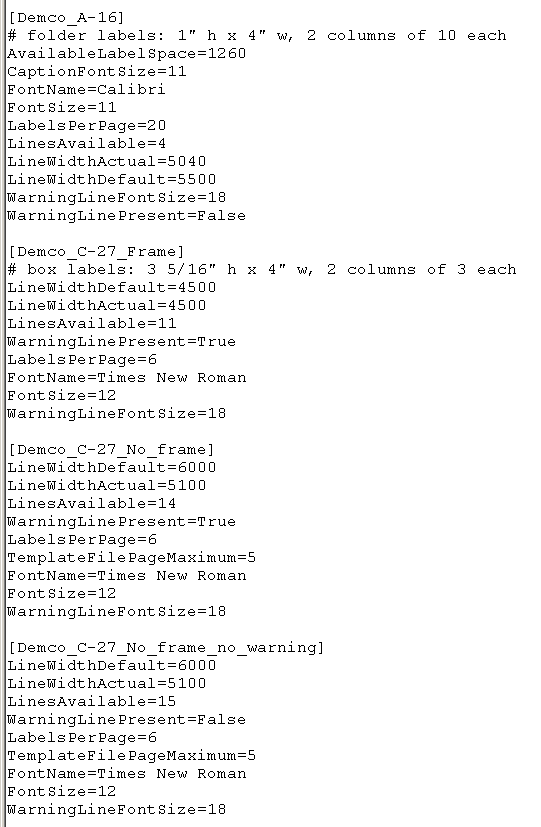
|
The stanzas that define the characteristics of each set of template files contain the following elements. The elements are listed here in alphabetical order, but the configuration file can list them in whatever order seems best to you. A few elements apply only to folder labels, or to box labels.
The number needed here is not quite the same as the actual height of the physical label. Gary has found that for the Demco A-16 labels, which are 1" (1400 twips) high, a value of 1260 produces acceptable labels. If you are setting up a configuration for some other label stock, start with a value of 90% of the nominal folder label height, use a source file containing a variety of lengths of folder captions, and carefully examine the files of labels that the program produces. (Asking Word to display boxes around the labels during this review is a big help.) If it looks to you like the last line of the labels could be a bit lower, increase the value of this element so that the program uses a bit more of the label; if the last line of the label runs into the border, decrease the value of this element so that the program uses a bit less of the label.
When the program starts up, it reads the configuration file to find the available sets of folder and box template files, and then it reads the characteristics of each of those sets of files. These characteristics define some aspects of the program's appearance and behavior, and the appearance of your labels.
The following sections describe the program's folder and box template files in detail.
You un-zip the file of default template files into whatever folder seems appropriate. The default folder template files are designed for Demco A-16 labels (two columns of ten labels each), printed in portrait orientation; these files have names that begin Demco_A-16. These files are described by the Demco_A-16 stanza in the program's configuration file, which is in turn listed in the configuration file's FolderLabels stanza. One of the folder template files (the one with "01" in its name) describes an output file containing a single page of folder labels, another (with "02" in its name) describes an output file containing two pages of folder labels, and so on up to the last file (with "10" in its name), which describes an output file containing ten pages of folder labels.
| The following illustration shows one of the program's default sets of folder template files. | |

|
If you wish to create your own folder template files, they must follow the same pattern: there must be ten files, describing successively one through ten pages of output.39 The names of the files must consist of the name defined in the configuration file, a two-digit number to indicate the number of pages produced by the file, and the extension .rtf. The files must be in the RTF format. Your files must be properly identified in the program's configuration file.
| For example, if you wish to add the (imaginary) Smith WP-35 label stock (24 labels per page) to the repertoire of available folder label types, you might assign the template files the name Smith_WP-35. The ten template files would be named Smith_WP-35.01.rtf, Smith_WP-35.02.rtf ... Smith_WP-35.10.rtf. If you decide to print these labels in 10-point Arial, the program's configuration file might contain these stanzas: | |
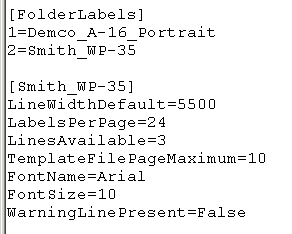
|
Each label in the folder template file has three lines, each with a distinct and odd-looking piece of text. The program replaces these bits of text with your data. (The program removes these odd texts if there is no corresponding data element.)
| Here is a typical segment of a folder template file. | |
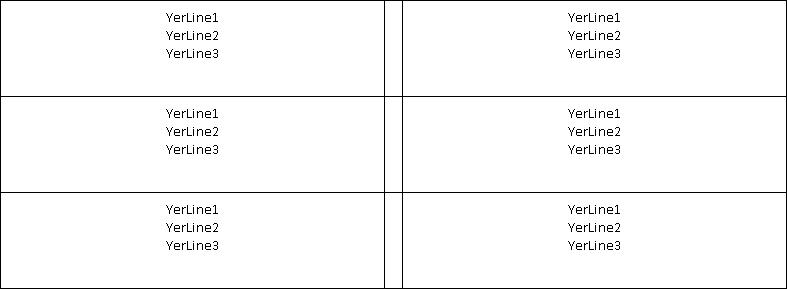 |
When this program uses a folder template file to create an output file of folder labels, it replaces these dummy texts with your texts, or nothing; it's a simple matter of substitution. The following describes the program's default behavior, but other arrangements are possible.
You cannot change the order of the lines in folder template files: YerLine1 must come first, followed by YerLine2 and YerLine3. However, if you wish the elements on your folder labels to be in some order other than the default order (collection name, folder caption, series/box/folder numbers), you can achieve this by using an equivalent technique.
The installation program places several sets of five box template files each into the same folder as the program itself. These default box template files are all designed for Demco C-27 labels (two columns of three labels each), printed in portrait orientation; these files have names that begin Demco_C-27_Frame, Demco_C-27_No_frame, and so on. These files are described by the stanzas with those names in the program's configuration file, which are in turn listed in the configuration file's BoxLabels stanza. One of the files in each set of box template files (the one with "01" in its name) describes an output file containing a single page of box labels, another (with "02" in its name) describes an output file containing two pages of box labels, and so on up to the last file in each set (with "05" in its name), which describes an output file containing five pages of box labels.
| The following illustration shows three of the program's default sets of template files for box labels; each set of template files consists of five files. | |

|
If you wish to create your own box template files, they must follow the same pattern: there must be five files in each set, describing successively one through five pages of output.40 The names of the files must consist of the name defined in the program's configuration file, a two-digit number to indicate the number of pages produced by the file, and the extension .rtf The files must be in the RTF format. Your files must be properly identified in the program's configuration file.
| For example, if you wish to add the (imaginary) Smith WB-9 label stock (8 labels per page; with 10 lines of free text) to the repertoire of available box label types, you might assign the template files the name Smith_WB-9. The five template files would be named Smith_WB-9.01.rtf, Smith_WB-9.02.rtf ... Smith_WB-9.05.rtf. If you decide to print these labels in 10-point Arial, the program's configuration file might contain these stanzas: | |

|
The labels defined in box template files can have borders, or not, depending on your preference. The presence of a border reduces the maximum length of lines of text available on box labels. The illustrations in this section chiefly show labels produced by a set of template files that include a border.
Each label in the template file has a number of lines, each containing a distinct and odd-looking piece of text. The program replaces these bits of text with your data. (The program removes these odd texts if there is no corresponding data element.)
| Here is a typical segment from one of the default box template files. This template defines 11 lines of text, a Warning line, and the standard final line; all within a frame. | |
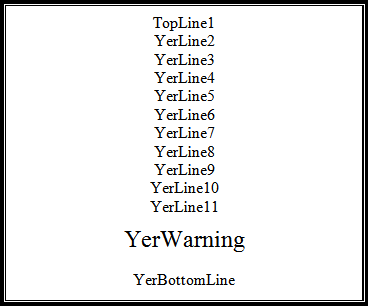 |
| Here is a segment from a different box template file, for a different size of label. This template defines six lines of text and the standard final line, all no Warning line; all again within a frame. | |
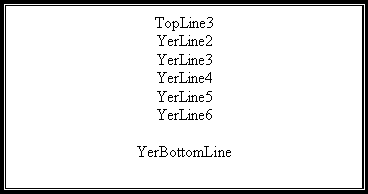 |
When this program uses a box template file to create an output file of box labels, it replaces these dummy texts with your texts (or nothing); it's a simple matter of substitution.
These texts in the template files are required, but—except for the TopLine text, which must be the first line in the label—the relative placement of the lines is under your control. (You would only sow confusion by giving a different order to the YerLine lines, but you could if you wanted to.) You might wish to place the warning line at another point in the label, or place the line for series and box numbers between YerLine2 and YerLine3.42 Because the program does not flow text from one line on a box label to another, and does not add blank space to box labels, you can use whatever line spacing you like, as long as everything fits onto the label.
Producing a set of labels requires appropriate information in three different places: the template files, the configuration file, and a theme in the labels program. Deciding the most reasonable home for each kind of information is not a simple task, and there is often more than one possibility. The question is a bit more involved than it might be, due to the nature of RTF encoding: Gary simply doesn't know enough about it to make many changes to the file on the fly. (Changing font size is easy; adding a color is within reason; changing paragraph spacing is iffy; adding a font is impossible.) The solution for now is to use encoding in the template files (maintained via Word) for those things that Gary doesn't know how to change, to put into the configuration file those things that you're not likely to want to change from one project to the next, and to put into the program's themes those things that you may want to change frequently. If you have another idea how options might be distributed, please send Gary a message with your thoughts.
If you decide to change the font name and/or font size used in the folder or box template files, or if you are defining your own template files, you may need to do an experiment in order to determine the best setting for the LineWidthActual element in the stanza in the program's configuration file that describes those template files. To do this, you can use a special feature built into the program. Follow these steps:
The following paragraphs describe the slightly different ways the program tells you the correct values to set for LineWidthActual for folder and box labels. When you are done experimenting, don't forget to un-check the Generate test files to determine maximum line length box on either the Folder labels or the Box labels tab.
Determining the length for folder labels
The captions or titles in the program's output files of folder labels consist of repeats of the letter "i". You need to find the last label that has a folder caption—the label just before the label with no caption at all. In the following example, that's the label with the designation Box 9 / Folder 2—the second label in the right-hand column; the next label (Box 9, Folder 3) has no folder caption.
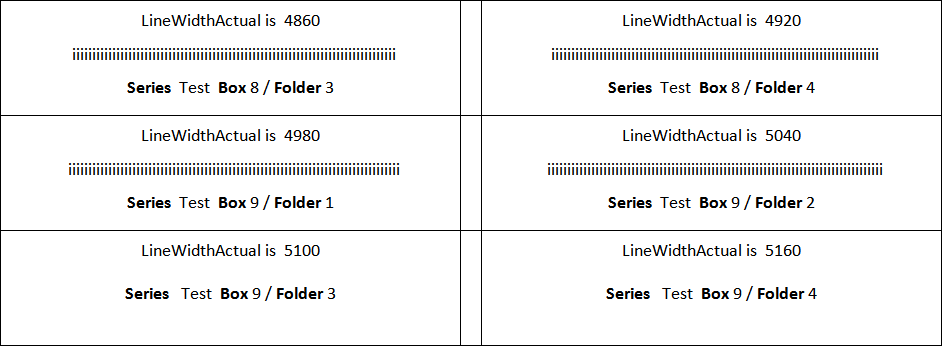
The program adds a number to the end of the pretend collection name LineWidthActual for each label. That number is the length of the text of the caption on that label, in twips. The number in the collection name given on the last label with a caption consisting of a row of letter "i" is the value you want to use as the value for LineWidthActual. In the example above, that value is 5040; for this font/size selection, the correct value for LineWidthActual for this set of folder template files is 5040.
If none of the folder labels has a caption consisting of a row of "i", decrease the value of LineWidthDefault and repeat the test. If all of the folder labels have a caption consisting of a row of "i", increase the value of LineWidthDefault and repeat the test.
Determining the length for box labels
The texts used in the program's box labels for testing the length of a line of text come in pairs: the first line in the pair containing the text LineWidthActual is (follolwed by a number), the second line consisting of a row of repeats of the lower-case letter "i." You need to find the last line of repeated "i" that fits on one line. The explanatory line just above that line gives the length of that line in twips. In the following example, the last row of repeated "i" that prints on one line is preceded by the line LineWidthActual is 4500. For a test file that looks like this, the correct value for LineWidthActual for this set of box template files is 4500.
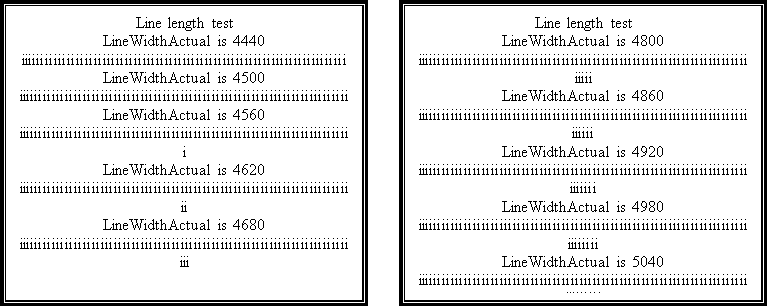
If none of the box labels has a caption that takes up more than one line, increase the value of LineWidthDefault and repeat the test. If all of the box labels have captions that take up more than one line, decrease the value of LineWidthDefault and repeat the test.
The term special characters is used in this document for all characters that are not in the range of ASCII characters 0x20 through 0x7E. The following characters are in the range of ASCII characters 0x20 through 0x7E, and so are not special characters:
All other characters are special characters. The term special characters includes (but is not limited to):
The labels program can produce labels that contain any special character, as long as the source data has been prepared in an acceptable manner, and as long as the character is available in the font you have chosen to use for printing your labels. (The program won't know which characters are available in your preferred font.) Much depends on the manner in which special characters are represented in the data that you feed into the labels program.
Special characters in ArchivesSpace data (data that the program reads directly from ArchivesSpace; or data in an Excel spreadsheet prepared for loading into ArchivesSpace via the plug-in) are restricted to those characters that are acceptable to ArchivesSpace itself.
At present, ArchivesSpace does not recognize entity references for individual special characters (such as "é"), and it does not recognize entity references in the form "&x...;" or "&#...;". ArchivesSpace also does not provide a mechanism for entering special characters.
All special characters needed in an ArchivesSpace record must come from the outside. Special characters can be laboriously copied into Archives from a Web page (sometimes!), or some other document (sometimes!); they can be input in Word via the Insert/Special character mechanism and then copied into ArchivesSpace; or they can be input in Excel (also via the Insert/Special character mechanism) and then loaded into ArchivesSpace via the plug-in.
| The captions shown in the following illustration (some of which contain special characters) were created in an Excel spreadsheet which was subsequently loaded into ArchivesSpace via the plug-in. | |
|
|
| The poster titles shown in the following illustration (all in a non-roman script) were added to ArchivesSpace by first creating the text strings in a Word document, and then laboriously copying them, one a a time, into ArchivesSpace. | |

|
Notes and perhaps other ArchivesSpace data elements may contain carrige returns, line feeds, tab characters, or formatting codes that are the equivalents of those characters. Such formatting instructions should not be present in the ArchivesSpace data elements used by the labels program (title, dates, and container identifiers).
The data in a source file may contain special characters (letters with accent marks, for example). It will happen from time to time that you need to use similar special characters in the texts you supply in the program's text boxes for use on folder and box labels. When this happens, you will need to use special symbols instead of the characters themselves. These symbols consist of the ampersand ("&"), followed by either a piece of text or a numeric designation, and ending with a semicolon. These symbols are sometimes called entity references.
The program recognizes a limited number of entity references that are identified by pieces of text. (These are also, as it happens, the ones you're most likely to need for labels; plus a few others.) These are shown on the following table. For reasons that may be obvious, these labels are case-sensitive.
| Reference | Produces | Reference | Produces | Reference | Produces | Reference | Produces |
| Á | Á | á | á | Â | Â | â | â |
| Æ | Æ | æ | æ | À | À | à | à |
| Å | Å | å | å | Ã | Ã | ã | ã |
| Ä | Ä | ä | ä | ¦ | ¦ | Ç | Ç |
| ç | ç | ¢ | ¢ | © | © | ¤ | ¤ |
| ÷ | ÷ | É | É | é | é | Ê | Ê |
| ê | ê | È | È | è | è | Ð | Ð |
| ð | ð | Ë | Ë | ë | ë | Í | Í |
| í | í | Î | Î | î | î | Ì | Ì |
| ì | ì | Ï | Ï | ï | ï | ¬ | 43 |
| Ñ | Ñ | ñ | ñ | Ó | Ó | ó | ó |
| Ô | Ô | ô | ô | Ò | Ò | ò | ò |
| Ø | Ø | ø | ø | Õ | Õ | õ | õ |
| Ö | Ö | ö | ö | ¶ | ¶ | § | § |
| ß | ß | Þ | Þ | þ | þ | Ú | Ú |
| ú | ú | Û | Û | û | û | Ù | Ù |
| ù | ù | Ü | Ü | ü | ü | Ý | Ý |
| ý | ý | ¥ | ¥ |
| For example, if the name of your institution is UNIVERSITÄT SMITH you will give the Line 1 text in your box label definition like this: | |
|
|
|
| This produces text on box labels like this: | |

|
The program also recognizes the full range of entity references that are constructed with a hexadecimal number preceded by "x". This hexadecimal number is the encoding assigned to characters of the Unicode character set.44 (You can drop leading zeroes. All of the characters defined in the preceding table can also be produced with this kind of numeral reference.) There are far too many Unicode characters to be represented here in a table; the following table shows a few (unlikely) examples. Note that just because you can define a character in this manner, that doesn't mean that the printer font you're using will be able to render it correctly. (Your printer may very well not have a font for Egyptian hieroglyphics, as in the last example in this table.)
| Reference | Produces | Reference | Produces | Reference | Produces | Reference | Produces |
| &x531; |
|
&x42F; |
|
&x394; |
|
&x133BC; |
|
| For example, if your collection name is π day celebrations (March 14 is "Pi day"—3/14), you would look up the lower-case letter "pi" in the Unicode documentation (it's character 03C0), and give the name of your collection like this: | |
|
|
|
| This produces text like this on folder labels: | |

|
The program does not know how wide characters generated from numeric entity references will be when they are rendered on labels. When the program is testing the width of a line of text, it assumes that any characters represented by numeric entity references have the same width as the lower-case letter "a". If a line of text contains a large number of numeric entity references, the program's assumption might lead to incorrect results: it might declare the line to be too long, when it isn't; and it might believe that it's short enough, when it isn't.
Underneath the drop-down selection boxes on the Data mapping tab for the box number and folder number are check-boxes with the captions Blank box number and Blank folder number, respectively. If you check one of these boxes, the program will produce its normal suite of labels, but instead of printing explicit box and/or folder numbers, the program will just leave a blank space; the idea being that you will come along later and add the box and folder numbers by hand. You can ask the program to leave blank space for a box number, a folder number, or both.
| With this configuration, the operator is asking the program to leave blank space for both the box number and the folder number. The spreadsheet used in this configuration contains columns for folder numbers and box numbers, although the program is to ignore those numbers. The first row of this spreadsheet contains the captions for folder numbers and box numbers. A different spreadsheet layout requires a different configuration to produce blank folder and box numbers. | |
|
|
|
| This configuration produces labels like this, with blanks instead of box and folder numbers. | |
|
|
If you check the Blank box number box, the program makes an additional choice available on the Data mapping tab, called Blank space for box numbers. Use this to tell the program just how much blank space to leave for the box number. (Unlike most of the measurements that the program uses, this is a count of characters—the number of blank spaces.) Available values are in the range 3-12. (The above illustration of a label with a blank box number was created with the value of 8 for Blank space for box numbers.)
|
|
As is the case when there are explicit box and folder numbers, when producing labels with blank folder numbers the program will produce one folder label for each valid row in the input data you provide, whether or not there is an explicit folder number.
If you ask the program to leave the box number blank (and if you are interested in box labels), there is a small problem. The program normally creates one box label for each distinct box caption plus box number. (So it produces box labels for Box 1, Box 2, and so on.) If you ask the program to leave out the box number, the program would normally only print one box label for each distinct box caption, because there's no distinguishing number. For this reason, when you ask the program to leave the box number blank, the program shows you a special panel, and asks you to tell it how many box labels you wish to have for each distinct caption that the program finds in your input data. The program shows you this panel before it starts to work producing its labels.
| In the following illustration, the operator has previously asked the program to leave the box number blank. When the operator checked the Produce labels button, the program scanned the input file and found that there are three distinct captions in that file for the primary container: Box, Carton and Tube. The program shows the operator the following panel. The operator can adjust the values in this panel to produce the appropriate number of labels for each type of primary container. (The default value for the number of labels for a given container type is based on the number of labels defined to fit on one page: the program assumes you want one full page of each.) | |
|
|
To change the number of labels that the program will produce for a box caption, highlight the line for that caption and use the up/down arrows on the right side to adjust the number higher or lower. This up/down contraption has a maximum value of 500, and a minimum value of 0. (500 is a lot of boxes; if you need more than that, you can just run the program again to create some more box labels.)
Click the Add button to define a primary container type not already in the list.
| In this illustration, based on the preceding illustration, the operator is asking the program to generate nineteen labels for the caption Box, three labels for the caption Carton, no labels for the caption Tube, and three labels for the caption Film reel. (The operator added the caption Film reel via the Add button.) This is a total of 25 labels; if there are six labels per page, these choices will generate five pages of labels; on the last page of labels, all of the labels except the first will be wasted. | |
|
|
When the number of labels for each caption is to your liking, click the OK button; the program will proceed to produce files for the full suite of folder labels, and for the box labels you have requested. If you wish instead to cancel the printing of box and folder labels altogether, click the Cancel label printing button. Remember as you're doing all this that the program creates output files; it does not write its output directly to a printer. So if you are interested in having the program produce folder labels but not box labels, go ahead and click the OK button anyway, then simply ignore the program's output file (or files) of box labels.
In the normal course of things, the program reads through your data and immediately produces a set of files containing folder and box labels. If you wish, you can review these label files in Microsoft Word and make adjustments to them. However, in some circumstances you may wish to review the box labels within the program, before the program even produces its output files. You might, for example, choose to do this if some of the labels need pieces of text that are not common to all of the labels (and are not pulled from the source file). (For example, you might wish to show series or sub-series names on some box labels; or you might wish to indicate on particular box labels that the contents of a box have access restrictions, although the bulk of the collection has no such restrictions.)
If you wish to review the box labels before the program has created its output files, check the Review box labels box on the Box labels tab. When you click the Produce labels button, the program will read your input file and prepare output files of folder labels. Instead of preparing files of box labels, the program will stop, and present the set of box labels for your review.
During review, you can move from one label to the next, and make changes to individual labels as necessary: you can change the text of any line, and you can change the bold and italic properties of any line. For the Warning line, you can also change the color in which the text is printed. Any changes you make to a label during this review apply only to that one label. (Among other things, this means that the Warning line on each label can not only have a different text, but can also be in a different color, if that's what you want.) If you want to make the same change to all of the labels in the file, it’s probably easier to cancel the operation, adjust the box label definition, and produce a new set of labels.
You can also delete individual labels.
| The following illustration shows a typical box label, as presented by the program during the review of box label. | |

|
In the following illustration, the operator has supplied text for the Warning line on one label, and has opted to display this text in red.
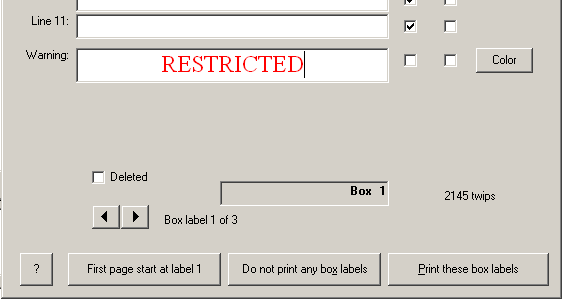
The following illustration shows a label marked for deletion. All of the text boxes and check-boxes are unavailable. If you wish to change this box label for some reason, you must first un-delete the label by un-checking the Deleted box.

When you are satisfied that the labels in the file conform to your wishes, click the Print these box labels button. The program will prepare one or more output files of box labels, skipping the labels you marked as Deleted.
If you wish the program not to produce any files of box labels, click the Do not print any box labels button.
|
|
You only need to install the MySQL driver, and configure one or more ODBC connections to your ArchivesSpace database, if you wish to produce labels from data as it exists in ArchivesSpace. If you are only going to use the label program to produce labels from a spreadsheet or text file, you don't need to take any of the ODBC-related steps described here. |
The label program uses a method called ODBC (Online DataBase Connectivity) to request information from your ArchivesSpace database. The labels program sends its requests for information to Windows, which passes them to the ODBC driver for MySQL. This ODBC driver is the component that actually signs on to your ArchivesSpace server and retrieves information. (The retrieved information gets passed back from module to module in a similar manner; all of this passing-around may sound complicated, but it takes next to no time.) All of these pieces have to be in place and properly configured before you can use the label program. The installation, and some of the configuration, requires a person with administrative privileges on your workstation.
Locate, download and run an installer for the ODBC Unicode driver for MySQL. (It's available at no cost from more than one site; it's called a "connector" at download sites.) After you've done this, there will be a line in the ODBC data source administrator (see the next section) that reads "MySQL ODBC 8.0 Unicode Driver." (The version number may change with time.)
The 32-bit ODBC data source administrator
Use the 32-bit version of the ODBC data source administrator (this is part of Windows, not part of the label program) to identify your database as something that can be reached via ODBC. (The labels program tells Windows that it wants to talk to this connection, and it is then able to retrieve what it needs.) You can't do this step until you've installed the MySQL ODBC driver. (See the previous section.)
If you have more than one ArchivesSpace database (such as a production database and a test database) you can define an ODBC connection to each. (Later, you will tell the labels program about each ODBC connection to your ArchivesSpace database.)
Collect these pieces of information about each ArchivesSpace database before you start the 32-bit ODBC data source administrator:
Use the correct version of the ODBC data source administrator:
One way to find the ODBC data source administrator is to open a search box, and type “odbc.”
Take these steps in the ODBC data source administrator to define the connection to each ArchivesSpace database:
After you've done all this, you're still not done! You also need to tell the spine labels program about your ODBC connections.
Go to the program's download site. Download these two files:
Open (or unzip) ArchiveLabels.zip, and run the program setup.exe. Each time the program pauses for your input, press Enter to accept the default value.
Identify some convenient folder into which to install the program’s configuration files. (This should be a new folder, not used for anything else. Permissions on this folder must allow the program to open and read these files; and should allow all users to open, modify and save these files.) Unzip Configuration.zip into that folder. If a number of people are going to be generating labels from different workstations, you may find it most convenient to put the configuration files on a networked drive, so that everyone draws on the same configuration.
You can start the labels program from the Windows menu (it's under "Northwestern University Library"); or you can create an icon on your desktop (point the shortcut to C:\Program Files (x86)\ArchiveLabels\ArchiveLabels.exe).
Once you've got everything installed, and (as necessary) ODBC configured, you're ready to configure the program to produce box and folder labels. You'll create one or more themes, and configure your themes to match your needs.
The labels program is updated as new features are added or problems are resolved. This documentation is also updated from time to time to describe the current state of the program; a separate section of the documentation describes changes made to the program. If you find that the program has a new feature you could use, or if you see that a problem you've encountered has been fixed, you can download the latest version of ArchiveLabels.zip. Run the setup.exe program in this file to install the latest version over top of your existing version.
Updating the program in this manner does not affect the configuration choices you have made; all of your themes, and your template files, remain untouched.
This section lists changes made to the labels program, in reverse chronological order. Not included are changes that are purely mechanical or cosmetic in nature; those that involve adjustments to modules included in the labels program that don't directly affect the printing of labels; and (when the documentation is being updated long after a change is made) those whose function Gary can no longer understand.
You should get in the habit of looking at this list from time to time, to see if the program has been modified in a way that will be of use to you. If you see someting you like, download and install the latest version of the program.
1. In ArchivesSpace terminology, secondary containers are called (children. Although this document does not often refer to them, the labels program also recognizes a level of container hierarchy below the folder; this level is called a grandchild in ArchivesSpace.
2. The top-level container might even be an "item" that exists without any container at all; or it may be just a box, with no second-level containers inside.
3. Although the workstation does not need to have access to a printer, the workstation does need to have an appropriate printer defined on it, so Windows can tell the program about fonts available on the default printer for printing labels. All of the fonts you use on your labels must be installed on both the workstation that produces the label output files, and that you use to send files to a printer.
4. If the program draws information from a file, note that the program does not have access to formatting (bold, italics, underlining, etc.) you may have applied directly to texts in a spreadsheet file. (For captions on folder labels, the program does preserve such formatting when it is indicated via tags such as <emph>, as this encoding is part of the text of the caption given to an object, and is not merely inherent in the display as seen in Excel.) If you are generating a set of labels from a spreadsheet that uses implied formatting (as opposed to formatting with tags), and you are bothered by the disappearance of this formatting on your labels, you should consider carefully whether the work of modifying the spreadsheet will produce a benefit for users of the labels that outweighs the cost in time required to do the work.
5. If you are only interested in box labels, and if you don't have a source file at all (or if your source file doesn't contain information about individual folders), you can use a special configuration to get what you want.
6. If you have checked the Review box labels box on the Box labels tab, the program will produce one or more files of folder labels, then begin the review of the box labels .
7. There is actually a good reason for this: you may define a theme not for producing labels, but to be used only as the base for additional themes. (The program's own Default theme is an example of this.) Such a theme may be missing critical information, such as the series number or the name of the archival collection.
8. In its current mode of working, the program can produce files containing up to a pre-defined number of pages. (The number of pages in the largest output file is under your control.) If the labels for a resource require more than that number of pages, the program creates a second file. The program creates as many separate files as needed by the data its is processing; each file except the last contains the maximum number of pages. The program numbers the files sequentially.
9. This illustration shows the defualt arrangement. See a following paragraph in the main text for information about changing the order of the elements printed on folder labels. The default folder template files define labels without a border; but you can change this as well, if you want. Illustrations in this document of folder labels have a single-line border, simply to make their edges obvious.
10. If you want to produce a folder label with a blank caption, give as the caption the string "\uA0;" (minus the quotation marks). This RTF encoding represents a non-breaking space. The program will treat this character as a single-line caption, and otherwise behave as if nothing were unusual.
11. The text RESTRICTED is particularly arresting if it's printed in bright red. At least in theory, if you modify the template files in an appropriate manner, you can have any of the lines on a box label (or, for that matter, a folder label) in color. But only the color of the warning line on the box label can be changed from within the program, and that's the only color that the program can be aware of.
12. The default color for the text printed in the warning line is the same as all of the other lines on a box label: black. You can select any color you choose.
13. If the program is using this abbreviated method to find items of interest, some features of the program may not be available. (For example, the program will not attempt to construct series identifiers to place on box labels.) You can force the program to use the less efficient method (but which makes all program features available) by placing an asterisk (*) anywhere in the string of top container identifiers.
14. Contact Gary if this presents a challenge for you; there may be a solution.
15. When the program queries ArchivesSpace by the EAD identifier, it uses the identifier exactly as you supply it. There appears to be a certain amount of leeway at the database end in finding the match. However, it is best if you give the EAD identifier exactly as it exists in the ArchivesSpace record.
16. If the program is using this abbreviated method to find items of interest, some features of the program may not be available. (For example, the program will not attempt to construct series identifiers to place on box labels.) You can force the program to use the less efficient method (but which makes all program features available) by placing an asterisk (*) anywhere in the string of top container identifiers.
17. Contact Gary if this presents a challenge for you; there may be a solution.
18. The passwords have been deliberately obscured in this illustration. When you are using the program, the passwords will be legible. (The passwords are stored in the program's configuration file in an encoded form.)
19. The program won't know if the resource name will fit into the available space on box and folder labels until it has made the connection to ArchivesSpace and begin to pull data from it. If the resource name won't fit on a single line, the program will pause in its work, to ask you to truncate the name.
20. These "primary areas" contain the collection name, the folder caption, and identifiers for series, box and folder. If the program is reading data from ArchivesSpace, there is a fourth possibility for the three areas: the name of the repository.
21. The program will split a line at any space, or at a hyphen or slash (but the program will not split a line at a hyphen or slash if the hyphen or slash is followed by a numeral).
22. If the date is the only identifying information for a folder (in other words, there is a date but no text caption), the program uses "From" instead of "from"
23. The third area on the box label contains the series number and the box number. The series number is defined on the Get started tab, and the box numbers come from your source file.
24. Any of the texts defined here may contain a special character, such as a letter with a diacritical mark.
25. If you wish some of your labels to have additional information (such as the name of different sub-series; or the only occasional warning message) you can either modify the program’s output files before you send them to a printer, or use the program’s built-in review of box labels to do the same thing. You can also use a complex mechanism to add variable lines of text to box labels, using data in your source file.
26. The program has an option that allows the warning text to be applied conditionally, based on the existence within a top container of materials marked "restricted." If the Warning line is to be used for some other purpose, this option should probably be set so that the text appears on the labels for all top containers.
27. For example, if a sub-series is marked as restricted, then the program treats all of the objects contained within that sub-series as restricted, even if they are not actually so marked; if an object at the bottom of a hierarchy is marked as restricted, and none of the superior elements in its hierarchy are marked as restricted, then only that single object is considered to be restricted. The presence of even one object marked as restricted within a top container means that the program considers the entire top container to be restricted.
28. At some point in the future, the program will be enhanced to recognize information in EAD files.
29. Text files do not have the column identifiers that are an inherent part of Excel spreadsheets. For the purposes of this program, the first element in a line of a tab-delimited text file is column "A", the second element is column "B", and so on.
30. In other words, you must supply a column letter for either the Box number or Box caption plus number element, and a column letter for either the Folder number or Folder caption plus number element. You must also supply a column letter for the Folder title, part 1 element.
31. If your source file is an Excel spreadsheet that has multiple worksheets, each worksheet can define different box and folder captions in its first row.
32. If the configuration defines one box title, the program will use the title from the data, or a blank. If the configuration defines two box titles, the first title is 'sticky', in that it persists from one box to the next, until it is changed, or until both box titles are set to blank.
33. The tool that the program uses to read Excel spreadsheets does not have an explicit marker to tell the program when it has reached the last row. If the program asks for data from a cell that's beyond the last row in the spreadhseet, the program is simply told that the cell is empty. For this reason, the program needs some other way to know that it should stop reading the spreadsheet (otherwise, it would simply keep reading lines forever). The rule that this program uses, is the "three blank lines and you're done" rule described here.
34. The possibility of also displaying sub-series information on box labels has been carefully considered, but had to be abandoned as unworkable.
35. Here is a description of Windows file name conventions. The most important thing to note in this page is the list of characters that cannot be used in file names.
36. The program replaces underscores with spaces when it displays the name in the drop-down lists on the Folder labels and Box labels tabs.
37. The name you give here must match the name of a font defined within one of the RTF template files. If you supply this element, the program compares the name you give here, and the name you supply in the FontName element, against information in the RTF file. If the program can find matches for both font names within the RTF file, the program will alternate fonts as you instruct; otherwise, the program will not perform any font switching.
38. The program uses this element as part of its calculation of the amount of space available on labels for the caption. If you also supply the CaptionFontName element, the program compares both names to fonts defined within one of the RTF template files. If the program finds boths names, the program adds instructions to the RTF file to switch fonts as instructed. If you do not supply the CaptionFontName element, the program does not insert font selection instructions into the RTF file; whatever fonts are present will be the fonts that are used.
39. If you find it too tedious to create all ten files, you can create a lower number of files; but you must remember always to set the value of the Maximum pages per file of labels box on the Folder labels tab to no more than your chosen number of files.
40. If you find it too tedious to create all five files, you can create a lower number of files; but you must remember always to set the value of the Maximum pages per file of labels box on the Box labels tab to no more than your chosen number of files.
41. There is a technical reason for the top line of box labels having this construction, which Gary would rather not go into.
42. If you decide to swap the positions of lines, do not simply replace the numbers at the ends of the lines; instead, you must remove the entire text of the line and replace it with the new text. You must change the lines in this way, because Word keeps track of each change you make. If you only change the number at the end, the number is surrounded by coding (not visible in Word) that describes that change, and is separated from the remainder of the text in the line by that coding. This coding in the middle of what appears in Word to be a single line of text makes it impossible for the program to find the dummy text, and replace it with your text.
43. There doesn't seem to be a convenient way to render a logical "not" sign using the mechanisms allowed by this XML text editor. This is Unicode character U+00AC.
44. Find the full repertoire of Unicode characters at http://www.unicode.org/ Select The Unicode Standard on the left side.
External NU Links: Northwestern Home | Search | Directories
Northwestern University Library •
1970 Campus Drive • Evanston, IL • 60208-2300
Phone: (847) 491-7658 • Fax: (847) 491-8306 • E-mail:
library@northwestern.edu
© Copyright 1994-present Northwestern University Library. World Wide Web Disclaimer and Policy Statements
Last Revision: April 26, 2022